Notifications
If the SDK is configured to use notifications, there are currently two possible types of notification visible to the user:
-
There’s a new message
-
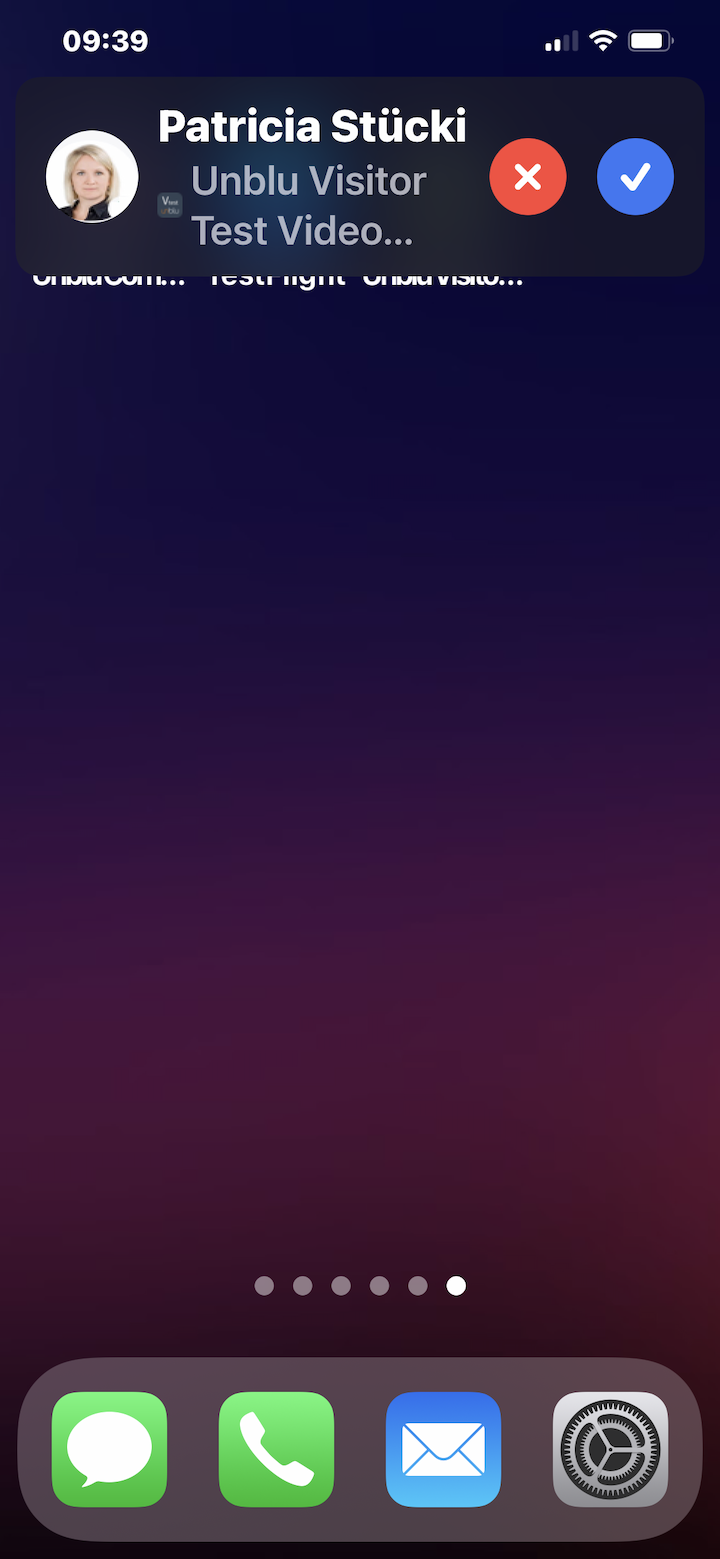
There’s an incoming call
If notifications are disabled, the user’s device token is deleted from the Collaboration Server to ensure they don’t receive any notifications.
The mobile SDK doesn’t provide a way for users to manage their devices. This must be done outside the SDK.
Incoming call notifications
The SDK uses a special type of notification, PushKit, to trigger the incoming call dialog. PushKit notifications use the Apple Push Notification service (APNs). You must configure the Collaboration Server to send PushKit notifications.
The incoming call dialog is a native iOS user interface managed with the CallKit framework. It behaves the way users are used to from other applications. It isn’t possible to change this UI’s appearance or behavior, except for the icon that appears on the provider call button.
You can customize the icon by adding an icon to your application’s resource. Prepare the icon as described in the Apple documentation.
You must also specify the name of the icon in the Unblu client configuration. This is a static variable that you should specify as early as possible, for example, in the AppDelegate function.
class AppDelegate {
    //...
    override func application(_:didFinishLaunchingWithOptions:) {
            UnbluClientConfiguration.callKitProviderIconResourceName = "ProviderIcon"
    }
}
If your application isn’t running when there’s an incoming call, the handler that displays the incoming call control UI works before initializing the Unblu API.

Webhook push notifications
If you’re using a push notification service, you need to provide the Unblu mobile SDK with the data passed in the internalMobilePushNotificationData field of the webhook sent to the service. To do so, call the UnbluNotificationApi.handleRemoteNotification(jsonString:) or UnbluNotificationApi.handleRemoteNotification(jsonString:withCompletionHandler:) method provided by UnbluNotificationApi.
For push notifications relating to audio or video calls, use UnbluNotificationApi.handleIncomingCallPayload(jsonString:completion:).
Voice greeting
If the iPhone is locked when a user answers a call, they usually unlock the screen quickly using biometric authentication. For video calls, the app then launches automatically.
If the call is an audio call, or if there’s a delay of a few seconds before the user unlocks their iPhone, the behavior is different. After the user answers the call, iOS loads the native call control UI instead of launching the app. If your app requires authentication before running UnbluView, the audio stream isn’t established at this point.
To provide a better user experience in such cases, you can set up a voice greeting that’s played to the user once they accept the call. For example, the greeting could guide the user to access the call: "Please tap the button to go to the application where the call is waiting for you."
Voice greetings are synthesized from the text you provide in the text property com.unblu.mobiledevice.deviceAudioGreeting on the Unblu Collaboration Server.
Biometric authentication after receiving a call
If your app uses biometric authentication, for example FaceID, when the app starts after receiving a call, authentication must start when the app is in an active state. This is because when the incoming call UI appears, the app starts but is in the background. After the user accepts the call, the app transitions from the background state to the active state and the authentication process can begin.
If the Unblu API runs before the user unlocks the phone, the API starts in the background, which can lead to problems.
To detect this situation and wait for the app to become fully initialized, use something like the code snippet below:
context.evaluatePolicy(.deviceOwnerAuthenticationWithBiometrics, localizedReason: reason) {
    [weak self] success, authenticationError in
    if success {
        DispatchQueue.main.async {
            // Launch unblu API here
        }
    }
}
App Store review
During the review of your Unblu-enabled iOS app, Apple may request a video recording related to the CallKit and VoIP functions. This is because iOS requests permission to access the microphone, camera and so on during the first call.
Past experience suggests that the video must meet the following requirements:
-
The recording must show a physical device running iOS, not a simulator.
-
The video must show the process of receiving the first call after installing the application.
-
The process of requesting access must be visible in the recording.
-
After you accept the call, go to the Home screen to show the microphone indicators.
-
Finally, return to the call and end it.
Encrypted notifications
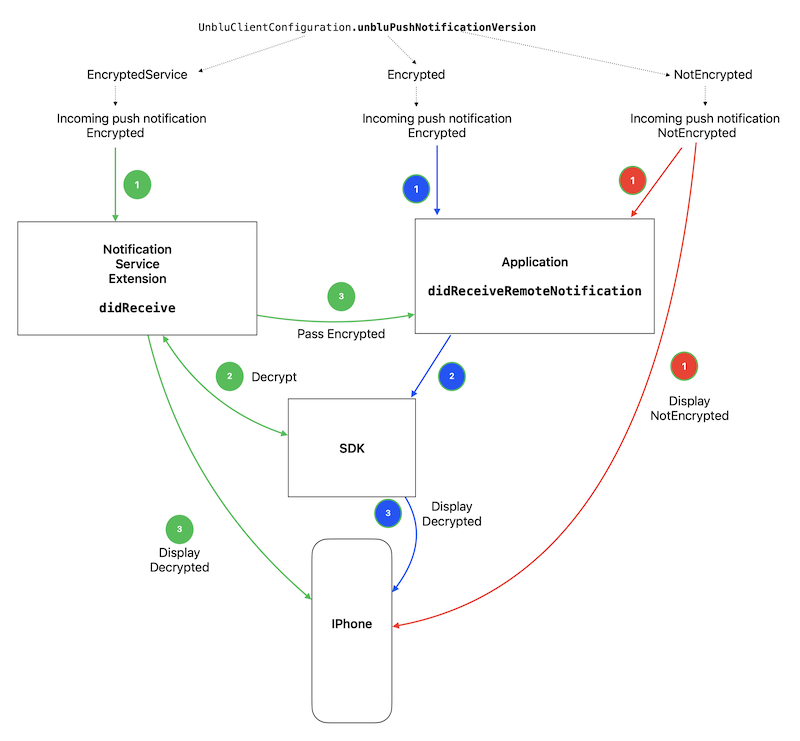
The SDK provides three versions of notification encryption:
-
Encrypted: All notifications are encrypted. The SDK decrypts the notifications automatically.If you opt for
Encryptednotifications, you should use the notification service extension; see the related known issue for more information. -
EncryptedService: All notifications are encrypted. The notifications are decrypted in the notification service extension. You must add the notification service extension yourself. -
NotEncrypted: Notifications aren’t encrypted. This is a legacy option.
You must specify the version you want to use by setting UnbluClientConfiguration.unbluPushNotificationVersion:
var config = UnbluClientConfiguration(...)
config.unbluPushNotificationVersion = .Encrypted
Encrypted notifications are decrypted with a key stored in Keychain Access. This key is automatically updated from the Collaboration Server over a protected HTTPS connection.
The diagram below provides an overview of how notifications with different versions of encryption are processed.

Notification service extension
This is a special module that modifies the content of a remote notification before it’s delivered to the user. Add it to the application manually:
-
First, follow the instructions in the Apple article Modifying content in newly delivered notifications.
-
To save the secret key and access it from the extension, add the keychain group
group.com.unblu.coreSdk.sharedto the Keychain Sharing section for the app and the extension. -
Add
UnbluCoreSDK.framework(Do not Embed) to Framework and Libraries. -
Configure the Unblu SDK to use the service extension:
var config = UnbluClientConfiguration(...) config.unbluPushNotificationVersion = .EncryptedService -
Replace the code in the
NotificationServiceclass with the code below:class NotificationService: UNNotificationServiceExtension { var contentHandler: ((UNNotificationContent) -> Void)? var bestAttemptContent: UNMutableNotificationContent? override func didReceive(_ request: UNNotificationRequest, withContentHandler contentHandler: @escaping (UNNotificationContent) -> Void) { self.contentHandler = contentHandler bestAttemptContent = (request.content.mutableCopy() as? UNMutableNotificationContent) if let bestAttemptContent = bestAttemptContent { if let dictionary = decryptBody(userInfo: bestAttemptContent.userInfo) { guard let body = dictionary["text"] as? String else { contentHandler(bestAttemptContent) return } guard let title = dictionary["title"] as? String else { contentHandler(bestAttemptContent) return } bestAttemptContent.userInfo = dictionary as [AnyHashable : Any] bestAttemptContent.body = body bestAttemptContent.title = title bestAttemptContent.sound = .default } else { bestAttemptContent.body = "" bestAttemptContent.title = "" } contentHandler(bestAttemptContent) } } func decryptBody(userInfo: [AnyHashable : Any]) -> [String : Any?]? { if let encryptedData = userInfo[UnbluEncryptedNotificationServiceHelper.KEY_ENCRYPTED_DATA] { guard let dictionary = UnbluEncryptedNotificationServiceHelper.decode(encryptedData as! String) else { return nil } return dictionary } return nil } override func serviceExtensionTimeWillExpire() { // Called just before the extension is terminated by the system. // Use this as an opportunity to deliver your "best attempt" at modified content, otherwise the original push payload is used. if let contentHandler = contentHandler, let bestAttemptContent = bestAttemptContent { contentHandler(bestAttemptContent) } } }
See also
-
For more information about the
UnbluEncryptedNotificationServiceHelperused in the notification service extension code above, refer to the Unblu iOS mobile SDK reference. -
For an example of using notifications with the Unblu iOS mobile SDK, check out the
ios-demo-notificationsrepo on the Unblu GitHub page.