Avatar configuration
An avatar is a graphical representation of an entity in Unblu.
Avatars fulfil a variety of functions in Unblu UIs:
-
They indicate who is participating in a conversation.
-
They make it easy to discern who contributed what in a conversation.
-
They provide access to information about conversation participants.
-
They’re also used in the Agent Desk and the Configuration Interfaces to determine who a setting or property refers to. This is particularly useful if entities have personalized avatars.
The following entities may have an avatar:
-
Accounts
-
Bots
-
Named areas
-
Persons
-
Teams
-
Users
Default avatar
The default avatar is generated on the basis of the name of the entity it represents. It consists of two letters on a single-color background. If the entity’s name consists of a single word, the avatar uses the first two letters of the entity’s name. For entities with names consisting of two or more words, the avatar uses the first letters of the first and last word in the entity’s name.
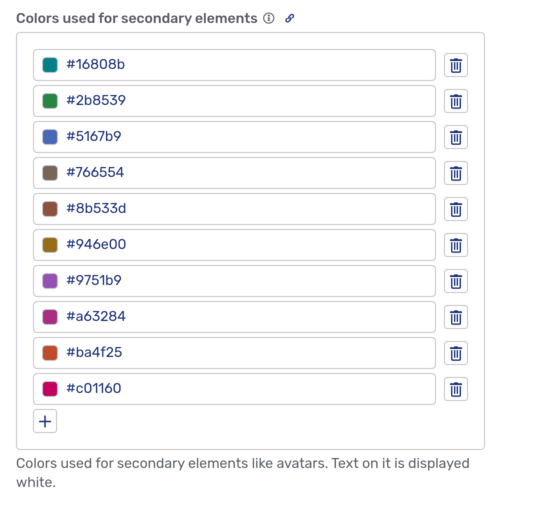
The background color is drawn from the set of colors specified in the configuration property com.unblu.theme.color.secondaryColorMap.
Unblu assigns an entity’s default avatar a background color based on the entity’s name. This way, the default avatars of all or most participants in a conversation have different background colors (provided the secondary color map contains sufficient colors). The following picture shows the avatars of two visitors, Sven Hoek and Stephen Hawking, from the same conversation. Note that their avatars have different background colors, even though their initials are the same:
| Visitors only ever have a default avatar. |
Personalized avatar
Accounts, bots, named areas, teams, and users can all have personalized avatars. The image used for a personalized avatar must be a PNG or JPEG file and must be no larger than 5 MB. We recommend you use an image 256x256 pixels large. If you use a larger image, it’s cropped to the appropriate size from the center of the uploaded image.
Avatars can’t be shared between different entities. This means that if you want to use the same image for multiple entities, you must create a personalized avatar for each entity using the same image.
If you want to use the same image for more than one entity, check whether you can take advantage of the avatar fallback behavior.
Personalize a user avatar
Users can upload an image to personalize their avatars.
-
Click your avatar in the upper right-hand corner of the Agent Desk and select Profile.
-
On the General tab, click Select image to choose and upload an image for your avatar.
Supervisors and admins can change a user’s avatar image.
-
Click Users in the sidebar of the Account Configuration interface and select the user in question. This gives you access to the user’s profile.
-
Select and upload an image the same way a user would.
Personalize a team avatar
Supervisors and admins can change the avatar image for a team.
-
Click Teams in the Account Configuration interface.
-
Select the appropriate team to open the team’s general profile tab.
-
You can then select and upload an image with the Select image button.

Personalize a named area avatar
Admins can personalize the avatars of named areas.
-
Click Named areas in the sidebar of the Account Configuration interface.
-
The rest of the procedure is the same as for a team.
Personalize an account avatar
Admins can also personalize the avatar of an entire account.
-
Click Overview in the sidebar of the Account Configuration interface.
-
In the overview, click the Edit account button. This opens a fly-in page where you can upload an image for the account avatar.

Personalize a bot avatar
Bot avatars can only be personalized with the Unblu web API. For more information, refer to Personalize a bot avatar with the web API below.
Fallback behavior
Your organization may prefer not to use the default avatars for anyone but visitors. In that case, you can configure Unblu to fall back on the avatar of another entity if the current entity doesn’t have a personalized avatar.
The fallback behavior is configured separately for conversation recipients and conversation participants (that is, users).
| Bots don’t have fallback avatars. |
Recipient fallback behavior
When a visitor initiates a conversation, Unblu sends an invitation to potential participants. Which users receive an invitation is determined by the conversation’s recipient.
The recipient’s avatar is displayed in the conversation list on the Floating Visitor UI overview. If the configuration property com.unblu.visitor.ui.alwaysDisplayRecipientInConversationOverview is false, the avatar is replaced by the avatar of the agent who redeemed the invitation to join the conversation.
For recipients, the fallback order is:
-
person → team → parent team → account
-
named area → account
So, if the recipient of a conversation is a person who doesn’t have a personalized avatar, the personalized avatar of the team they’re a member of is used. If that team has neither a personalized avatar nor a parent team, the account’s personalized avatar is used. If the account doesn’t have a personalized avatar, the default avatar for the account is used.
To activate fallback behavior for recipients, set the configuration property com.unblu.messenger.useRecipientAvatarFallback to true.
Person fallback behavior
In the course of a conversation, participants in a conversation are represented by their avatars. A participant is always a person.
For persons, the fallback order is:
-
person → team → parent team → account
If a person doesn’t have a personalized avatar, the personalized avatar of the team they’re a member of is used. If that team has neither a personalized avatar nor a parent team, the account’s personalized avatar is used. If the account doesn’t have a personalized avatar, the default avatar for the account is used.
To activate fallback behavior for persons, set the configuration property com.unblu.messenger.usePersonAvatarFallback to true.
| Person fallback behavior only applies to users. Visitors are always represented by default avatars. |
Fallback behavior in the Agent Desk and the Account Configuration interface
In the Agent Desk and the Account Configuration interface, users, teams, and named areas are also represented by their avatars. However, avatars in these interfaces are always the avatar of the entity in question. If the entity doesn’t have a personalized avatar, its default avatar is used.
Other avatar features
In the Agent Desk and the Floating Visitor UI, the avatar is used for some additional features.
Availability badge
The avatar indicates users' availability with a badge in the lower right-hand corner.
-
A green badge indicates that the user is online.
-
A yellow badge indicates that the user is unavailable.
-
If no badge is present, the user is offline or the availability badge is disabled.
Visitors are only ever online or offline. Their avatars never display a yellow badge.
Disabling availability badges
You can disable the availability badge to hide users' status by setting com.unblu.avatar.ui.showOnlineStateIndicator to false.
When disabled, the availability badge and any texts indicating the users' online or offline status are removed from all agent and visitor avatars with the following exceptions:
-
The availability badge continues to appear in the avatar displayed in the top right corner of the Agent Desk.
-
Online or offline status is still visible in the agent monitor.
-
Agents can see the online or offline status of other agents and teams when inviting them to a conversation or forwarding a conversation.
Participant information menu
Clicking an avatar that represents a user or a person provides access to the participant information menu. In the following picture, the agent has clicked the visitor’s avatar. They can see that the visitor is the primary visitor in the conversation and isn’t authenticated. Furthermore, they can launch various types of collaboration directly from the menu.

Avatar overflow
If there are more than five participants in a conversation, only the first four avatars are displayed. The fifth avatar sports a plus icon with the number of additional participants. Clicking it opens the list of additional participants.
![]()
The entries can be clicked to open the respective participant’s information menu.
Reading avatars with the Unblu web API
The Unblu web API includes an endpoint to read avatars. Calls to the avatars/read endpoint return an Avatar model that contains the avatar’s image. For more information, refer to the Avatar web API documentation.
If you want to retrieve the avatar of a particular entity, call the entity type’s read endpoint with the expand parameter and the avatar value, for example /users/read?id=<user-id>&expand=avatar.
The following call would read a team’s data and return its avatar.
GET http://<unblu-server>/unblu/rest/v3/teams/read/id=wLnF0JpARJ2bi_GwwIb0FgThis is the response body the call would return:
expand=avatar
{
    "$_type": "Team",
    "id": "wLnF0JpARJ2bi_GwwIb0Fg",
    "creationTimestamp": 1591609100000,
    "modificationTimestamp": 1591609100000,
    "version": 1,
    "accountId": "T-fc_lVIR_WNvY1ZX9ZA0w",
    "avatar": {
        "$_type": "Avatar",
        "id": "cA7Lm5ixACAB72KPdSUwA",
        "creationTimestamp": 1597144915490,
        "modificationTimestamp": 1597144915490,
        "accountId": "T-fc_kUHQ_WNvY1ZX9ZA0w",
        "imageZoomFactor": null,
        "imageXPositionRatio": 0.5,
        "imageYPositionRatio": 0.5,
        "imageRotationAngle": 0,
        "imageData": "data:image/png;base64,iVBORw0KGgoAAAANSUhEUgAAAQAAAAEACAYAAABccqhmAAAABGdBTUEAALGPC/xhBQAAACBjSFJNAAB6JQAAgIMAAPn/AACA6QAAdTAAAOpgAAA6mAAAF2+SX8VGAAAABmJLR0QA/wD/AP+gvaeTAAAACXBIWXMAAAsTAAALEwEAmpwYAAAAB3RJTUUH5AgLDgEd1vNPZgAAgABJREFUeNrsnXd8HNW5978zs33Ve7Pce2+4YoMxmN5rKElIQkIaJKTn3vSbNyEhNyS5N5UUIEAIvWPABYxx70VukmzJ6n377syc94+z6lppJavYXH6fbIx2Z2fOnJ3nOc95yu9R+AjnBO5bM631Py1AIuAEkgAH4AYKgPToa2z02DFAMqBEX1Oix/eGIFAEiOirGSiNflYC1Edf5YAvenwLEAA8gA7w8JuHRnrKPkIcUEZ6AB+hZ0QF3grkRF/pwKjofxcCWUgBTwdykcLa9ffs6+9YEHH8rQCVSGVQCtQAp4AqoCz6flX0FflIIZyd+EgBnCWICnwCcpWeDExECno+kIcU+EzO/t9MALVIhVABnEYqhmPAEaR14f1IIZwdONsfpg8dooKuIFd3J1LQZwELov9mRF8pgDbS4x0kGEATUBd97QN2RP89htw+RADxkWIYXnykAIYBUaHXkPvxNGAOsDT6Go/clzsZBIEXQm7dhQAQ0f+JHg5s+z9A6fFJUNreV1Da/h2UR8ZACn0QOAFsBtYhrYMGpN/B+EgZDD0andSoOnAndSoForth..."
    },
    "name": "Commercial Advisors",
    "parentId": "U6ApJUqpSKHiG9bReFfpjg",
    "description": "Team for Commercial Client Advisors",
    "configuration": null,
    "metadata": null
}
Without the expand=avatar parameter, the call would return the avatar’s ID instead of the Avatar model:
expand=avatar
{
    "$_type": "Team",
    "id": "wLnF0JpARJ2bi_GwwIb0Fg",
    "creationTimestamp": 1591609100000,
    "modificationTimestamp": 1591609100000,
    "version": 1,
    "accountId": "T-fc_lVIR_WNvY1ZX9ZA0w",
    "avatar": "cA7Lm5ixACAB72KPdSUwA",
    "name": "Commercial Advisors",
    "parentId": "U6ApJUqpSKHiG9bReFfpjg",
    "description": "Team for Commercial Client Advisors",
    "configuration": null,
    "metadata": null
}
Assigning an avatar to an entity with the Unblu web API
If you wish to assign a personalized avatar to an entity using the Unblu web API, use the parameter expand=avatar in the call to create or update the entity. This gives you the possibility to upload an image for the avatar in the body of your call. The image is included using the data URI scheme.
The following example shows the body of a call to the namedareas/create endpoint to create a new named area. The image for the personalized avatar is based on a PNG file.
{
  "$_type": "NamedArea",
  "id": null,
  "dateCreated": 0,
  "dateModified": 0,
  "version": 0,
  "accountId": "T-fc_kUHQ_WNvY1ZX9ZA0w",
  "name": "Mortgages",
  "description": "Named area for private mortgage",
  "type": "META_TAG",
  "avatar": {
    "$_type": "Avatar",
    "imageData": "data:image/png;base64,iVBORw0KGgoAAAANSUhEUgAAAfQAAAH0CAYAAADL1t+KAAAACXBIWXMAAAsSAAALEgHS3X78AAAgAElEQVR4nO3dCZhV5Z3n8X/VvbVBIQodQQo0D5uiiGJEhDSkXQDXSLRdomYC6kyMTkiiPcaM9rRJZGJwiWEi7TOjwCRqRMclMWoAMd3YEREVxYrI5oyyBDEoW1HrrZrnf6uuDZxazqm6y/v+z/fzPDyF55acc8+59/2ddz1Fn+ysaREAAOC1Yi4fAAD+I9ABADCAQAcAwAACHQAAAwh0AAAMINABADCAQAcAwAACHQAAAwh0AAAMINABADCAQAcAwAACHQAAAwh0AAAMINABADCAQAcAwAACHQAAAwh0AAAMINABADCAQAcAwAACHQAAAwh0AAAMINABADCAQAcAwAACHQAAAwh0AAAMINABADCAQAcAwAACHQAAAwh0AAAMINABADCAQAcAwAACHQAAAwh0AAAMINABADCAQAcAwAACHQAAAwh0AAAMSHIRAVsSW9dKctNrUvTpVklse++g95YadLy09KuSpmGnS6pqFFceMKTok501LVxQwG/Fn26R0uULpaR6qRR/tjXUe2k+okoaR0+RhskzpLnf4MDrAPxCoAMeK6rdI2WL50rZKwt79CbqJ82Q+mmzpKXisMBrAPxAoAOeSm5aKb3mXy9FdXuz8gZayvvI/mselKZh4wOvAXAfg+IAD5Wuekp6z7sqa2Gu9N/Sf1P/bQD+YVAc4Jmy5Quk/Lezc3bQFY//andSoOnAndSoForth..."
  }
}
Personalize a bot avatar with the web API
Unlike with other entity types, bots' personalized avatars can only be added to the person with which the bot joins a conversation.
To add an avatar to a bot, call the /persons/createOrUpdateBot endpoint with the expand=avatar parameter. Include an Avatar model in the call body as you would when adding an image to the avatar of any other entity.
{
    "$_type": "PersonData",
    "personSource": "VIRTUAL",
    "sourceId": "best.bot.id",
    "firstName": "Best",
    "lastName": "Bot",
    "username": "best.bot",
    "displayName": "Best Bot",
    "personType": "BOT",
    "avatar": {
        "$_type": "Avatar",
        "imageData": "data:image/jpeg;base64,/9j/4AAQSkZJRgABAQAAAQABAAD/2wCEAAkGBxAREhUQEBIVFhUVFRgVFxUVFRAYFRYWFhUYFhcXGhYYHCggGholHRcVITEiJSkrLzAuGCAzODMtOCgtLysBCgoKDg0OGxAQGy0lHyUtLS8tLSstLy0tLS0tLS0tLS0tLS0vLy0tLS0tKy4tLS0tLS0tLS0tLS0tLS0tLS0tLf/AABEIAOEA4QMBEQACEQEDEQH/xAAcAAEAAgIDAQAAAAAAAAAAAAAABgcEBQEDCAL/xABGEAABAwEEBQcJBQUIAwAAAAABAAIDEQQFITEGEkFRcQcTIjJSYYEUM0JTcpGSsdEWI3OhshU0YoLBCBdDVJOiwvDS0/H/xAAbAQEAAgMBAQAAAAAAAAAAAAAAAQUCBAYDB//
        andSoOnAndSoForth..."
    }
}