Visitor login with a JSON web token (JWT)
This article is a tutorial on logging a visitor in to Unblu using JSON web tokens (JWT) with asymmetric (RSA) encryption.
The tutorial assumes that an external authentication system identifies the visitor. The visitor is then forwarded to Unblu using a JWT to identify them. It can therefore be considered an example of visitor single sign-on (SSO) in the broader sense of the term.
The tutorial uses Python 3 and commands as you would execute them on Linux-based systems, but neither of these is a requirement. You can use any programming language and operating system that provide the tools needed to create the various components.
Process overview
Logging a visitor in to Unblu using a JWT requires the following steps:
-
Authenticate the user with an external authentication system.
-
Create a JWT containing claims based on the authentication information retrieved in the previous step and sign it with the private key.
-
Return the JWT.
-
Log the visitor in to Unblu. This can be done in one of two ways:
-
Call the Unblu web API endpoint
/authenticator/loginWithSecureTokenfrom middleware located between the visitor and the Unblu server or cluster. The JWT must be included in the call’s body. -
In the visitor’s browser, call
UnbluApi.login(). Pass the JWT as aStringparameter.
In the Android and iOS mobile SDKs, you can provide the access token using
UnbluClientConfiguration.Builder#setAccessToken()orUnbluClientConfiguration.accessToken, respectively. -
-
Unblu loads the public key as a JSON web key (JWK) set and caches it for future use.
-
It then validates the token using the public key.
-
Lastly, Unblu creates an authentication session and sets the session ID in a cookie.
-
Verify the response. If the response is valid, use the returned cookies in the visitor’s browser for all calls to Unblu.
This final step varies depending on whether you call the Unblu web API endpoint with middleware or use
UnbluApi.login()in the browser.-
If you use
UnbluApi.login(), the cookies are automatically set. -
If you use middleware, the middleware is responsible for forwarding the cookies from the Unblu response to the visitor’s browser.
-
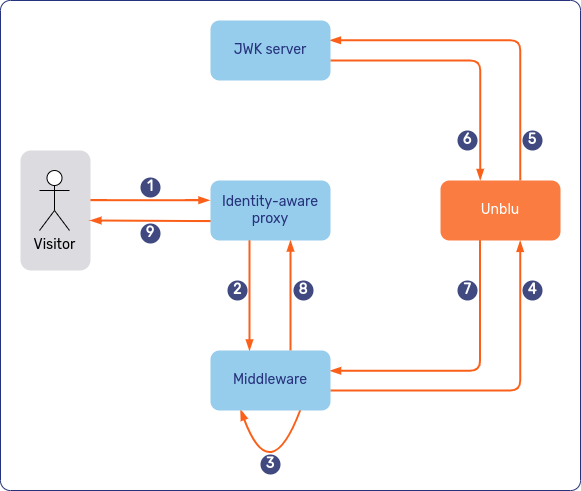
The diagrams below show the sequence of events. In the first diagram, the middleware logs the visitor in to Unblu and returns the cookie to the visitor:

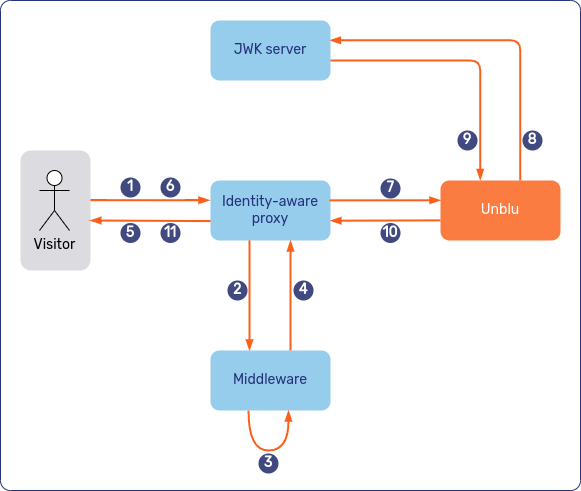
The second diagram shows how the various elements of the login process interact if the visitor’s browser calls UnbluApi.login() to log the visitor in to Unblu:

UnbluApi.login().
Requirements
The process outlined above requires the following components:
-
An RSA public/private key pair. How to create such a key pair is described in the section Creating a public/private RSA key pair below.
-
An HTTP server accessible by the Unblu server that serves the public RSA key in the form of a JSON web key (JWK) set.
-
Middleware to generate the JWT using the private RSA key.
-
One of the following, depending on how you want to call
/authenticator/loginWithSecureToken:-
Middleware called by the visitor to forward their JWT to the
/authenticator/loginWithSecureTokenendpoint and send the returned authentication cookies back to the visitor. This can be the same piece of middleware that creates the JWT. -
JavaScript code that calls
UnbluApi.login()in the visitor’s browser.
-
Creating a public/private RSA key pair
Unblu expects the JWT to be signed asymmetrically. The JWT must be signed with the private key. Unblu then verifies the JWT with the public key.
To create a pair of public and private RSA keys, proceed as follows:
-
Open a command line terminal.
-
Go to the directory where you want to create the key files.
-
Run the following two commands:
Listing 1. Generate a public/private key pair with the RSA algorithm# Create the public/private key pair ssh-keygen -t rsa -b 4096 -m PEM -f jwt.key # Extract the public key from the private key openssl rsa -in jwt.key -pubout -outform PEM -out jwt.key.pubDon’t enter a passphrase when the first command asks you for one.
Creating a JSON web key (JWK) set
Unblu retrieves the public key to verify the JWT’s signature by fetching a JSON web key (JWK) set from an HTTP(S) server. You must therefore generate a JWK set containing the public key you generated in the previous section.
This tutorial uses the Python library AuthLib for this purpose. Run pip3 install AuthLib to verify it’s installed or install it.
The example code below generates a JWK set and stores it in a file named jwkset.json in the current directory. It expects the file containing the public key to be called jwt.key.pub and to be present in the directory where the command is executed.
jwkset.json
python3 << EOF
import json
from authlib.jose import JsonWebKey
with open("jwt.key.pub") as f: key_data = f.readlines()
key_data="".join(key_data)
jwk_dict=JsonWebKey.import_key(key_data, {"kty": "RSA"}).as_dict()
jwk_set=json.dumps({"keys": [jwk_dict]})
with open("jwkset.json", "w") as f: f.write(jwk_set)
EOF
The result is a file called jwkset.json.
Adding middleware that generates a JWT
You must implement a component that creates and signs JWTs.
The JWT contains a set of claims that describe the authenticated visitor or provide Unblu with authorization information for backend systems. Some claims are registered with the IANA, some are custom private claims defined by Unblu.
All claims are optional, with two exceptions:
-
Unblu requires the token to include an
"iss"(issuer) claim. -
You must provide at least one claim that Unblu can use as the visitor identifier. What that identifier should be depends on your specific use case.
In production environments you should also include the "exp" (expiration time) claim for security reasons.
|
Anyone who obtains a JWT from this component can log in to Unblu. It’s your responsibility to put appropriate measures in place to protect the middleware and thus Unblu. The middleware must be protected in such a way that only authenticated visitors can call it—or it must authenticate the visitor (and check their authorization) before creating the JWT. |
The Python code below demonstrates how to create the JWT. It assumes the private key you created earlier is in a file called jwt.key located in the working directory.
The code uses PyJWT. Run pip3 install pyjwt to verify it’s installed or install it.
For this tutorial, add the code below to your middleware and make the endpoint available according to your system’s architecture.
import time, jwt (1)

issuer = "company.name.jwt.middleware" (2)
expiration_time_in_seconds = 1800 (3)

# Visitor information. Provide whatever information your use case needs to be
# available in Unblu.
visitor_given_name = "Ren"
visitor_last_name = "Höek"
visitor_email = "ren.hoek@geemail.com"

# optional system information for Unblu or systems integrated with Unblu (e.g. Chatbot)
visitor_auth_info = "auth-token"
visitor_additional_info = "additional-info-about-visitor"

# Read the private key to sign the token
with open("jwt.key") as f:
    private_key = f.readlines()
private_key = "".join(private_key)

# Create and sign the token
encoded_token = jwt.encode(
    {
        # Registered claims
        "iat": int(time.time()),
        "iss": issuer,
        # Skip the line below if you need to create a non-expiring token for
        # test purposes. Don't use non-expiring tokens in a production
        # environment!
        "exp": int(time.time()) + expiration_time_in_seconds,
        # Skip lines not relevant to your use case, or add missing lines
        "given_name": visitor_given_name,
        "family_name": visitor_last_name,
        "email": visitor_email,
        # Unblu private claims, such as the authInfo to use in the Unblu
        # backend
        "auth_info": visitor_auth_info,
        "additional_info": visitor_additional_info,
    },
    private_key,
    # Specify the algorithm of the key pair used to sign the token
    algorithm="RS256",
)

# Replace the lines below this comment with whatever it is you need to do with
# the token.
print("Encoded:")
print(encoded_token)

# Read the public key to decode the token
with open("jwt.key.pub") as f:
    public_key = f.readlines()
public_key = "".join(public_key)

print("Decoded:")
decoded_token = jwt.decode(encoded_token, public_key, algorithms=["RS256"])
print(decoded_token)| 1 | Run pip3 install pyjwt to verify the library’s installed or install it. |
| 2 | Use the same issuer as configured in com.unblu.authentication.jwt.public.expectedIssuer. |
| 3 | This is used to calculate the value of the exp claim. If Unblu receives the claim after the expiration time, it rejects the token. Keep the expiration time short in production environments. |
Testing the JWT
To check whether the JWT produced is valid, visit JWT.IO and paste the token printed by the Python script above into the Encoded input field. You then see the claims it contains on the right.
You can verify the token’s signature, too:
-
Change the algorithm above the Encoded and Decoded sections to RS256.
-
Paste the contents of
jwt.key.pubinto the first field under the heading Verify signature of the Decoded section. If the signature’s valid you’ll see Signature verified at the bottom of the Encoded section.
Serving the JWK set for Unblu
When Unblu receives a JWT using the /authenticator/loginWithSecureToken call, it verifies the token’s signature. To do so, it needs access to the public key in the format of a JWK set. Furthermore, Unblu expects the JWK set to be served over HTTP(S).
Since the public key isn’t considered secret, you needn’t apply any special security measures. All you need is a web server accessible to Unblu over HTTP(S) that serves the static JWK set file.
To test a setup locally:
-
Copy the
jwkset.jsonfile to a location that you’ll serve with an HTTP server. -
Run a python3 HTTP server:
Listing 3. Launch Python’s built-in HTTP server to serve the JWK set# Run the python3 http server in the directory where the jwkset.json # file's located. By default, the server listens on port 8000. python3 -m http.server
| Never copy the private key to this location! On your local machine this may not be an issue, but the private key must never be publicly accessible in a production environment! |
Configuring Unblu
You must configure Unblu for it to accept JWT tokens and know which JWT claims should be used for which purpose. Below is a list of relevant configuration properties. In an on-premises installation, you can add them to your unblu.properties file, but you can set them in your Unblu Cloud account or in the Account Configuration interface as well.
# Allow Unblu to use loginWithSecureToken
com.unblu.authentication.tokenSignup.enabled=true

# Add LOCAL to the authentication sources for the public entry path
com.unblu.authentication.public.sources=LOCAL,NONE

# The value of this property must match the issuer used while creating the JWT (1)
com.unblu.authentication.jwt.public.expectedIssuer=company.name.jwt.middleware

# URL where the Unblu server can retrieve the JWK set (2)
# com.unblu.authentication.jwt.public.jwkUrl=http://jwksetendpoint.company.com/jwkset.json
# In a local setup, you can use the following:
com.unblu.authentication.jwt.public.jwkUrl=http://localhost:8000/jwkset.json

# Alternatively, you can specify a static JWK set. Add the set as a multiline
# string. (3)
com.unblu.authentication.jwt.staticJwk=<your-JWK-set>

# Mapping of JWT claims to Unblu fields. You must map the username
# configuration property to a claim.
# All other mappings are optional.
com.unblu.authentication.tokenSignup.claimMapping.username=email
com.unblu.authentication.tokenSignup.claimMapping.email=email
com.unblu.authentication.tokenSignup.claimMapping.firstName=given_name
com.unblu.authentication.tokenSignup.claimMapping.lastName=family_name

# Unblu private claim mappings
com.unblu.authentication.tokenSignup.claimMapping.authInfo=auth_info
com.unblu.authentication.tokenSignup.claimMapping.additionalInformation=additional_info
com.unblu.authentication.tokenSignup.claimMapping.logoutToken=logout_token| 1 | The expectedIssuer must match the issuer used when you created the JWT. |
| 2 | The jwkUrl is the URL that serves the JWK set. It must be reachable from the Unblu server. |
| 3 | If you set both com.unblu.authentication.jwt.staticJwk and com.unblu.authentication.jwt.public.jwkUrl, Unblu uses the JWK set in staticJwk. |
The complete login sequence
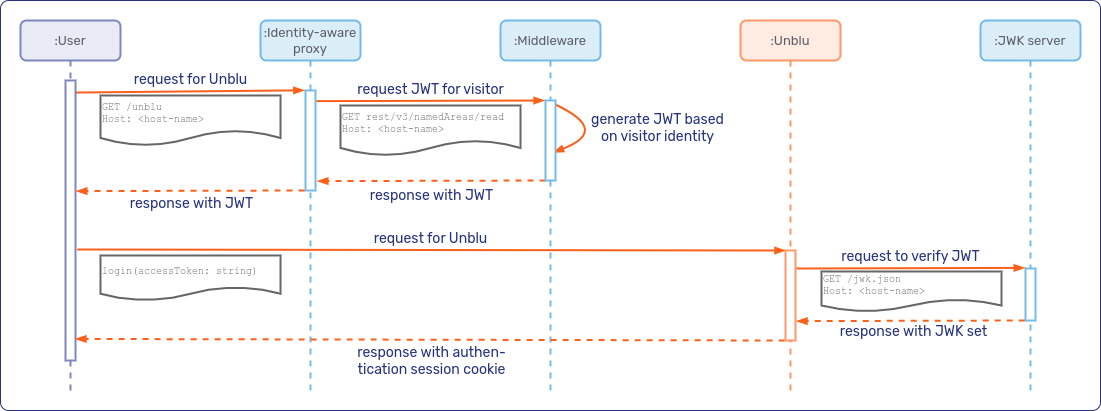
You now have the various pieces in place to log visitors in to Unblu using a JWT.
If the visitor’s browser calls UnbluApi.login() to log the visitor in to Unblu, the sequence diagram looks like this:

UnbluApi.login()
If your middleware carries out the login, the sequence diagram looks something like this:

Testing visitor login with JWT
The following test can be run on a local setup or an on-premises site-embedded setup. It may not work in an Unblu Cloud setup because of cross-origin resource sharing (CORS). At any rate, you should be able to adapt the test to your own environment.
The test uses the built-in Unblu JS API demo page. By default, the page is disabled for security reasons, so you need to enable it first by setting com.unblu.server.resources.enableDemoResources to true.
You also need the API key of your account.
-
Open a browser tab and go to
https://<yourunbluserver>/unblu/static/js-api/v8/demo/floating/index.html. -
Open the browser’s dev tools, paste the following code into the dev tools console, and execute it:
Listing 4. Logging in to Unblu using a JWTunblu.floating.api.initializedApi.login("<encoded_access_token>") (1) .then((response) => console.log(response));1 Replace with your JSON web token, created either with your middleware or manually. -
Verify that a new cookie called
x-unblu-authsessionexists. -
On the demo page in your browser, enter your API key in the first field and click Init Unblu. The launcher button should appear in the lower right-hand corner.
-
Click the launcher button and start a new conversation.
-
Open the Agent Desk in another browser window.
-
Accept the new conversation.
-
In the conversation, check the visitor information. It should contain the visitor’s details that you provided in your JWT claims.
You may want to increase the value of the exp claim for the test so that you can use the same JWT for a longer time.
If you create a JWT that doesn’t expire, you must protect it. If unauthorized persons get access to it, you have to create a new public/private key pair and a new JWK set, as well as redeploy all affected components.
To log the visitor out again when you’ve completed your test, enter the following code and execute it in the console of the visitor browser:
unblu.floating.api.initializedApi.logout()
    .then((response) => console.log(response));
Logging visitors out through a back channel
You can enable backend servers to log out visitors authenticated with SSO. To do so, you must include a logout token in the JWT claim during the login process and specify the mapping of the logout token in the claim with com.unblu.authentication.tokenSignup.claimMapping.logoutToken.
To log visitors out, backend applications call the /authenticator/logoutWithSecureToken endpoint. The call must include a signed JWT containing the same logout token as was provided in the visitor’s login claim set. It must also include the GET parameter x-unblu-apikey.
See also
-
For more information on authentication in Unblu, refer to Authentication.
-
If you’re an Unblu Cloud customer and prefer to implement visitor single sign-on (SSO), refer to Single sign-on in the Unblu Cloud.
-
A tutorial for visitor SSO with code samples is available at github.com/unblu/unblu-visitor-sso-sample.