Creating simple intents
In natural language understanding, the intent of a visitor’s utterance is a representation of the utterance’s underlying meaning. For the Unblu Conversational Bot (UCB), intents are central to how it responds to visitors' messages. They’re directly connected to both the training phrases that allow the UCB to identify a visitor’s intent and to the responses it sends.
The sections below describe the steps necessary to create a simple intent for the UCB. This consists of four steps:
-
Creating the empty intent
-
Configuring the intent’s general settings
-
Creating training phrases
-
Creating an answer or answers for the bot to respond with
The last three steps can be completed in any order.
Create the empty intent
To create a new intent:
-
Launch the Bot Dialog Builder (BDB). This opens the BDB on the Intents tab.
-
On the far left of the menu ribbon at the top, select the domain you want to add the intent to. Make sure you select the right domain. You can’t move an intent to another domain once you’ve created it.
-
Click the Create button above the list of intents on the left.
Double-check the intent before you click Create. You can’t delete intents once you’ve created them. You can only deprecate them. -
In the modal dialog that appears, enter the name you want to give the new intent, then click Create. This creates your intent in the state New in all languages (English, French, German, and Italian).
If you carried out the steps as described above, your new intent won’t appear in the list of intents. This is because, by default, the Intents tab only displays intents whose state is Productive in at least one language.
To view your intent, click the Search bar at the top of the tab and change the search criteria to display intents in the state New.

The list of intents changes to display only intents in the state New in at least one language. You can now select your new intent. When you do, its configuration appears in the main section of the tab, to the right of the list intents.
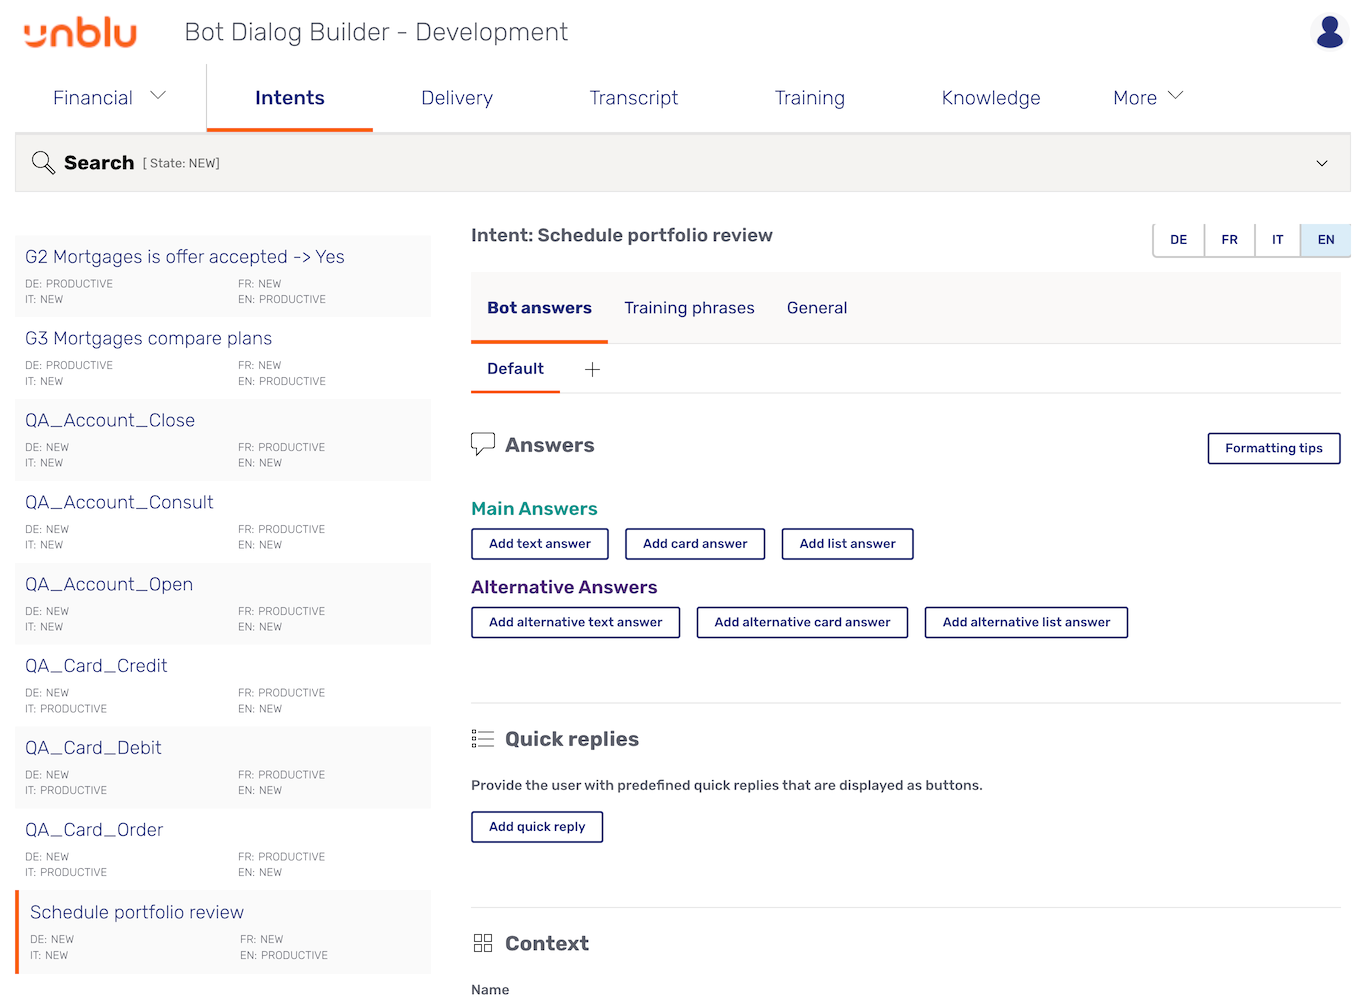
At the top of the intent’s details are its name and a selector to choose between different languages.
| While working on a new intent, always make sure you’ve selected the right language. If you create, say, your French training phrases in the Italian version of the intent, the only way to correct your error is to transfer each training phrase manually and delete it in the Italian version. |
Each intent’s details has three tabs:
-
General, where you provide general information about the intent.
-
Training phrases, where you add phrases used to train the UCB to identify a particular intent as the one that best matches a visitor’s intent.
-
Bot answers, where you define how the UCB should respond when it’s identified this as the best match for a visitor’s intent.
Configuring the intent’s general settings
To review your intent’s general settings, open its General tab:
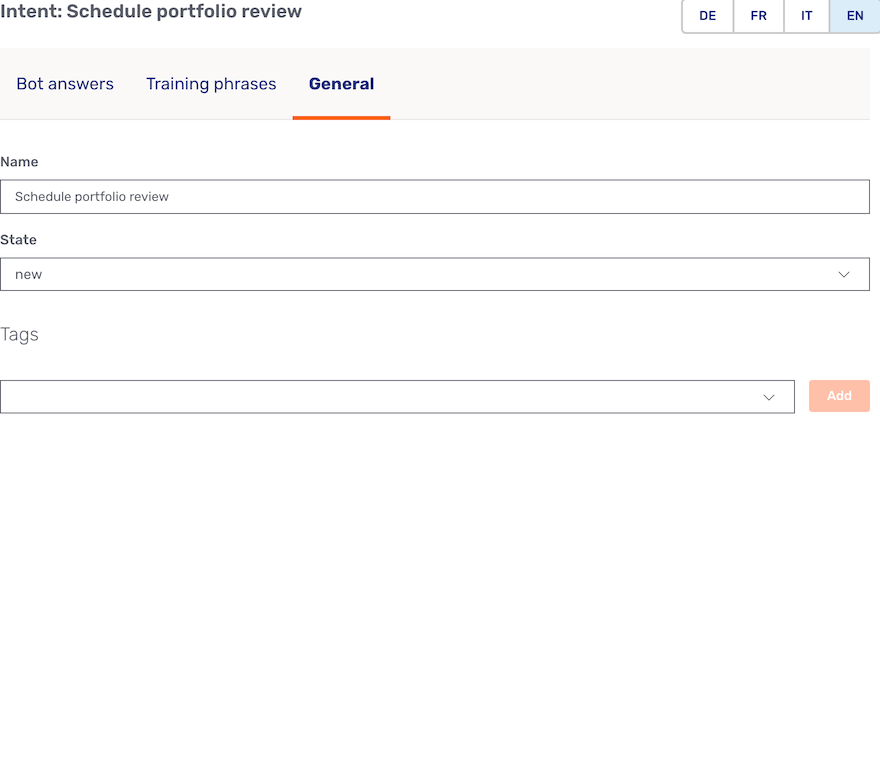
-
The Name field lets you edit the intent’s name.
An intent’s name is the same across all languages.
-
The State field lets you set the intent’s state. There are three possible states:
-
New is the state assigned to an intent when you create it.
-
Productive is the state you assign to intents that are ready to be used in production.
-
Deprecated is the state you assign to intents you no longer need.
New and Deprecated intents aren’t used in production or to create deliveries.
-
-
You can use Tags to group intents under a label. To apply a tag to an intent, click the select element under the Tags heading, select the tag you want to apply, and click Add. The tag appears between the heading and the select element.
To remove a tag from an intent, click its cross icon
 .
.For more information on creating and managing tags, refer to the section Organizing intents below.
| The intent’s State and Tags are set individually for each language. For example, you can set the state of your intent to Productive in English while leaving it New in the other languages. |
Creating training phrases
To train the UCB to recognize the intent that’s most appropriate for a visitor’s utterance, you must provide it with a set of phrases that may arise in relation to an intent.
The better the training phrases, the better the UCB becomes at identifying intents. Wherever possible, keywords should be used exclusively within a single intent, and you should use them within a large proportion of that intent’s training phrases.
The more intents use the same keyword, the less likely the UCB can choose between the intents when determining how to answer a visitor’s question. Conversely, if you find yourself adding multiple related keywords or keyphrases to a single intent, you should consider creating a dialog flow with multiple intents. This lets you create more specific intents, and the UCB can respond to the visitor with more specific information.
To create the training phrases for your intent, switch to its Training phrases tab.
Before you can add training phrases, you must allow adding training phrases to the intent. To do so, change the value of Is it allowed to add training phrases to this intent? to Yes. This displays the fields necessary to add training phrases:
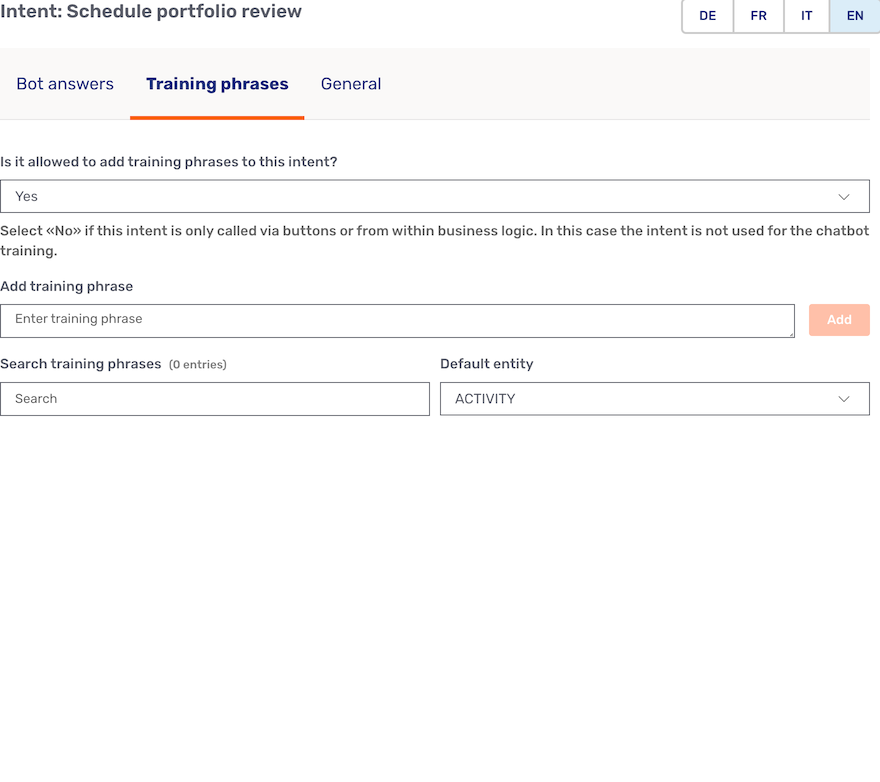
| Intents that don’t have any training phrases are used when you create dialog flows, where a subsequent intent is triggered by a button or some business logic. The article Advanced intents discusses creating dialog flows. |
Before you add training phrases, double-check that you’ve selected the right language!
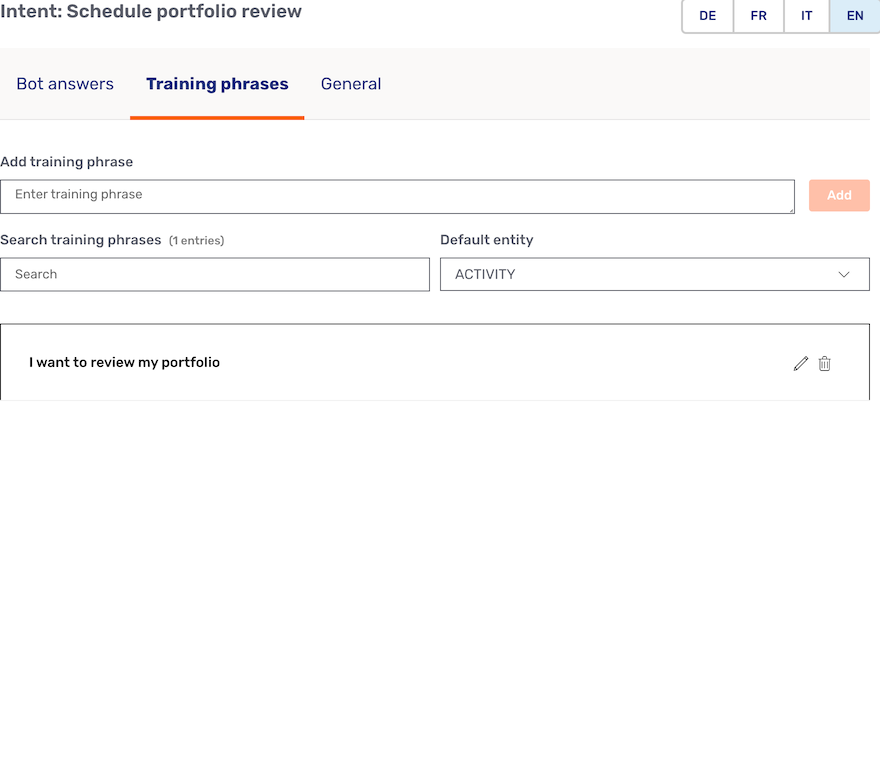
Enter a training phrase in the field Add training phrase and click Add. The training phrase now appears beneath the input fields. You can also no longer specify that the intent shouldn’t have any training phrases.
You should create at least 20 training phrases for each intent. If the UCB has fewer training phrases, its performance suffers. The article Improving the Unblu Conversational Bot’s performance discusses ways to improve the UCB’s performance once it’s been deployed.
To edit a training phrase, click its pencil icon ![]() . This opens a modal dialog where you can edit the phrase.
. This opens a modal dialog where you can edit the phrase.
The Search training phrases field lets you search for a particular series of characters within the intent’s training phrases. The BDB updates the list of training phrases as you enter your search term so the list only displays matching training phrases.
Creating an answer for the UCB to respond with
The answer is how the UCB reacts to an utterance once it determines that the intent matches what the customer wants. To create an answer, switch to the intent’s Bot answers tab.
The UCB can send three different types of message as an answer: simple text messages, card messages, and list messages. An answer can consist of up to three messages. Each message in an answer is sent to the visitor in a separate chat bubble. You can change the order the messages are sent in using the Move up and Move down buttons on the individual messages.
If you scroll down, you see that there are a number of ways to enhance answers with additional capabilities. These options are discussed in Adding advanced features to intents.
Creating text messages
To create a text message, click Add text answer. Enter the text you want to send in the Text field of the modal dialog that appears. Click Save to create the message and return to the intent’s settings.
The text message you created appears in a bubblelike the one pictured below:
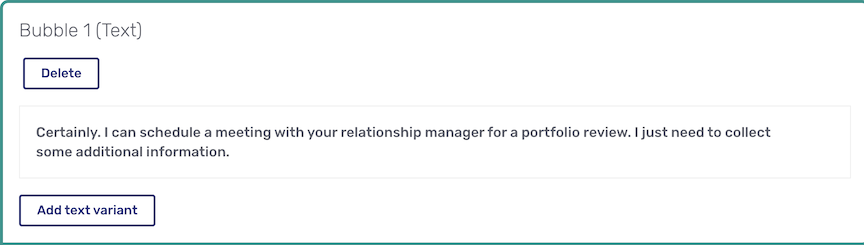
If you don’t want the UCB always to respond with the same text, click Add text variant to add a variation on the message. If there are multiple text variants available for a text message, the UCB chooses one of them randomly when responding to the visitor.
If you move the cursor over the bubble, a Delete button appears. Click the button to delete the message. The message is deleted immediately.
Creating card messages
To create a card message, proceed as follows:
-
Click Add card answer.
-
In the modal dialog that appears, enter the details for the header of the card message. The Title and Text fields are mandatory.
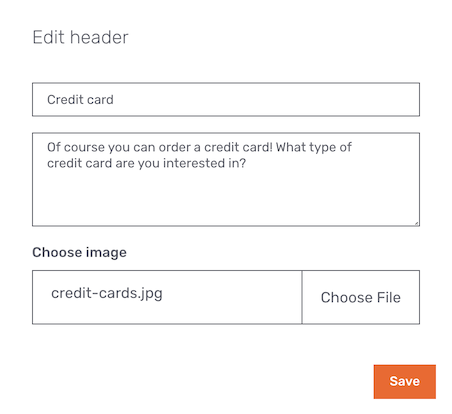 Figure 7. Modal dialog for a card answer
 -
Click Save to return to the intent’s settings. You now see the header of your card answer in a bubble:
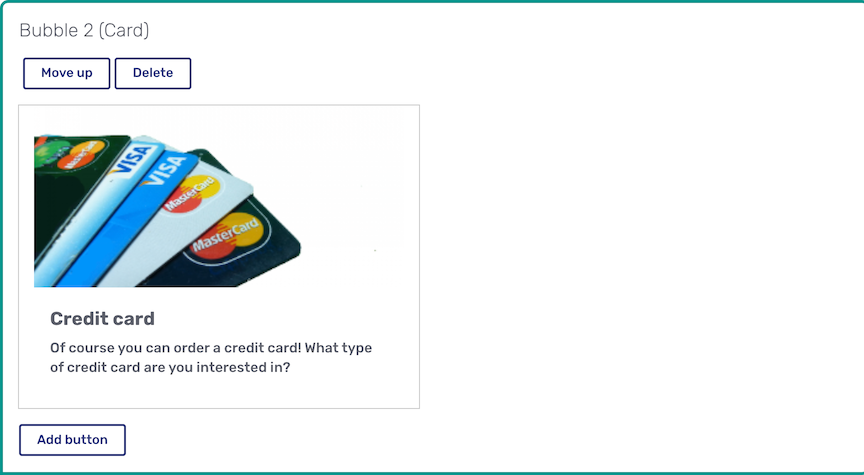 Figure 8. Card answer bubble without buttons
-
In the bubble, use Add button to add buttons to your card message. Clicking the button opens a new modal dialog:
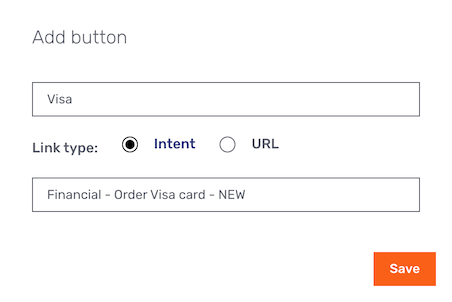 Figure 9. Modal dialog to add a button to card answer
Only the Text field is mandatory, but if you don’t add a link, the button won’t do anything.
There are two types of link:
-
Intent links trigger the intent you specify in the field below the link type. This is used to create dialog flows. You can only select productive intents.
-
URL links take the visitor to the website specified by the URL.
-
-
Click Save to save the button and return to the intent’s settings. The card answer’s bubble now includes the button you created:
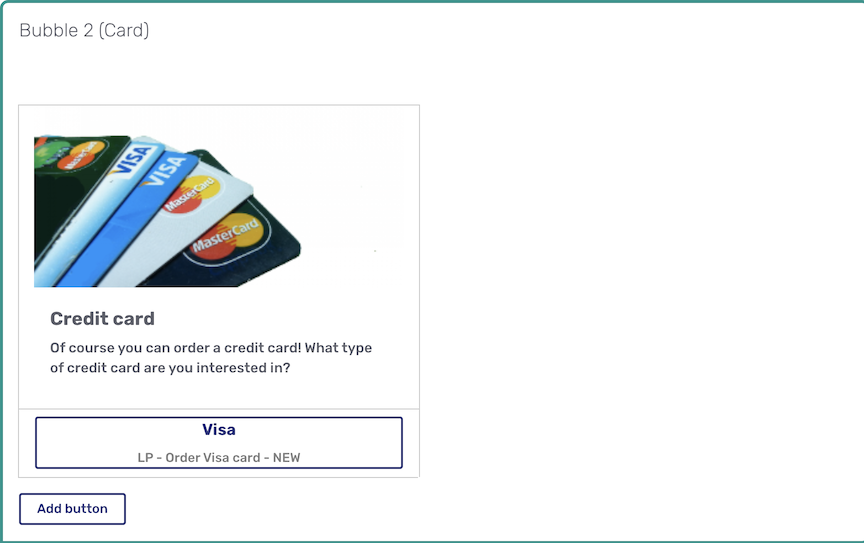 Figure 10. Card answer bubble with a button
To delete a button, move the mouse pointer over it. This displays the trash icon ![]() beside the button. CLicking the icon deletes the button immediately.
beside the button. CLicking the icon deletes the button immediately.
If you add multiple buttons to a card answer, you can change their order. Scrolling your mouse cursor over a button displays the move up icon ![]() and move down icon
and move down icon ![]() (as applicable) beside it. Click the appropriate icon to move the button by one position.
(as applicable) beside it. Click the appropriate icon to move the button by one position.
Creating list messages
To create a list message, proceed as follows:
-
Click Add list answer. The modal dialog that appears is the same as for card messages, with the same mandatory and optional input fields.
-
Fill in the form to create the message’s header.
Click Save to save the header and return to the intent’s settings,
-
Add list items and buttons to your list message.
-
Adding buttons works the same as for card messages.
-
To add a list item, click Add list item. This opens a new modal dialog:
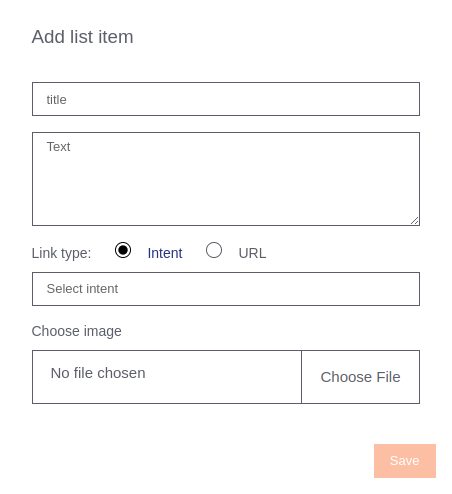
Only the Title and Text fields are mandatory. You can also add links and an image to list items.
To save the list item and return to the intent’s settings, click Save.
-
-
Once you add a button or list item to a list answer, it appears in the list answer’s bubble.
Setting the intent’s state to productive
When you’re satisfied with your intent’s configuration, go back to its General tab and change its state to Productive. This doesn’t immediately make the intent available to customers. It means that the intent will be taken into account when you create a delivery.
| Remember: you have to set an intent’s state to Productive separately for each language! |
Organizing intents with tags
The more intents you create, the harder it can be to find the one you’re looking for when you need to make changes to it or reviews its settings.
To make it easier to find intents, you can group them using tags. You can assign any number of tags to an intent on its General tab. Before that, however, you must create the tags on the Tags tab:
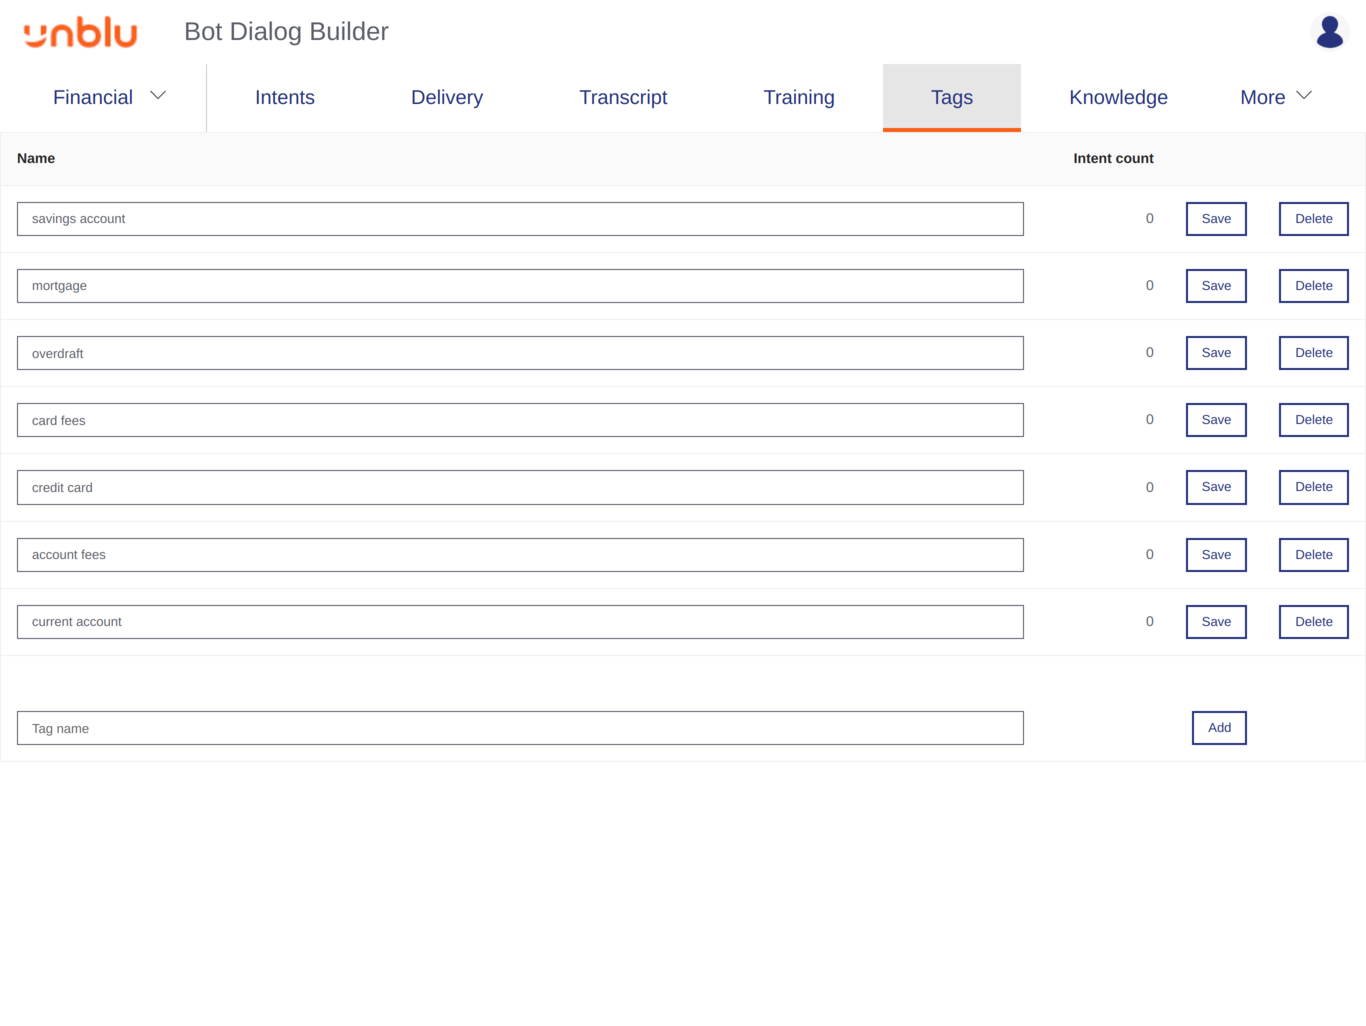
-
To create a tag, enter the name of the tag in the text field below the list of tags and click Add. The tag is added to the bottom of the list of tags.
Tags are only available within the domain they were created in. Make sure you’ve selected the appropriate domain before you create a tag. -
To edit a tag, click its name and make your changes, then click Save or hit the Enter key.
-
To delete a tag, click its Delete button.
The Intent count column in the list of tags tells you how many intents are tagged with each tag. To see which intents are using a tag, add the tag to the search criteria on the Intents tab and click Search.
See also
-
To learn how to create advanced intents containing elements other than messages, read Adding advanced features to intents.
-
Subintents are intents that can only be reached from another intent or subintent. For information on subintents and how to use them, refer to Subintents and Dialog flows.
-
For information on creating dialog flows, refer to Dialog flows.
-
For information on deploying your intents, refer to Creating deliveries.