Adding advanced features to intents
The Unblu Conversational Bot (UCB) can do more than just send messages in response to a visitor’s question. This article describes the advanced capabilities you can add to the UCB’s answers to an intent.
Subintents
You can create intents that are only accessible from other intents. These are referred to as subintents.
For more information on subintents, refer to the dedicated article on Subintents.
Confirming the selected intent: Did you mean…
Sometimes, the UCB can’t choose between two intents. If the intent with the greater probability has a supplementary question associated with it, the UCB asks the visitor that question to confirm that the intent it selected is correct.
You can add a supplementary question to an intent’s answer under the heading Did you mean…. Enter the text you want to display to the visitor. The supplementary question is saved once you hit Enter, or when the cursor leaves the field.
Quick replies
If you want to suggest responses for the visitor to choose from, but also want them to be able to enter a response of their own, you can use quick replies.
For more information on quick replies in Unblu, refer to Quick replies.
Dependencies between intents
When the UCB responds to an intent with a card or list message, the buttons and list items in the message can reference other intents or subintents. This applies to quick replies it sends to a conversation, too. Linking intents this way lets you create dialog flows.
For more information, refer to Dialog flows.
Providing context
Sometimes you want the UCB to respond differently in different contexts.
For example, suppose you have an intent for visitors asking about how to open an account. The procedure to do so may be different for personal accounts and business accounts. In that case, you want the UCB to provide different answers depending on whether the visitor started the conversation on the personal or business banking page of your organization’s website.
You can create multiple versions of an intent by creating multiple contexts for the same intent. All the contexts you define for an intent use the same training phrases. If you need to use different training phrase for different contexts, you have to create different intents.
Every intent has at least one context in each language. When you create an intent, the UCB automatically creates the Default context. To rename the default context, enter a new name in the Name field in the Context section of the intent’s Bot answers tab. The name is updated once you hit Enter, or when the cursor leaves the field.
To create an additional context:
-
Select the language you want to create the new context in.
-
Click the Plus icon
 at the top of the intent’s settings.
 -
Enter the name of the new context in the modal dialog that appears, then click Create. The name of the new context appears next to the others at the top of the intent’s settings.
Contexts are listed in alphabetical order, so your new context may not be at the end of the list.
The BDB doesn’t automatically switch to the new context when you create it. To edit the new context, you must first switch to it. Once you’ve done that, you can edit it just like the default context.
The Context section is where you define the conditions that must be met for the UCB to respond with the answer in the context you created. You can choose between different sources where the conversation’s taking place or specify one or more URLs where the conversation originated.
-
To specify a source, select SOURCE in the Type select element. In the Value select element, select UNBLU.
-
To specify a URL, select ENTRY_POINT in the Type select element. In the Value field, enter the URL where the conversation originated for this intent to be taken into consideration.
To complete the process, click Add condition.
To delete a context, click the Trash icon ![]() that appears next to the context’s name when you scroll over it. In the modal dialog that appears, click the Delete button.
that appears next to the context’s name when you scroll over it. In the modal dialog that appears, click the Delete button.
| Since every intent needs at least one context, the Trash icon only appears if there are two or more contexts. |
Adding actions to intents
Custom actions for intents allow you to trigger actions outside the Unblu Conversational Bot (UCB) when the UCB detects a certain intent. A custom action can:
-
Trigger a specific process, including processes that call third-party services
-
Return one or more messages that the UCB then forwards to the user
-
Save information in the conversation session
This allows you to create more complex interactions between users and the UCB.
Entities: Extracting information from user messages
One important aspect of custom actions for intents is the ability to extract information from users' messages. For example, a user might ask for the balance of a certain account and enter the account number in their message. To be able to retrieve the user’s account balance, the custom action must be able to determine the account number they entered. This is possible thanks to entities.
Entities are defined in the configuration of the UCB. They can then be used when creating training phrases. Information extracted using entities can be used immediately or stored in the conversation session for later use.
There are two types of entity:
- Regex entities
-
These are simply regular expressions. They can be used to check for data of a certain format, such as telephone numbers or account numbers.
- Table element entities
-
These consist of a table of possible values, such as country names or codes or currencies.
OpenAPI specification
Any service you create that’s called by a custom action in an intent must follow the OpenAPI specification used by custom actions for intents. For information on the specification, contact the Unblu Services team.
Using custom actions in intents
To use a custom action in an intent, you must:
-
Configure the entities you need for your custom action.
-
Add the custom action to the intent.
-
Create training phrases for the intent. If the custom action uses entities, you must add the entity or entities to the training phrases.
Adding a custom action to an intent
-
To add a custom action to an intent, open the Intents tab.
-
In the list of intents, select the intent you want to add a custom action to and open its Bot answers tab.
-
Select the language you want to add the custom action to.
-
If necessary, select the appropriate intent context.
-
Scroll down to the Actions section and select the custom action you want to add to the intent.
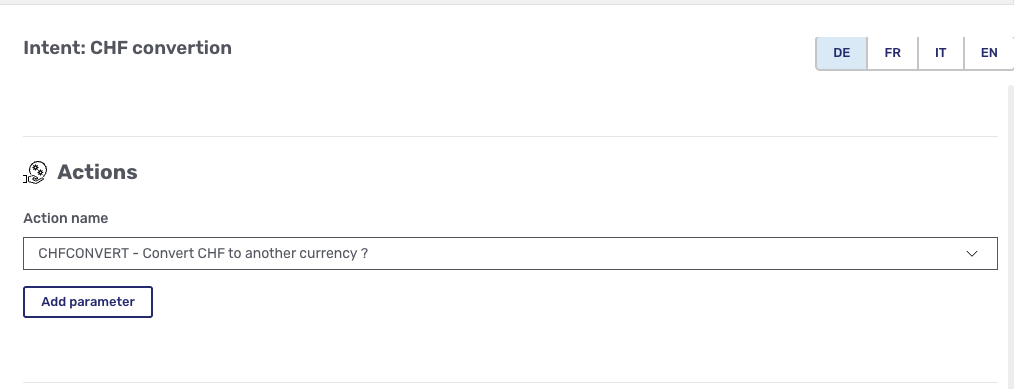
Creating training phrases with entities
The basics of creating training phrases are discussed in Creating simple intents. This section focuses on how to add entities to a training phrase.
-
Select the intent’s Training phrases tab and make sure you’ve selected the right language.
-
In the Default entity select element above the list of training phrases, select the entity that extracts the information your custom action needs.
-
In each training phrase, select the term that represents the entity you want to extract.
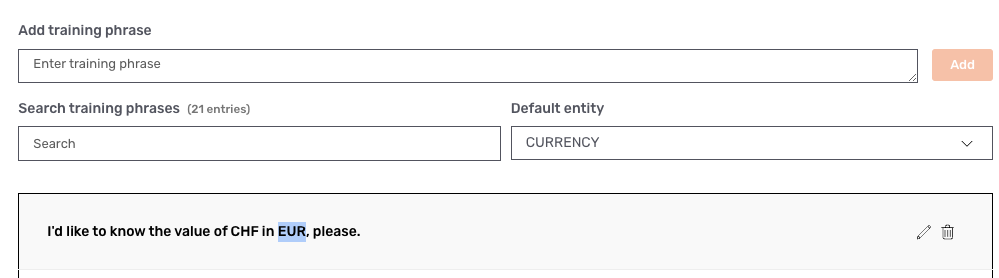 Figure 2. Adding an entity to a training phrase
 -
When you release the mouse button, the term is replaced by a representation of the entity.
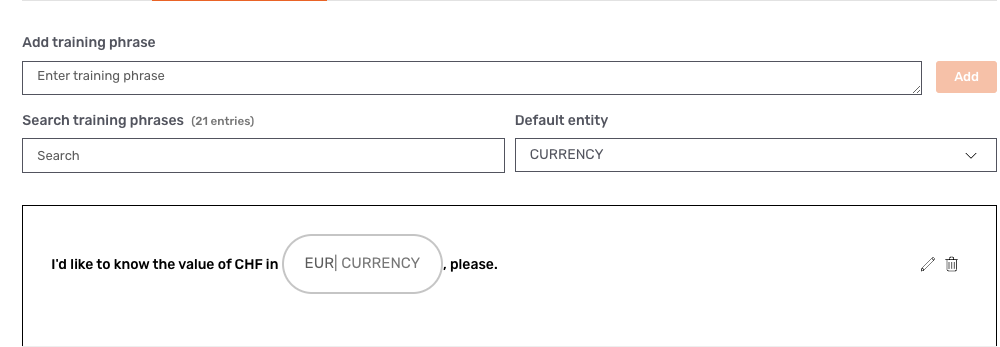 Figure 3. Training phrase with an entity
If you need to change the entity in a training phrase, click the representation of the entity in the training phrase. This displays a select element beneath the training phrase where you can change the type of entity. You can also remove the entity entirely by clicking the Delete button.

Using intents with custom actions
Once you’ve finished configuring the intent and set it to Productive, you can use it like any other intent. For more information, refer to Creating deliveries.
Viewing dependencies between intents
An intent can trigger another intent, for example by referencing it in a button on a card answer. This creates a dependency between the two intents.
The dependency is displayed in the Dependencies section at the bottom of the Intents tab of both intents.
-
On the left, you see which intents depend on the intent you’re viewing. These are intents that are accessible from the current intent using a quick reply, a button on a card or list answer, or a list item on a list answer.
-
On the right, you see which intents the current intent depends on. These are intents that have a quick reply, a button, or a list item that triggers the current intent.
The Dependencies section only shows immediate dependencies. You can’t see whether an intent that depends on the current intent has other intents that depend on it, for example.
See also
-
For information on how to create flows, where one intent triggers another, refer to Dialog flows.