Scheduling Unblu conversations with Google Calendar
If your organization uses Google Workspace, the Unblu Google Calendar add-on lets your agents schedule Unblu conversations when they create events in Google Calendar. All communication takes place between Unblu Spark and Google. There’s no need to install additional server components.
This article mainly describes the steps administrators must take to make the Unblu Google Calendar add-on available to users in your organization. If you’re a Google Calendar user and only want to know how to use the add-on, go straight to Using the Unblu Google Calendar add-on below.
Publish your add-on to the Google Workspace Marketplace
Before your users can benefit from the Unblu Google Calendar add-on, you must publish it to the Google Workspace Marketplace for your organization. This involves completing the following steps:
-
Adding credentials
-
Defining the contents of the OAuth consent screen
-
Configuring the add-on the Google Workspace Marketplace SDK
-
Creating a store listing
Google has its own instructions for this process. The sections below provide additional information about the various publication steps.
Prerequisites
-
Agents must have a working Google account associated with Unblu.
-
Agents' Unblu usernames must be the same as their email address.
-
Google must be configured as an identity provider (IDP) for Unblu Spark.
-
You must provide the Unblu Services team with the project number of the Google Project you’re using for the add-on.
To retrieve the project number, oen IAM and admin in Google Cloud console and click Settings in the left sidebar.
-
The Unblu Services team will provide you with the deployment ID and the redirect URI for your add-on.
Add credentials
In the credentials section of your project in the Google Cloud console, create an API key and add the OAuth client ID.
Create an API key
-
Click Create credentials and select API key.
-
In the API key created modal dialog that appears once the key’s been created, click Edit API key to assign the key a more helpful name and to review its settings. The key shouldn’t have any restrictions.
-
Make a note of the API key. You must provide it to the Unblu Services team at a later stage so they can complete setting up the Google Calendar add-on for your organization.
-
Click Save.
Add the OAuth client ID
-
Click Create credentials and select OAuth client ID.
-
Select the application type Web application.
-
Enter a name for the OAuth 2.0 client.
-
In the section Authorized redirect URIs, add the redirect URI. The URL is generated by Google when you send the first request to Unblu. Click the URL that appears in the logs. There, you’ll be asked to allow communication with Unblu.
-
Click Create.
OAuth consent screen
The OAuth consent screen is displayed to users so they know what they’re allowing Unblu to do with their Calendar if they install the add-on.
-
In the left side panel, click OAuth consent screen.
-
Select the user type Internal and click Create.
-
Complete the app registration form and click Save and continue.
-
On the Scopes screen, add the following scopes:
-
https://www.googleapis.com/auth/calendar
-
https://www.googleapis.com/auth/calendar.addons.current.event.read
-
https://www.googleapis.com/auth/calendar.addons.current.event.write
-
https://www.googleapis.com/auth/calendar.addons.execute
-
https://www.googleapis.com/auth/script.external_request
-
https://www.googleapis.com/auth/script.locale
-
https://www.googleapis.com/auth/script.scriptapp
-
https://www.googleapis.com/auth/userinfo.email
The add-on needs each of these scopes to work. For information on the purpose of the required scopes, refer to Google’s documentation:
-
-
Click Save and Continue.
Configure the add-on in the Google Workspace Marketplace SDK
The next step is to configure the app in the Google Workspace Marketplace SDK. Refer to the Google documentation on configuring apps in the Marketplace SDK for general information, including on how to enable the Google Workspace Marketplace SDK.
Open the Google Workspace Marketplace SDK and complete the App configuration tab of the add-on as follows:
-
Set App Visibility to Private.
-
Set the Installation Settings as required by your organization.
-
In the App Integration section, check the field Google Workspace Add-on and select the option Deploy using Apps Script deployment id.
-
In the field Deployment ID, enter the deployment ID the Unblu Services team gave you.
-
In the OAuth Scopes section, add the following scopes:
-
https://www.googleapis.com/auth/userinfo.email
-
https://www.googleapis.com/auth/userinfo.profile
-
-
Complete the Developer Information section as required.
Store listing
You must create a store listing for the add-on so users can find and install it. Refer to Google’s instructions on creating a store listing for guidance.
🔒 Finish configuring the Apps Script project
Follow the steps below to finish configuring the Apps Script:
-
Click Project Settings in the left sidebar of the Apps Script Project.
-
In the Script Properties section, define the following properties:
-
conferenceSolutionName -
The name used for the add-on
-
unbluApiKey -
The API key of the Unblu account that the add-on is used with
-
unbluServerPath -
The base URL of the Unblu Collaboration Server as specified in com.unblu.identifier.publicServerBaseUrl
-
unbluCustomConversationTemplateId -
The ID of the conversation template to use when creating a conversation
-
unbluUseLinkType -
The Unblu UI clicking the link in the invitation opens. There are four options:
-
OPEN_IN_VISITOR_DESK -
OPEN_PUBLIC_LINK -
OPEN_IN_AGENT_DESK -
OPEN_IN_AGENT_SINGLE_VIEW
The default is
OPEN_PUBLIC_LINK. This is also the link type used if the value ofunbluUseLinkTypeis invalid. -
-
| Changes to these settings don’t require a new deployment. |
When you’ve finished, the Script Properties section should look something like this:

Install the Google Calendar add-on
Depending on the installation settings you chose when you configured the add-on in the Google Workspace Marketplace SDK, you can install the add-on for your agents or have them install it themselves.
Install the add-on as an administrator
To install the Google Calendar add-on for users in your organization, follow the installation instructions provided by Google.
Install the add-on as an agent
Depending on the installation settings you chose when you configured the add-on in the Google Workspace Marketplace SDK, agents can install the Unblu Google Calendar add-on inside the Google Calendar:
-
Click the Plus icon in the side panel on the right. This opens Google Workspace Marketplace.
-
If necessary, enter Unblu or Unblu Google Calendar add-on in the Search apps field and hit Enter to search for the add-on. If your organization chose a different name for the add-on, search for that.
-
Select the Unblu Google Calendar add-on, then click Install.
-
Select the Google account you want to install the add-on for.
-
Review the access you’re granting the add-on and click Allow.
-
Refresh the browser tab or window Google Calendar is running in.
Using the Unblu Google Calendar add-on
With the Add-On installed, you can schedule conversations in Unblu.
-
When you create a new event, click the chevron on the Google Meet button to open a list of options.
-
Click the option Unblu Conversation.
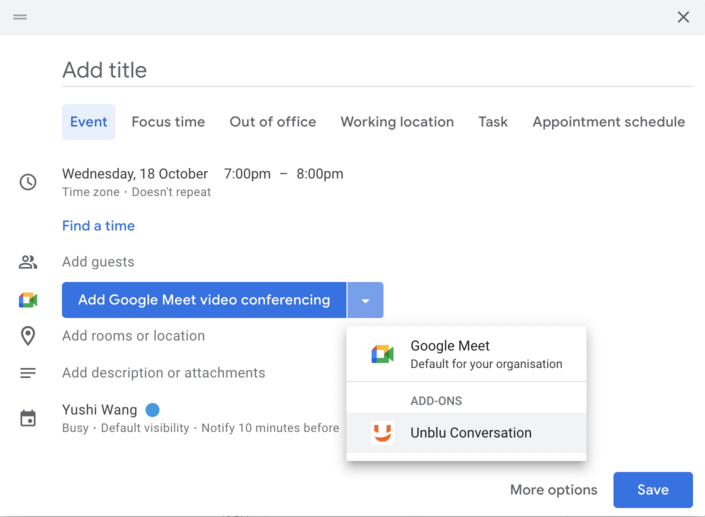 Figure 2. Using the Unblu Google Calendar add-on when creating a meeting
 -
Save the event as usual.
This adds a link to the Unblu conversation in the event details. You can share the link with other participants.
If you make any changes to a meeting or delete it in Google Calendar, these changes are synchronized with Unblu.
| The opposite isn’t the case. Changes to a scheduled conversation that you make in the Unblu Agent Desk aren’t synchronized back to Google Calendar. |