|
This document describes version 5 of Unblu. If you’re using the latest major version of Unblu, go to the documentation of the latest version. The support period for version 5 ended on 22 November 2021. We no longer provide support or updates for this version. You should upgrade to the latest version of Unblu. |
Agent quick start
If you are reading this quick guide it most likely means that everything has already been set up on the _Agent Desk ready for you to interact with visitors to your web site(s). However, before you start serving real visitors you may want an easy way to practice for the real thing. If you want to learn a little more about overall design concepts, roles and the role hierarchy, you can look at the Introduction to the Agent Desk. The Agent Actions page contains some topics not covered here and offers a little more technical detail.
This quick guide is designed to get agents up and running. It will move quickly through conversations, canned responses, document and file sharing, audio and video, snapshots, co-browsing, marking pages, and forwarding. If you want to see more you can use the provided URLs throughout this guide to drill-down into some more in-depth information on the features and functionality.
Getting Started
Understand that what you will see in this quick start guide will be different to what you may see in your own company’s implementation. You may see more or fewer icons, the page will look different, etc. However, there should be sufficient commonalities for you to work through this guide without too much pain.
| You only need one computer to perform everything covered here. You can use two computers or substitute a tablet or mobile phone to represent the visitor if you wish. Agents-in-training would be advised to run a few sessions with a tablet and mobile phone accessing the visitor browser. Unblu can be integrated into your own mobile app(s) but this is beyond the scope of this guide. You will, however, almost certainly get requests from visitors using their phones or tablets to access your web site(s) and it makes sense to get a feel for those particular user experiences in order that you can be of more help to visitors. |
Before you start
Make sure your computer’s audio and video are in working order (if you intend to use audio and video). Ideally, you should use a headset (with earphone(s) and microphone) but a set of headphones and an on-board (your computer’s built-in) microphone will do, at a pinch. If you intend to practice with a colleague (each alternately playing the role of visitor/agent) you will both need a working microphone of some sort.
| You may also want to refer to Video Chat Limitations for a little on what one cannot do with video. |
Ensure you have the required credentials to login to the system.
Have a document in a minimized folder ready to experiment with document sharing / document co-browsing.
Prepare the Browser Views
-
Start Chrome and another Chrome / or Firefox web browser.
-
In one of the browsers, start a private/incognito browsing session.
To start a private session in Chrome, select the three dots in the top right corner of the browser then select New Incognito window. Alternately, in Firefox, select the three lines in the top right corner of the browser then select New Private Window: Only one of the browsers (the agent browser) needs to be in private mode. -
Use the private browser to login as the agent.
If the visitor uses a private browsing session the agent will not be able to see the name the visitor enters at the start of their Conversation. -
In the other browser, login as the visitor.
-
Ensure that both browsers are visible at the same time.
| Using two monitors makes this easier but it can be done on a single monitor. Best of all is to practice with a partner using two computers/devices. |
Start a Conversation
| If you perform the steps below, at some point your session(s) may time out or become otherwise disconnected. If this happens a message will display. If you are offered the option (in that message) to rejoin the Conversation then go ahead and do that. If the conversation is terminated, simply start a new one. |
-
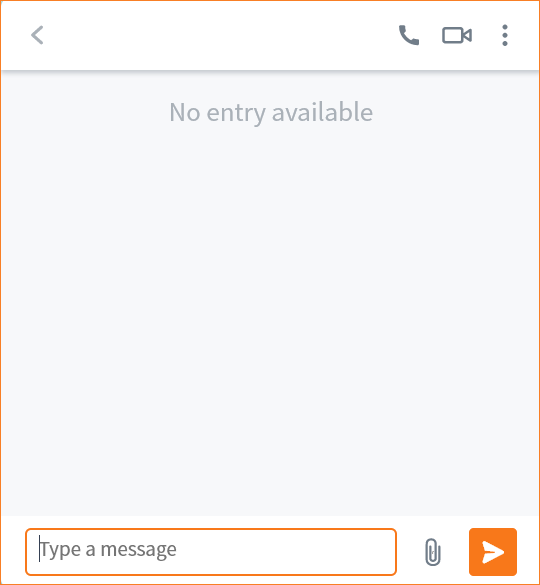
As the visitor, click on the speech bubble
 to get assistance. What you will see may be different from the pictures here. All that matters here is that the visitor may have a number of options:
-
An option that does not require a PIN. (Conversation option)
-
An option that requires a PIN. (Co-browsing option)
-
An option to share the visitor’s Web site with the agent.
-
A support call option.
Below are some pictures of something similar to what the visitor may see upon selecting the speech bubble
.+ image::../imgs/visitor-first-engagement-19072018.png[visitor-first-engagement-19072018.png]
+ NOTE: If your system is set up to do so, you will be able to access most of the Agent Desk functionality inside a Conversation or a PIN session.
+ The option (Chat to a support agent in the picture above) allows the visitor to immediately join the Agent Queue while the co-browsing option requires the agent to pass a PIN to the visitor. (In order to pass a PIN to the visitor the agent must already be in communication with the visitor.) Note that even if the visitor starts a Conversation the agent can quickly provide a PIN and switch to co-browsing.
-
-
(As the visitor), click the Chat to a support agent option.
The first time a Visitor does this they will be able send a message. Even if an agent is not currently available, the message will still reach an agent. If the message is part of an ongoing Conversation it will land in that agent’s Inbox. If this is the first message the visitor has sent, the message will stay in a queue until an agent responds. As soon as an agent responds, that message will be transferred fom the queue to the (Assignee) agent’s inbox. (See Conversation roles for more.)
-
Still on the Visitor side, enter a message then click the
 arrow. The Visitor will see a message telling them the message has been sent.
On the Agent side, the Agent will see a new message in their Queue.
-
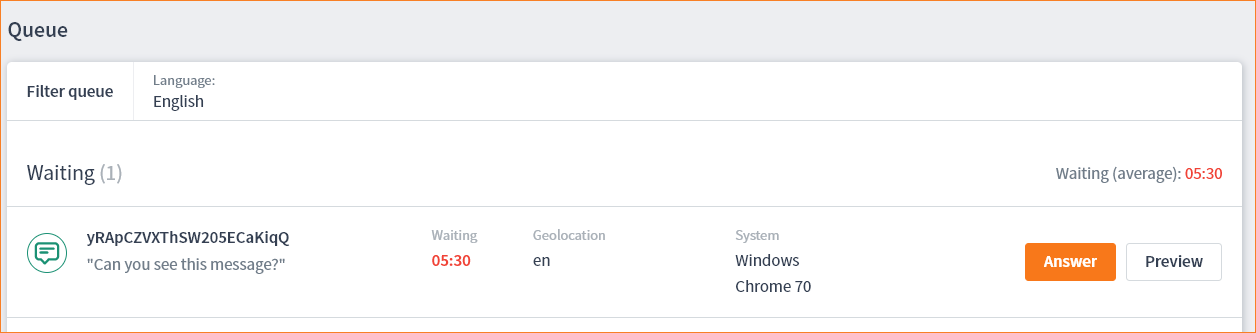
In the Agent Desk, from the main menu, select Queue. The visitor is put into the queue, awaiting a response from the agent. (If you performed the steps above you should see an entry waiting in the queue.)
The queued item has a little information to help you see where the visitor is and what the visitor is using to access the site (in this case Windows 10 and Chrome). The agent can preview the page before answering. Later in this topic we will look at forwarding sessions. For more detail on forwarding see Conversation Forwarding and Forward a Session to an Agent / Forward a Session to a Team.
You can click on the Preview button now to have a look at what the visitor is looking at. When you are done, click the Close button, as we do not want to answer the visitor just yet. Here is an example of what it should (roughly) look like: Preview.
In real life, the time the visitor has been waiting is crucial to the success of this entire communications strategy. We need not worry about it here but you will most certainly be subject to some internal company directives regarding Waiting time.
-
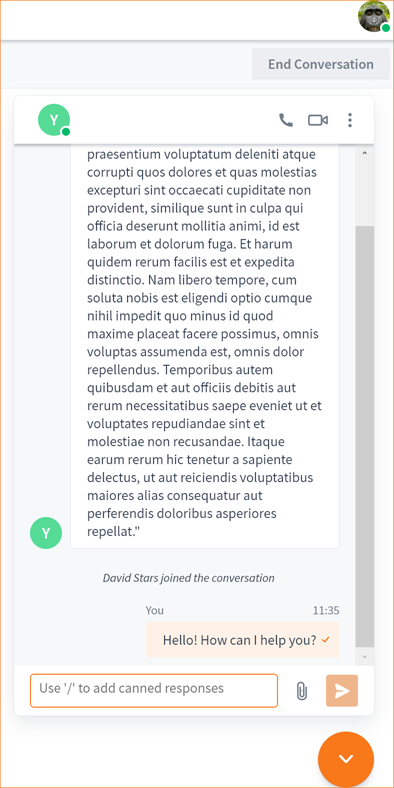
On the Agent side, select the Answer button. The Agent Chat panel opens.
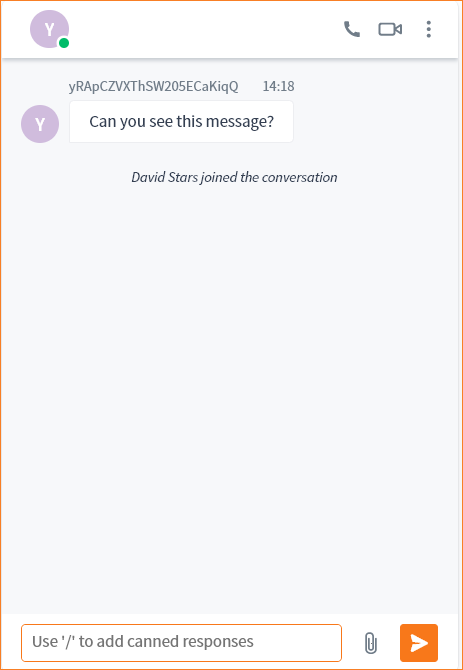
Now the agent and the visitor can type messages and press the Send button to converse with each other. All participants in the Conversation will see the messages. Type in and send a few messages on both sides to see how it works.
You will notice that both the visitor and the agent chat panels look similar but the agent panel has a few more options.
Agent Desk Icons
The icons an agent can use during a Conversation can be found in different areas of the interface.
The icons above (or a subset thereof, depending on your license) will appear near the bottom of the screen when an agent is within a Conversation. In this case the agent is already in a Conversation and using embedded co-browsing (as the orange color denotes the function is switched on).
| Icon | Description |
|---|---|
|
Embedded co-browsing (orange is active) |
|
Toggle cursor on/off |
|
|
|
Universal co-browsing is inactive |
|
End co-browsing |
When a call is answered a few more icons become available to the agent.
These icons are visible only during a Conversation. Therefore, the only way to see/use them is to be involved in a Conversation.
| Icon | Description |
|---|---|
|
Forward the Conversation to an Agent or Team. (You will no longer be part of the Conversation.) |
|
Invite an Agent or Team or Customer (this can be anyone) into the current Conversation. (You will remain within the Conversation.) |
|
|
|
End the Conversation. |
Visitor Desk icons
The visitor will see the icons your organization want them to see.
In general, the visitor page will show fewer icons. The picture above is typical. It allows the visitor to end a co-browsing session.
| The icons you see in your browser may be slightly different from those shown above. There are many options to either show or not show various parts of the software. The main thing here is simply to notice that the agent has a few more tools than the visitor. |
Now that both the visitor and the agent can chat, and are inside a conversation, we will look at how you (the agent) can make life a little easier for yourself by using canned responses.
Canned responses
For a more comprehensive look at canned responses and advice on how to create them, see Canned Responses.
| Canned responses must exist before you can use them. It may be that your system has none. You can check if there are some already-available canned responses by entering the forward slash character (/) into the chat box on the agent side. While we cannot say whether your company allows you to create canned responses, suffice to say that useful responses will reveal themselves to you during your future interactions with visitors. That is to say; when you find yourself typing the same thing over and over, during a session, it is time to can it. |
-
While still in the Conversation, on the agent side, press the forward slash character / on your keyboard. This will cause all of your available canned responses to display.
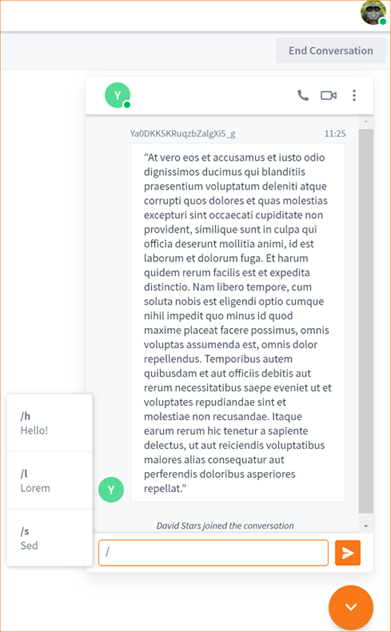
-
Click on a canned response. In our case we have clicked on /h Hello!.
The agent will only see the title of the canned response in the selection list but the entire message will be pasted into the Chat box. -
Click the Send button to send the response to the visitor.
Now that you can chat with visitors you may find that Chat is simply the first step in effective communications. Next, we will look at using audio and video. (You can keep using this session or you can start a new session to learn about these features.)
Audio and Video
In the Conversation panel click on the movie camera icon ![]() in either agent or visitor.
in either agent or visitor.
| For the video and audio to function properly, both the agent and the visitor must have video and audio facilities already working on their PCs. |
You can use video and audio simultaneously or you can use only audio or only video (silent video). You can also move between these different states easily. Be aware that using video and audio works best when using two devices (as the same camera and microphone will be used for both participants when using a single PC).
You can select the Video call icon ![]() either on the agent side or on the visitor side. For our purposes we will start with selecting on the agent side. This will send video of you (the agent) to the visitor.
either on the agent side or on the visitor side. For our purposes we will start with selecting on the agent side. This will send video of you (the agent) to the visitor.
Visitors can range from nervous; where you will make the suggestions and initiate the processes, to over-confident; where the visitor may click everything madly to see what works. In the first instance it is best if the agent confidently suggests actions to the visitor, without limiting those actions in any way. For example: “Would you like to do this on video, where we can see each other? Or perhaps audio suits you best right now?” Many users may be, on first contact, a little resistant to use video. This is perfectly normal. Chat is often sufficient but knowing that video/audio is available is important to visitors (who may, after making many typos, give audio and/or video a go).
-
While already within a Conversation, in the Agent browser, select the video camera icon
 .
.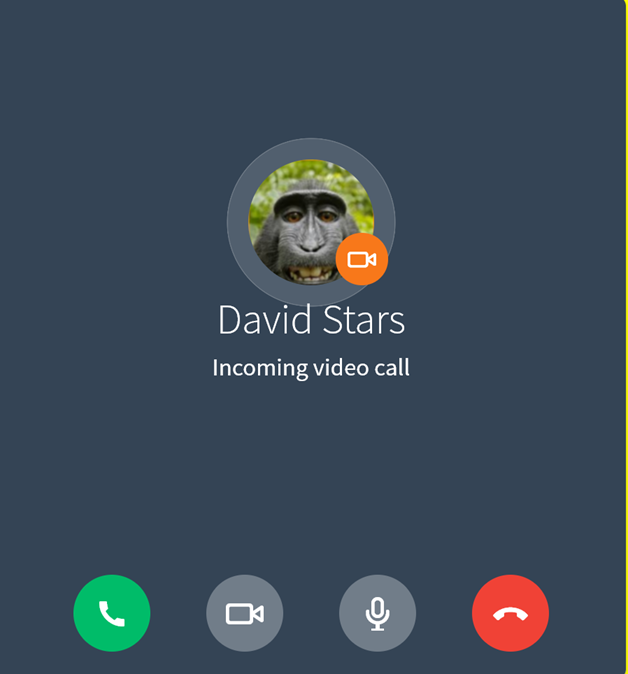
On the Visitor side the call can be answered by selecting the green icon.
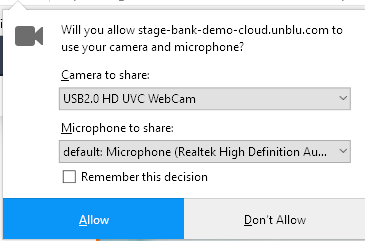
You may see a dialog, generated by your computer’s operating system, asking you to confirm the use of audio and video. It will look similar to the dialog below. Select Allow to continue.
Now the agent and visitor can see and hear each other, and they can still also use the Chat box to communicate.
| If you are using a single PC you may get some feedback from the audio system. (Try moving the microphone around, or turning the volume down a little may help. Switching off one microphone — on the agent or visitor side — should stop the feedback.) |
It can be confusing at first as messages and video shoot back and forth but you can use the real-time messages listed above the Chat box to keep track of where you are, what you’ve said, and what is switched on or off.
You should also note that if you are using a single PC you will not get the same view as using two PCs or devices. Using two devices you will see a video of the visitor/agent with a smaller video stream of yourself superimposed in the lower-right corner of the screen.
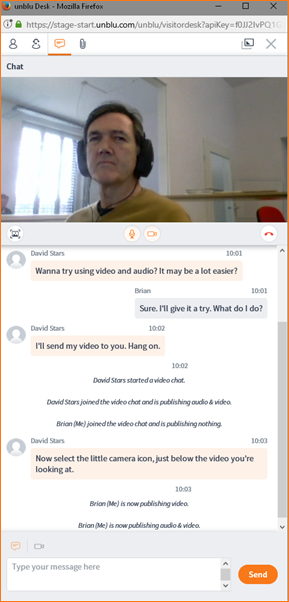
The history shown in the session above is simply a record of chat messages and notifications of who is publishing what (video / audio /documents) and when.
Note that the color orange represents the on state. Using the icons in the picture above you can switch video and audio on and off, end the call, or you can take a snapshot.
Snapshots
Snapshots allow you to take a still picture of a video stream. Mostly, this would be used for identification purposes. For example, apart from a snapshot of the visitor’s face, you may need to see, and retain evidence of, their passport or other identification. In turn, the visitor may want a snapshot of the agent.
-
In the agent browser (while engaged in a duplex video session — the visitor and the agent can already see each other) click on the snapshot icon
 .
.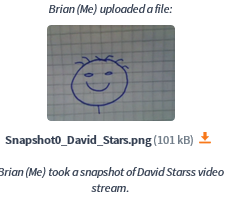
The picture above represents the visitor (Brian) taking a snapshot of the agent. It demonstrates the power of using video in such interactions. Agents have to do their part in offsetting identity theft. Being able to communicate face-to-face, and to quickly create a visual record of the person with whom you are communicating, and perhaps of some identifying credentials, can have great value; both to the nurturing of the agent/visitor relationship and as part of a potential audit trail. The agent (or the visitor, as the snapshot becomes available to all participants) can download this snapshot by clicking on the download icon
 . After clicking the download icon you will be given options according to the browser you are using. After you take the snapshot it will also be available using the paper clip
  icon.
icon. -
Click on the paper clip icon
. The Files panel opens.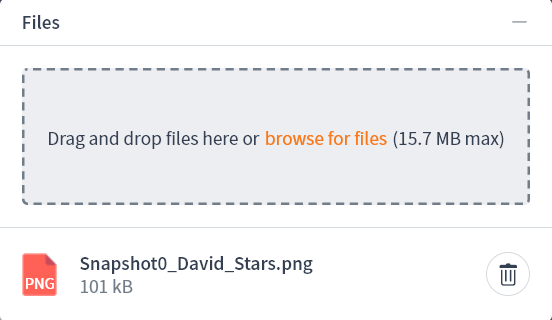
| You can download the snapshot by clicking on it or you can use the bin to delete it. |
Co-browsing
| Depending on your company’s implementation you may or may not have access to Universal / Embedded co-browsing. |
Co-browsing comes in two flavors:
-
Embedded (works with company web pages)
-
Universal (works with any web pages)
These are two methods of doing (almost) the same thing. They use different technologies but, as far as the agent is concerned, the main difference is that with Embedded co-browsing you (and the visitor) are restricted to browsing only your own company web pages that have been properly orchestrated to handle the Unblu system, while Universal co-browsing allows you navigate anywhere on the web.
-
With embedded co-browsing you may traverse the pages (predefined by your company) that sit behind your own firewall.
-
Universal co-browsing allows the agent and the visitor to traverse any site.
Embedded co-browsing allows you to arrive in the agent Conversation with the visitor history intact. This means that when using embedded co-browsing you can enter the context of whatever the visitor was doing (within your company’s Unblu-orchestrated pages).
Using embedded co-browsing the agent can observe the actions of the visitor and they can move their pointer but they cannot interact with the page; only the visitor can trigger actions. See Agent Side Limitations for a little more on what Embedded Co-browsing actually means for the agent.
Initiating co-browsing requires the agent to pass a PIN (code) to the customer. The customer enters the PIN and joins the Conversation.
Initiate a PIN session
In order for any visitor to join any PIN session (Embedded or Universal) they must already be on a page that has been orchestrated with the Unblu snippet (otherwise there is no place to enter the PIN).
The following assumes the visitor is on one of your web pages, but not yet in any Conversation, and is waiting for you to pass the PIN to them to enter into whatever dialog box your company has designed.
The following steps assume the visitor and the agent are, in some way, in contact, or have been in contact and the engagement is planned. This is necessary as the PIN must be passed to the visitor in some way; email, phone, message app, etc. It is also assumed that the visitor can see a dialog box on their side that allows them to input the PIN. (This may be on any part of the page, as a graphic with a box, for example, or it may appear when something else is chosen. Either way, there must be a PIN entry field displaying on the visitor side.)
| There is a little more on inviting visitors on this page. But for more comprehensive coverage see the Visitor Desk. |
-
In the Agent Desk click the plus sign
 (at the top left of the Agent Desk screen). The menu offers three PIN choices, depending on your needs, and on what is available in your particular implementation.
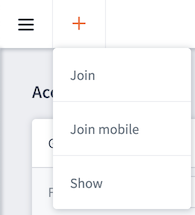
To use Join mobile your company must already have a mobile app that has been integrated with Unblu. -
Select the type of PIN you need for that session (bear in mind that you can always switch the session type after it has started; from Embedded to Universal or vice-versa). For now, select either Universal or Embedded. The Generate new PIN panel opens.
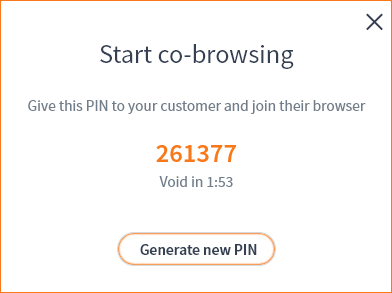
The PIN (in orange) that you see is valid for two minutes. If, for any reason, the PIN is not entered on the visitor side within that time limit it will expire. If the PIN does expire, click on the Generate new PIN button to create another. (This PIN will remain valid for the entirety of the Conversation.)
You must pass this PIN to the visitor and the visitor must enter it into whatever dialog box has been created for that purpose.
-
Enter the PIN on the visitor page to connect. A representation of the visitor page opens in the Agent Desk. All available tools open in both browsers.
When the page opens you will be able to see the visitor cursor on the page but the agent cursor needs to be toggled on.
-
In the Agent Desk, from the top of the Chat panel, select the double-pointer icon
 to toggle your cursor on. This means the visitor will be able to see the agent cursor, and the agent will be able to see the visitor cursor. Both cursors will have the name of each respective participant attached (in order to differentiate between the agent and the visitor).
There is no way for us to know exactly what (on the page) can be manipulated on the agent side, as your company will decide such matters. As co-browsing is about the agent helping the visitor we will look mainly at the tools the agent can use to facilitate the engagement. -
Click around and experiment with co-browsing. There may be company-specific issues to explore but even if there is not, you can create embedded co-browsing sessions and universal co-browsing sessions to get a feel for the software.
Switching Co-browsing Sessions
At almost any time during a Conversation you can switch to/from universal to embedded and vice-versa, simply by choosing either the universal co-browsing ![]() or embedded co-browsing
or embedded co-browsing ![]() icon(s). There may be many specific use cases for such actions. The important thing to remember is that Universal co-browsing allows you to roam free across the web. So, switching would mostly be about a necessity to see web pages other than your company’s own web pages, which would require universal co-browsing. While going from Universal to Embedded would mostly be about switching the visitor back to pages within your firewall.
icon(s). There may be many specific use cases for such actions. The important thing to remember is that Universal co-browsing allows you to roam free across the web. So, switching would mostly be about a necessity to see web pages other than your company’s own web pages, which would require universal co-browsing. While going from Universal to Embedded would mostly be about switching the visitor back to pages within your firewall.
| The choice between Universal and Embedded is simple, as an agent, to implement but has many implications under-the-hood. These matters (Universal Versus Embedded Co-browsing) will be decided by your internal strategists and you must take your lead from the policies your company has put in place. Whatever policies you must follow know that initiating or working within either universal or embedded is quite easy and natural. If you search these documents you will find many highly technical references to Universal and Embedded. You do not need to know anything about them to use them. If you do want to see more on Universal versus Embedded you could look at Embedded Co-browsing or Universal Co-browsing or Universal Versus Embedded Co-browsing (But bear in mind that this content is extremely technical and not necessary to manipulate the Agent Desk.) |
Switch on Co-browsing while in a Chat Session
If you are in Chat then you can switch on either Embedded Co-browsing ![]() or Universal Co-browsing
or Universal Co-browsing ![]() .
.
The Universal and Embedded icons are on both the agent and visitor interfaces. This means either the visitor or the agent can request a session (by clicking either the Universal or Embedded icons). However, the behavior is different according to whether it is the agent or visitor making the request (by clicking the icon). Essentially, if a visitor clicks one of the co-browse icons then acceptance by the agent is implied and both agent and visitor are immediately placed within a session. However, if the agent clicks either of the co-browse options then a message is generated in order to get confirmation that the visitor accepts the session.
-
While in a Chat session, as the agent, click the Embedded Co-browsing icon
 . A dialog box displays on the visitor side asking for confirmation.
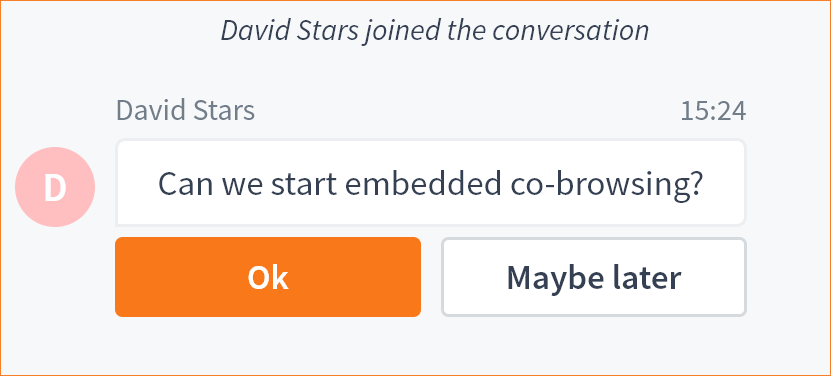
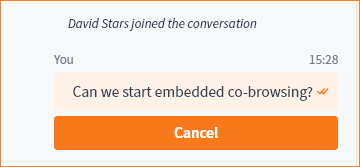
Meanwhile, the agent sees a waiting message.
-
On the visitor side click the Ok button to start the session.
Starting a Universal session while in a Chat session is exactly the same as starting an Embedded session while in Chat. The only difference is which icon you click (Universal  or Embedded ).
 -
Navigate the page from both sides — agent and visitor. Try navigating to new pages both from within your own domains and other domains (any that are not your company’s).
Notice that while in an Embedded session you will not be able to load non-company pages. In Embedded the visitor can navigate away; however, this will cause them to leave the session (the agent will get a notification if this happens). The good news is the visitor can simply navigate back to the previous page to rejoin the session. This is not a problem when in a Universal session. Universal creates a new browser in both sessions. This new browser is inside your own browser(s). You can create new tabs and navigate anywhere using Universal. (Useful, perhaps, for looking at a competitor web page (or non-Unblu orchestrated pages of your own company’s domain) or to confirm prices or read a news story / watch a video together, or even if you just need to have a lot of tabs open for any given visitor.)
| Your own web pages will/should be set up in a very particular way. This may mean that, as the agent, you cannot do this or click that, or you cannot even see some things that the visitor can see. If this is the case try to perform the same actions on the visitor page. Various areas and links, etc., will not be available to the agent for security, and other, reasons. The only way to familiarize yourself with the content in your domain is to navigate like crazy, find out what you can and cannot do during testing, if possible. If you cannot see something that a visitor can see, this is to protect visitor privacy and is most probably an intended design feature implemented by your company. |
Mark Mode
Mark mode allows both the agent and visitor to highlight parts of the page using either a single click that produces a throbbing colored dot on both the agent and visitor sides, or by drawing a rectangle, which produces a throbbing colored rectangle on the both sides; useful when directing attention to something on the page.
-
Click the Mark Mode icon
 . The icon color changes to orange as it becomes active.
 -
Draw shapes and click on items on both the agent and the visitor side to observe the effect.
| Mark Mode and point mode cannot be active at the same time. Selecting the icons will toggle the mode. ('Point mode' is just the regular cursor with Mark Mode switched off |
| For more on Mark Mode see Using Mark Mode and Mark Mode’s Limitations. |
Document Sharing and Document Co-Browsing
Documents can be uploaded/downloaded on both sides and documents can also be co-browsed by all participants in a Conversation.
| The following steps assume your implementation is configured for document sharing / co-browsing. This may not be the case. You can either ask your superior if you are enabled to share and co-browse documents, or you can perform the steps below to find out. |
-
Start a Conversation (either Embedded or Universal co-browsing) then, from either the visitor or the agent side, click on the paper clip icon
 . The file manager of your operating system will open and you can either select a file and open from there or you can drag and drop the file into the Unblu Conversation box.
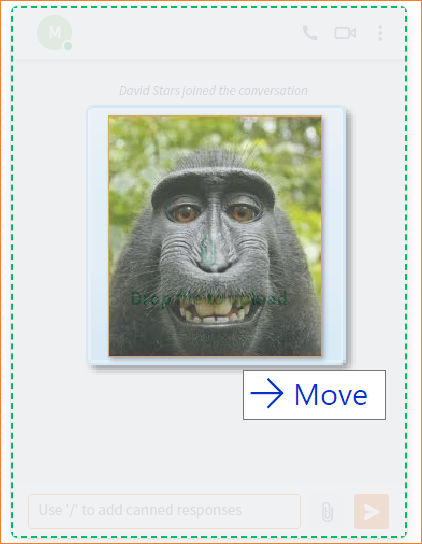
-
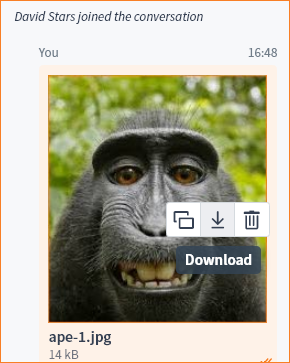
Drag a file from your desktop / file manager and drop it into the box. The file name appears in a list at the bottom of the box.
-
Right-click on the image to co-browse, download, or delete.
Mark mode can be used with document co-browsing. -
Try co-browsing a few documents to get a feel for the behavior.
Forwarding the Conversation
Invite Others into the Session or Forward the Session to Others
| Forwarding is covered more fully here: Conversation Forwarding. |
If you need to get other agents, or visitors, involved in a session there are two ways to do this:
-
Invite others into the session (agents, teams, visitors)
-
Forward the session to other agents or teams
There may be any number of reasons to get other agents involved with a particular visitor. In general, you would use Invite an agent mostly to get someone from your team into the session, while forwarding the whole session is more likely to suggest forwarding to another team that can, in turn, forward the session to the right agent, or you might forward the whole session directly to another agent.
There are two places from where you can get others involved:
-
Forwarding from the (Chat) Queue
-
Forwarding from within a Session
Forwarding from the Queue
-
From the main menu select Queue. All visitors waiting in the queue display.
-
In one of the items waiting in the Queue, click on the downwards pointing chevron (angled bracket)
 . (After clicking the chevron it will point upwards and the color will change to orange.)
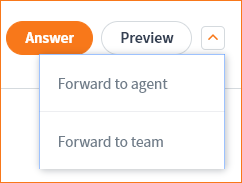
-
From the list select Forward to agent. The Forward session to agent modal window slides in from the right.

-
Click on an entry in the agent list. The entry expands to offer a text box.
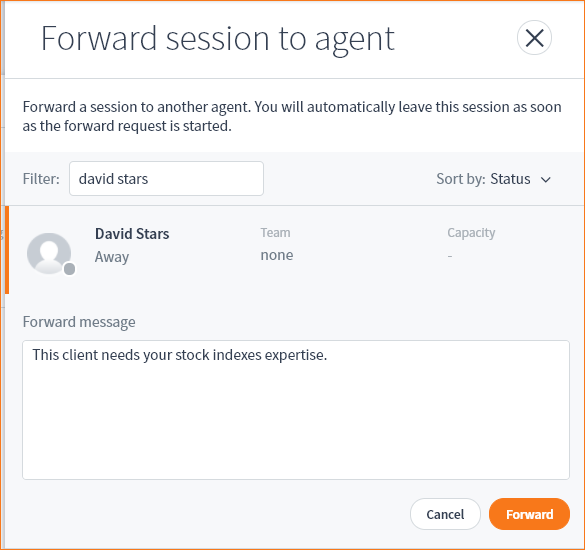
All of the agents in the previous picture are away and we have chosen an agent who is also away. You would normally only forward a session to an agent who is Available. However, even if the agent to whom you forwarded the session is away, the visitor would still get a message informing them of the current status. Nevertheless, ensure that you only forward to agents or teams who are available. 
-
Go back to the start of these steps Forwarding from the Queue. This time, when you get to step 3 select Forward to team instead of Forward to agent, and try forwarding to a team. The steps are the same but you may not have any teams set up yet. If you want to see more on how teams are created see Creating Agent Teams.
Forwarding from within a Session
You may be inside a session with a visitor and ascertain that the visitor’s needs could be better met by another agent or team. In such cases you can forward the session to another agent or team at any time.
-
-
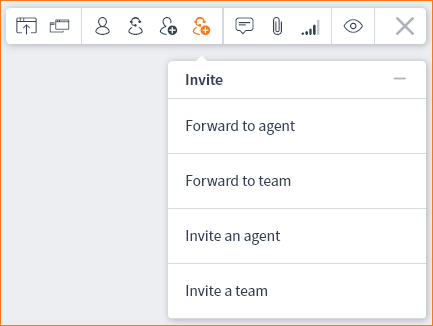
Click on the Invite another agent icon
 . A drop-down list offers some options. The various modal windows will slide-in from the right according to your choice.
 -
Select an agent or team and either invite them or forward the session to them.
| It is only really possible to experiment with the forwarding and invite features when there are available agent and teams. |
Invite an Agent or Another Visitor
Another visitor does not have to be an actual visitor, it can be someone in your organization who is not registered within the Unblu system. Using this feature can be handy when you need expertise that may be available but not available from with the Unblu system (not yet registered).
See Visitor Desk for more on inviting visitors.