|
This document describes version 6 of Unblu. If you’re using the latest major version of Unblu, go to the documentation of the latest version. The support period for version 6 ended on 29 August 2023. We no longer provide support or updates for this version. You should upgrade to the latest version of Unblu. |
Conversation configuration
These settings allow you to fine-tune the behavior of each and every Conversation. For example, if you have special classes of visitors (e.g., high-value, or 'special' in some way) that you may want to treat differently from the rest, this is where you would set your preferences. You can also set preferences according to each 'engagement type' (e.g., chat request, PIN session, etc.) using templates and associate these settings with Named Areas. In this way, at least every 'class' of engagement, and even every individual Conversation itself, can be tailored to suit specific needs.
If you want to create 'personalized' Conversation configurations for 'special' visitors or perhaps to create 'classes' of Conversation configurations that apply to 'classes' of visitors, delineated by your own business goals, you can use the Conversation Templates here to get started. While 'fixing' 30 or more configurations for a raft of different visitor or engagement 'types' may seem daunting, the templates allow you to load, change to suit, then save for further use.
There are many options to choose from. Some are 'binary' decisions where you can switch features on or off. Many of the options relate to exactly which 'role' (within a Conversation - see Conversation Roles below) should be empowered to make any given change or configuration.
| The entire range of Conversation configuration options can be accessed during a (live) Conversation by selecting the gear icon |
We recommend that, at least at the start, you configure your Conversations using templates. If you really need finer control then you can start with a template and alter it to suit your requirements.
| Even if you do not intend to configure Conversations manually, it is worth looking at the next section(s) (including Conversation Roles) in order to familiarize yourself with the internal terms (such as Assigned agent and Context person ) specifically related to Unblu Conversations. |
Configure a conversation manually
| While it is possible to manually configure Conversations it is more likely, and simpler, to use a template. |
In the agent desk, during a Conversation (that is, a Conversation is active between you and a visitor) select the gear icon ![]() from the top left of the screen. A modal window containing all Conversation configuration possibilities slides-in from the right.
from the top left of the screen. A modal window containing all Conversation configuration possibilities slides-in from the right.
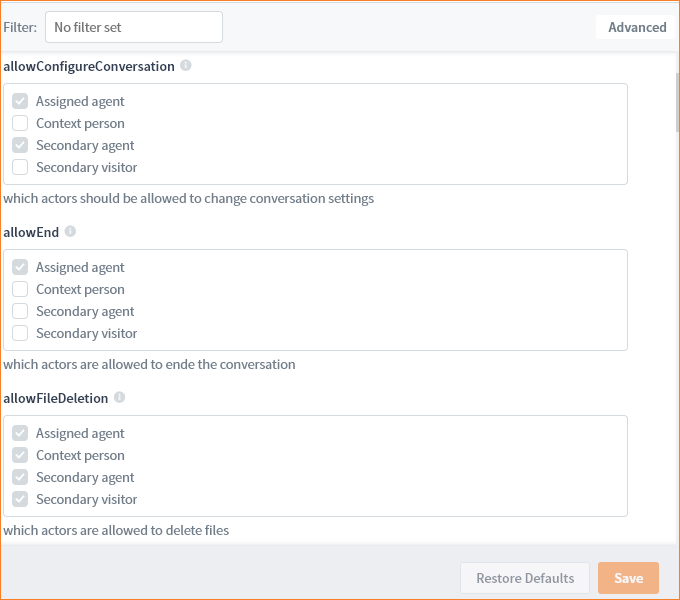
There are four (possible) 'roles' within any Conversation. These four 'roles' are specific to the Conversation configuration and, in this context, when we talk about the 'Agent' here, we mean the role and not the actual agent.
The Conversation configuration can be used to select, for example, which role has the credentials to make changes to the Conversation configuration. In the picture above, for example, both Assigned agent and Secondary agent(s) can change Conversation settings but only the Assigned agent can end a Conversation, and all participants can delete files.
Conversation roles
| All Conversations require an Assigned agent and a Context person in order to exist. The Secondary agent and Secondary visitor roles are not required. |
Assigned agent
The main (or 'responsible') agent in the Conversation: The agent who either answers a Conversation from the Queue or who starts the Conversation using 'Join' or 'Show'.
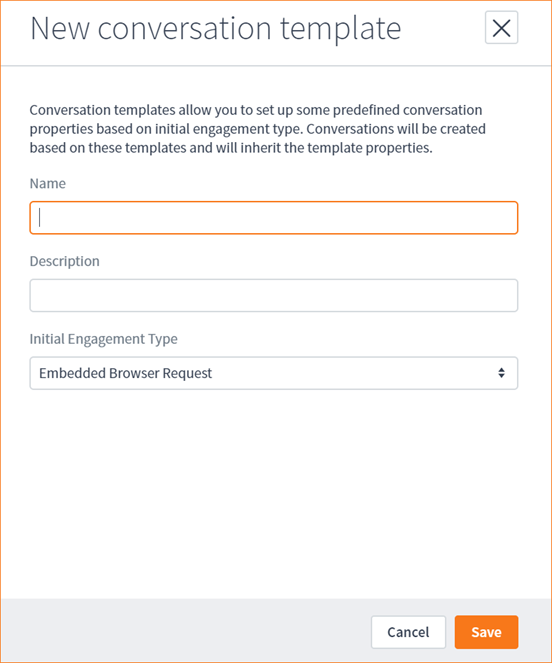
Conversation templates
As working with many Conversation configuration values can quickly become unwieldy it is possible to apply pre-built templates.
Each 'engagement type' (e.g., Join embedded, Join mobile, Join universal, etc.) has a Conversation template associated with it.
Example: In a given Named Area we want to use the 'chat template' with video enabled. So, any Conversation started from this Named Area will have this Conversation template applied to it. The template that is applied is always associated with a Named Area. Therefore, each Named Area can have only one Conversation template associated with it. If you want to change the Conversation behavior using a different template you must start a new Conversation and ensure that the template you want to use is associated with that Named Area.
Applying templates to named areas
From the main menu select Conversation templates. The page displays all available Conversation templates.
There is a default template for every type of engagement (and you can also adapt these, manually, and save to fit your needs).
Select the Chat requests Video call requests
Create template (click then slide in), Save.
Go to named area > settings There will be a template available in a dropdown.
Select the template to associate it with all requests (according to engagement type) coming from that named area. For example, all chat requests can use one template and all PIN sessions could use a different template.