|
This document describes version 6 of Unblu. If you’re using the latest major version of Unblu, go to the documentation of the latest version. The support period for version 6 ended on 29 August 2023. We no longer provide support or updates for this version. You should upgrade to the latest version of Unblu. |
Unblu documentation
This is the main Unblu documentation site.
In the following sections we will introduce you to the Unblu product suite, how it works and how to get started using it.
1. Introduction
1.1. Overview
Unblu is a software suite that lets agents and advisors at your firm engage and interact with your website visitors, customers or clients through multiple online channels. This enables a level of help, advice and relationship-building that was previously only possible face-to-face.
1.2. Why Unblu?
Unblu software is designed specifically with the requirements of financial institutions in mind.
-
Unlike most screen-sharing and co-browsing solutions, with Unblu, website visitors and clients never have to download any extra software to their computers. This greatly enhances security.
-
All communication channels are fully secured.
-
All data resides either on your own infrastructure or in a secure cloud in Switzerland, subject to Swiss financial data regulations.
1.2.1. Capabilities
With Unblu, your agents and advisors can:
-
Provide help on-demand to website visitors through text chat, video and voice.
-
Securely conduct and keep track of long-running conversations and relationships with clients via text chat, video and voice, through your website or through a dedicated mobile app.
-
Co-browse with website visitors and mobile app users, seeing what they see on their screen, providing valuable context when helping them navigate your website or other online resources.
-
Securely share documents with visitors and clients.
1.3. How does Unblu work?
Unblu consists of a central server that handles the communication and collaboration between the various parties. The server can be installed on-premises, or you can use the Unblu Financial Cloud.
1.3.1. Visitors
Visitors to your public website as well as known clients using web or mobile apps are connected through the server to agents and advisors at your firm.
1.3.2. Agents
Agents can use the built-in web app or custom mobile apps to interact with visitors. Unblu also enables supervisors to organize teams of agents and assign incoming visitor requests to area experts.
All aspects of both visitor- and agent-side interfaces are flexible and fully customizable, allowing integration with your existing web infrastructure while also enabling interaction though other channels such as custom mobile apps, custom web apps and external messenger services.
1.4. Product features
Unblu consists of the following product features:
The communication features Live chat and Video & voice can be used in conjunction with the co-browsing features to provide a richer, more effective user experience. For example, a relationship manager may conduct a video call with a prospective client. When the time comes to sign a contract, they can launch a document co-browsing session to fill in the contract with the client and thus bring the transaction to a successful conclusion.
You can choose to license all of the features or just a subset.
1.4.1. Live chat
Live chat enables visitors to communicate with agents on-demand using Unblu’s text chat capability. The live chat feature is designed specifically for situations where the relationship between visitor and agent is anonymous and conversations are relatively short. A typical use-case would be a help desk scenario.
1.4.2. Secure messenger
Secure messenger uses the same text chat capability as Live chat but in a different way. With secure messenger, the system is configured to support long-running relationships between an advisor and a client by maintaining a permanent and continuous conversation history.
1.4.3. Video & voice
In addition to text chat, Unblu can provide a channel for video & voice communication. You can use video & voice and live chat simultaneously or switch between the two.
Unblu has the ability to archive all video and voice interactions.
1.4.4. Embedded co-browsing
Embedded co-browsing uses DOM capturing to allow visitors to share their view of your Unblu-enabled website with your agents. This can provide agent with valuable context during a conversation and thus enables them to provide more effective assistance.
From a visitor’s perspective, embedded co-browsing looks like this:
For an agent, this is what embedded co-browsing looks like:
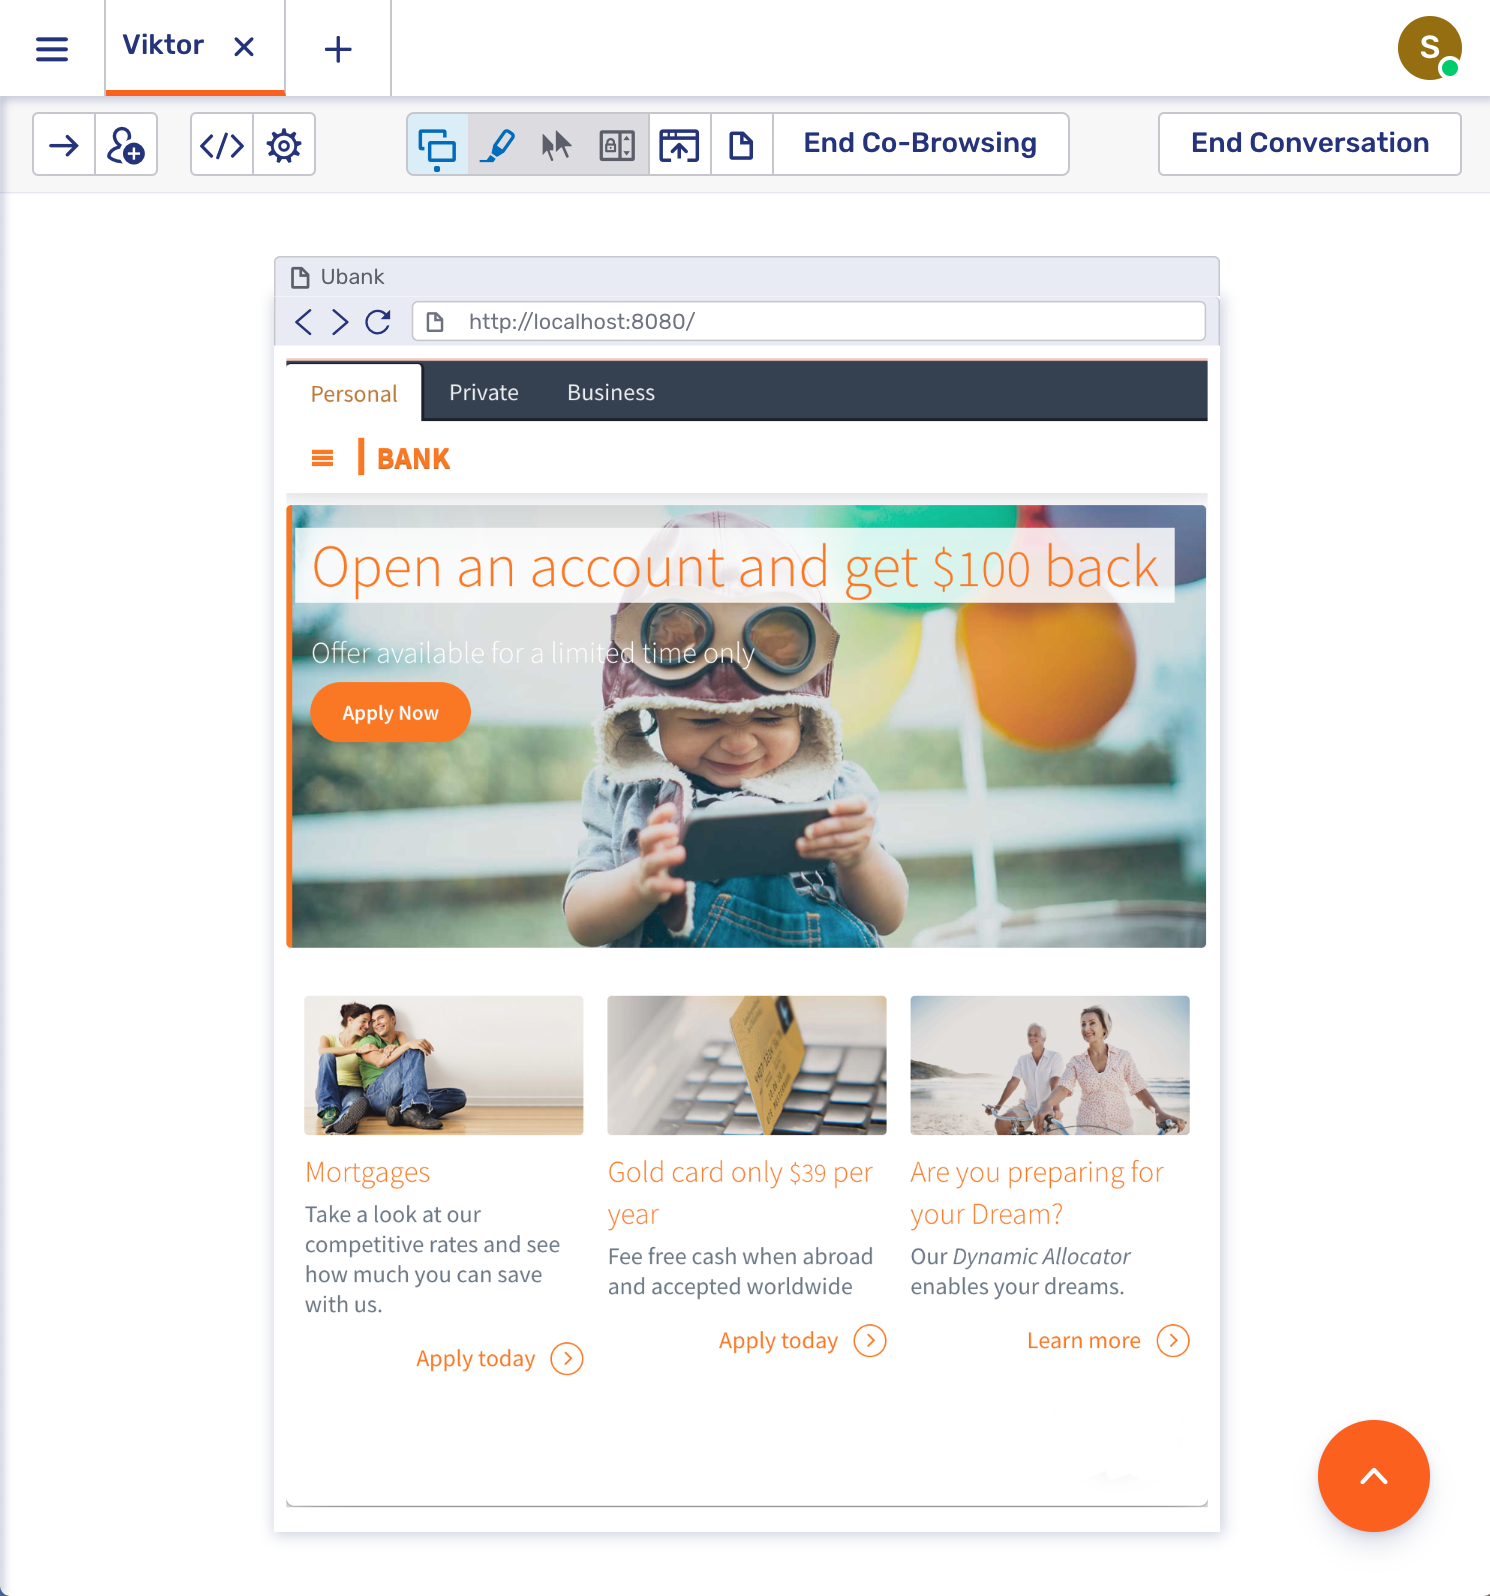
1.4.5. Universal co-browsing
Universal co-browsing uses the rendered co-browsing capability to let conversation participants share their view of any website.
Here is what universal co-browsing looks like from the visitor’s perspective:
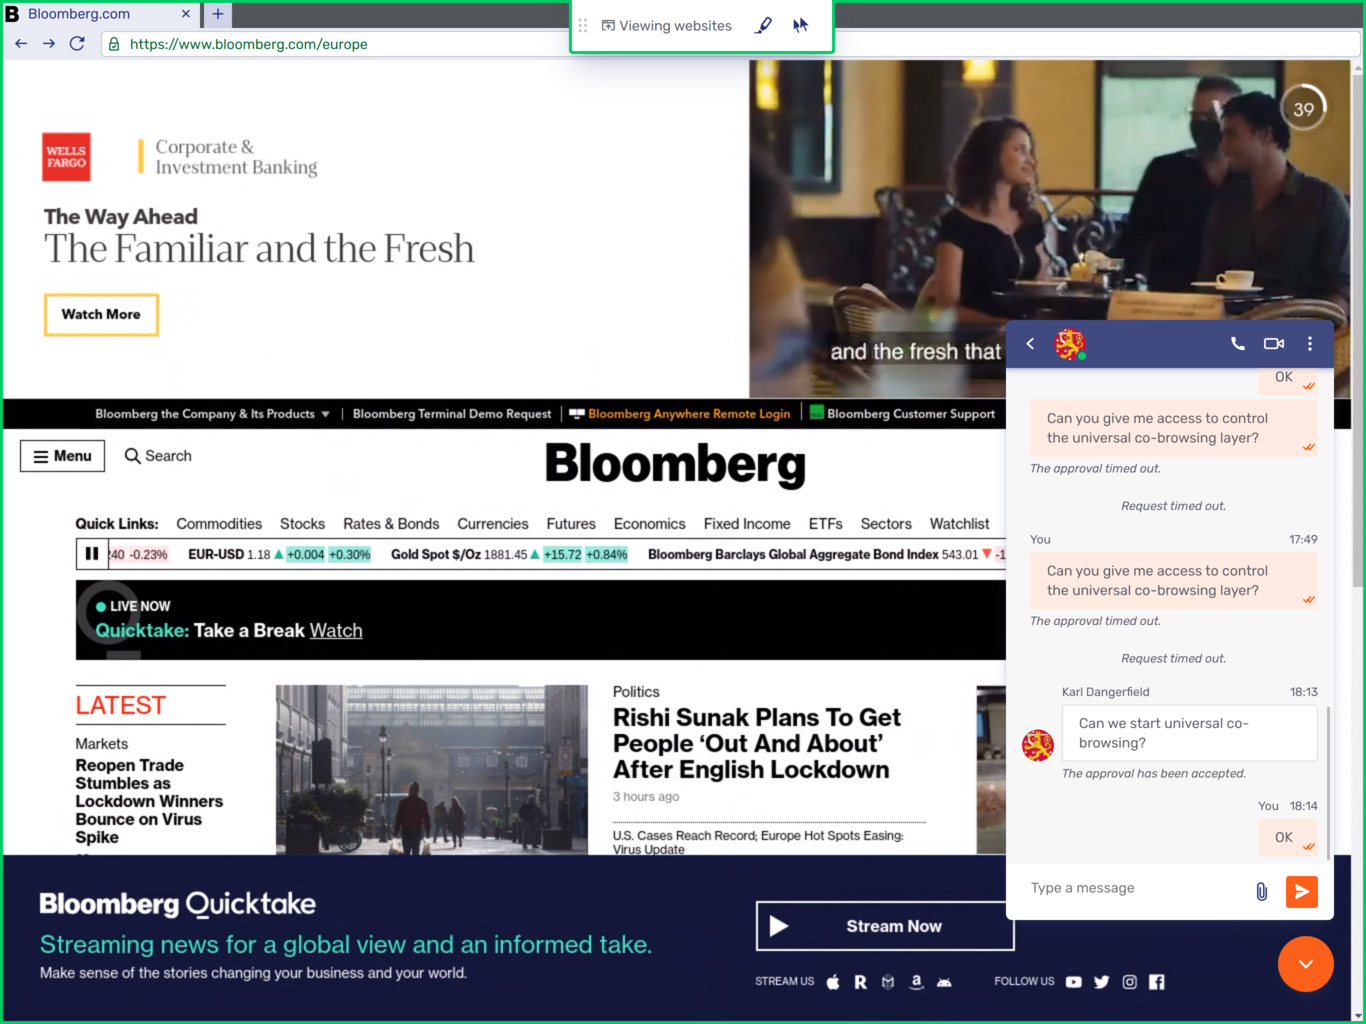
This is the agent’s view of the same universal co-browsing session:
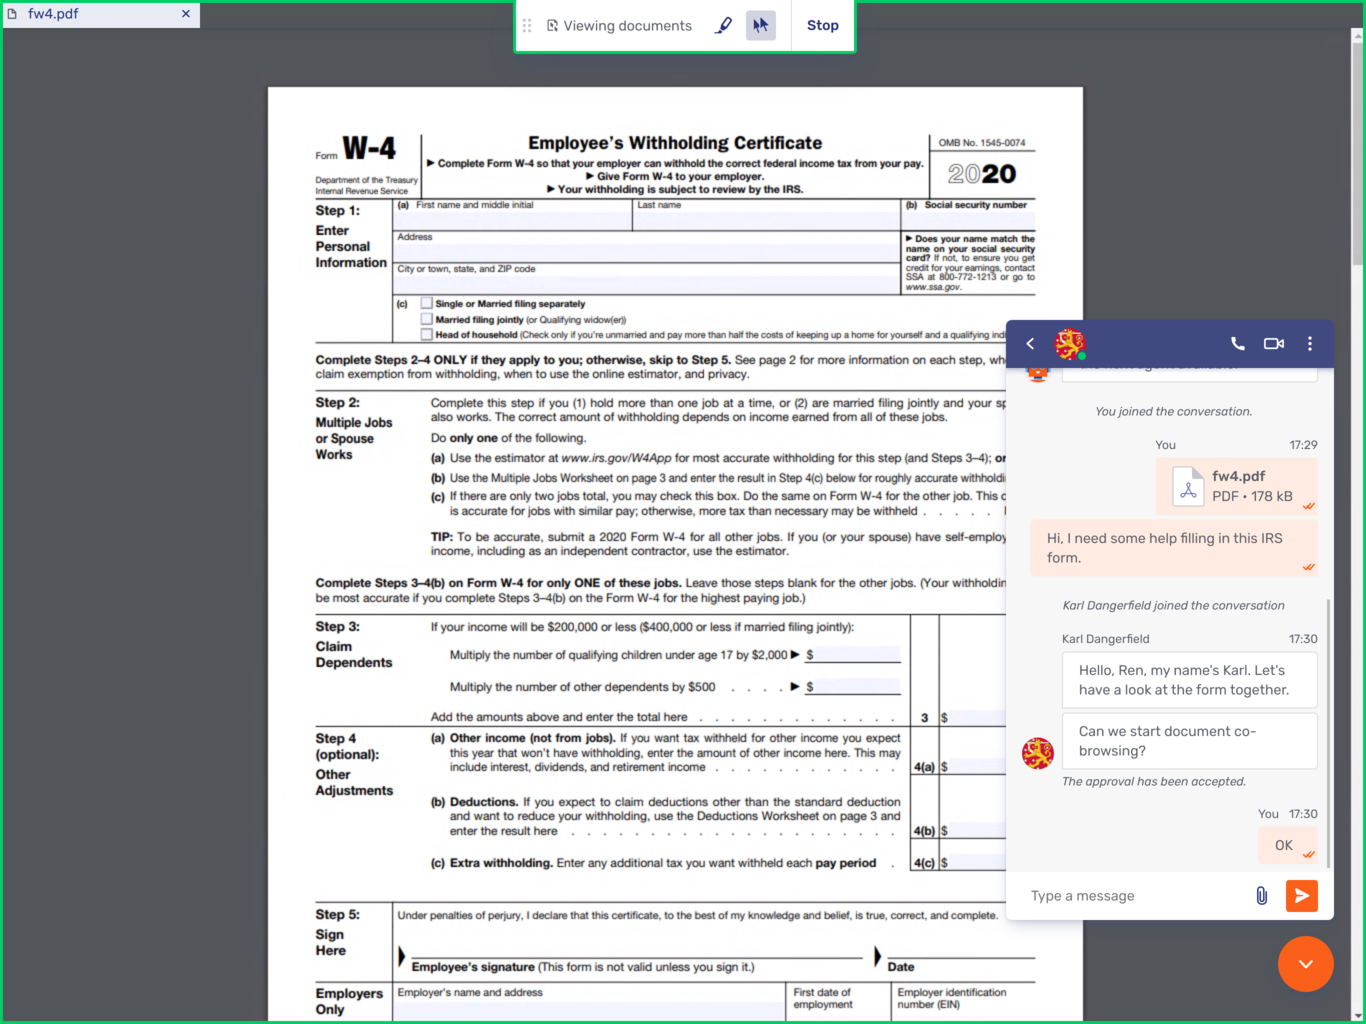
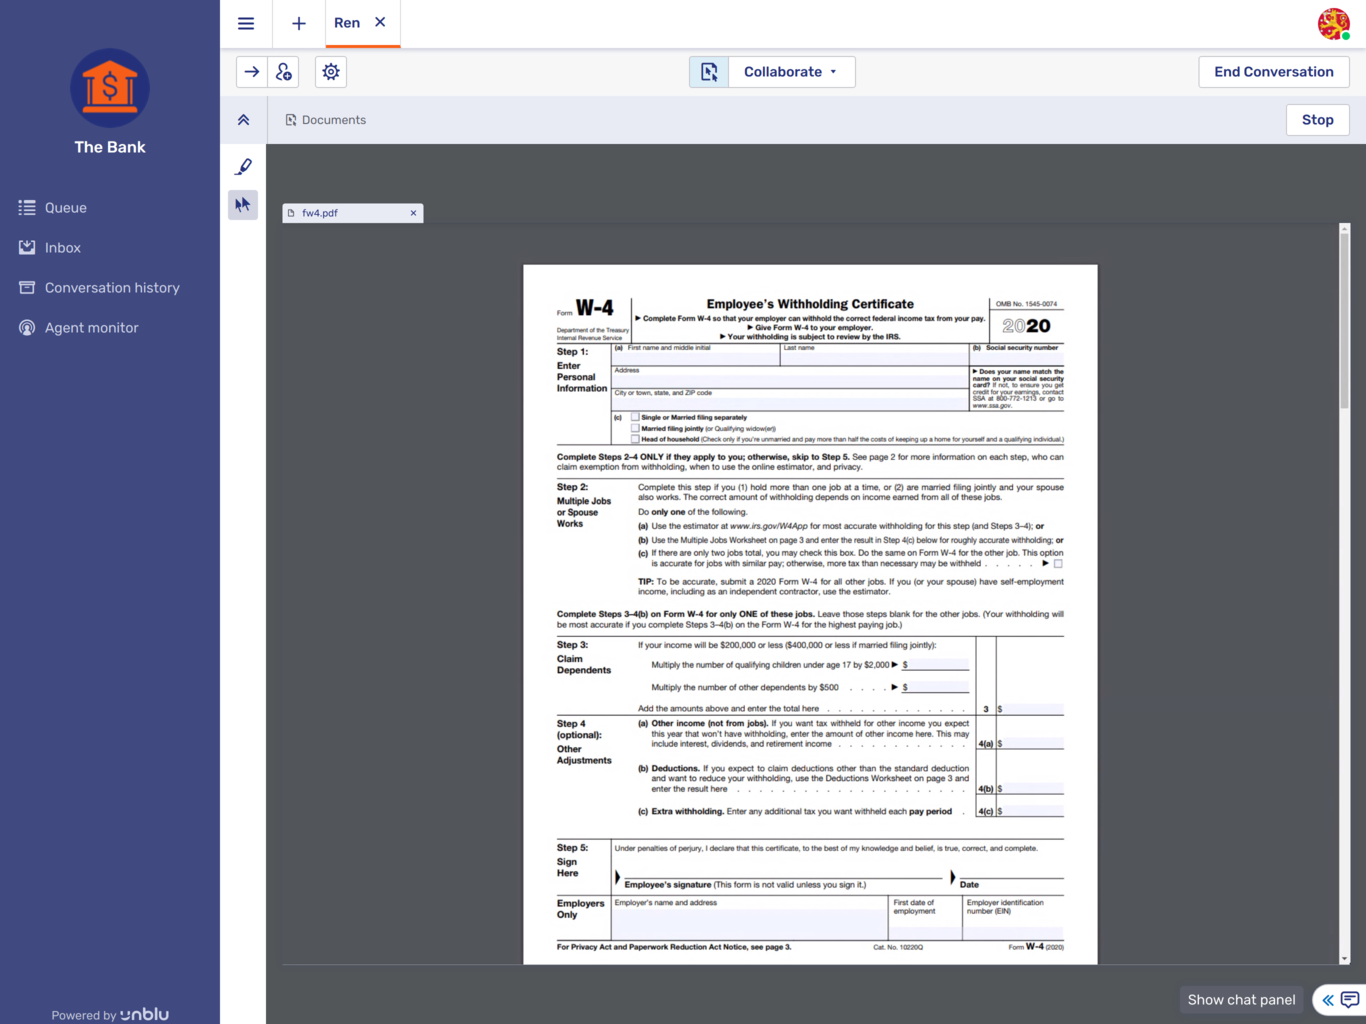
1.4.6. Document co-browsing
Document co-browsing also uses the rendered co-browsing capability. In this case, however, it is to allow the conversation participants to simultaneously view a document such as a PDF that one of the parties has uploaded.
Conversation participants can edit documents together. You can also integrate digital signature solutions like DocuSign to conclude agreements entirely online.
Here is what the document co-browsing interface looks like for visitors:
This is what it looks like for agents:
| Using document co-browsing with files types other than PDF relies on third-party services and involves uploading the files to the servers of those third parties. |
1.4.7. Mobile app co-browsing
With mobile app co-browsing, you can provide assistance and advice to visitors as they use your organization’s mobile apps. To do so, integrate Unblu into your apps using the Unblu Mobile SDKs for iOS and Android.
This is what mobile app co-browsing looks like in the Agent Desk:
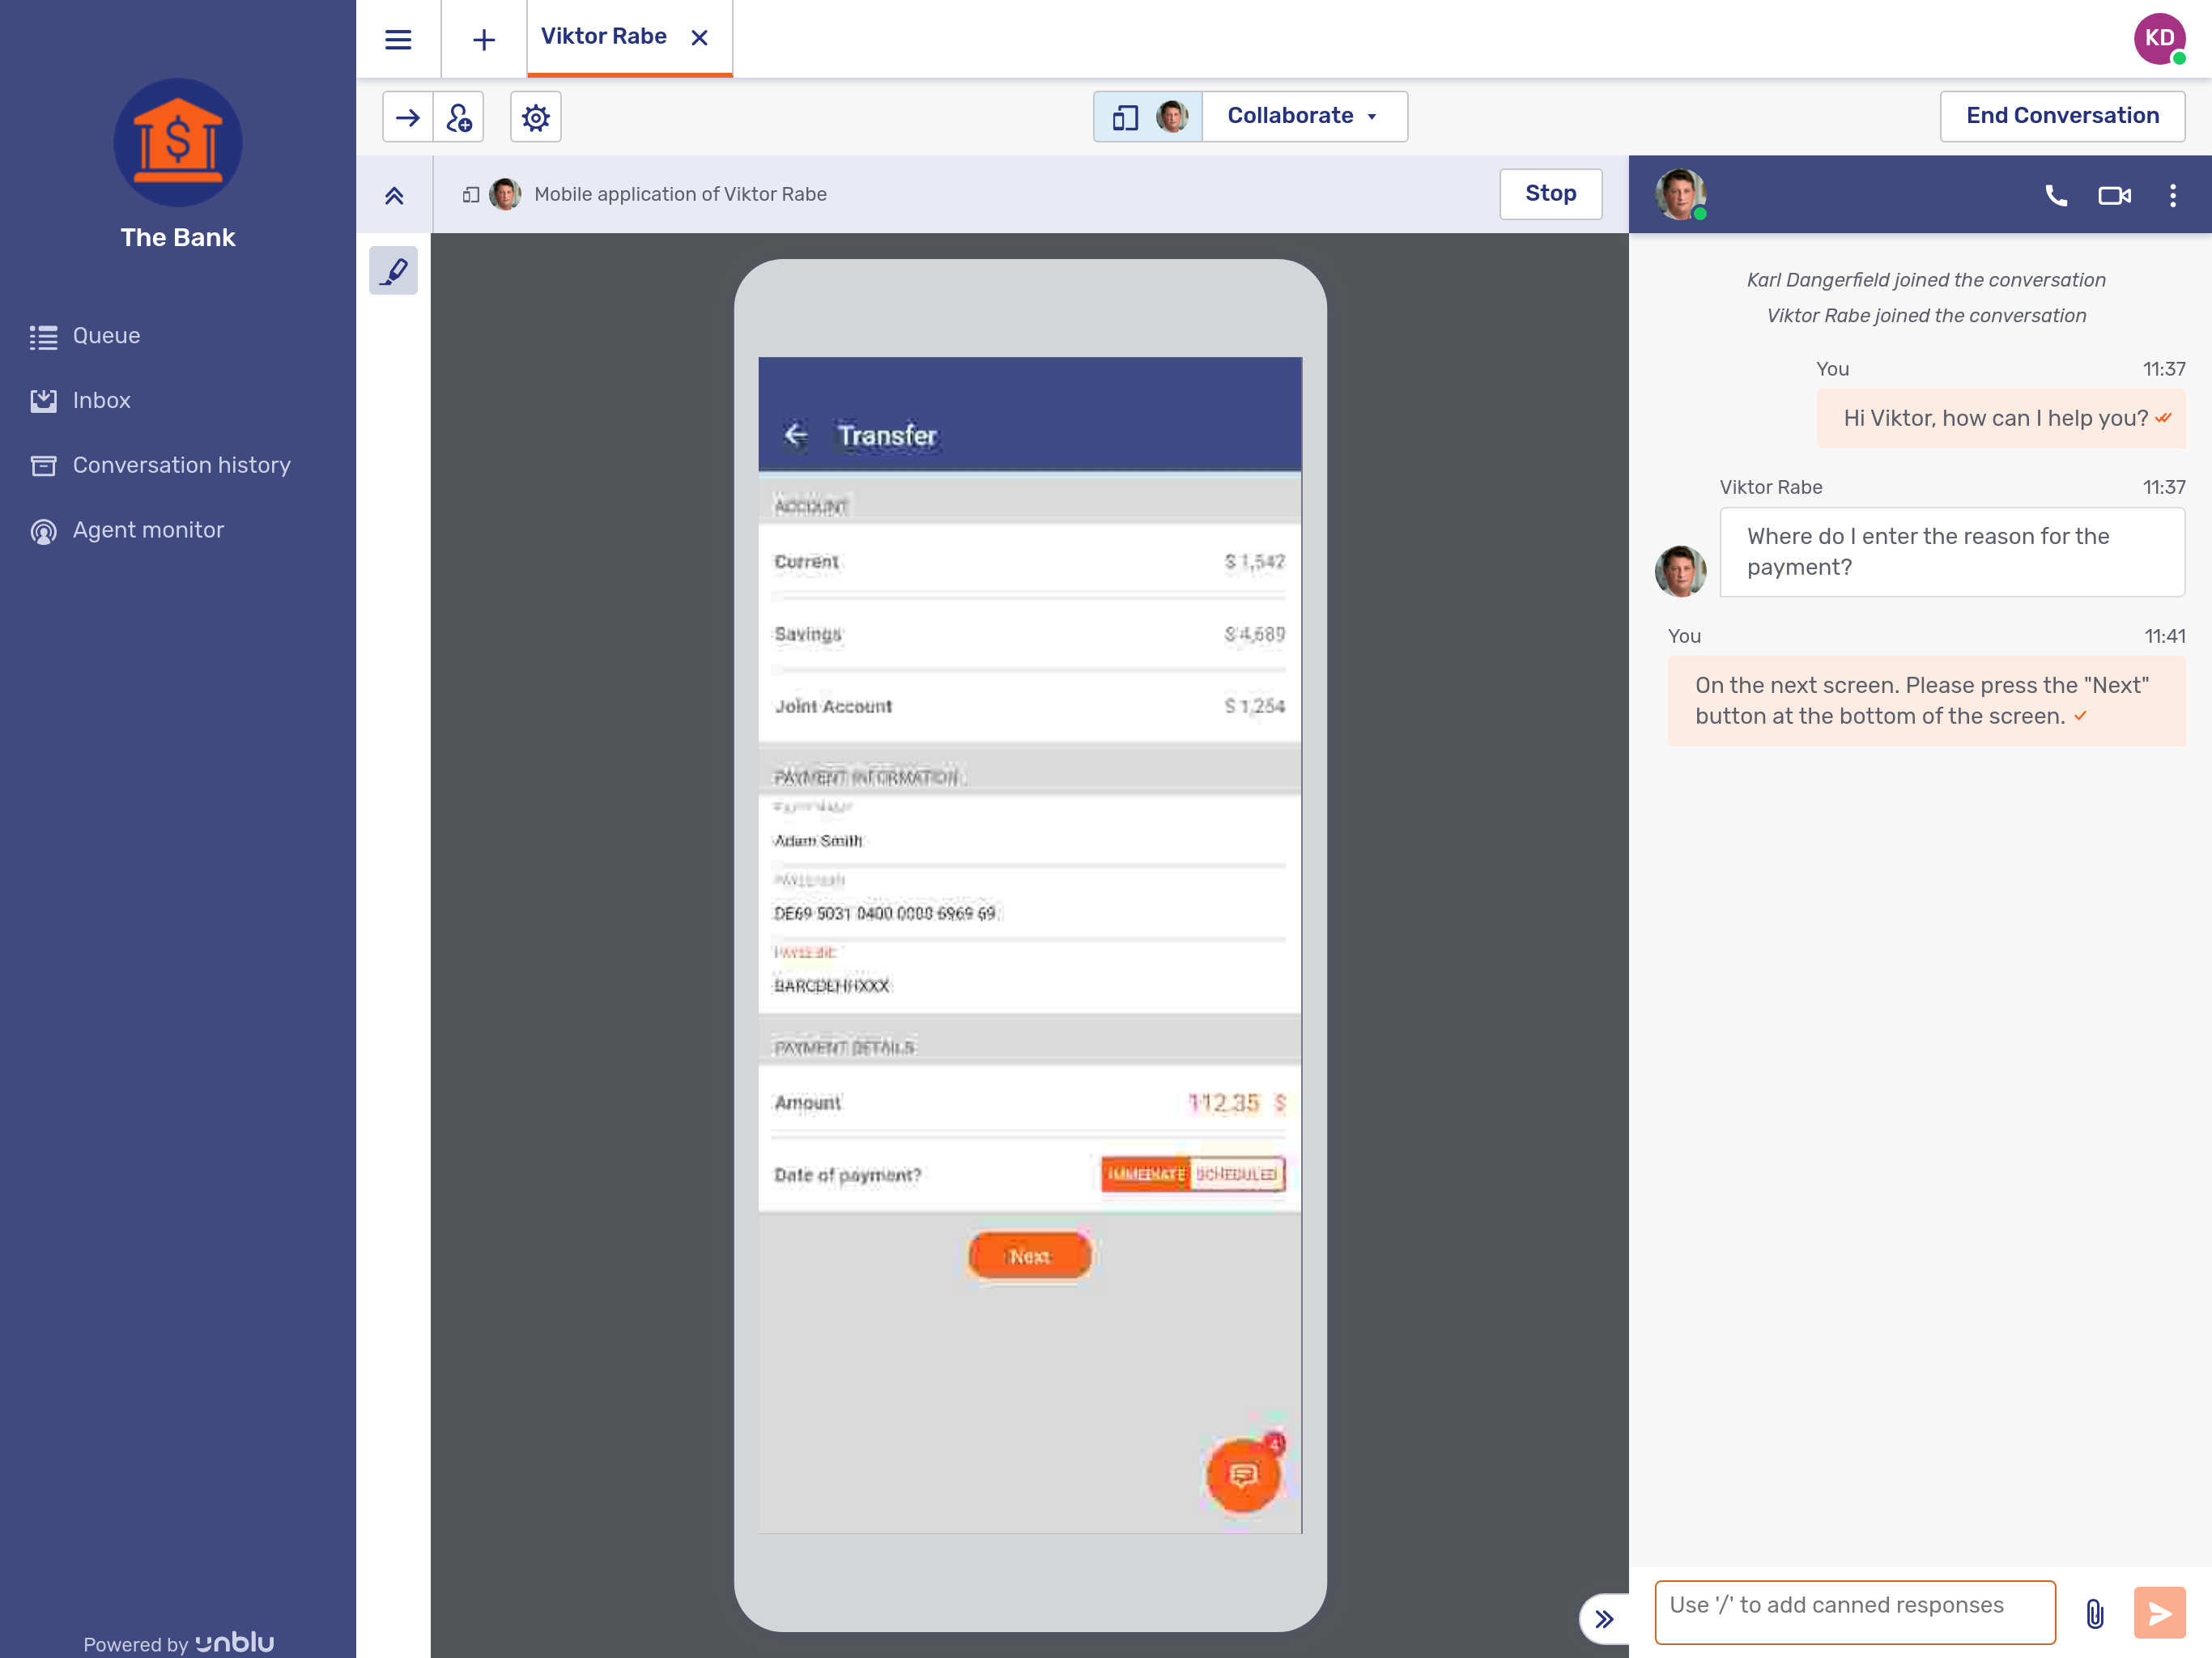
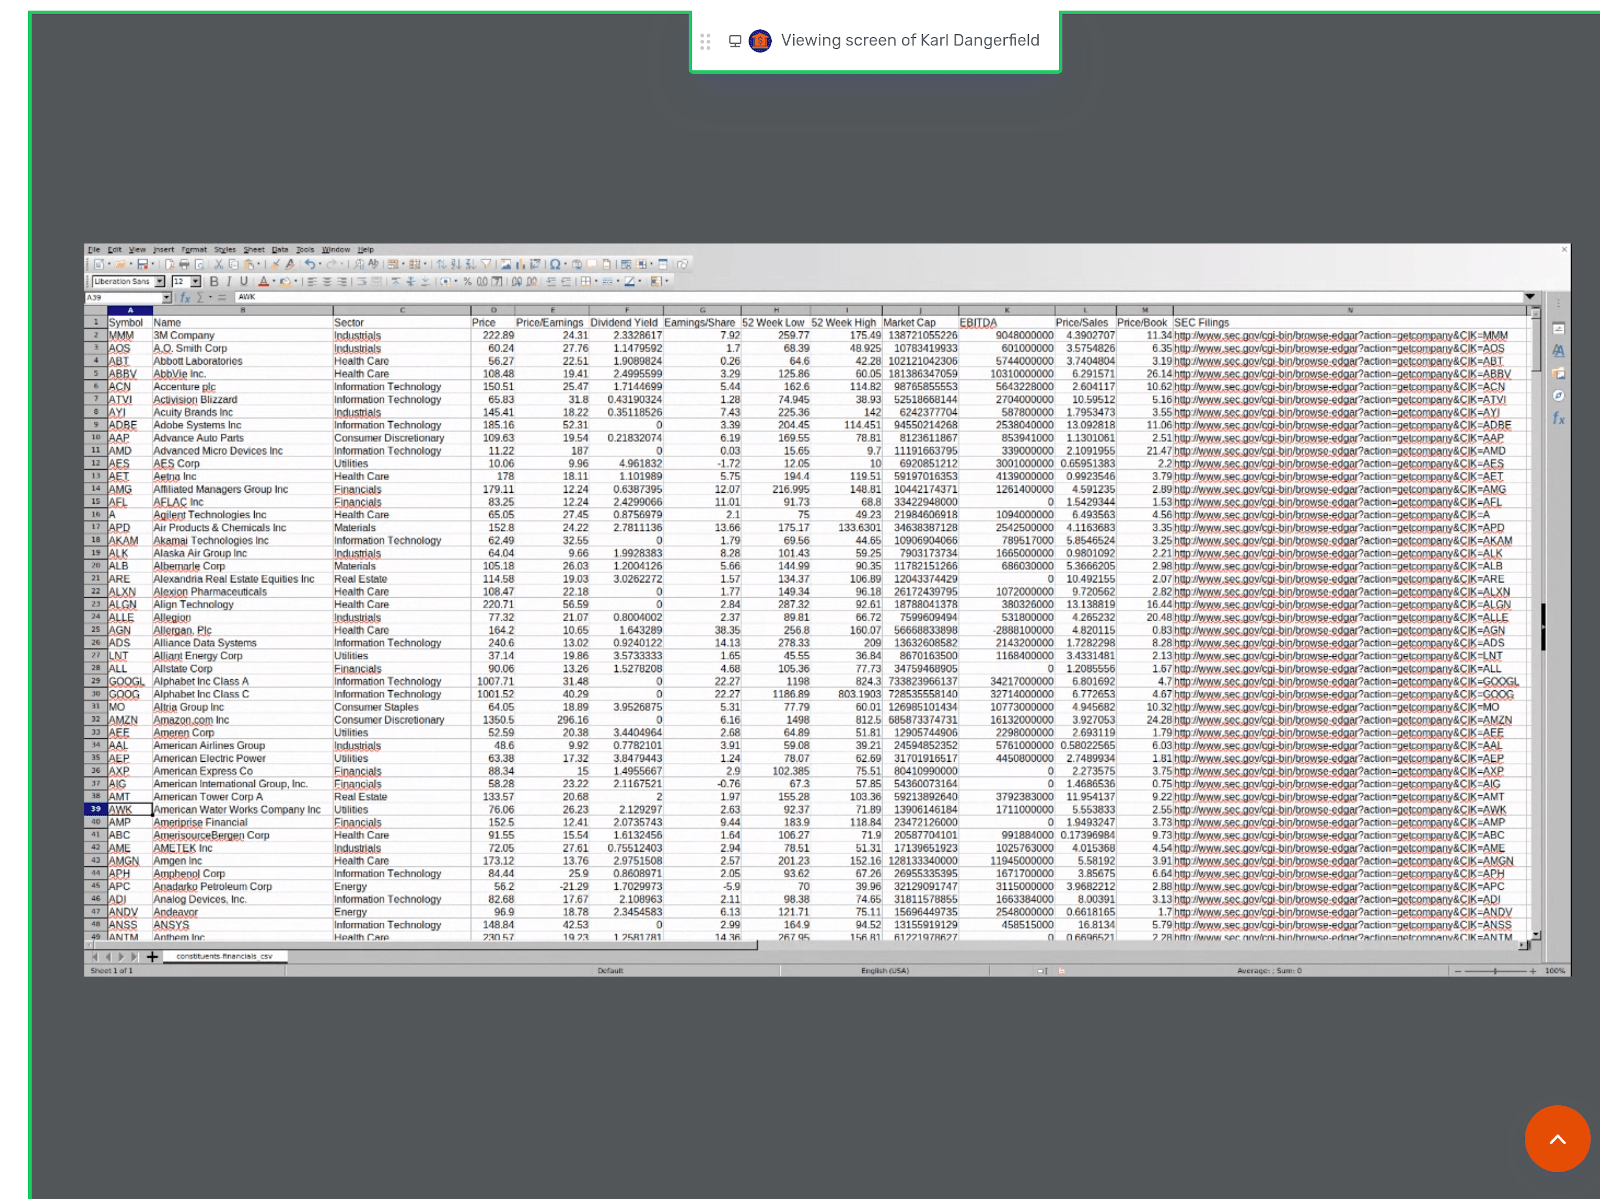
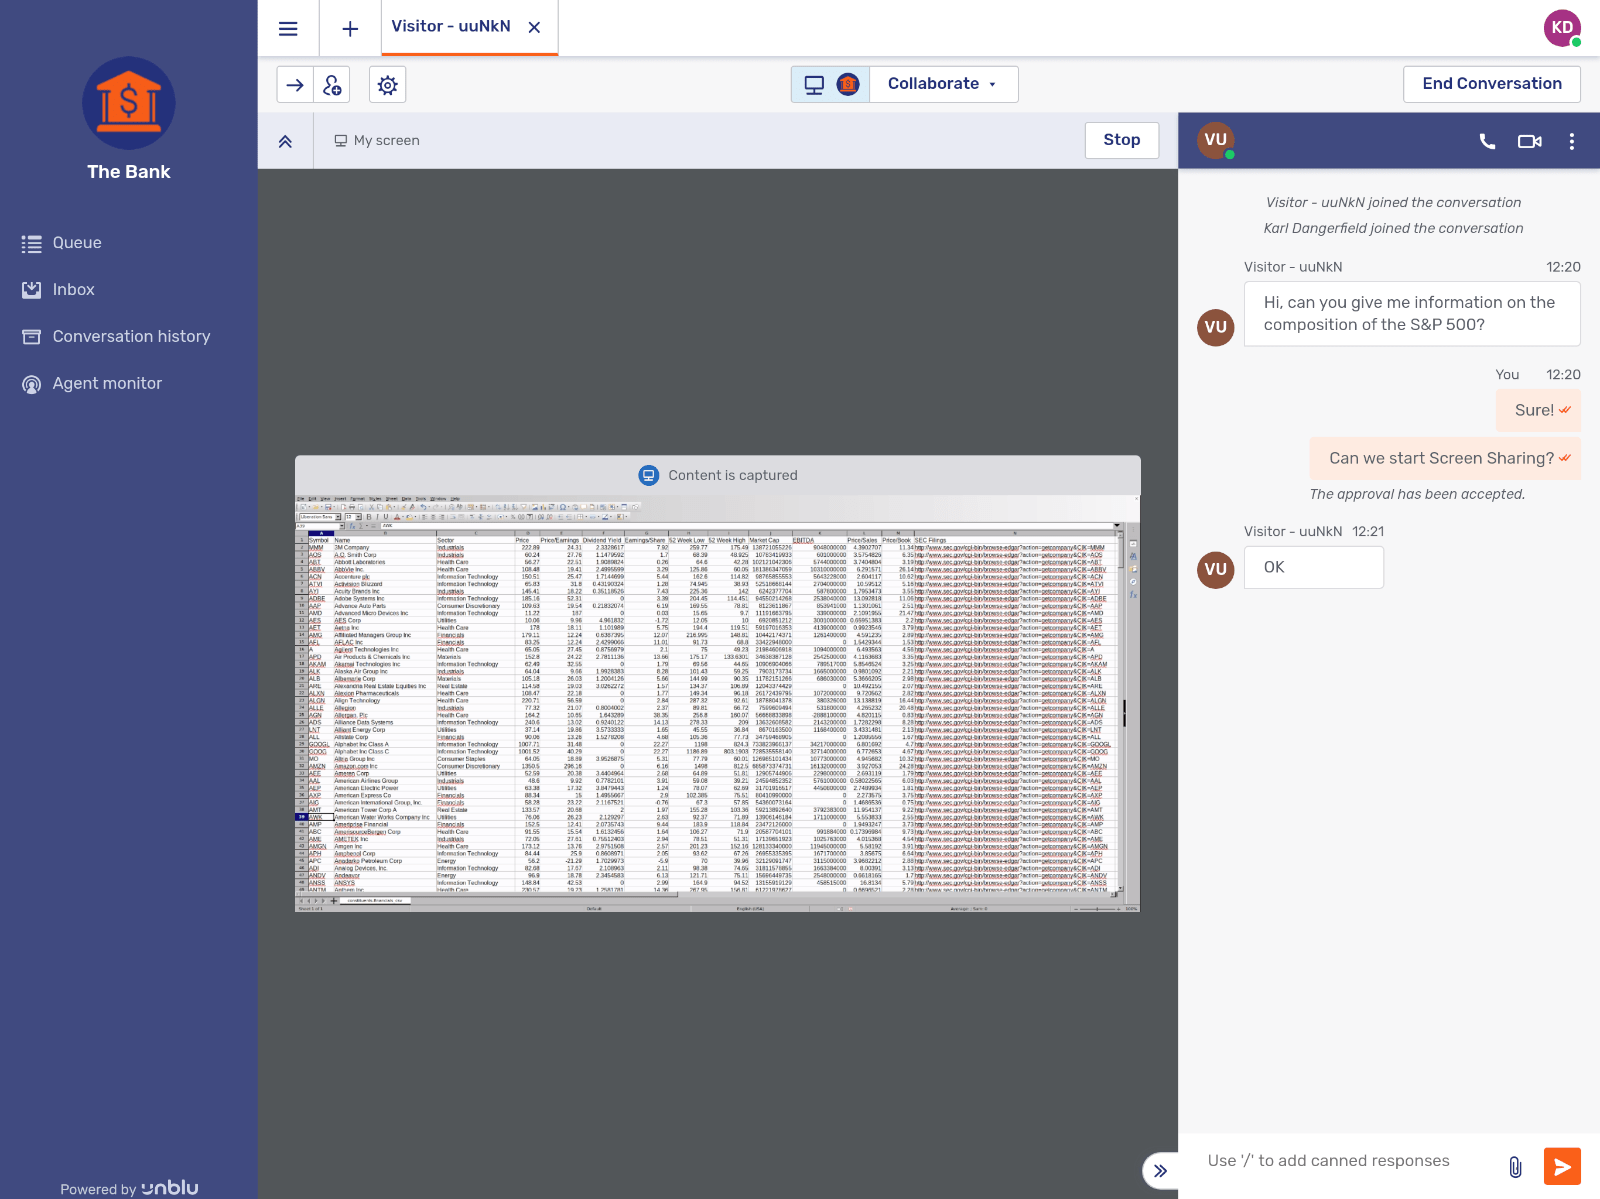
1.4.8. Screen sharing
Screen sharing allows your employees and visitors to collaborate using any application they want. They can choose to share their entire desktop or a single application such as Microsoft Excel.
The following pictures show a screen sharing session where an agent is sharing a spreadsheet application with a visitor.
Here is what the session looks like on the visitor’s side. The Individual UI has been minimized to show the entire collaboration layer:
This is what it looks like in the Agent Desk:
1.5. Basics
In this section we will discuss the basic concepts underlying the Unblu system and take a look at some of the key elements of the product.
1.5.1. Conversation
The central organizing concept within the Unblu system is that of the conversation. A conversation in Unblu refers to a communication/collaboration session between a visitor and an agent. A conversation may involve text chat, voice and video and co-browsing of websites and documents.
Depending on your specific use-case, a conversation may be short-lived, as between an anonymous website visitor and a support agent, or it may be long-running, as between a client and a trusted advisor. For more information see Conversations.
1.5.2. Visitor
In Unblu terminology visitor refers to any client, customer or potential customer that engages with your firm online. The term originates from the idea of a website visitor but we generalize this concept so that it can include:
-
Anonymous visitors to your public corporate site.
-
Signed-in users on your service site (for example, e-banking).
-
Clients with whom your representatives have long-running relationships.
1.5.2.1. Visitor interface
The point of contact with the visitor is called the visitor interface. The default and most commonly used one is the Individual UI web integration. This is a web component that comes out-of-the-box as part of Unblu. It is deployed by integrating its component code with your existing website. It can also be customized to suit your branding and the functionality you wish to expose.
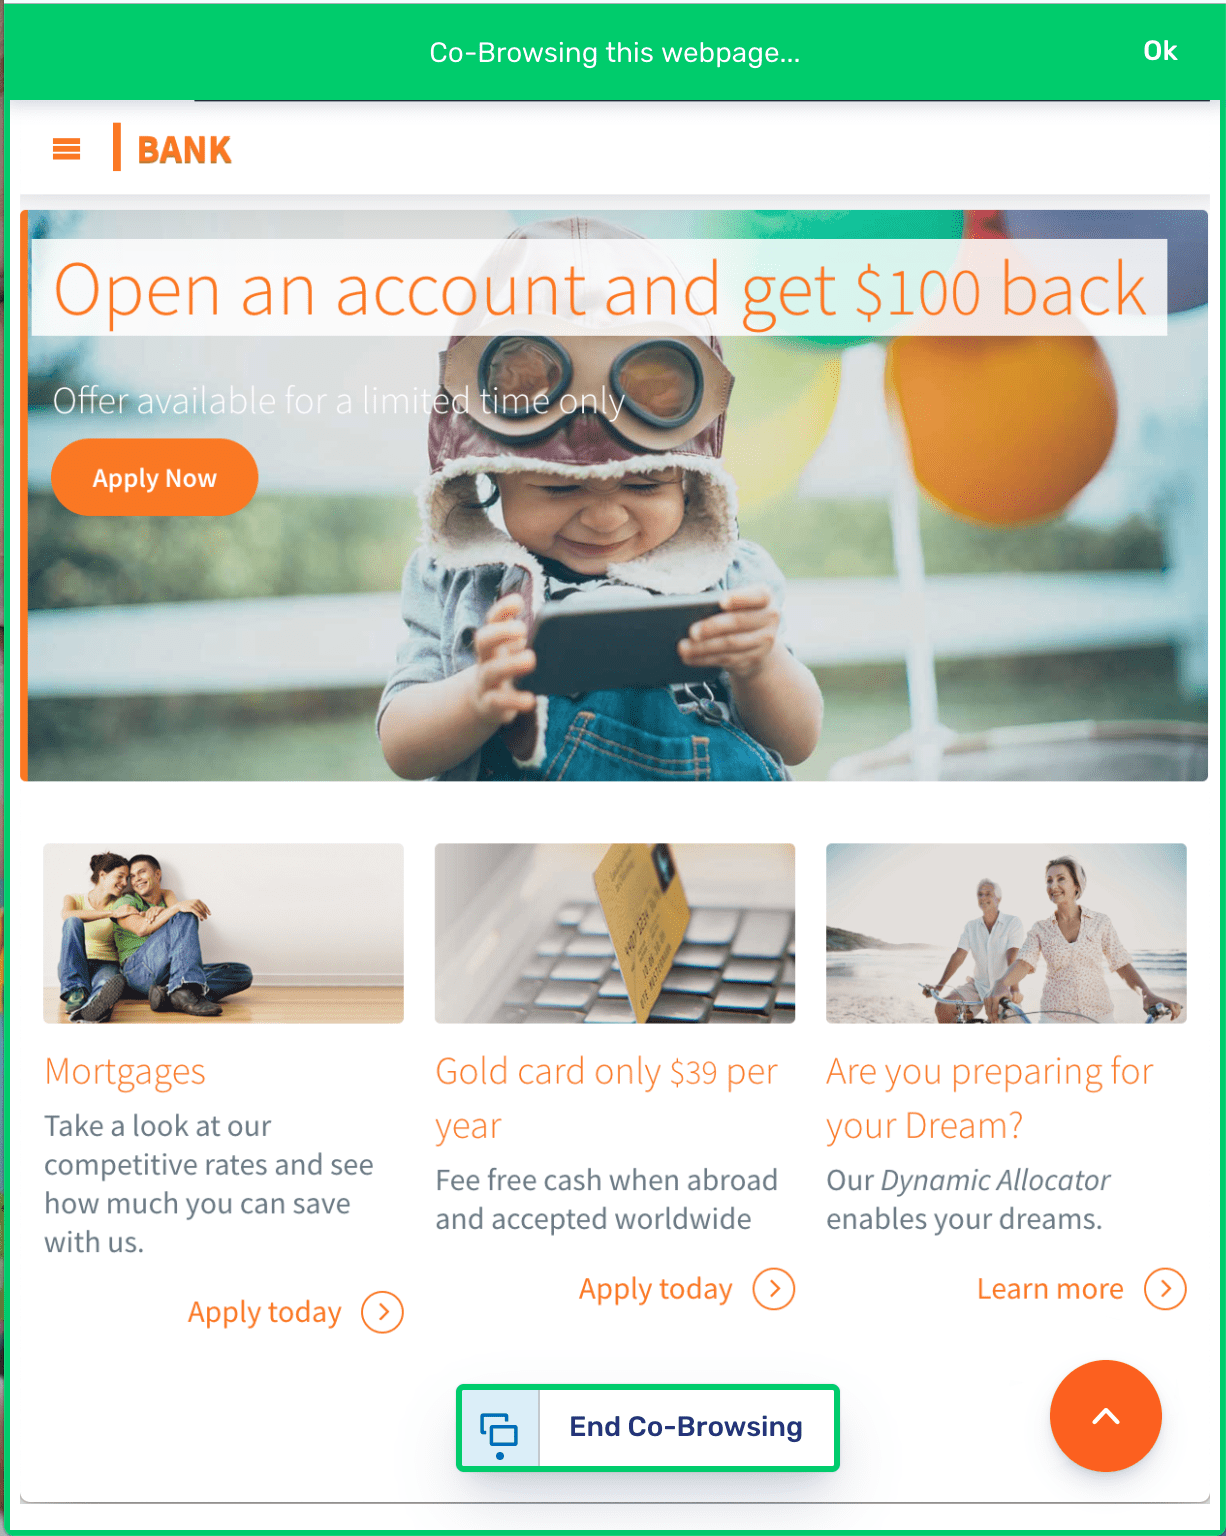
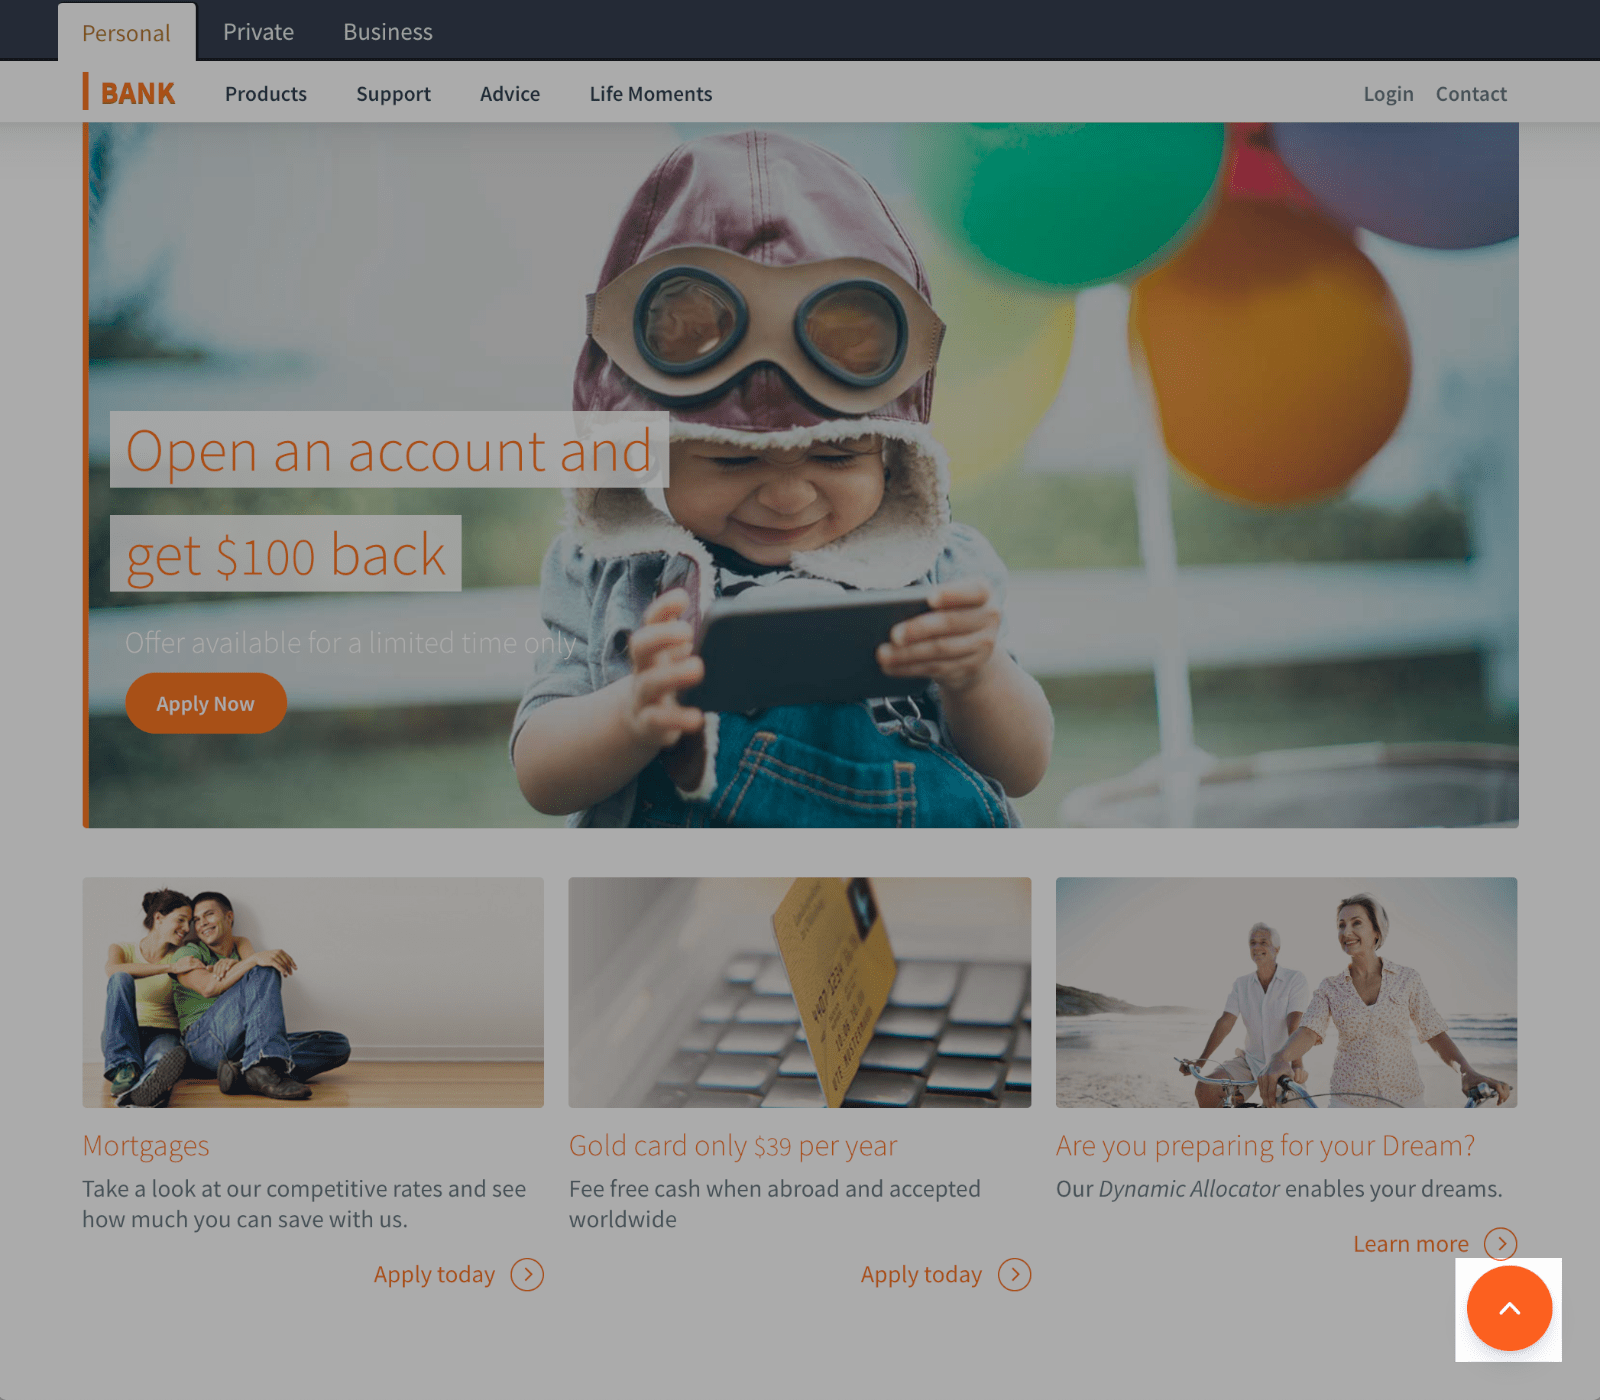
The screenshot below depicts an example of an Unblu-enabled site. Notice that the site includes a launcher button in the bottom right corner:
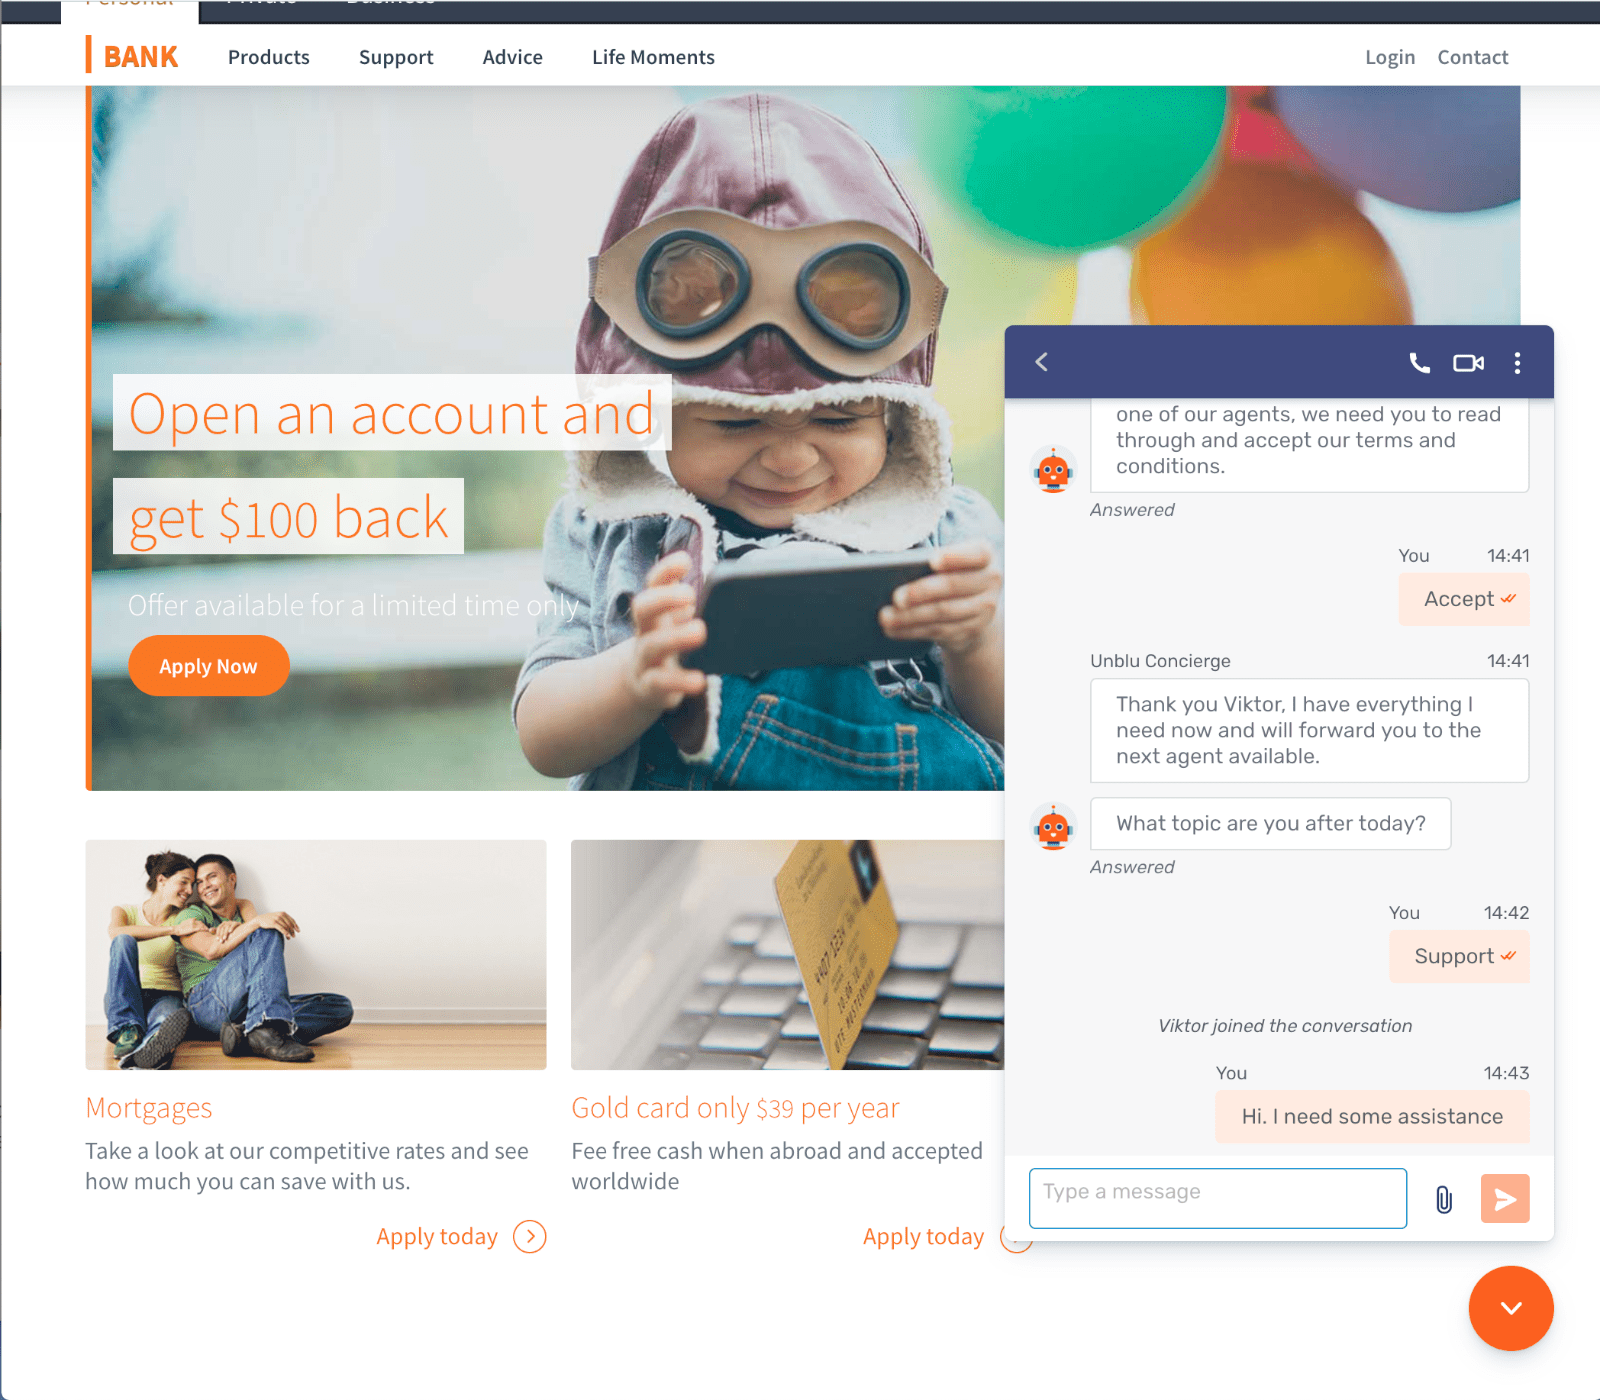
Clicking on the launcher button opens the Individual UI. From here the visitor can begin interacting with an agent at your firm. In this example we see the visitor using text chat to ask for assistance:
The Individual UI also supports video, voice and co-browsing. We will see how these work in later sections. In addition, Unblu also supports custom extensions to the Individual UI using the JavaScript API and custom mobile apps built with the Mobile SDK. See Front-end interfaces and integrations for more details.
1.5.3. Agent
The agent is the person who represents your firm and interacts with the visitor. This can be:
-
A help desk agent who assists website visitors on-demand.
-
An agent who engages with existing e-banking customers to provide information about products or processes at your institution.
-
A relationship manager who has an established relationship with a client and who periodically provides in-depth financial advice.
1.5.3.1. Agent Desk
The Agent Desk is the main interface that Unblu provides for agents. It is a conventional web app served by the Unblu server.
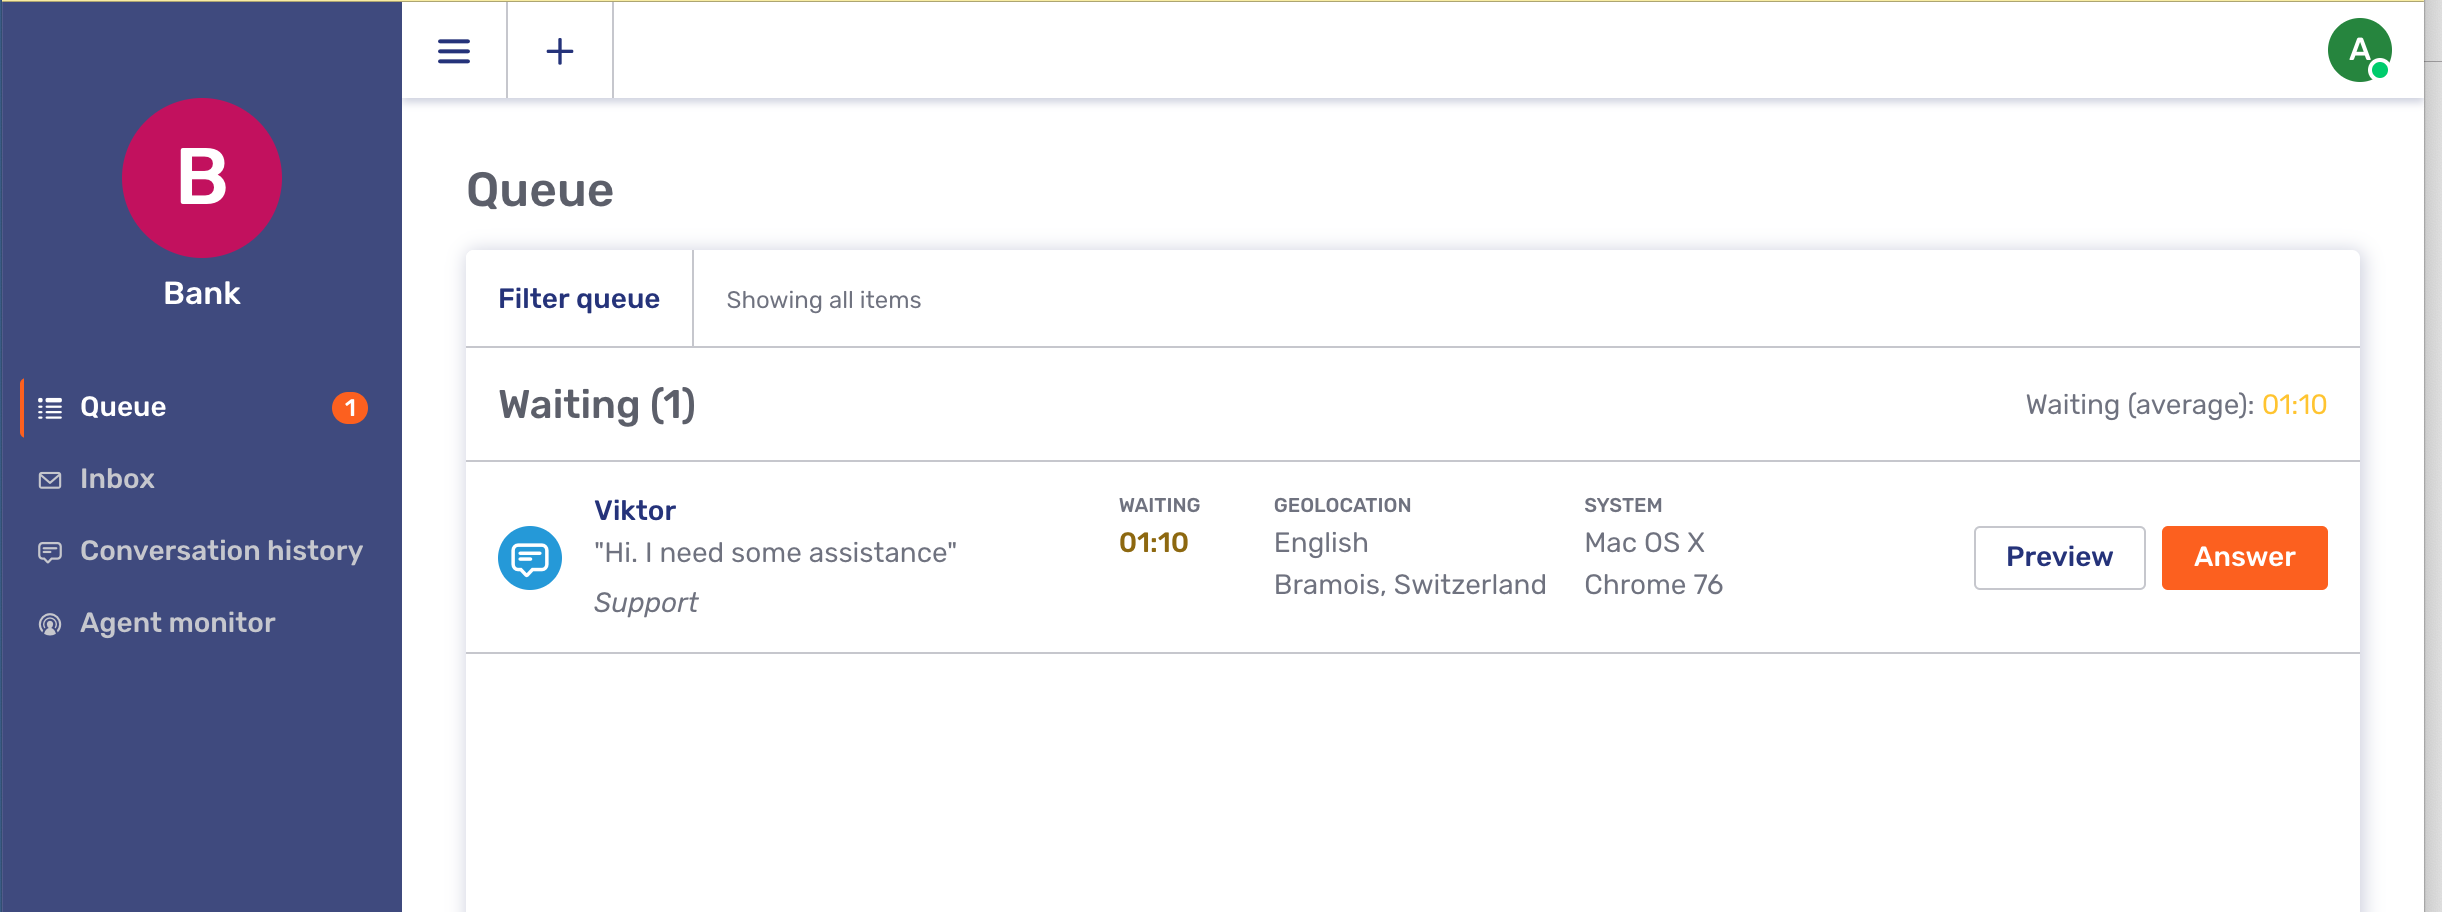
Here we see that the message from the visitor appears in the queue of the agent desk, to wait for an agent to pick it up.
An agent picks up the conversation from the queue and responds to the visitor.

Here we see a text chat interaction. The Agent Desk also supports video, voice and co-browsing.
In addition to the web-based Agent Desk, some agent-side tasks can be done via custom mobile apps built with the Mobile SDK. See also, Front-end interfaces and integrations.
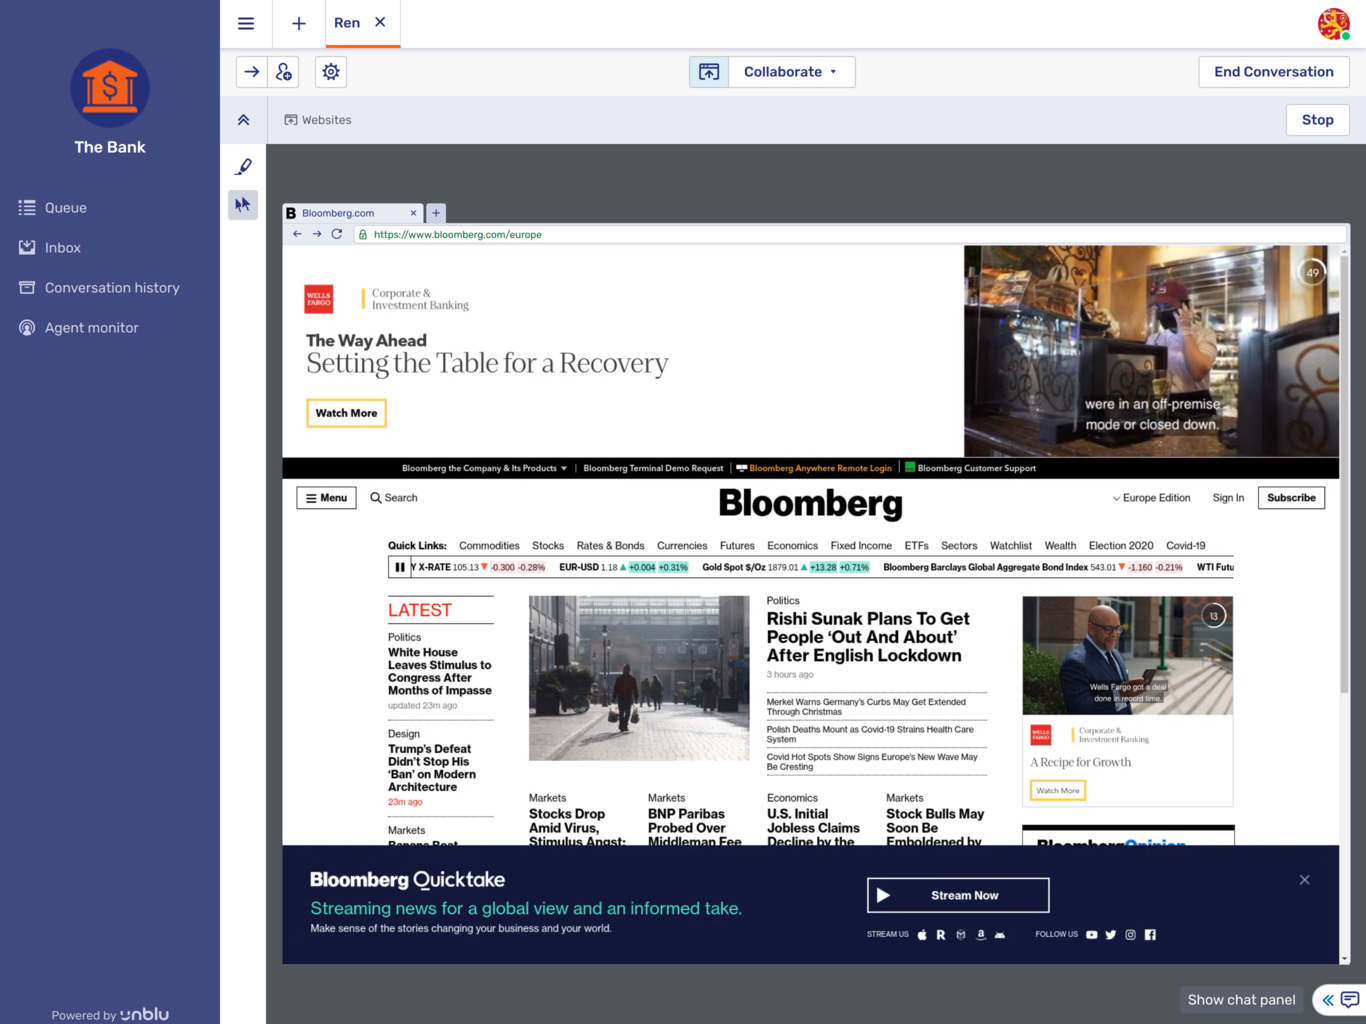
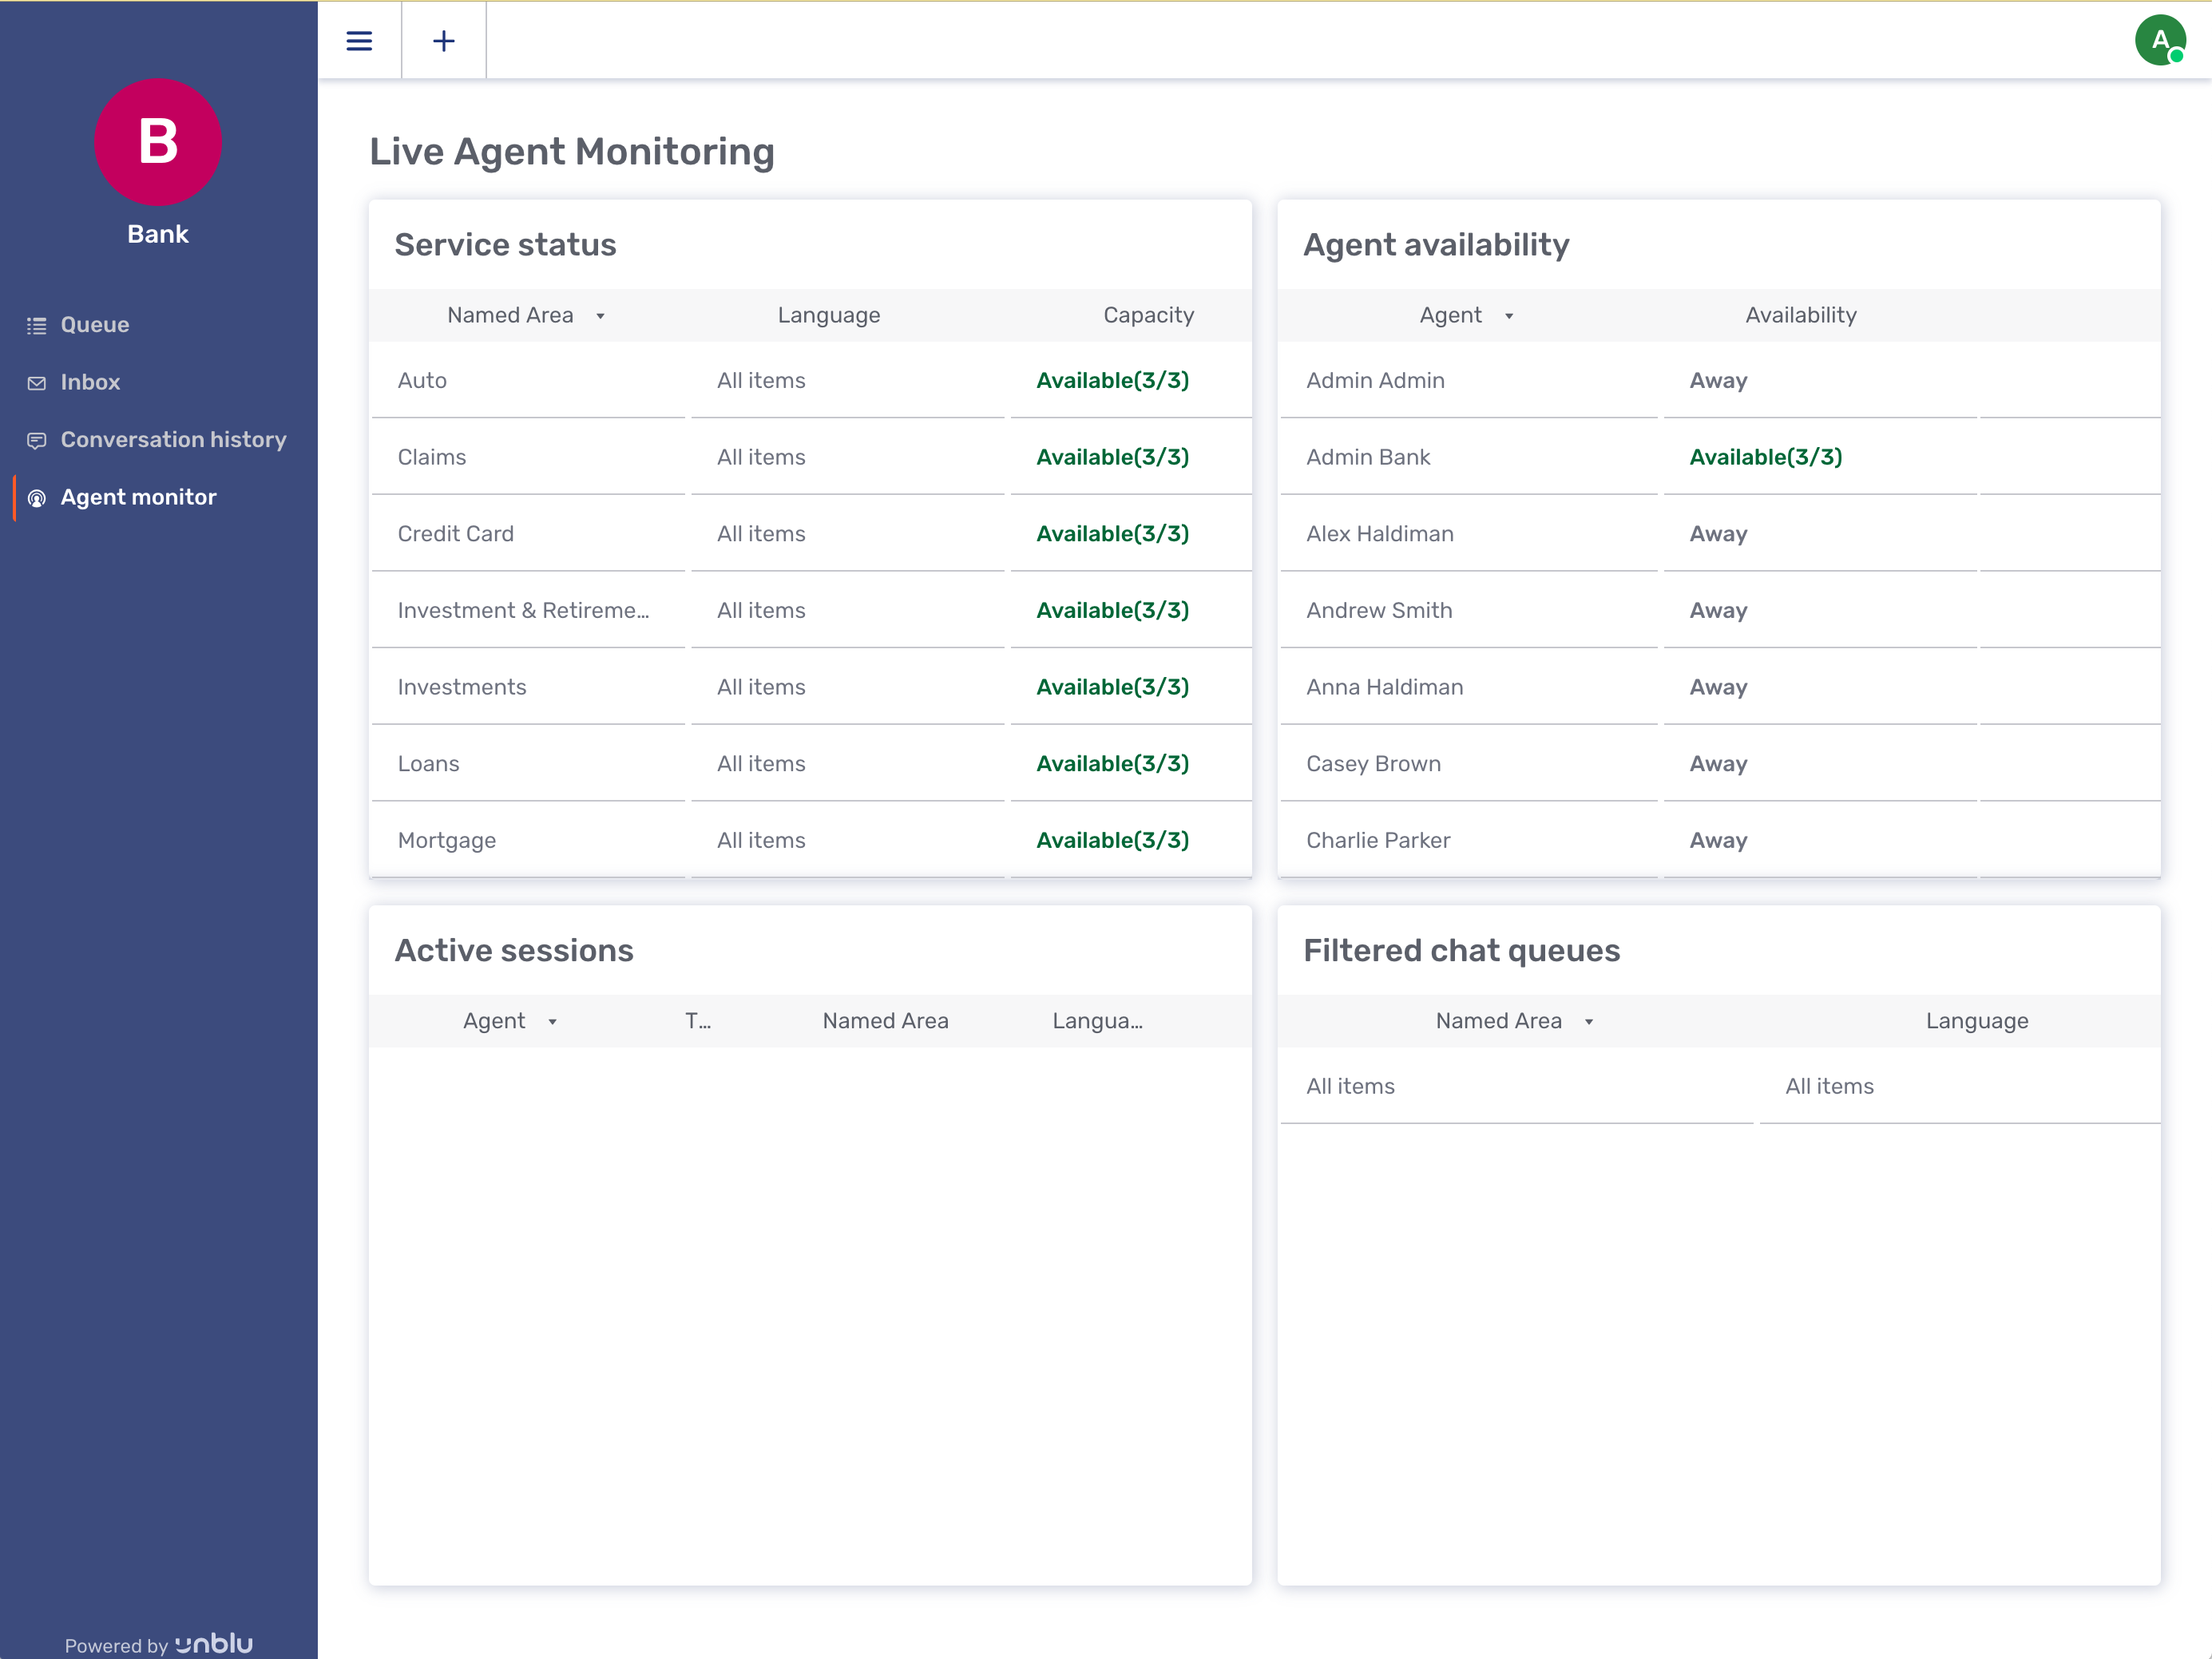
1.5.3.2. Teams and supervisors
Agents can be organized into teams with specific people designated as supervisors. Supervisors manage teams and allocate incoming requests to area specialists. Unblu provides specific interfaces for these functions. For example, here we see the Agent Monitor part of the Agent Desk:
1.5.3.3. Administrators and accounts
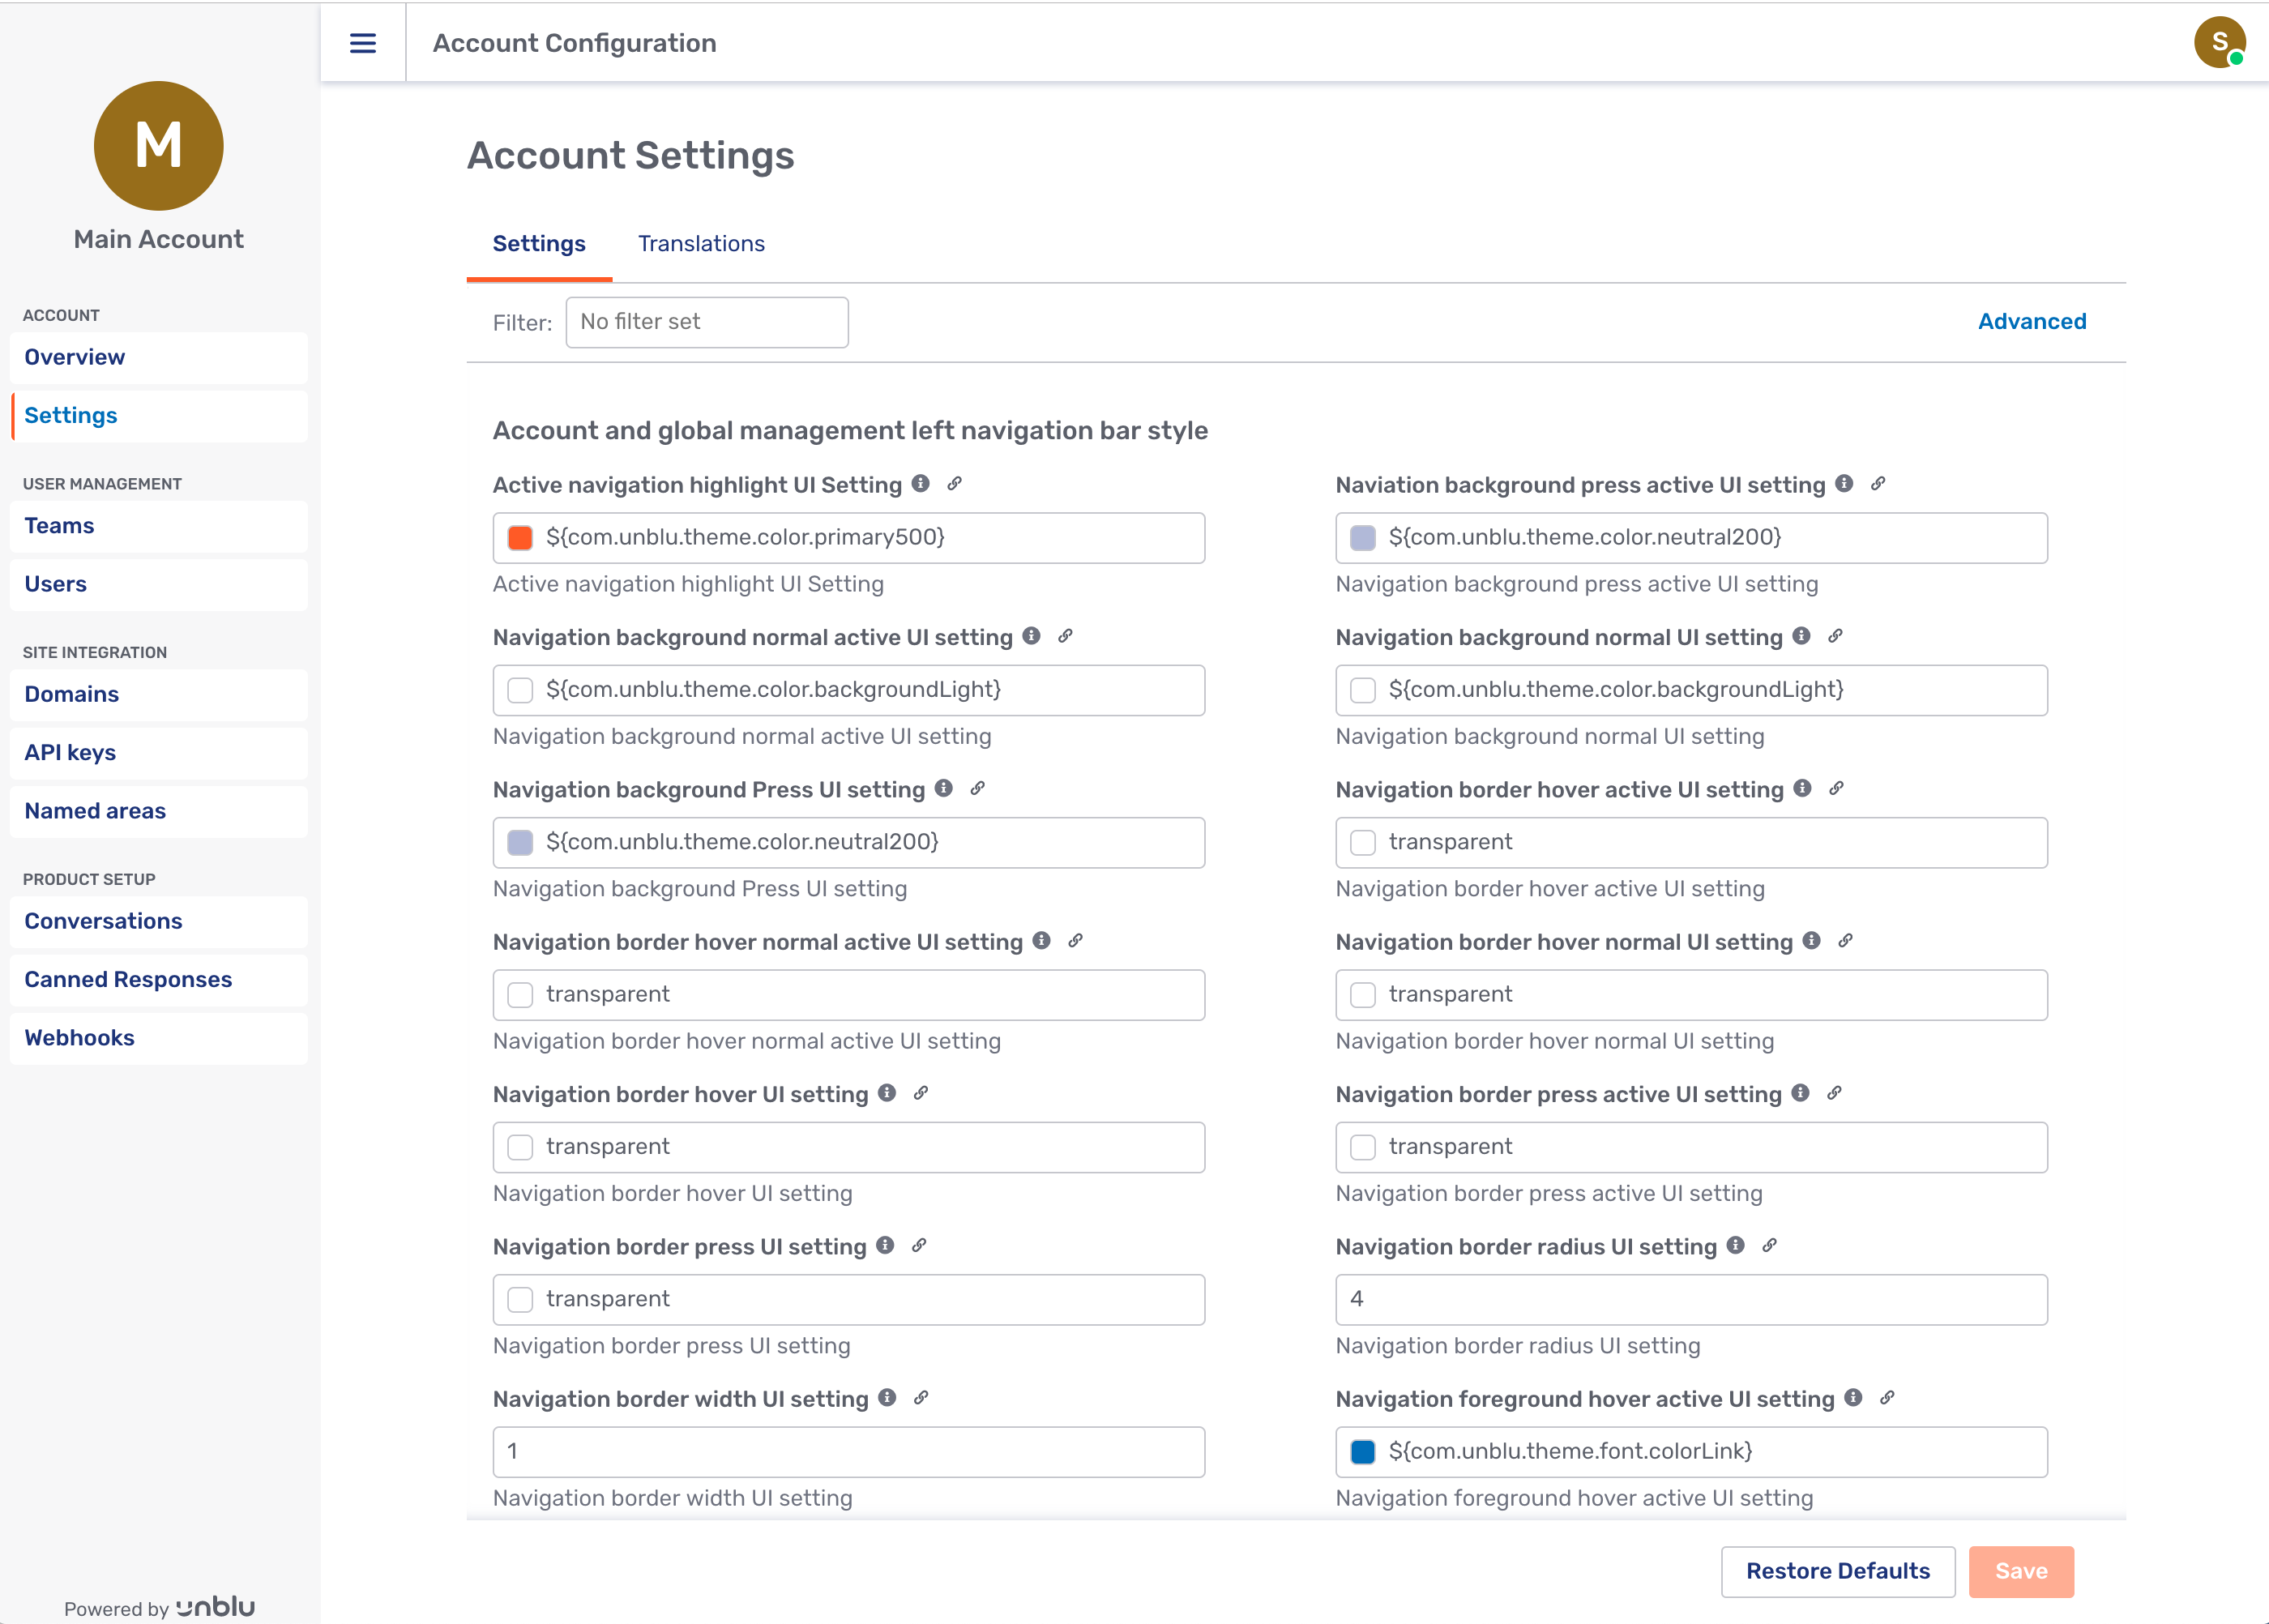
In addition to agents and supervisors, Unblu also defines the roles of administrator (or admin) and superadministrator (or superadmin).
A single Unblu installation can support multiple tenants or accounts. An admin is responsible for a single account and has rights to configure that account. A superadmin is responsible for the entire Unblu installation and has even more rights,relating to configuring and running the server as a whole.
Unblu provides interfaces for all of these configuration and administration tasks. (see Configuration). For example, here is the Account Settings page:
1.5.4. Text chat
Text Chat in Unblu refers to the text-based messaging between visitor and agent provided by the Unblu system itself. This medium of communication is used to support two distinct features of the Unblu product: Live Chat and Secure Messenger, which we will discuss in the next section.
1.5.5. Video & voice
Voice and Video refers to the real-time audio/video connection between visitor and agent provided by the Unblu system. In terms of product features, Video and Voice comprises a single feature of its own.
Unblu supports video & voice calls with up to six participants.
1.5.6. Co-browsing
Co-browsing refers to the functionality that enables visitors and agents to simultaneously view the same web page or electronic document. This category comprises three distinct product features:
- Embedded co-browsing
-
Enables the visitor to share with the agent the Unblu-enabled page that they are on.
- Universal co-browsing
-
Enables the visitor or agent to share and simultaneously view a third-party website (not Unblu-enabled).
- Document co-browsing
-
Enables the visitor or agent to share and simultaneously view an electronic document.
1.6. Technical capabilities
In this section we will explore the key technical capabilities of Unblu that support the various product features. Often a single technical capability supports more than one feature, depending on how it is configured. The capabilities are:
-
Text chat
-
Video call
-
DOM-capture co-browsing
-
Rendered co-browsing
Note that these capabilities are defined in terms of the technologies used to implement them and do not align precisely with the set of Unblu product features as seen from a business user’s perspective. Later we will see how the product features are constructed from the technical capabilities. here we examine the capabilities themselves.
1.6.1. Text chat
Text chat refers to the text messaging functionality of Unblu that provides real-time text communication between visitor and agent. Most commonly the visitor would chat using the standard visitor interface while the agent uses the agent desk. In other cases either or both parties might use mobile apps or the visitor might use an external messenger service. In all these cases the same basic text chat functionality is leveraged.
The text chat capability is employed as part of the product features Live Chat and Secure Messenger.
1.6.2. Video call
Video call refers to the real-time audio/video communications capability of Unblu. In the most common case, visitors engage in the video call via the standard visitor interface, and agents use the Agent Desk. In other cases either or both parties might use mobile apps. In all these cases the same basic video call functionality is leveraged. This capability uses the external service Vonage Video API (formerly TokBox) to provide the audio/video link.
Unblu supports video calls with up to six participants.
The video call capability is a distinct product feature called Video & Voice.
1.6.3. DOM capture co-browsing
DOM capture co-browsing refers to the capability that allows visitors to co-browse on an Unblu-enabled website, sharing their view of the site with an agent. This technology mirrors the visitor webpage by employing Javascript code that copies the structure of the page’s document object model, and other context information, and transmits it to the agent browser where it is reconstructed.
DOM capture co-browsing technology is used as part of Unblu’s embedded co-browsing feature.
DOM capturing only works on web pages that have been instrumented with Unblu. It therefore only works on the website of the Unblu customer. To support co-browsing of any third-party website requires rendered co-browsing.
1.6.4. Rendered co-browsing
Rendered co-browsing refers to a technique for providing co-browsing of third-party websites and documents by visitor and agent. It works by rendering the website or document in a browser running on the Unblu server in headless mode The Unblu server streams the resulting video to both visitors' and agents' browsers simultaneously. The browser instance on the server is called headless because it is a process without a user interface. A separate headless browser instance is required for each visitor-agent co-browsing session. The part of the server responsible for spawning and managing the headless browsers is called the rendering service.
This technology is used for two product features: Universal Co-browsing and Document Co-browsing.
See also: Rendering service and Rendered co-browsing.
2. Architecture
2.1. Overview
The details of your Unblu setup will differ depending on which deployment model and which optional elements you choose. However, the underlying architecture of the system is essentially the same across all variants.
In this section we will explain this common architecture at an abstract level and then examine how it is actually implemented for each deployment model and how the various optional pieces fit in.
2.2. Elements of the system
An Unblu installation can be divided into the following principal components:
-
Unblu server
-
Rendering service
-
Database
-
External services
-
Front end interfaces and integrations
-
Back end integrations
The following diagram shows how these pieces fit together:

2.2.1. Unblu server
This is the main server component. It performs the following major functions:
-
User authentication and authorization
-
Managing the communication between the visitor interface and the agent desk via chat, video and voice.
-
Managing embedded co-browsing.
-
Mediating universal and document co-browsing.
-
Managing the configuration settings.
-
Serving the web-based agent desk and admin interface.
-
Providing client and server integration APIs
The specifics of the Unblu server setup depend on the deployment model. For details see Unblu server.
2.2.2. Rendering service
The rendering service is required for universal co-browsing and document co-browsing. If universal or document co-browsing are not licensed, then this component will not be present. The rendering service works by spawning a headless browser instance for each co-browsing session and then streaming the visual rendering of the webpage or document simultaneously to both agent and visitor. See Rendering service.
2.2.3. Database
The database holds all the persistent data needed by the Unblu server including conversation history and other system state. See Database.
2.2.4. External system components
To support some features (video/voice, universal and document co-browsing) Unblu relies on two additional components: TokBox and the TURN server. These are external cloud services to which the Unblu Server connects. They do not reside on your infrastructure. See External components.
2.2.5. Front-end interfaces and integrations
The Unblu front end includes multiple types of interfaces and integration points for both visitors and agents. They include:
-
Interfaces that are already built-in to the product: Agent Desk, Visitor Desk, Admin Interface, Config Interface.
-
Pre-built components that require integration: Visitor Individual UI.
-
APIs and SDKs for building your interfaces: JS API, Visitor and Agent Mobile SDK, External Messenger API.
See Front-end and back-end integration for more details.
2.2.6. Back-end integrations
Unblu also supports custom integrations on the back end using the Web API and Webhooks as well as chatbot integration using the Bot API. See Web API and webhooks.
2.3. Deployment models
Unblu supports four different deployment models:
-
Unblu Financial Cloud service
-
On-premises cluster
-
On-premises application server
-
Standalone on local machine
2.3.1. Unblu Financial Cloud
The Unblu Financial Cloud is Unblu’s cloud service offering. With this service, you receive an account as a tenant on an Unblu system running on our own infrastructure in a secure data center in Switzerland. Under the hood, the Unblu Financial Cloud setup is a clustered deployment similar to one that a customer might have on-premises (see below), except that all management and maintenance of the system is handled by Unblu.
2.3.1.1. Getting started with the Unblu Financial Cloud
The Unblu delivery team can help get you up and running on the Unblu Financial Cloud. For details see Unblu Financial Cloud onboarding.
2.3.2. On-premises cluster
In this model, the Unblu system is installed on your in-house Kubernetes or OpenShift cluster and managed by your company.
| For Unblu 5 and later, cluster deployment is the recommended on-premises deployment model. The application server deployment model that was used for previous versions (see below) is still functional in Unblu 5 and later, but is deprecated. See Recommendations. |
2.3.2.1. Kubernetes and OpenShift
Unblu supports all recent versions of the open-source Kubernetes cluster orchestration system as well as the commercial OpenShift variant of Kubernetes. All references to Kubernetes therefore apply to OpenShift as well. Where differences exist, these are noted.
2.3.2.2. About Kubernetes
Kubernetes is a cluster orchestration system designed to simplify the deployment of applications across multiple machines in a cluster. To do this a number of abstractions are employed to insulate the Kubernetes user from the details of the implementation. A quick review of these may help with later discussion of how the Unblu cluster works.
- Node
-
The abstraction representing the physical machine (i.e. a computer). In practice a node may be either a real physical machine or a virtual machine. From the Kubernetes point of view, this distinction is hidden by the abstraction. Nodes are building blocks of the cluster in the sense that a "cluster" is so-called because it is a cluster (an interconnected group) of nodes.
- Container
-
A lightweight environment for isolating running processes within a single physical or virtual machine. Kubernetes uses container technology (like Docker, for example) to organize the running processes in the cluster.
- Pod
-
The essential abstraction used within Kubernetes to enable scalability. A pod is a component that holds one or more containers and constitutes the unit which can be replicated to scale up performance within a cluster. Applications are written to be deployed within pods so that multiple replicas of a pod can be spawned to increase computing power. When more performance is needed the Kubernetes admin can increase the number of pods and Kubernetes takes care of spreading these running processes across the available compute nodes.
2.3.2.3. Cluster system overview
The following diagram gives an overview of the organization of an on-premises cluster deployment:

2.3.2.4. Getting started with on-premises cluster
The installation of Unblu on a Kubernetes cluster requires that you get access to the install scripts from the Unblu delivery team. For details see Cluster deployment.
2.3.3. On-premises application server
In this model the Unblu server is deployed on a Java application server (like Tomcat) using your own infrastructure, managed by your company. Additionally, the rendering service (if present) runs on a Docker engine, either on the same machine or a separate one.
This is the legacy deployment model for pre-Unblu 5. For Unblu 5 and later this model is available but not recommended.
The following diagram gives an overview of the organization of an on-premises application server deployment:

2.3.3.1. Getting started with on-premises application server
The installation of Unblu on an application server requires the deployment of the Unblu WAR file, which is available from the Unblu delivery team. For details see Application server deployment.
2.3.4. Standalone deployment
The standalone deployment allows you to install an Unblu server quickly to your local machine. This can be useful in a number of scenarios including, testing, demos or development.
2.3.4.1. Getting started with standalone deployment
To install Unblu in standalone mode you will use the same WAR file as is used in application server deployment. In this case, however, the file doubles as an executable JAR file. When run it unpacks itself and deploys Unblu into an embedded application server. For details see Standalone deployment.
2.4. Unblu server
The Unblu Server is the central component of the Unblu installation. It manages company and user accounts, coordinates all communication (text chat, video, voice), manages co-browsing, serves the agent desk and admin web interfaces, and provides the connection points for API integrations.
2.4.1. Differences across deployment models
The details of the Unblu Server architecture depend on whether your installation is a cluster deployment or an application server deployment. For general information on these this topic see Deployment models. Here we will cover the specifics of how the Unblu server differs across the models.
2.4.1.1. Cluster architecture
In the earlier, more abstract depiction (Basic System Components) the Unblu server appears as a single component. In the diagram below we see that in a cluster deployment it is composed of a number of separate entities within the cluster.

Unblu uses the Kubernetes cluster orchestration system. Both Kubernetes itself and the OpenShift variant of Kubernetes are supported. In this system components are deployed in units called pods. Components that require modest resources typically may consist of a single pod while components that require more computing resource can be deployed as multiple replicas of a pod. Some components consist of a fixed number of replicas. Others can be scaled by adding additional replicas as needed.
The Unblu Server consist of the following components, each deployed in one or more pods.
2.4.1.1.1. Unblu server components
- Collaboration Server
-
The core of the Unblu server functionality. This component typically consists of two or more pods.
This component can be scaled by allocating more pods. This ability to increase capacity on demand is one of the key reasons that the cluster model is recommended over the application server model (the other reason is the similar ability to scale the Rendering service). - Kafka
-
A data streaming and messaging platform that is used to synchronize across the multiple Unblu server core pods in the cluster. The Kafka component is always composed of three pods. See Kafka.
- Zookeeper
-
A system for sharing configuration data across the individual Unblu server pods. The Zookeeper component is always composed of three pods. See Zookeeper.
- Prometheus
-
A metrics collection and alerting system that is used to monitor the cluster. It typically occupies a single pod in the cluster. See Prometheus.
- Grafana
-
Grafana provides visualization of the metrics collected by Prometheus. It typically occupies a single pod in the cluster. See Grafana.
- Alert manager
-
Provides alerts to an external observation service to enable tracking of server behavior. It typically occupies a single pod in the cluster.
- Kubernetes Ingress (OpenShift Route)
-
Incoming requests from agent or visitor web clients are handled by a load balancer which then distributes the request among the Unblu server pods. This component can also be configured to act as a cache. The load balancer and cache can be either external to the cluster or deployed as one or more pod within the cluster.
- Proxy
-
This component provides the SecureFlow Manager with access to upload resources from your Unblu enabled website. It typically consists of one pod.
2.4.1.2. Application server architecture
In the earlier, more abstract depiction (Basic System Components) the Unblu server appears as a single component. In the diagram below we see that in an application server deployment it is implemented as a Unblu server component running within an application server.

Unblu supports most standard Java application servers (Tomcat, JBoss/WildFly, Jetty, GlassFish, Oracle WebLogic, IBM WebSphere, etc.). For more details see Deployment models.
2.5. Rendering service
The rendering service is used to support the universal and document co-browsing features. If your installation does not support one or both of these features, the rendering service will not be present.
When a visitor and agent start a universal or document co-browsing session, the rendering service creates a dedicated headless browser instance (i.e., a browser without a visible user interface shell) for that session. The browser process is used to produce a video rendering of the target document or website which is then streamed to both visitor and agent. One such headless browser instance is spawned for each individual visitor-agent co-browsing session.
2.5.1. Differences across deployment models
The details of the rendering service architecture depend on whether your installation is a cluster deployment or an application server deployment. For general information on this topic see Deployment models. Here we will cover the specifics of how the Unblu server differs across the models.
2.5.1.1. Cluster model
In the cluster model each headless browser instance is run within a separate a Kubernetes pod. As more sessions are started more pods are deployed. The Kubernetes system allocates the pods appropriately across the cluster automatically, spreading the processing load across the available compute resources.
If a customer finds that the rendering service is hitting resource limits regularly, additional compute nodes can be added to the cluster easily. One key advantage of the clustering model over the application server model with respect to the rendering service is precisely this ability to scale the capacity of the system horizontally. This is one of the reasons that the cluster deployment is the recommended setup for Unblu.
In the earlier diagram (Basic System Components) the rendering service appears as a single component. In the diagram below we see that in a cluster deployment it is composed of a number of separate pods, each running a single browser in headless mode.

2.5.1.2. Application server model
In the application server model the rendering service spawns each headless browser in a dedicated Docker container running on a Docker Engine on the same machine as the Unblu server running in the application server. As more sessions are started more containers are deployed within the Docker Engine.
If a customer finds that the rendering service is hitting resource limits regularly, the server can be scaled vertically (i.e., more memory and disk space can be added) but unlike the clustering case, horizontal scaling is not possible. This is one of the disadvantages of the application server model in comparison to the clustering model and one of the reasons that cluster deployment is the recommended setup for Unblu.
In the earlier diagram (Basic System Components) the rendering service appeared as a single component. In the diagram below we see that in an application server deployment it is composed of a number of docker engine holding a number of containers, each running a single headless browser.

2.6. Database
The Unblu requires an RDBMS to store all persistent data.
| Some personally identifiable information (PII) is stored in the Unblu database. This must be taken into consideration when deciding on the deployment details of the database. |
2.6.1. Database location
The database is external to the Unblu Server: In a cluster deployment it is outside the Unblu cluster and in an application server deployment it is outside the application server (usually on a separate machine). In many cases customers can benefit from leveraging the existing database infrastructure of their organization.
2.6.2. Supported databases
Unblu requires a conventional RDBMS, i.e., a SQL-based DB. The supported systems are:
-
Oracle 11.2g or later
-
Microsoft SQL Server 2012 or later
-
MySQL 5.5 or later
-
PostgreSQL 9.1.22 or later
-
MariaDB 10.1 or later
2.6.3. Stored data
The database is used to store all persistent data required by the Unblu system. This includes
- Configuration data
-
-
Users
-
Teams
-
Named areas,
-
API keys
-
Canned responses
-
Conversation templates
-
Tenant accounts
-
Configuration settings
-
- Operational data
-
-
Conversation state data
-
Text messages exchanged during conversations
-
Documents shared during document co-browsing
-
2.6.4. Deployment
For details on deploying the database and connecting it to the Unblu Server, see Database configuration.
2.7. External components
2.7.1. Vonage Video API
To support voice and video calls, Unblu relies on an external service called Vonage Video API (formerly TokBox). To enable voice and video, the Unblu server must be configured to connect to this service. This configuration does not involve any additional installation on the server side and is identical across deployment models.
2.7.1.1. Data security
All video and voice calls through the Unblu system traverse the Vonage Video API service. This includes both the actual video and audio streams as well as signalling data used to establish connections. All data is encrypted, both in transit and at rest.
If you wish to archive video and voice calls, the media stream must be decrypted on the Vonage server as part of the archiving process. However, it is immediately re-encrypted, and no unencrypted media stream is ever transmitted on the open internet.
Please review our page on Voice & Video Chat archiving and the Vonage security page for further details.
2.7.1.2. Archiving
Vonage Video API supports encrypted archiving of voice and video sessions. The service can be configured to automatically upload archive data to your own storage as required.
Please review the page on Voice & Video Chat archiving for more information.
2.7.2. TURN server
To support universal co-browsing, document co-browsing, and screen sharing, Unblu requires a connection to a TURN server.
A TURN server is a standard mechanism for creating such connections between endpoints that are each behind their own firewall. It does so by providing a common location external to the two communicating parties to which each can establish an outbound connection. The TURN server then provides a bridge creating the end-to-end connection.
In universal and document co-browsing, the TURN server is used to provide a video streaming connection between the rendering service on the one hand and the agent and visitor clients on the other.
The recommended approach is to use the Unblu cloud TURN server service.
2.7.2.1. Data security
All video traffic related to universal and document co-browsing traverses the TURN server. However, all data is always encrypted.
2.8. Front-end interfaces and integrations
Unblu provides a number of interfaces and interface integration points for both visitors and agents. These include the built-in web interface available out of the box that is used by agents and administrators, the Individual UI web component intended for integration with your website, and APIs and SDKs that enable additional interface channels.
2.8.1. Visitor-side integrations
2.8.1.1. Individual UI
On the visitor side, the primary interface in most installations is the Individual UI. This is a web component provided by Unblu that is deployed by integrating it into your website. A website into which the Individual UI is integrated is referred to as "Unblu-enabled".
The Individual UI is sometimes referred to as the "snippet" because it is included in the page of your website as a snippet of HTML containing a <script> tag that loads the required JavaScript code. For most customers the Individual UI is the default method through which visitors connect to Unblu. See Individual UI web integration.
2.8.1.2. JavaScript API
Unblu offers a JavaScript API (JS-API) that you can use within your website to add functionality above and beyond that provided by the Individual UI. See JavaScript API.
2.8.1.3. Visitor Mobile SDK
Using the Visitor Mobile App SDK, you can build custom mobile apps for your visitors to use that support the same features as the Individual UI. See Mobile SDK.
2.8.2. Visitor-side built-in interface
2.8.2.1. Visitor Desk
The Visitor Desk is a version of the Individual UI that is not integrated into your website. Rather, it is served directly from the Unblu server. It appears as an Individual UI in front of a neutral background.
The Visitor Desk is typically used when an agent wants to give a visitor access to Unblu outside the context of any particular webpage. They do so by sending the visitor a link to the Visitor Desk.
2.8.3. Agent-side integration
2.8.3.1. Custom agent mobile app using Mobile SDK
Using the Agent Mobile App SDK, you can build custom mobile apps for your agent.
2.8.4. Agent-side built-in interfaces
On the agent side, Unblu provides the Agent Desk and the Account Configuration interface as web interfaces served from the Unblu server out of the box. They do not require any extra work to get them up and running.
2.8.4.1. Agent Desk
The Agent Desk is a conventional desktop browser web application served directly by the Unblu server.
2.8.4.2. Account Configuration interface
The Account Configuration interface is a conventional desktop browser web application served directly by the Unblu server.
2.9. Back-end integrations
In addition to providing many options for front-end integrations (see Front End Interfaces and Integrations) Unblu also enables back end integrations using the Web API, Webhooks and the Bot API.
2.9.1. Web API and Webhooks
The Unblu Web API exposes the functionality of the Unblu server enabling you to perform actions on the server using JSON over HTTP. While the Web API enables external software to initiate actions in Unblu, the Webhooks feature enables the opposite: It lets the Unblu server initiate actions on external system, in response to events occurring in the server. For details, see Web API and webhooks.
2.9.2. Bot integration
The Bot API enables you to integrate an external chatbot system with Unblu, allowing the bot play the role of an agent in interactions with visitors. Typically the bot will be used to handle more formulaic interactions and information collection. As soon as the bot encounters a question it cannot answer the visitor will be redirected to a human agent. See Bot Integration.
3. Installation and deployment
3.1. Overview
Previously, in Architecture, we saw how the Unblu system is structured and how the various deployment models affect that structure. In this section we will explain what to consider when choosing which model to use and how to actually perform the installation, deployment or onboarding.
3.2. Recommendations
The first decision to make when adopting Unblu is whether to choose a managed cloud solution or an on-premises solution.
3.2.1. The Unblu Financial Cloud
The Unblu Financial Cloud gives you all the advantages typical of cloud services in general:
-
Lower IT costs.
-
Costs are part of operational, not capital, expenditure.
-
Always up-to-date software. No installation. No updates.
-
Easy scalability.
In addition to these, the Unblu Financial Cloud also offers specific benefits:
-
The physical and legal security of Swiss hosting
-
ISO 27001: 2013 certified
-
Compliant with FINMA Guidelines of Circular 2008/7
-
Compliant with SFBC Circular 2005/2 No. 87
-
The technical reliability stemming from Unblu’s expertise in our own product and infrastructure
The use of cloud software is becoming more widespread in the financial industry as regulations are adapted to the new technology and as customers become more familiar with the advantages inherent in the approach.
Our recommendation to our customers is simple: If your organization can (in terms of compliance) choose the Unblu Financial Cloud, then you should.
For details on how to get started see Unblu Financial Cloud onboarding.
3.2.2. The on-premises option
While the Unblu Financial Cloud offers many benefits, Unblu does recognize that many customers will prefer an on-premises installation, for a variety of reasons. If this is the case with your organization, the recommended on-premises solution is the Cluster deployment.
Cluster deployment was introduced with Unblu 5 and continues to be the recommended on-premises model for Unblu 6. Previous to Unblu 5 on-premises installations used the Application server deployment. While this type of installation is still possible with Unblu 5 and 6 it is considered deprecated and is not recommended for production systems.
3.2.2.1. Single-node cluster
The cluster deployment model has numerous advantages over the older application server model. However, some customers may be concerned about the amount of infrastructure investment required and would prefer to single machine rather than the multiple machines typical of a Kubernetes cluster.
In such cases customers may be tempted to consider a single machine application server install. However, Unblu’s recommendation is to still employ the cluster deployment but to use a single-node cluster.
With the single-node cluster you will still only need a single machine but you will have the advantage of being able to seamlessly scale the system later as your needs grow. In addition, the cluster approach also provides you with
-
Health checks automatic restart of components
-
Metrics and alerting
-
Ability to easily add a rendering service (if you initially start without this feature).
In short the single-node cluster is best choice for a "starter" installation that you can later expand.
3.2.3. Standalone
While the application server approach is not recommended for production systems, it still plays a role in the form of the standalone deployment. In this special case of the application server deployment, the runnable web archive file (WAR) unpacks itself and runs the system on an embedded Jetty application server. See Standalone deployment
3.3. Configuration files
3.3.1. Overview
A big part of the installation process for all on-premises deployments is the configuration of the Unblu system.
Unblu configuration is governed by a single namespace of configuration parameters. On startup the configuration is read from one or more configuration files. Later, once the system is up and running the same configuration namespace is editable via the Configuration Interface.
In the application server and standalone deployments a single configuration file, by convention called unblu-config.properties, is used.
In the cluster deployment a number of configuration files are used in a series of overlays. Customer level configuration is placed in the file unblu-customer.properties.
3.4. Unblu Financial Cloud onboarding
In this section we describe the process of onboarding to the Unblu Financial Cloud.
3.4.1. Unblu delivery
Once you have a license agreement in place with Unblu, reach out to the Unblu delivery team to discuss the precise technical details of your project so that Unblu can correctly configure your account for your needs. When configuration is complete, you will receive your account details and be able to login as an administrator.
3.4.2. Integrations
With the Unblu Financial Cloud there is, of course, no server installation or configuration to be done on your end. However, you will still need to do some integration work to enable Unblu for visitors on your website. Optionally, you may also want to enable other integrations for visitors, agents or on the back end.
The primary difference, in terms of integration, between an on-premises installation and the Unblu Financial Cloud setup is that the Individual UI integration is subject to certain restrictions in the latter case.
All other integrations and interfaces are the same.
3.4.2.1. Individual UI integration
With the Unblu Financial Cloud solution, the following restrictions exist with respect to integrating the Individual UI into your company website:
-
The SecureFlow Manager is not available, so neither dynamic injection of the client-side code nor protected resource upload are supported.
-
The site-embedded server setup is not supported.
In other words, with the Unblu Financial Cloud, your Individual UI web integration will have the following features:
-
Static injection of client code
-
No protected resource upload
-
Cross-origin server setup
See Individual UI web integration for details.
3.4.2.2. Other interfaces and integrations
All other interfaces and integrations work just as they do with an on-premises setup.
-
On the visitor side, the JavaScript API, Visitor Mobile SDK and External Messenger API are fully supported.
-
On the agent side, the Agent Desk and Configuration Interface are available out-of-the-box as usual, and the Agent Mobile SDK is supported.
-
On the back end, the Web API, Webhooks and Bot API are also fully supported.
3.4.3. Single sign-on
The Unblu Financial Cloud supports single sign-on (SSO) for both agents and visitors. You can choose to implement single sign-on for agents, or for visitors, or for both.
The technical details of SSO in the Unblu Financial Cloud are discussed in the article single sign-on in the Unblu Financial Cloud.
3.5. Cluster deployment
3.5.1. Prerequisites
To begin cluster installation you will need the following:
-
A running Kubernetes cluster. This may be an existing cluster already used in production at your organization, a newly installed cluster, or a cloud cluster managed by your organization. (This is distinct from Unblu’s own cloud offering, the Unblu Financial Cloud.) Unblu supports both standard Kubernetes and OpenShift.
-
The Kustomize configuration management tool (this may be already included in your Kubernetes installation as it is integrated into
kubectlsince1.14). -
The Unblu Kustomize bundle used to deploy the software. This will be provided to you by the Unblu delivery team.
-
Access to the Unblu container image registry (
gcr.io/unblu-containerrepo-public) to pull the images.
You might want to check the cluster hardware requirements before you start.
Should you not be able to run kustomize, the Unblu delivery team will send you the already built YAML deployment file.
3.5.2. Access to the Unblu image registry
A Kubernetes cluster requires access to the image registry at all times in order to pull images. Should this be prevented by a company policy, you can use a company internal registry as a proxy. Products such as Artifactory can be used to either manually push images or download images transparently in the background.
Access credentials to the Unblu image registry will usually be provided as a gcr-secret.yaml YAML file. Please apply this file to your cluster before you perform the installation.
kubectl create namespace unblu-test
kubectl apply -f gcr-secret.yaml --namespace=unblu-testoc new-project unblu-test \
--description="Unblu Test Environment" \
--display-name="unblu-test"
oc project unblu-test
oc apply -f gcr-secret.yaml3.5.3. Database secret
Unblu stores all data in a relational database. The credentials to access the database need to be passed to Unblu as a secret named database.
kind: Secret
apiVersion: v1
metadata:
  name: database
type: Opaque
stringData:
  DB_USER: unblu
  DB_PASSWORD: unblu_password
  DB_ADMIN_USER: unblu_admin
  DB_ADMIN_PASSWORD: admin_password
The database secret is used to populate the user configuration. Consequently, you don’t need to manually declare those parameters in the configuration file unblu-customer.properties. In other words you do not need the following lines in unblu-customer.properties:
com.unblu.storage.database.user=unblu
com.unblu.storage.database.password=<pwd>
com.unblu.storage.database.adminUser=unblu_admin
com.unblu.storage.database.adminPassword=<pwd>
Other database related configuration is part of unblu-customer.properties file and follows the Unblu configuration standard. Please refer to the section Database configuration for more details.
3.5.4. Performing the installation
The Unblu delivery team will send a compressed archive containing a set of files. The listing below assumes that you’ve extracted the bundle into a folder called unblu-installation.
kustomize build unblu-installation > unblu.yaml
kubectl apply -f unblu.yaml
Before deploying Unblu into a cluster, you may want to adjust the following in kustomization.yaml.
apiVersion: kustomize.config.k8s.io/v1beta1
kind: Kustomization

namespace: customer (1)

bases: (2)
- unblu-kubernetes-base/collaboration-server
- unblu-kubernetes-base/renderingservice
- unblu-kubernetes-base/k8s-ingress
- unblu-kubernetes-base/k8s-prometheus
- unblu-kubernetes-base/grafana

resources: [] (3)

patchesStrategicMerge: [] (4)

configMapGenerator:
- name: collaboration-server-config
  behavior: merge
  files:
    - unblu-customer.properties (5)

secretGenerator:
- name: ingress-tls (6)
  behavior: merge
  files:
    - certs/tls.crt
    - certs/tls.key
  type: "kubernetes.io/tls"

images: (7)
  - name: gcr.io/unblu-containerrepo-public/collaborationserver-public-centos7
    newName: example.com/unblu/collaborationserver-dev-centos7
  - name: gcr.io/unblu-containerrepo-public/headless-browser-public-ubuntu1804
    newName: example.com/unblu/headless-browser-private-ubuntu1804
  - name: gcr.io/unblu-containerrepo-public/nginx-public-centos7
    newName: example.com/unblu/nginx-private-centos7
  - name: gcr.io/unblu-containerrepo-public/haproxy-public-centos7
    newName: example.com/unblu/haproxy-private-centos7
  - name: gcr.io/unblu-containerrepo-public/coturn-public-centos7
newName: example.com/unblu/coturn-private-centos7| 1 | Change the namespace (Kubernetes) or project (OpenShift) to be used. |
| 2 | Add or remove base modules, depending on your environment or license. |
| 3 | Deploy custom components as part of Unblu. |
| 4 | Patch some values of the deployment. |
| 5 | Add the configuration file unblu-customer.properties to the deployment. |
| 6 | Add the TLS certificate as a secret to be used for the Ingress or Route. |
| 7 | Rewrite the images source to a new registry. |
Instead of updating the kustomization.yaml that was delivered to you, we recommend to create a new one and separate your customizations from our deliveries.
apiVersion: kustomize.config.k8s.io/v1beta1
kind: Kustomization

namespace: unblu-production

bases:
- unblu-delivery
3.5.5. Update an existing installation
Upgrading an existing Unblu installation implies the following steps:
-
Remove the existing deployment from the cluster using
clean.sh. -
Apply the new deployment, identical to a new installation.
-
Database patches are automatically applied when the Unblu server starts.
For simple configuration updates the first step may be omitted, for Unblu release upgrades all steps are mandatory.
#!/usr/bin/env bash

NAMESPACE="demo-latest"

read -p "Do you really want to clean environment \"$NAMESPACE\"? (y/N) " -n 1 -r
if [[ ! $REPLY =~ ^[yY]$ ]]
then
  exit 1
fi

echo ""
echo "Dropping Unblu"
kubectl delete deployment,pod -n $NAMESPACE -l "component = collaboration-server"
kubectl delete statefulset,pod -n $NAMESPACE -l "component in (kafka, zookeeper)" \
  --force --grace-period=0
kubectl delete deployment,statefulset,pod,service,configmap,persistentvolumeclaim,secret \
  -n $NAMESPACE -l "app = unblu"

read -p "Do you want to drop the metrics platform (Prometheus, Grafana) as well? (y/N) " -n 1 -r
echo

if [[ $REPLY =~ ^[yY]$ ]]
then
  kubectl delete deployment,pod,service,configmap,persistentvolumeclaim,secret \
    -n $NAMESPACE -l "app in (grafana, prometheus)"
fi

echo "Finished"#!/usr/bin/env bash
oc whoami &>/dev/null
if [ "$?" != "0" ]
then
echo "You are not logged in to any openshift cluster. Please login first (oc login) and select the correct project"
exit 1
fi
if [[ ! $1 = "-f" ]]
then
read -p "Do you want to delete the contents of $(oc project -q) (y/N) " -r
echo
if [[ ! $REPLY =~ ^[nNyY]?$ ]]
then
echo "Unexpected answer. Exiting"
exit 2
fi
if [[ ! $REPLY =~ ^[yY]$ ]]
then
exit 0
fi
fi
echo "Dropping Unblu"
oc delete deployment,pod -l "component = collaboration-server"
oc delete statefulset,pod -l "component in (kafka, zookeeper)" --force --grace-period=0
oc delete deployment,statefulset,pod,service,configmap,persistentvolumeclaim,secret -l "app = unblu"
read -p "Do you want to drop the metrics platform (Prometheus, Grafana) as well? (y/N) " -n 1 -r
echo
if [[ $REPLY =~ ^[yY]$ ]]
then
oc delete deployment,pod,service,configmap,persistentvolumeclaim,secret -l "app in (grafana, prometheus)"
fi
echo "Finished"3.5.6. Smoke test of an OpenShift installation
Once you have completed an OpenShift installation, you can check the installation with the following procedure.
The listed instructions must all succeed in order for the smoke test to be successful. Perform the tests immediately after installation to ensure that you don’t miss important log messages.
3.5.6.1. OpenShift deployment status
- CLI
-
oc status - Success criteria
-
No errors reported.
- Example
-
In an example project on server
https://example.intranet.ch:443.
$ oc status

svc/alertmanager - 10.1.1.130:80 -> 9093
  deployment/alertmanager deploys docker.io/prom/alertmanager:v0.16.1
    deployment #1 running for 6 days - 1 pod

svc/blackbox-exporter - 10.1.1.246:80 -> 9115
  deployment/blackbox-exporter deploys docker.io/prom/blackbox-exporter:v0.14.0
    deployment #1 running for 6 days - 1 pod

svc/collaboration-server - 10.1.1.113:9001
  deployment/collaboration-server deploys gcr.io/unblu-containerrepo-public/collaborationserver-centos7:6.0.0-beta.1
    deployment #1 running for 4 days - 1 pod

svc/glusterfs-dynamic-bd5fa376-fb0a-11e9-8274-00ffffffffff - 10.1.1.59:1
svc/glusterfs-dynamic-bd66cca4-fb0a-11e9-8274-00ffffffffff - 10.1.2.62:1
svc/glusterfs-cluster - 10.1.1.255:1

svc/grafana - 10.1.1.56:80 -> 3000
  deployment/grafana deploys docker.io/grafana/grafana:6.2.2
    deployment #1 running for 6 days - 1 pod

svc/haproxy - 10.1.1.9:8080
  deployment/haproxy deploys gcr.io/unblu-containerrepo-public/haproxy-public-centos7:1.9.5-0,docker.io/prom/haproxy-exporter:v0.10.0
    deployment #1 running for 6 days - 2 pods

svc/kafka-hs (headless):9092
svc/kafka - 10.1.1.66:9092
  statefulset/kafka manages gcr.io/unblu-containerrepo-public/collaborationserver-centos7:6.0.0-beta.1
    created 4 days ago - 3 pods

https://example.intranet.ch (redirects) to pod port 8080-tcp (svc/nginx)
  deployment/nginx deploys gcr.io/unblu-containerrepo-public/nginx-public-centos7:1.0,docker.io/nginx/nginx-prometheus-exporter:0.3.0
    deployment #1 running for 6 days - 2 pods

svc/prometheus - 10.1.1.108:80 -> 9090
  deployment/prometheus-server deploys docker.io/prom/prometheus:v2.10.0
    deployment #1 running for 6 days - 1 pod

svc/prometheus-kube-state-metrics - 10.1.1.121:80 -> 8080
  deployment/prometheus-kube-state-metrics deploys docker.io/kube-state-metrics:v1.5.0
    deployment #1 running for 6 days - 0/1 pods

svc/zookeeper-hs (headless) ports 2888, 3888
svc/zookeeper - 10.1.1.249:2181
  statefulset/zookeeper manages gcr.io/unblu-containerrepo-public/collaborationserver-centos7:6.0.0-beta.1
    created 4 days ago - 0/3 pods growing to 3

1 info identified, use 'oc status --suggest' to see details.
3.5.6.2. Unblu server startup status
- CLI
-
$ oc logs <collaborationserverpod name>
for Unix/Linux systems:
$ oc logs $(oc get pods -l component=collaboration-server -o name | cut -d '/' -f 2) | grep "ready for requests" - Success criteria
-
A message containing "ready for requests" must exist in the logs.
- Example
$ oc logs collaboration-server-123

{"message":"Initializing Timer ","logger":"org.eclipse.gemini.blueprint.extender.internal.support.ExtenderConfiguration$1","severity":"INFO","user":"","client":"","page":"","request":"","execution":"","thread":"Start Level: Equinox Container: a46608a9-4214-4f0e-871a-a24812ffffff","@timestamp":"2019-11-01T13:55:15.463Z"}
{"message":"all bundles (247) started in 64039ms ","logger":"com.unblu.platform.server.core.UnbluPlatform","severity":"INFO","user":"","client":"","page":"","request":"","execution":"","thread":"RxComputationThreadPool-1","@timestamp":"2019-11-01T13:55:15.753Z"}
{"message":"Removed down state INITIALIZING. New states [ENTITY_CONFIGURATION_IMPORTING] ","logger":"com.unblu.platform.server.core.UnbluPlatform","severity":"INFO","user":"","client":"","page":"","request":"","execution":"","thread":"RxComputationThreadPool-1","@timestamp":"2019-11-01T13:55:15.753Z"}
{"message":"No entity import source configured ","logger":"com.unblu.core.server.entityconfig.internal.EntityConfigImport","severity":"INFO","user":"","client":"","page":"","request":"","execution":"","thread":"RxComputationThreadPool-1","@timestamp":"2019-11-01T13:55:15.756Z"}
{"message":"Removed down state ENTITY_CONFIGURATION_IMPORTING. New states [] ","logger":"com.unblu.platform.server.core.UnbluPlatform","severity":"INFO","user":"","client":"","page":"","request":"","execution":"","thread":"RxComputationThreadPool-1","@timestamp":"2019-11-01T13:55:15.756Z"}
{"message":"product.com.unblu.universe.core 6.0.0-beta.1-WjNnGKRa ready for requests ","logger":"com.unblu.platform.server.core.UnbluPlatform","severity":"INFO","user":"","client":"","page":"","request":"","execution":"","thread":"RxComputationThreadPool-1","@timestamp":"2019-11-01T13:55:15.756Z"}
{"message":"disabling the agentAvailability auto updating due to request inactivity ","logger":"com.unblu.core.server.livetracking.agent.internal.AgentAvailabilityService","severity":"INFO","user":"","client":"","page":"","request":"","execution":"","thread":"AgentAvail-timer","@timestamp":"2019-11-01T14:55:03.814Z"}
{"message":"unsupported language: en-US falling back to en ","logger":"com.unblu.platform.server.clientsupport.internal.AbstractEntryPointWrapperServlet","severity":"WARN","user":"","client":"","page":"","request":"ROxknrGXQCuse2Q3CMFu2Q","execution":"","thread":"qtp1897380042-37","@timestamp":"2019-11-05T16:13:49.036Z"}
{"message":"unsupported language: en-US falling back to en ","logger":"com.unblu.platform.server.clientsupport.internal.AbstractEntryPointWrapperServlet","severity":"WARN","user":"","client":"","page":"","request":"TXaZh7OxRhW2N6tFtRHJ9g","execution":"","thread":"qtp1897380042-42","@timestamp":"2019-11-05T16:13:49.067Z"}
{"message":"enabling agentAvailability auto updating ","logger":"com.unblu.core.server.livetracking.agent.internal.AgentAvailabilityService","severity":"INFO","user":"","client":"","page":"","request":"TXaZh7OxRhW2N6tFtRHJ9g","execution":"","thread":"qtp1897380042-42","@timestamp":"2019-11-05T16:13:49.087Z"}
{"message":"unsupported language: en-US falling back to en ","logger":"com.unblu.platform.server.clientsupport.internal.AbstractEntryPointWrapperServlet","severity":"WARN","user":"","client":"","page":"","request":"_Drn9FNIRaODTCAqZiuSug","execution":"","thread":"qtp1897380042-37","@timestamp":"2019-11-05T16:14:07.306Z"}
{"message":"unsupported language: en-US falling back to en ","logger":"com.unblu.platform.server.clientsupport.internal.AbstractEntryPointWrapperServlet","severity":"WARN","user":"superadmin","client":"","page":"","request":"G5UzUttIRmCkc3QXUbR3Pw","execution":"","thread":"qtp1897380042-39","@timestamp":"2019-11-05T16:14:09.965Z"}
{"message":"sessionItem prepared: TrackingItem type: TRACKINGLIST status: OPEN id: null details: accountId=wZvcAnbBSpOps9oteH-Oxw&status=OPEN&type=AGENTFORWARDING session: hPAkysS1Qqa7V5DVLrth7w node: collaboration-server-559b6487c8-qzqkx node instance: 1x2j3Qn_T--dszMYT_MI8g created: Tue Nov 05 16:14:11 UTC 2019 ","logger":"com.unblu.core.server.collaboration.CollaborationSession","severity":"INFO","user":"","client":"","page":"","request":"UR8u7Fh6TJCRaeJfKBPmxA","execution":"CollaborationSessionStore","thread":"RxCachedThreadScheduler-1 - CollaborationSessionStore - $ FixedContextScheduler#CollaborationSessionStore $ ","@timestamp":"2019-11-05T16:14:11.554Z"}3.6. Application server deployment
Unblu can be deployed on any Java application server (i.e., any server that functions as a Java Servlet Container, implementing the Java Servlet API). You should consult your application server documentation to get the specific installation directions.
3.6.1. Deploying Unblu on Tomcat
As an example, here we will describe the installation process on Tomcat.
| At present, Unblu is not compatible with Tomcat 10, which targets Jakarta EE rather than Java EE. Unblu is compatible with Jakarta EE 8; it is not compatible with Jakarta EE 9 or 10. Deploy Unblu on Tomcat 9. |
3.6.1.1. Preparation
To begin with, you will need the following:
-
Suitable hardware on which to deploy the application server. See System Requirements.
-
Java 8 or 11. Unblu only targets long-term support (LTS) versions of Java. See Oracle’s Java SE Support Roadmap for further information.
-
An installed Tomcat server. Consult the Tomcat documentation for details on installation.
-
The Unblu WAR file. (typically,
product.com.unblu-<version>-<guid>.war). -
The Unblu properties file, (typically,
unblu-config.properties).
The Unblu files should be provided to you by the Unblu delivery team.
3.6.1.2. Deployment
In Tomcat terminology $CATALINA_HOME is the Tomcat home directory. If your Tomcat is properly installed, this environment variable should point to the location of the Tomcat installation. |
3.6.1.2.1. Configuration file
To ensure that Unblu starts up properly upon deployment, you need to install the unblu-config.properties file so that Tomcat reads it on startup. The recommended way of doing this is:
-
Copy
unblu-config.propertiesto$CATALINA_HOME/conf -
In the file
$CATALINA_HOME/bin/catalina.shinsert the following line at the top of the file:export JAVA_OPTS="$JAVA_OPTS -Dcom.unblu.propertyoverlay=file:///$CATALINA_HOME/conf/unblu-conf.properties"
Once you have made this change, restart Tomcat.
3.6.1.2.2. Context path
In Tomcat (and other application servers), applications have a context path. This is simply the URI path (relative to the hostname of the server) where you point your browser to access the application. An application can be deployed either to the root context or a non-root context.
Assuming that the server is at http://<tomcat>/ then a typical non-root context for an Unblu install would be
`\http://<tomcat>/unblu/`
Alternatively, if Unblu were deployed to the root context then its URI would be identical to that of the Tomcat server itself:
`\http://<tomcat>/`
3.6.1.2.3. Non-root context deployment
To deploy to a non-root context, the simplest method is:
-
Rename the WAR file to
<path>.warwhere path is the relative path at which you wish to deploy Unblu. Following the above example, we would simply rename the WAR file tounblu.war. -
Ensure that Tomcat is running and copy the WAR file to the directory
$CATALINA_HOME/webapps/. Tomcat should automatically unzip the WAR file and deploy the application. After a delay Unblu should be accessible athttp://<tomcat>/unblu. -
Once deployed, you can safely delete the original WAR file
$CATALINA_HOME/webapps/unblu.war.
3.6.1.2.4. Root context deployment
In Tomcat the root context app is found in the directory $CATALINA_HOME/webapps/ROOT. By default this directory contains the Tomcat server management application. To install another app at this location you need to replace the contents of that directory with the app you want to deploy. If you still want to keep the Tomcat management apps you have to first rename the existing ROOT folder. Assuming you want to keep the management apps, the following is the easiest way to deploy Unblu to the root context:
-
Stop Tomcat.
-
Rename
$CATALINA_HOME/webapps/ROOTto something else, like$CATALINA_HOME/webapps/mgmt. -
Copy the Unblu WAR file to
$CATALINA_HOME/webapps/`asROOT.war. -
Restart Tomcat.
-
Once deployed you can safely delete the original WAR file
$CATALINA_HOME/webapps/ROOT.war.
3.6.1.2.5. Database
You can either use the approach outlined in the database configuration section or use the datasource provided by the application server to connect Unblu to a relational database.
com.unblu.storage.database.datasourceFactory=USE_PROVIDED
com.unblu.storage.database.datasourceName=jdbc/Unblu (1)| 1 | JNDI name of the datasource |
3.6.1.2.6. Docker for rendered co-browsing
If you want your Unblu system to support either universal or document co-browsing (both types of rendered co-browsing) then you will need to provide access from the Unblu server to Docker host (either on the same machine or another). Unblu will use the Docker host to spawn headless browsers for the rendered browsing sessions. See Rendered co-browsing for more details.
See com.unblu.headlessbrowser.server.core.DockerClientConfiguration for information on how to enable the connection to the Docker host.
3.6.1.2.7. Check the server logs
After starting Tomcat, switch to the folder you configured for logging. You will find 3 files:
-
unblu.datestamp.log -
unblu-fatal.datestamp.log -
unblu-session.datestamp.log
Check the file unblu.datestamp.log to see whether the server started normally or if there are any configuration or DB connectivity issues.
3.6.1.2.8. Accessing the Unblu server
If you deployed Unblu in root context, then:
-
The restricted Unblu path
/co-unblu/(locally) can be accessed viahttp://localhost:8080 -
The public Unblu path can be accessed via
http://localhost:8080/unblu/
If you deployed Unblu in a non-root context (let’s say as unblu.war), then:
-
The restricted Unblu path
/co-unblu/(locally) can be accessed viahttp://localhost:8080/unblu/. -
The public path can be accessed via
http://localhost:8080/unblu/unblu/.
For more on restricted and public entry paths, see Call origin.
3.7. Standalone deployment
3.7.1. Overview
There are a number of scenarios where it can be useful to deploy an Unblu server quickly to your local machine. For example: testing, demos, development etc. A standalone deployment can be used for these situations.
The Unblu server is available as a WAR file. The file functions both as a traditional WAR file for application server deployment and as an executable JAR file for standalone deployment.
3.7.2. Requirements
To run Unblu in standalone mode any reasonably modern machine should be sufficient. For example, a machine with the following specs will do the job:
-
1 Recent CPU core running at 2.4GHz
-
4 GB RAM
-
10 GB of hard drive space
You will also need
-
Java 8 or 11
and finally, you’ll need the installation package from Unblu, which shuld be provided to you by Unblu delivery. It consists of
-
The Unblu WAR file with a name like
product.com.unblu-<version>-<guid>.war -
The Unblu properties file (optional)
-
A valid Unblu license
3.7.3. Deployment
As a customer you will typically receive access to a downloadable file with a name like product.com.unblu-<version>-<guid>.war.
The Unblu WAR file can also be used as a executable JAR. An embedded jetty based web server is used in that case. Standalone mode is not suitable for production use.
java -jar product.com.unblu.warThe embedded Jetty web server will automatically select a TCP port in the range from 6060 to 7070. To manually select the TCP port add -Dport= on the command line.
java -Dport=7070 \
     -jar product.com.unblu.war
3.7.3.1. Command line options
When running the executable JAR, the following command line options are available:
-e,--export <arg>   Type of export. Possible options: 'ear' or 'wjar'
-h,--help	        Display this help message
-l,--list           Format of output: ( version: build: branch: )
-m,--migrationOnly  use to shutdown the product after database migration is complete
-o,--output <arg>   File to write the exported product to. If not given, output will default to STDOUT.
-p,--product <arg>  ID of the product to start. For example product.com.unblu.enterprise (default)
-t,--test           Include test bundles into product execution/export (not available in production versions).
-d,--diag           Include diag bundles into product execution/export (not available in production versions).
Note: The 'product' switch is also available via System Properties and jndi.
These options are placed after the -jar product.com.unblu.war. For example:
java
     -jar product.com.unblu.war \
     --help
3.7.3.2. Configuration file
All configuration can be placed in a separate file, e.g. unblu-config.properties.
com.unblu.runtime.jetty.port=7777

# Create a superadmin on db setup
com.unblu.storage.createSuperAdmin=true
com.unblu.storage.superAdminUsername=
com.unblu.storage.superAdminPassword=superadmin
If the property com.unblu.storage.superAdminUsername is not specified, a random username will be generated from a WebUUID.
| The configuration property com.unblu.storage.superAdminUsername is available in Unblu version 6.18.0 and newer. |
unblu-config.properties
java -Dcom.unblu.propertyoverlay=unblu-config.properties \
    -Dport=7070 \
    -jar product.com.unblu.war
3.8. Database configuration
Unblu requires a relational database to persist configuration and operational data.
It is possible to run the Unblu server with an embedded in-memory database, but this is only to be used for development and testing.
| Some personally identifiable information (PII) is stored in the Unblu database. This must be taken into consideration when deciding on the deployment details of the database. |
3.8.1. Compatible databases
Unblu is compatible with the database platforms listed below. The version number indicates the oldest version of the database platform supported by Unblu.
-
Oracle 11.2g
-
Microsoft SQL Server 2012
-
MySQL 5.5
-
PostgreSQL 9.1.22
-
MariaDB 10.1 Series
3.8.2. Database setup
Before setup you must ensure the following prerequisites are in place:
-
The database must be created by a database administrator with elevated privileges. The initial database creation must be performed manually and may differ slightly between database types.
-
The default charset must be UTF-8.
-
You must create the database users used by Unblu; see below for further details.
-
The initial DB size requirement is less than 20MB (but see the following section for a proviso).
The database will grow as the system is used and session audit trails are logged. These sessions only add a small amount of data (typically less than 20KB per session) to the database if the information stored is purely text.
3.8.2.1. Document sharing and database size
Document sharing can increase the size of your database considerably. Files can be uploaded via the file manager and stored in the database, a cloud storage system such as AWS S3, or in the file system. If you configure Unblu to store files in the database, the 20MB size requirement we made above will be insufficient.
If you expect a large number of documents, we recommend that you either configure a Remote Blob Store (RBS) in the database or use Amazon AWS S3 or a compatible service to store documents.
3.8.3. Server recommendations
These recommendations should be regarded as a starting point. We cannot know how your system may evolve and therefore cannot define exact specifications for your particular needs. Your hardware requirements will be a direct function of the types and volume of data stored.
-
Recent Quad-core Architecture
-
16 GB Ram
-
200 GB disk (SSD)
The above hardware specification should provide capacity for roughly 50,000 sessions per week. This is equivalent to 200 sessions per agent per week for 250 agents.
3.8.4. Database users
Unblu uses two distinct database users to operate:
-
An admin user with database owner (DBO) privileges
They must have the rights to execute the following statements:
CREATE, ALTER, DROP, INSERT, UPDATE, DELETE, SELECT. -
A regular database user with the rights to execute
INSERT, UPDATE, DELETE, SELECTon the tables created by the above user
com.unblu.storage.database.user=unblu (1)
com.unblu.storage.database.password=<user-pwd>
com.unblu.storage.database.adminUser=unblu_admin (2)
com.unblu.storage.database.adminPassword=<admin-pwd>| 1 | The regular users with DML permissions. |
| 2 | The admin user with DDL permissions. |
Upon initial setup of the system, the server must be started with the admin user configured so that the DB structure can be established. Once set up, the server will use the regular user, ensuring that security policies can be adhered to. The admin user may then be removed from the Unblu server configuration. To do so, proceed as follows:
-
Stop the collaboration server.
-
Remove com.unblu.storage.database.adminUser and com.unblu.storage.database.adminPassword.
-
Set com.unblu.storage.database.dbSetupEnabled to
false. -
Restart the collaboration server.
| Updates to the collaboration server usually require updates to the database. When they do, you have to enable the database admin user again in the configuration of the collaboration server. If you don’t, the database migration will be run using the regular database user, which will result in errors. |
3.8.5. Configuring different database types
Below you will find configuration examples for each database type. For the sake of convenience all users and schemas listed here are called unblu. You may use any name you wish.
| In all of the cases below, the user and schema (and schema, depending on the type of database) must be created manually before you set up Unblu. |
3.8.5.1. PostgreSQL
unblu database and users
create database unblu;

-- activate database: \c unblu
create user unblu with password '<user-pwd>';
create user unblu_admin with password '<admin-pwd>';
grant usage, create on schema public to unblu_admin;

-- run as unblu_admin
alter default privileges for user unblu_admin in schema public grant select, update, insert, delete on tables to unblu;
alter default privileges for user unblu_admin in schema public grant usage, select on sequences to unblu;
The example configuration below connects to the database unblu and relies on the default schema public which does not need to be created.
com.unblu.storage.database.platform=org.eclipse.persistence.platform.database.PostgreSQLPlatform
com.unblu.storage.database.driver=org.postgresql.Driver
com.unblu.storage.database.url=jdbc\:postgresql\://<server>\:5432/unblu (1)
com.unblu.storage.database.user=unblu
com.unblu.storage.database.password=<user-pwd> (2)
com.unblu.storage.database.adminUser=unblu_admin
com.unblu.storage.database.adminPassword=<admin-pwd> (3)
com.unblu.storage.database.schema=public
com.unblu.storage.database.liquibaseSchema=public| 1 | Replace <server> with your database hostname or IP address. |
| 2 | Replace <user-pwd> with the password of the unblu user. |
| 3 | Replace <admin-pwd> with the password of the unblu_admin user. |
3.8.5.1.1. Transparent encrypted SSL connection
This additional configuration setting enables the connection to use SSL encryption (connecting a SSL-enabled database).
com.unblu.storage.database.jdbcProperties=\
  sslmode\=verify-ca,\
  sslrootcert\=path/to/root-ca.pem.crt,\ (1)
  sslcert\=path/to/client-cert.pem.crt,\ (1)
sslkey\=path/to/client-key.pem.pk8 (1)| 1 | Replace the values with valid paths and filenames |
Your certificates must be binary DER encoded, and the key file must be a binary DER encoded key (e.g. PKCS #8). You can convert PEM files to the PKCS #8 format as follows:
# Create key file
openssl pkcs8 -topk8 \
  -in KEY_FILE.pem -inform pem \
  -out KEY_FILE.pem.pk8 -outform der \ -nocrypt

# Create certificate file
openssl x509 \
  -in CERT_FILE.pem \
  -out CERT_FILE.pem.crt -outform DER
For further information on PostgreSQL encryption options, please consult the "Encryption Options" section of the PostgreSQL documentation.
3.8.5.2. Oracle
| Please review the script below with an Oracle database administrator before using it. |
ALTER SESSION SET "_ORACLE_SCRIPT" = TRUE;
CREATE USER UNBLU_DBO IDENTIFIED BY dbo_secret;
CREATE USER UNBLU IDENTIFIED BY secret;

GRANT CONNECT, CREATE TABLE TO UNBLU_DBO;
GRANT ALTER ANY TABLE TO UNBLU_DBO;
GRANT RESOURCE TO UNBLU_DBO;
GRANT UNLIMITED TABLESPACE TO UNBLU_DBO;

GRANT CONNECT TO UNBLU;

CREATE OR REPLACE TRIGGER UNBLU_DBO.DO_GRANT
  AFTER CREATE ON UNBLU_DBO.SCHEMA
DECLARE
    l_str VARCHAR2(255);
    l_job NUMBER;
BEGIN
    IF ( ora_dict_obj_type = 'TABLE' ) THEN
      l_str := 'execute immediate "grant select, insert, update, delete on '
               || ora_dict_obj_name
               || ' to UNBLU";';

      dbms_job.Submit(l_job, Replace(l_str, '"', ''''));
    END IF;
END;
/
The script above sets up and configures two users, an admin user called UNBLU_DBO for Liquibase upgrades and a non-admin user called `UNBLU`for all other Unblu functionality.
The schema trigger in the script grants UNBLU rights on Unblu tables as they are created by Liquibase using the admin user. Access is granted to UNBLU asynchronously.
| Some customers reported issues with the script as a result of the asynchronous grant. The grants needed to start the Unblu server may not be granted until after the server has started, which results in the server failing to start. If you experience this issue, we recommend that you adapt the script so that it creates a single user for both running Unblu and administering Liquibase. |
com.unblu.storage.database.platform=org.eclipse.persistence.platform.database.OraclePlatform (1)
com.unblu.storage.database.driver=oracle.jdbc.driver.OracleDriver
com.unblu.storage.database.url=jdbc\:oracle\:thin\:@<server>\:1521\:xe (2)
com.unblu.storage.database.user=unblu
com.unblu.storage.database.password=<user-pwd> (3)
com.unblu.storage.database.schema=UNBLU_DBO
com.unblu.storage.database.liquibaseSchema=UNBLU_DBO
com.unblu.storage.database.adminUser=unblu_dbo
com.unblu.storage.database.adminPassword=<admin-pwd> (4)| 1 | Specify the platform version you use, i.e. Oracle8Platform for Oracle 8 or Oracle10Platform for Oracle 10. Use Oracle12Platform for Oracle 12 and later. |
| 2 | Replace <server> with your database hostname or IP address. Change the SID or service name if required. |
| 3 | Replace <user-pwd> with the password of the unblu user. |
| 4 | Replace <admin-pwd> with the password of the unblu_admin user. |
|
For a deeper insight into encrypting the database connection, please consult SSL With Oracle JDBC Thin Driver. For a deeper insight into "Transparent Data Encryption" (TDE), please consult chapter 2 of the Oracle Database Advanced Security Guide. |
3.8.5.3. MySQL
| Consult the configuration section before creating the user and database. |
To create the unblu database and users on MySQL 8.0.x, run the following commands:
unblu database and users for MySQL 8.0.x
CREATE DATABASE unblu DEFAULT CHARACTER SET = utf8mb4 DEFAULT COLLATE utf8mb4_unicode_ci;

CREATE USER 'unblu'@'%' IDENTIFIED BY 'secret';
CREATE USER 'unblu_admin'@'%' IDENTIFIED BY 'admin_secret';

GRANT SELECT,UPDATE,INSERT,DELETE ON unblu.* TO 'unblu'@'%';
GRANT SELECT,UPDATE,INSERT,DELETE,CREATE,ALTER,DROP,INDEX,REFERENCES ON unblu.* TO 'unblu_admin'@'%';
For older versions of MySQL, run the following commands:
unblu database and users for MySQL versions before 8.0.x
CREATE DATABASE unblu DEFAULT CHARACTER SET = utf8 DEFAULT COLLATE utf8_general_ci;

GRANT SELECT,UPDATE,INSERT,DELETE ON unblu.* TO 'unblu'@'%' IDENTIFIED BY 'secret';
GRANT SELECT,UPDATE,INSERT,DELETE,CREATE,ALTER,DROP,INDEX,REFERENCES ON unblu.* TO 'unblu_admin'@'%' IDENTIFIED BY 'admin_secret';
For all versions of MySQL, set the following Unblu configuration properties:
com.unblu.storage.database.platform=org.eclipse.persistence.platform.database.MySQLPlatform
com.unblu.storage.database.driver=com.mysql.jdbc.Driver
com.unblu.storage.database.url=jdbc\:mysql\://<server>\:3306/unblu (1)
com.unblu.storage.database.jdbcProperties=connectTimeout\=60000,socketTimeout\=60000,useUnicode\=yes,characterEncoding\=UTF-8,useLegacyDatetimeCode\=false,serverTimezone\=UTC,autoReconnectForPools\=true (2)
com.unblu.storage.database.user=unblu
com.unblu.storage.database.password=<user-pwd> (3)
com.unblu.storage.database.schema=unblu
com.unblu.storage.database.liquibaseSchema=unblu
com.unblu.storage.database.adminUser=unblu_admin
com.unblu.storage.database.adminPassword=<admin-pwd> (4)| 1 | Replace <server> with your database hostname or IP address. |
| 2 | For MySQL 8, replace useUnicode=yes with useUnicode=true. |
| 3 | Replace <user-pwd> with the password of the unblu user. |
| 4 | Replace <admin-pwd> with the password of the unblu_admin user. |
In MySQL a schema is synonymous with a database. You can substitute the keyword SCHEMA instead of DATABASE in MySQL SQL syntax, for example using CREATE SCHEMA instead of CREATE DATABASE. |
3.8.5.3.1. Configuration
|
We have observed four issues that can occur when using the default MySQL or MariaDB configuration applying to both Linux and Windows. Before creating the schema you must override the MySQL defaults using the instructions below. |
my.cnf (Unix) or my.ini (Windows)
[mysqld]

character-set-server=utf8mb4
This change is required because emojis require 4 bytes and the default MySQL can only handle 3 bytes. Without it, an SQL exception will occur when users enter emojis in a chat.
Ensure that the value of max_allowed_packet is slightly more than twice as large as the Unblu setting com.unblu.filemanager.maximumUploadSize. This is necessary because of MySQL’s text-based wire protocol, which encodes binary values as text.
To support larger files being uploaded to Unblu, set max_allowed_packet to a higher value. The maximum file size is 1 Gigabyte (1G).
my.cnf (Unix) or my.ini (Windows)
[mysqld]

max_allowed_packet=<size> (Example: 16M)
You can check the current maximum file size by running the following query:
SHOW VARIABLES LIKE 'max_allowed_packet';To support uploading large files to Unblu, set net_write_timeout to a higher value. The default timeout is 60 seconds. In our test environment, this was not sufficient to handle files 15MB large.
my.cnf (Unix) or my.ini (Windows)
[mysqld]

net_write_timeout=<seconds> (Example: 180)SHOW VARIABLES LIKE 'net_write_timeout';Unblu requires that the MySQL parameters NO_ZERO_IN_DATE and NO_ZERO_DATE NOT be active. If they are active, an error will occur during setup and/or migration.
my.cnf (Unix) or my.ini (Windows)
[mysqld]

sql_mode=ONLY_FULL_GROUP_BY,STRICT_TRANS_TABLES,NO_ZERO_IN_DATE,NO_ZERO_DATE,ERROR_FOR_DIVISION_BY_ZERO,NO_AUTO_CREATE_USER,NO_ENGINE_SUBSTITUTION
In the example above, remove the section NO_ZERO_IN_DATE,NO_ZERO_DATE. (If you are running MySQL 8, you will also have to remove NO_AUTO_CREATE_USER, since it is not supported by MySQL 8.) Then restart the MySQL server.
Run the query below to check if the problem exists in your system:
SHOW VARIABLES LIKE 'sql_mode';3.8.5.4. MariaDB
MariaDB is a fork of MySQL and still largely compatible with MySQL. The configuration in Unblu is slightly different though.
| Please consult the configuration section of MySQL before creating the user and database. |
unblu database and users
CREATE DATABASE unblu DEFAULT CHARACTER SET = utf8 DEFAULT COLLATE utf8_general_ci;

GRANT SELECT,UPDATE,INSERT,DELETE ON unblu.* TO 'unblu'@'%' IDENTIFIED BY 'secret';
GRANT SELECT,UPDATE,INSERT,DELETE,CREATE,ALTER,DROP,INDEX,REFERENCES ON unblu.* TO 'unblu_admin'@'%' IDENTIFIED BY 'admin_secret';com.unblu.storage.database.platform=org.eclipse.persistence.platform.database.MySQLPlatform
com.unblu.storage.database.driver=org.mariadb.jdbc.Driver
com.unblu.storage.database.url=jdbc\:mysql\://<server>\:3306/unblu (1)
com.unblu.storage.database.jdbcProperties=connectTimeout\=60000,socketTimeout\=60000,useUnicode\=yes,characterEncoding\=UTF-8,useLegacyDatetimeCode\=true,serverTimezone\=UTC,useSSL\=false
com.unblu.storage.database.user=unblu
com.unblu.storage.database.password=<user-pwd> (2)
com.unblu.storage.database.schema=unblu
com.unblu.storage.database.liquibaseSchema=unblu
com.unblu.storage.database.adminUser=unblu_admin
com.unblu.storage.database.adminPassword=<admin-pwd> (3)| 1 | Replace <server> with your database hostname or IP address. |
| 2 | Replace <user-pwd> with the password of the unblu user. |
| 3 | Replace <admin-pwd> with the password of the unblu_admin user. |
3.8.5.5. Microsoft SQL Server
unblu database and users
CREATE DATABASE unblu;
USE unblu;

CREATE LOGIN unblu WITH PASSWORD = 'Unblu_Secret';
CREATE LOGIN unblu_admin WITH PASSWORD = 'Admin_Secret';

CREATE USER unblu_admin FOR LOGIN unblu_admin;
CREATE USER unblu FOR LOGIN unblu;

GRANT CREATE TABLE TO unblu_admin AS dbo;
GRANT ALTER, REFERENCES ON SCHEMA::dbo TO unblu_admin AS dbo;
GRANT SELECT, INSERT, UPDATE, DELETE ON SCHEMA::dbo TO unblu_admin;
GRANT SELECT, INSERT, UPDATE, DELETE ON SCHEMA::dbo TO unblu;com.unblu.storage.database.platform=org.eclipse.persistence.platform.database.SQLServerPlatform
com.unblu.storage.database.driver=com.microsoft.sqlserver.jdbc.SQLServerDriver
com.unblu.storage.database.url=jdbc\:sqlserver\://<server>\:1433;DatabaseName\=unblu (1)
com.unblu.storage.database.user=unblu
com.unblu.storage.database.password=<user-pwd> (2)
com.unblu.storage.database.schema=dbo
com.unblu.storage.database.liquibaseSchema=dbo
com.unblu.storage.database.adminUser=unblu_admin
com.unblu.storage.database.adminPassword=<admin-pwd> (3)
com.unblu.storage.database.jdbcProperties=sendStringParametersAsUnicode\=false (4)| 1 | Replace <server> with your database hostname or IP address. |
| 2 | Replace <user-pwd> with the password of the unblu user. |
| 3 | Replace <admin-pwd> with the password of the unblu_admin user. |
| 4 | Prevents implicit type conversions, can lead to performance problems if not set. |
| Analyze and optimize indexes at least every night to prevent fragmentation. |
3.8.5.6. In-memory database
When no database configuration is present, Unblu will by default start using an embedded H2 database. This allows an administrator to log in and perform tests.
| All data will be lost when you restart the server process. Do not use the in-memory database for any production use case. |
3.8.6. Use a dedicated document storage
A relational database is not an ideal location to store larger binary files such as documents that participants upload to a conversation. We therefore recommend that you use Amazon S3 or a compatible service (e.g. min.io).
com.unblu.server.storage.blob.persistentStoreType=S3
com.unblu.server.storage.blob.store.s3.bucketName=local-dev
com.unblu.server.storage.blob.store.s3.endpoint=http\://minio.example.com\:9001 (1)
com.unblu.server.storage.blob.store.s3.folder=blobs
com.unblu.management.aws.accessKey=<key> (2)
com.unblu.management.aws.secretKey=<secret> (3)| 1 | Remove this line to use AWS S3 instead of min.io. |
| 2 | Add your access key here. |
| 3 | Add your access secret here. |
3.8.7. All database related settings
All of the settings below can be added at the schema level. For example, the statistics database can become very large over time, so you may want to use a separate server for the statistics database.
Connection and pool parameters can be added to the configuration file. In such a case, all other schemas would use the default connection pool.
com.unblu.storage.database.platform=Auto
com.unblu.storage.database.driver=org.h2.Driver
com.unblu.storage.database.url=jdbc\:h2\:mem\:unblu
com.unblu.storage.database.jdbcProperties=
com.unblu.storage.database.user=unblu
com.unblu.storage.database.password=secret
com.unblu.storage.database.schema=unblu
com.unblu.storage.database.liquibaseSchema=
com.unblu.storage.database.adminJdbcProperties=
com.unblu.storage.database.adminUser=
com.unblu.storage.database.adminPassword=
com.unblu.storage.database.poolInitial=
com.unblu.storage.database.poolMax=20
com.unblu.storage.database.readPoolUrl=
com.unblu.storage.database.readPoolUser=
com.unblu.storage.database.readPoolPassword=
com.unblu.storage.database.readPoolInitial=
com.unblu.storage.database.readPoolMax=
com.unblu.storage.database.poolMinIdle=20
com.unblu.storage.database.adminUser=
com.unblu.storage.database.adminPassword=
3.8.7.1. Connection pool
The default JDBC connection pool is HikariCP.
It provides improvements in both speed and stability compared to the deprecated EclipseLink connection pool:
-
Connections are closed when not used for a longer period.
-
Connections are validated before using
java.sql.Connection.isValid(int)provided by the JDBC Driver. (See Documentation) -
New connections are proactively opened, not just on demand.
A Grafana dashboard called "Database (HikariCP)" visualizing all HikariCP metrics is automatically deployed with every Unblu cluster installation.
# Database Connection Pool
com.unblu.storage.database.datasourceFactory=HIKARI
com.unblu.storage.database.poolMax=20 (1)
com.unblu.storage.database.poolMinIdle=20 (2)| 1 | Maximum number of connections in the pool. |
| 2 | Minimum number of connections that should be idle, new connections are added to the pools when connections are busy up to the configured maximum number of connections. |
The above configuration reflects the default settings beginning with Unblu 6. Please only add a connection pool configuration if you want to deviate from this default. For productions setups, the following values may be more appropriate:
com.unblu.storage.database.poolMax=60
com.unblu.storage.database.poolMinIdle=60| Instead of the approaches listed in this chapter, you can also use a data source provided by the application server. Please refer to this chapter for instructions. |
3.9. Reverse proxy & WAF configuration hints
If your Unblu installation is behind a reverse proxy or web application firewall (WAF), you may have to make some changes to the latter’s configuration to ensure that Unblu is fully functional.
-
Requests from Unblu clients — the Individual UI and the Unblu mobile SDKs — must be forwarded to the Unblu Server:
-
If you are running Unblu in a cross-origin installation, make sure that the domain or subdomain that Unblu is running on is accessible.
-
If your Unblu installation is a site-embedded deployment, create a URI mapping to the Unblu entry path for the
UNTRUSTEDcall origin.
-
-
If a business (as opposed to a purely technical) exception occurs during an HTTP request, Unblu sends the error response code
400or the error code specified in com.unblu.nio.error4xxcode and com.unblu.rest.error4xxcode. This code must be passed to clients so that they may handle it. You must therefore ensure that this error code is sent and not replaced by or redirected to an error page. -
The request and response headers on the list of required HTTP headers must all be passed through unchanged.
-
The protocol used by clients to access Unblu can influence the server’s behavior. You should therefore add
x-forwarded-protoandx-forwarded-hostheaders to the request headers forwarded to the Unblu Server. -
Ensure that the
x-unblu-devicecookie is passed through and not stored in a cookie store (if your WAF has one). -
If your installation uses CORS, allow the HTTP
OPTIONSmethod. The method is required for CORS preflight requests.This is only necessary if your WAF is in front of Unblu (as opposed to the website being instrumented with Unblu).
-
If you want to use WebSockets, your WAF must support them.
3.10. Rendered co-browsing
3.10.1. Overview
Rendered co-browsing refers to the specific co-browsing technology that underlies the Universal Co-browsing and Document Co-browsing product features of Unblu.
For each rendered co-browsing session the Unblu server opens a headless browser on the server. The browser is referred to as "headless" because it is run without its own user interface. However, the visual result of its rendering process is captured and then streamed via WebRTC to both the visitor’s and agent’s browser.
Both the visitor’s and agent’s browsers display the video stream from the headless browser in a "browser-within-a-browser". The rendered content appears within the inner "browser".
Two separate communication channels, one from the visitor back to the headless browser and one from the agent back to the headless browser allow either party to control the headless browser with keyboard and mouse.
The Universal Co-browsing and Document Co-browsing product features are simply two applications of the rendered co-browsing technology. In the first case the headless browser is used by agent and visitor to view any accessible website or web application while in the second case the headless browser is used by agent and visitor to view a document that has been uploaded to the server by one of the parties.
3.10.2. Rendering service
On the server side, the Rendering Service is responsible for managing the headless browsers. Each headless browser runs inside its own container (in the sense of software container, such as Docker).
In clustered Unblu installations each of these containers is in turn run within its own Kubernetes pod. For each rendered co-browsing session, a new pod is spun up in the cluster by the rendering service. When a session ends the pod is removed.
In an application server installation (and indeed in a standalone installation, though this is rarely used) the containers are hosted within a Docker environment within which the rendering service can add and remove headless browser containers on demand.
3.10.3. WebRTC
WebRTC is the technology used to stream the view from the headless browser to both visitor and agent. It is a real-time peer-to-peer video and audio communications technology that is now built into most browsers, requiring no plugins to work (though, on IE 11 a plugin is required).
In the rendered co-browsing case we have at least three peers participating:
-
Headless Browser (in the rendering service on the Unblu server)
-
Visitor Browser
-
Agent Browser
One video stream is established from the headless browser to the visitor and another from the headless browser to the agent. There are also two signal channels (implemented separately from WebRTC) in the reverse direction that allow either party to control the browser through keystrokes and mouse input.
For full details on WebRTC and how it works, see webrtc.org.
3.10.4. Browser requirements
The browser requirements for WebRTC, and therefore for any feature that requires it (universal co-browsing, document co-browsing) are the same as for Unblu as a whole (see Browser Requirements), with the additional restriction that Internet Explorer is not supported.
3.10.5. Network restrictions
At its core WebRTC is a peer-to-peer system, meaning that it is designed to connect two WebRTC endpoints (like two browsers) directly to each other and stream audio and video back and forth without any intervening server. However, for true peer-to-peer communication to work, both parties must be accessible to each other on the same network. In most real-world scenarios involving communication across the internet firewalls and network address translation devices typically prevent this. In the rendered co-browsing scenario this is definitely the case, since:
-
The headless browser in the rendering service, being part of the Unblu server, is behind a firewall both in on-premises installation and the Unblu Financial Cloud.
-
The agent browser in an on-premises installation is often also behind the same firewall so in theory could contact the rendering service directly (though there may be other restrictions, depending on the internal details of the corporate network). In a cloud scenario, the agent browser accesses the Unblu Financial Cloud over the internet and is therefore also outside the firewall.
-
The visitor browser is always outside the firewall and additionally, is often behind its own NAT.
Taken together, all these restrictions mean that for all practical purposes true peer-to-peer connection for rendered co-browsing would be impossible since it would involve unacceptable security practices like opening up ports in a corporate firewall.
Luckily, WebRTC supports techniques for navigating around these kinds of network restrictions. The specific mechanism used in our case is to connect the WebRTC peers via something called a TURN server.
3.10.6. TURN server
The TURN server is a specialized server that resides at a publicly accessible network address on the internet. WebRTC peers use the TURN server as an intermediary to communicate with each other.
The types of network restrictions that we discussed above, and that prevent true peer-to-peer communication, typically apply to incoming connections. For example, a typical firewall might prevent all incoming traffic expect HTTP requests on port 80 and HTTPS requests on port 443. However, such a firewall would usually allow outgoing requests from inside the firewall and, crucially, also permit the transit of the responses to those requests back through the firewall.
This means that a component inside a firewall can establish a connection to something outside, as long as:
-
the target on the outside is itself not behind a firewall
-
the component on the inside initiates the connection
A TURN server provides exactly this kind of target for both parties in a WebRTC session. Even if neither party can receive unsolicited connections, they can both initiate connections. The TURN server is purposely located on the internet in such a way that it can accept connections.
So, the WebRTC parties both initiate a connection with the TURN server and the TURN server bridges the gap and connects the parties.
| This section discusses the TURN server used for Unblu’s rendered co-browsing functions (universal and document co-browsing) and for screen sharing. This should not be confused with the TURN server associated with the Vonage Video API service (formerly TokBox) that underlies Unblu’s voice and video call features. These two TURN servers are entirely separate: their roles cannot be shared across functions. The Vonage TURN server is bundled as part of the Vonage Video API service that Unblu employs. It cannot be used for any functions other than the voice and video service. Similarly, the Unblu TURN server (either in the cloud or on your infrastructure, if you choose that path) can only be used by Unblu’s rendering service. |
3.10.7. TURN server deployment options
Depending on your deployment model and your other requirements there are three options for deploying the TURN Server for rendered browsing:
-
Unblu cloud service
-
Unblu on-premises with cloud TURN server
-
Unblu on-premises with on-premises TURN server
3.10.7.1. Unblu Financial Cloud
The Unblu Financial Cloud and Unblu cloud TURN server are separate products. The Unblu Financial Cloud is the full Unblu system based in the cloud. If a feature requiring the TURN server (like universal co-browsing) is enabled, then the Unblu Cloud TURN server is included transparently in the system. There is no additional work required on the customer’s part to enable this.
3.10.7.2. Unblu cloud TURN server
The Unblu cloud TURN server is a cloud-based TURN server available by itself (without the full Unblu Financial Cloud) for use by customers with Unblu on-premises. For Unblu on-premises customers, we recommend using the Unblu cloud TURN server for the vast majority of cases.
3.10.7.3. On-premises TURN server
If, for compliance or other reasons, using the Unblu cloud TURN server is not a feasible option, you can install your own TURN server on your own infrastructure. Advice on installation and configuration is provided below. However, general support for this option is not part of the standard Unblu license.
3.10.8. Firewall configuration
3.10.8.1. Unblu cloud TURN server
Outgoing connections from the rendering service in the Unblu server and the agent browsers to the Unblu cloud TURN server will require:
-
Open outgoing source ports in firewall for TCP and UDP.
-
Open outgoing destination ports
443for TCP and3478for TCP and UDP.

The above diagram depicts the WebRTC connections between the parties in a cloud turn server scenario. Notice that only outgoing connections through the firewall are required.
3.10.8.2. On-premises TURN server
Incoming connections from the visitor browser to the on-premises TURN server will require:
-
Open incoming destination ports
443for TCP and3478for TCP and UDP.

In most cases organizations find it easier to accommodate the first option (opening the outgoing ports) than the second option (opening the incoming ports).
3.10.9. Data security
WebRTC is always end-to-end encrypted. This means that all the data flowing back and forth between the communicating parties is encrypted the entire way.
In some cases, a TURN server can be configured to add a technical participant to a conversation in order to record and archive the conversation. If this is done, then necessarily the encryption between the two original parties is interrupted.
For example, this is an option with the TokBox system that underlies Unblu voice and video service. However, the Unblu cloud TURN server does not support archiving and therefore does provide true end-to-end encryption.
|
Using document co-browsing with files of a type other than PDF relies on third-party services and involves uploading the files to the servers of those third parties. Please review the following configuration properties: |
3.10.10. Comparison
Considering the two deployment issues above it should be clear that
-
In terms of firewall policy, the Unblu cloud TURN server is the simplest solution
-
In terms of data security in transit, there is no significant security advantage to the on-premises solution compared to the Unblu cloud solution
Therefore, from an operational perspective, the Unblu cloud TURN server is the better choice.
3.10.10.1. Unblu cloud TURN server configuration
To configure your on-premises Unblu server to connect to the Unblu cloud TURN server you need the following information:
-
The DNS address of the Unblu cloud TURN server (
<TURN_ADDR>):turn.unblu.cloud -
The authentication key (
<AUTH_KEY>): available from the Unblu delivery team
The authentication key is given to you as part of the onboarding when you register for an Unblu cloud TURN Server account. Please consult with the Unblu delivery team for more details.
With this information you can set the following configurations properties on your Unblu server:
com.unblu.webrtc.iceServer=turn.unblu.cloud
com.unblu.webrtc.useWebRTC=true
com.unblu.webrtc.credentialSecretKey=<AUTH_KEY>
Additionally, for testing you can set the following:
com.unblu.webrtc.useRelayOnly=trueBut for production this should be changed to
com.unblu.webrtc.useRelayOnly=false3.10.10.2. On-premises TURN server configuration
If you do choose to install your own TURN server on-premises then a common choice is the open-source Coturn Project To create a secure key, we recommend programmatically creating a pseudo-random string using code like the following:
#!/usr/bin/env python3

from base64 import b64encode
from random import SystemRandom
from string import ascii_letters

def generate_turn_auth_secret(length = 36):
    """Generate a Base64 encoded random string to be used as the turn server auth secret"""
    character_set = ascii_letters + '#$%&()*+,-./:;<=>?@[]^_`{|}~'
    random_string = ''.join(SystemRandom().choice(character_set) for _ in range(length))
    # print('secret is: ' + random_string)
    return b64encode(bytes(random_string, 'utf-8')).decode("utf-8")

print("Generated, random auth secret: " + generate_turn_auth_secret())
The resulting key should be used in place of <AUTH_KEY> in the configuration files below.
3.10.10.2.1. Note the TURN server address
Since you are installing the TURN server on your own infrastructure you control the address of the server. This value should be used in place of <TURN_ADDR> in the configuration files below.
3.10.10.2.2. Use the standard ports
The ports configured for TCP and UDP transport should be the standard ones, the same as with the Unblu cloud TURN server option:
-
<UDP_PORT>:3478 -
<TCP_PORT>:443
3.10.10.2.3. Determine listening IP address
The IP address on your internal network at which the TURN server should listen for connections is represented by the placeholder
<LISTENING_IP>
in the configuration file below.
3.10.10.2.4. Determine external IP address
The external IP addresses (i.e., as seen from the internet) at which the TURN server is listening for connections is represented by the placeholder
<EXTERNAL_IP>
in the configuration file below.
3.10.10.2.5. Unblu server configuration
The configuration on the Unblu server side will be very similar to that used with the Unblu cloud TURN server above, except that the <AUTH_KEY> will be the one you created and the <TURN_ADDR> will be the one you specified when you did the installation.
3.10.10.2.6. Coturn server configuration
Configuration of the coturn TURN server is done in the file turnserver.conf. You can adapt the following by substituting the appropriate values for the placeholders:
listening-device=eth0
listening-port=<UDP_PORT>
listening-ip=<LISTENING_IP>
external-ip=<EXTERNAL_IP>
min-port=20000
max-port=20200
verbose
use-auth-secret
static-auth-secret=<AUTH_KEY>
realm=unblu.com
cert=/etc/ssl/localcerts/tls.pem
pkey=/etc/ssl/private/tls.key
cipher-list=ECDH+AESGCM:DH+AESGCM:ECDH+AES256:DH+AES256:ECDH+AES128:DH+AES:ECDH+3DES:DH+3DES:RSA+AES:RSA+3DES:!ADH:!AECDH:!MD5:!RC4
dh2066=
log-file=/var/log/turn.log
simple-log=
Here is an example configuration, with placeholders filled in:
listening-device=eth0
listening-port=3478
listening-ip=172.16.2.54
external-ip=193.159.170.115/172.16.2.54
min-port=20000
max-port=20200
verbose=
use-auth-secret=
static-auth-secret=W3dEO1VoSURAJVtCeGdPVHoqYWtOJiMoaUhCYEFRemFsSW0q
realm=unblu.com
cert=/etc/ssl/localcerts/tls.pem
pkey=/etc/ssl/private/tls.key
cipher-list=ECDH+AESGCM:DH+AESGCM:ECDH+AES256:DH+AES256:ECDH+AES128:DH+AES:ECDH+3DES:DH+3DES:RSA+AES:RSA+3DES:!ADH:!AECDH:!MD5:!RC4
dh2066=
log-file=/var/log/turn.log
simple-log=4. Front-end and back-end integration
As we saw in the sections Front-end interfaces and integrations and Back-end integrations Unblu offers a number of connection points for integrating different kinds of interfaces and additional functionality. In the following section we will look at each of these integration points in more detail.
4.1. Overview
In terms of our earlier Basic System Components diagram, we will be looking at the highlighted components below:

4.2. Individual UI web integration
To enable the Individual UI on your website the Unblu installation must be integrated with your web infrastructure. This involves addressing three issues:
-
How is the client code for the Individual UI (often called the Unblu snippet) included in your website page? The options are dynamic injection or static inclusion.
-
Where is the Unblu Server positioned inside your infrastructure? The options are site-embedded or cross-origin.
-
Do you need support for protected resource upload to the agent?
| These options only apply in an on-premises deployment. In an Unblu Financial Cloud deployment, dynamic injection, site-embedded integration and protected resource upload are not supported. Consequently, all Unblu Financial Cloud deployments use static inclusion and cross-origin integration and do not have protected resource upload. |
4.2.1. Including the Unblu snippet
When an Unblu-enabled website is initially requested by a visitor’s browser the returned page includes not just the normal website code but also extra code that implements the Unblu visitor interface. This extra Unblu client code is often called the Unblu snippet. It can be included in your website code by either static inclusion or dynamic injection.
4.2.1.1. Static inclusion
In this method you alter your website markup to include the Unblu snippet. The snippet in turn loads the Unblu client code. Every page on which you want to display the individual UI launcher button must include the snippet. This method of inclusion is relatively simple but you do need access and permission to change the actual code of the website in question.
<!DOCTYPE html>
<html>
<head>
    <script type="text/javascript" defer="defer"
        src="https://unblu.cloud/unblu/visitor.js?x-unblu-apikey=YOUR_API_KEY"></script> (1)
</head>
<body>
    <!-- Your HTML body -->
</body>
</html>| 1 | Replace YOUR_API_KEY with your API key. |
The snippet with the correct key can also be copied from the API keys section in the Account Configuration.
| For certain use cases you might not need the snippet on all pages. For example when you want Unblu’s Universal or Document Co-Browsing only on a specific section of your website, it is sufficient to instrument only those pages. |
4.2.1.2. Dynamic injection
In this method you configure the Unblu snippet in a single central place and have it injected into the appropriate pages. There are two ways of doing this:
-
Dynamic injection with the SecureFlow Manager
-
Dynamic injection with a tag management system
4.2.1.2.1. Dynamic injection with the SecureFlow Manager
With this strategy you use a reverse proxy in front of your website server that includes the Unblu SecureFlow Manager. This method does not involve any changes to the website code itself, but it does involve installation of software on your corporate infrastructure. If you already have a suitable cache/reverse proxy installed you may be able to simply add the SecureFlow Manager to it.
The SecureFlow Manager will manage the injection of the required JavaScript into the pages to enable the Individual UI. It also provides the protected resource upload functionality (see below).
For details on installation see SecureFlow Manager.
4.2.1.2.2. Dynamic injection with tag management
An alternative method of including the Unblu snippet is to leverage an existing tag management system to inject the snippet into the desired pages of your website. Tag management systems are used primarily to centralize the management of injecting marketing-related code into pages across large websites, but in many cases they can be used to inject any JavaScript snippet, including the Unblu snippet.
4.2.2. Server positioning
4.2.2.1. Site-embedded
The following diagram depicts the site-embedded scenario:

In this setup both the Unblu server and your company website server sit behind a proxy. Note that in this case the diagram also depicts the SecureFlow Manager as being installed on the proxy server. In most situations where a site-embedded integration is used, the SecureFow Manager will also be used (and thus dynamic injection and protected resource upload will both be enabled). However, strictly speaking the two factors are independent: SecureFlow Manager can be used without site-embedded integration and vice versa.
4.2.2.2. Cross-origin
The following diagram depicts the cross-origin scenario:

In this setup the Unblu server and your company website server are exposed separately to the internet. Typically this arrangement is used with static inclusion, though as above, the factors are independent: cross-origin installation could theoretically be used in conjunction with dynamic injection provided by a SecureFlow Manager.
4.2.3. Protected resource upload
As discussed earlier, embedded co-browsing works by capturing the state of the DOM of the Unblu-enabled website on the visitor browser and transferring that state to the agent browser.
Once the DOM has been rebuilt on the agent browser, there are typically additional resources (stylesheets, images, etc.) that the browser must request to complete the rendering of the visitor’s view.
In many cases, these resources will be inaccessible without authentication and authorization, for example, if they are part of a bank’s e-banking site. In normal circumstances, such as in the case of the visitor browser, this does not present a problem since that browser will already be signed in to the site. However, co-browsing is a special case. The agent browser will not have the same authorization as the visitor browser and yet, in order to properly render the visitor’s view, it needs access to the protected resources.
Since uploading the resources from the visitor browser is considered unsafe and would usually be too slow, Unblu solves this problem with the SecureFlow Manager, a software component installed in a proxy in front of the website server that caches the resources and uploads them on demand to the Unblu server, from where the agent browser can successfully request them and build an accurate rendition of the visitor’s view.
4.3. JavaScript API
The JavaScript API is an optional add-on to the Unblu Individual UI website integration. It allows JavaScript to access and control certain functions related to the Individual UI.
4.3.1. Concepts
The Visitor JS API allows you to load, access and control the Individual UI inside your website. The API directly accesses and communicates with the loaded Unblu code. Any interaction with the API is reflected in the visitor’s Individual UI. For example, if a conversation is opened via the API, it will also be visible in the Individual UI.
The Visitor JS API can only perform actions that the current visitor has the right to perform. For example, if a visitor is allowed to end a conversation, this may be done via the API. If not, an API call to end the conversation will fail with an error.
The visitor JS API is meant to be used for actions directly connected to the current visitor and that visitor’s usage of the Individual UI. This includes things like automatically starting a conversation or starting a call within a conversation that the visitor is already part of.
For actions that require rights beyond those the local visitor has, or that should be independent of the visitor’s UI, consider using the Unblu Web API either directly in JS or via custom REST services provided by your own server.
4.3.2. Reference and examples
For information on how to integrate the Visitor JS API with your website, please refer to the Unblu Visitor JavaScript API reference documentation. The reference documentation is updated with the changes of the latest Unblu version.
The reference documentation includes examples to help get you started. Additional examples are available from our GitHub repository.
If you are running an older version of Unblu, you might prefer to view the documentation page directly from your Unblu server. That page describes the JS API as it is available on your server.
You can find your local documentation page at the following address:
<unblu-server>/unblu/static/js-api/v2/docs/index.html
4.4. SecureFlow Manager
4.4.1. Overview
The SecureFlow Manager (SFM) is an optional part of the Unblu product, separate from the Unblu server itself. It is designed for site-embedded deployments. These are on-premises installations where the Unblu server and the Unblu-enabled website are both hosted within your company network and exposed to the internet via a web application firewall or other reverse proxy.
The SFM is designed to be integrated into this reverse proxy component. From this position in the network, it can serve two different purposes that enhance the functionality of your Unblu installation:
- Dynamic injection of the Unblu snippet
-
The SFM can dynamically inject the Unblu JavaScript snippet into specific pages of your website. This eliminates the need to modify the source code of the instrumented website itself.
- Forwarding of protected resources
-
The SFM can intercept protected resources such as images and CSS as they transit the proxy from the website back-end to the visitor’s browser. It then forwards these resources to your agents' browsers during embedded co-browsing sessions.
4.4.2. Dynamic injection
As discussed in the section Individual UI web integration, you must include the Unblu JavaScript snippet on pages where you wish to enable Unblu. There are two ways to accomplish this:
-
Static inclusion, where the snippet is added to the page’s source code.
-
Dynamic injection, where the back-end code is left unchanged and the snippet is injected by some other mechanism.
The SecureFlow Manager is one mechanism that can be used to perform dynamic injection. An alternative would be to inject the snippet using a tag management system. See Dynamic injection with tag management for further details.
4.4.3. Protected resource forwarding
Protected resource forwarding enhances the effectiveness of embedded co-browsing. It helps to ensure that pages your visitors and agent are co-browsing look as similar as possible to all participants.
When a visitor requests a page from your Unblu-enabled website, this is roughly what happens:
-
Your website’s back-end responds to the initial request by sending the HTML document representing that page.
-
The visitor’s browser parses the HTML and constructs a Document Object Model (DOM) within the browser.
-
The DOM does not directly contain all the elements needed to render the page. Resources such as CSS files and images are referenced within the DOM via URL and require an additional request to actually retrieve them.
-
Once the browser has retrieved all the referenced resources, the browser can finish rendering the page and display the final result.
The visitor’s ability to access the original HTML document and all the subsidiary resources often depends on their having the proper permissions (in an e-banking portal, for example) in the form of a cookie that is transmitted on each request.
How does embedded co-browsing fit into the picture outlined above?
-
During an embedded co-browsing session, the Unblu code on the webpage in the visitor’s browser deconstructs the DOM and sends its state information to the Unblu server. Unblu reconstructs the page and serves it to the agent’s browser, giving the agent a view of what the visitor sees.
-
Because the agent’s browser receives the DOM information through this mechanism and not via a direct request for the webpage, it doesn’t need its own authorization to get the basic structure of the webpage.
-
Things are different for resources referenced in the DOM. The agent’s browser has to retrieve these resources directly. However, since the agent’s browser doesn’t have the same authorization as the visitor, it won’t be able to retrieve those resources if doings so requires authorization.
This is the problem that the SecureFlow Manager’s protected resource forwarding is designed to address. It does so by intercepting referenced resources as they transit the reverse proxy on their way to the visitor. It then forwards these resources to the Unblu server’s Resource History. Unblu can then use them, in conjunction with the DOM that it already has, to reconstruct the visitor’s view of the webpage for the agent.
The following diagram depicts the flow of data.

4.4.4. Supported products
Unblu provides out-of-the-box SecureFlow Manager implementations for the following reverse proxy products:
| Customers interested in using the SecureFlow Manager with a product not listed above should contact Unblu. The SecureFlow Manager is defined by a publicly available specification that can be used as a guide to building a custom implementation. For more details, see the SecureFlow Manager specification. |
4.4.5. Common configuration
Before installing the SecureFlow Manager on your specific reverse proxy product (see links below) it will help to understand some aspects of SFM configuration that apply across all products.
As discussed above, the SecureFlow Manager has two responsibilities: code injection and resource forwarding. The precise way that a specific SFM installation performs these functions is based on a set rules that are defined as part of its configuration.
The configuration of the SFM is actually done in the UI of the Unblu server. The Unblu server then translates these configuration settings into an SFM-specific format and this file is provided to the SFM component.
4.5. Mobile SDK
The Mobile SDKs for Android and iOS can be used to integrate Unblu into mobile applications for visitors or agents. When the SDK is integrated into an app, the app can use many of the same features as are available to visitors and agents through the web interfaces (chat, co-browsing, notifications, etc.).
4.5.2. Features
The following features of Unblu are available when interacting with the SDKs:
-
Dynamically load and unload the API
-
Check if a connection to the Unblu server could be established
-
Start a chat conversation
-
Start a mobile co-browsing conversation
-
Start an audio/video call
-
Add or remove private views, which should not be displayed to the agent/visitor (e.g. password fields)
-
Add or remove private areas, which should not be displayed to the agent/visitor
-
Add or update custom cookies sent to the Unblu server with each request
-
In-app events for API state, session state, notifications (e.g., agent/visitor joint messages, chat messages), errors (More details can be found in the code documentation which is provided together with the SDK for each platform.)
-
Push notifications for unread messages and incoming calls
-
Whitelist of accessible URLs inside the WebView of the SDK
-
Whitelist of external links that can be opened from the chat
-
Certificate Pinning
The visitor SDK additionally provides the following features:
-
Check if an agent is available
-
Join a conversation via a PIN from the agent
The following features are available in co-browsing sessions:
-
Co-browsing all of your app’s content
-
Interactions of the user with the device screen can be seen remotely
-
Orientation changes are displayed on the agent side
-
Lock the screen displayed in the agent desk if the visitor puts the app into the background
-
Areas of the app can be marked remotely
-
Chat between visitor and agent inclusive UI
-
Start an audio/video call
4.5.3. Architecture overview
The diagram below shows how the mobile SDKs are integrated into the Unblu environment. Additionally it shows the OpenTok and Firebase Server which are used inside the SDKs via their libraries.

4.5.4. Configuration on the Unblu Collaboration Server
The following configuration properties are important for the mobile SDKs:
-
messenger.mobileVisitorSdkEnabled -
Specifies whether the visitor mobile SDK is enabled. This must be enabled so that the visitor SDK on a mobile device can initialize. If the property is set to
false, the visitor mobile SDK will not be usable. -
messenger.mobileAgentSdkEnabled -
Specifies whether the agent mobile SDK is enabled. This must be enabled so that the agent SDK on a mobile device can initialize If the property is set to
false, the agent mobile SDK will not be usable. -
messenger.mobileCoBrowsingEnabled -
Specifies whether mobile co-browsing with the SDKs is enabled. If it is not enabled, the SDKs can still be used for chat or call conversations.
-
conversation.feature.mobileCoBrowsingEnabled -
The same as
messenger.mobileCoBrowsingEnabledbut on the conversation level. This property may be set individually for each conversation and conversation template. -
cobrowsing.startWithMobileCobrowsingOptionEnabled -
Enables starting a mobile co-browsing conversation. Such a conversation immediately launches mobile co-browsing when the conversation is accepted from the queue.
-
visitor.ui.showRequestMobileCobrowsingEngagementOption -
If this property is
true, the UI will give you the option to start a mobile co-browsing conversation when the Unblu UI is displayed in the app.
4.5.4.1. Collaboration Server and mobile SDK compatibility
Releases of the Collaboration Server and the mobile SDKs don’t take place at the same time. To determine whether a particular version of the Collaboration Server is compatible with a particular version of one of the SDKs, follow the guidelines below:
-
The principle component is the Collaboration Server. Releases of the mobile SDK are compatible with the latest version of the Collaboration Server available when the mobile SDK is released.
-
A mobile SDK version remains compatible with minor versions of the Collaboration Server released after the mobile SDK was released.
-
Once an SDK reaches the end of its support period, there is no guarantee that it will remain compatible with new minor versions of the Collaboration Server.
Consider the following example: Android mobile SDK 3.4.2 was released on 14 June 2021. At the time, the latest version of the Collaboration Server was 6.35.0, which was released on 11 June 2021. As a result, Android SDK 3.4.2 is compatible with 6.35.0 and subsequent minor and major versions of the Collaboration Server. This is the case until 29 August 2023, when the support period for version 3 of the mobile SDKs ends.
There are no guarantees that Android mobile SDK 3.4.2 is compatible with version 6.34.4 of the Collaboration Server, which was released on 21 May 2021, or earlier versions of the Collaboration Server.
4.5.5. Integration
For iOS integration, please see iOS mobile SDK integration.
For Android integration, please see Android mobile SDK integration.
To go directly to the SDKs' API documentation, use the following links:
4.5.6. Mobile push notifications
The following configuration properties need to be set for mobile devices to be able to send and receive mobile push notifications from the Unblu server via Firebase Cloud Messaging:
-
mobile.push_notification.enablePushNotification -
Enables push notifications in general. Currently there are email and mobile push notifications.
-
mobile.push_notification.enableFirebasePushNotification -
Enables push notifications via Firebase Cloud Messaging.
-
mobile.push_notification.firebaseDatabaseName -
The name of the firebase database where the app is configured for Firebase Cloud Messaging. Set the property to the Project ID of your Firebase project, as displayed on the General tab of your Firebase project’s settings.
-
mobile.push_notification.firebaseServiceAccountKey -
The account key to allow the Unblu server to access Firebase Cloud Messaging. You can generate an account key by clicking on the Generate new private key button on the Service accounts tab in the settings of your Firebase project,
For more information on Firebase Cloud Messaging, please refer to the Firebase documentation. Depending on the operating system you are targeting, please review the Firebase documentation on setting up a Firebase Cloud Messaging client on Android or iOS.
Unblu-specific information is available in the sections iOS mobile SDK integration and Android mobile SDK integration.
4.5.7. UI concepts
The Unblu UI is implemented as an overlaying window. This allows the UI to be displayed either as an actual overlay or visually embedded within another view. As this approach is different from most UIs in Android and iOS, the following pointers should help you integrate Unblu into your app.
4.5.7.1. Life cycle
Because the Unblu UI is implemented as an overlay it can be displayed independently of the Activity/ViewController that is displayed as the main content of an app. This means that the Unblu UI also has a separate life cycle which is not bound to the life cycle of an Activity/Fragment or ViewController. Therefore the Unblu UI´s life cycle has to be managed with the scope of the whole application in mind.
4.5.7.2. Integrating Unblu as overlay
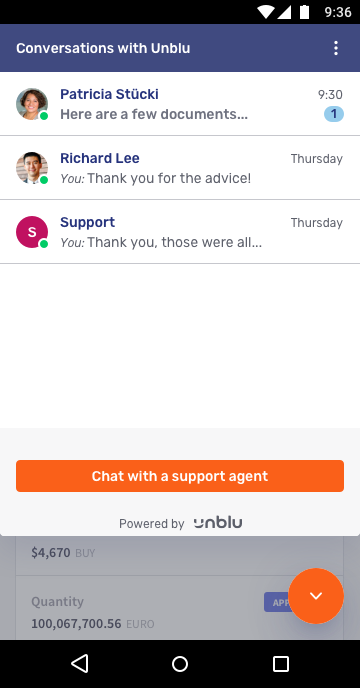
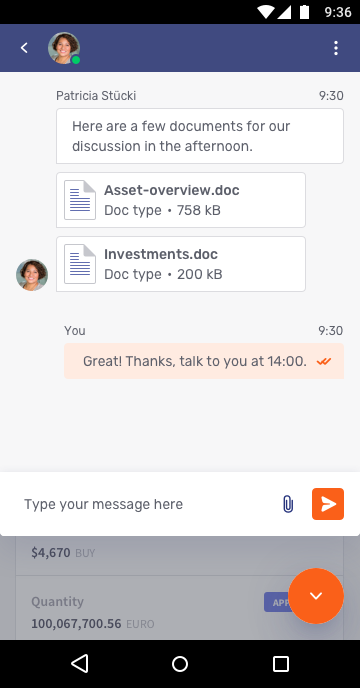
If Unblu is integrated as an overlay, it is displayed on top of the main app content. The easiest way to do this is to use the Unblu Launcher Button (iOS/Android). The button has to be added to the active View. It displays the unread message notification count and will open and close the Unblu UI when toggled. It will also add a gray background behind the Unblu UI to clearly lay it on top of the other content.
Alternatively you can provide your own implementation of the Unblu Launcher Button. The implementation must encompasses the logic of when to show and hide the Unblu UI. See the Unblu Launcher Button as a reference.
4.5.7.3. Integrating Unblu in a standalone Activity, Fragment or View
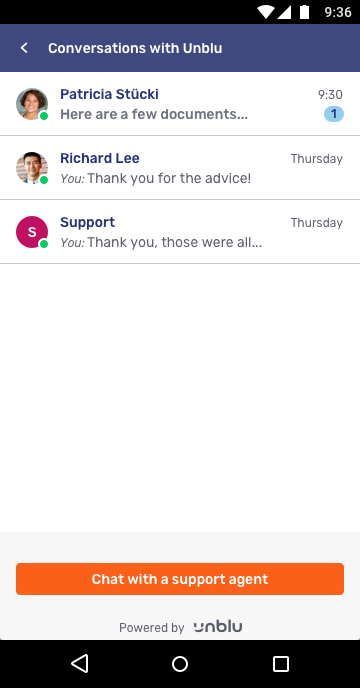
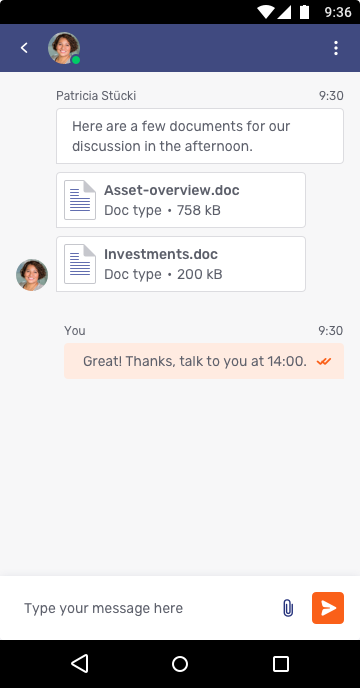
If your app is designed to show the Unblu UI as its main content (i.e. its own Activity or ViewController), there are a number of points to bear in mind.
To properly display the Unblu UI below an action bar or above some tab bar, the top and/or bottom margin of the Unblu UI must be adapted to take this into account. This is because the Unblu UI is still rendered in a window above the rest of the content and would be displayed atop other content otherwise.
Since the Unblu UI is independent of the app UI life cycle, it will stay above the app UI even if the app changes the current Activity/ViewController. As a result, when displaying or hiding the Activity/Fragment/ViewController that Unblu is displayed in, the Unblu UI must also be shown or hidden, respectively. To this end, you must programmatically show or hide the Unblu UI whenever the user navigates to or away from the main content where Unblu is displayed. If you don’t, the Unblu UI will float over the newly loaded app and potentially conceal the latter’s content.
4.5.8. Android mobile SDK integration
This section describes how the visitor/agent SDK can be integrated into an Android app. It describes step by step from adding the AAR files to use the API, whereby it gives some hints to get a good user experience and avoid some common pitfalls.
4.5.8.1. Requirements
The Android mobile SDK requires Android version 6 or newer.
Before you start, make sure that you are using the D8 dex compiler and JDK 11 or newer to build your app.
| The information here refers to version 3 of the Unblu mobile SDK. Please refer to the Unblu 5 documentation for information on version 2 of the SDK. |
4.5.8.2. Android archive integration
For Android, Unblu provides android archive (AAR) files with additional sources JARs for public classes and Javadoc JARs for them. Those files are delivered within a .tar.gz file either for the visitor or the agent SDK. The TAR files have the internal structure of a maven repository.
Unblu is divided into modules, and depending on your implementation, you may use all, or only some of them. Depending on the target audience of the app, either the agent or the visitor SDK TAR needs to be added to the project.
To integrate the SDK, the TAR files have to be extracted into the project folder of the app. Assuming one would need the visitor SDK for the app, the folder could be called unblu-mobile-visitor-sdk. To add it to the project, the following lines need to be added to the app/build.gradle file:
repositories {
    ...
    mavenCentral() (1)
    maven {
        url "../unblu-mobile-visitor-sdk"
    }
}
...
dependencies {
    ...
    implementation 'com.unblu.mobile-sdk-android:visitorsdk:3.3.0'
    implementation 'com.unblu.mobile-sdk-android:firebasenotificationmodule:3.3.0'
    implementation 'com.unblu.mobile-sdk-android:callmodule:3.3.0'
    implementation 'com.unblu.mobile-sdk-android:cobrowsingmodule:3.3.0'
    implementation 'com.unblu.mobile-sdk-android:advancedscreencapturemodule:3.3.0'
}| 1 | This line is required if you use the Unblu video & voice call feature in your app. The Unblu call module has a dependency on the OpenTok Android SDK provided by the Vonage Video API. |
This way all dependencies of the SDK are automatically retrieved.
The *-public-sources.jar files only contain the sources for the public API part and cannot be used as a library as they don’t contain the internal classes. |
The Unblu SDK’s firebasenotificationmodule uses Firebase Cloud Messaging for push notifications. For Firebase to work correctly, the google-services.json file from the Firebase project must be added to the app. Additionally, you need to add the following line at the end of your app’s gradle file.
apply plugin: 'com.google.gms.google-services'Please follow the instructions here for detailed information.
| It is not necessary to set up Firebase in your code. This is done automatically by the SDK when push notifications are enabled. |
4.5.8.3. Permissions
Various features require that you include certain permissions in your application’s manifest.
-
android.permission.INTERNET -
Required to use the internet connection
-
android.permission.SYSTEM_ALERT_WINDOW -
Required to overlay the Unblu UI on top of the application. This permission is automatically granted by the app store.
-
android.permission.WRITE_EXTERNAL_STORAGE -
Required to save files which should be downloaded
-
android.permission.RECORD_AUDIO -
Required by OpenTok for audio and video sessions (also for plain audio sessions)
-
android.permission.CAMERA -
Required by OpenTok for audio and video sessions
-
android.permission.MODIFY_AUDIO_SETTINGS -
Required by OpenTok for audio and video sessions (also for plain audio sessions)
-
android.permission.BLUETOOTH -
Required by OpenTok if bluetooth device is used inside calls
-
android.permission.BROADCAST_STICKY -
Required by OpenTok (no details available)
-
android.permission.READ_PHONE_STATE -
Required by OpenTok (no details available)
4.5.8.4. Code setup and initialization
4.5.8.4.1. UnbluApplication
To ensure the SDK works properly, you must set the attribute android:name in the application tag of the AndroidManifest.xml file to either com.unblu.sdk.visitor.UnbluVisitorApplication or com.unblu.sdk.visitor.UnbluAgentApplication. (If you implemented your own custom application class that inherits from one of the above classes, set the attribute to that.) See the code snippet below for an example.
<?xml version="1.0" encoding="utf-8"?>
<manifest xmlns:android="http://schemas.android.com/apk/res/android"
    package="com.unblu.testapp">

    <application
        android:name="com.unblu.sdk.visitor.UnbluVisitorApplication"> <!-- There may also be some other attributes -->
        </application>
</manifest>
If this is not possible in your application, you can use the UnbluApplicationHelper. They define a couple of static functions like onCreate(..) which need to be called in the corresponding functions of the used Application class. The names of the functions in the helper class are the same as those in the Application class. The documentation also states whether the function must be called before or after the super call.
4.5.8.4.2. Unblu API instance
The most important class of the visitor SDK is UnbluVisitorApi; that of the agent SDK is UnbluAgentApi. They provide an getInstance() function, which can be used to get an instance of the API.
Note: The UnbluApi is defined as a singleton, so there is only one instance of it. Therefore further usages of the instance member will not create additional instances.
4.5.8.4.3. Unblu API configure
Before using the instance of the UnbluVisitorApi/UnbluAgentApi, it needs to be configured The API can be configured using the function UnbluVisitorApi#configureApi(..)/UnbluAgentApi#configureApi(..). It accepts an instance of UnbluApiConfiguration. This class can be instantiated with the base URL of the Unblu server and the API key of the Unblu account.
For all possible configurations and their effects, take a look at the documentation of UnbluApiConfiguration.Builder. Only a limited number of settings can be configured via the Unblu SDKs. All configurations which are independent of the client (the app) can be done via the Unblu agent desk.
To properly separate the configuration for the mobile visitor and agent SDK and also from configurations done for the webpage where Unblu is integrated, we recommend to use different API Keys for each environment.
Inside the Unblu API instance, only a copy of the configuration is stored. So it can not be changed by the reference. A new call to configureApi has to be done. Configuring the API can only be done while it is not initialized and it would throw an exception if it is already initialized.
Normally the configuration should only be done once at the beginning.
4.5.8.4.4. Events
Before you initialize the API you should register for events in order to be sure not to miss any.
In android this can be done by using a custom implementation of UnbluVisitorEventReceiver for the visitor sdk and UnbluEventReceiver for the agent SDK. Additionally for UI events a subclass of UnbluUiEventReceiver can be used. An instance of such a receiver will register himself in the given context. Therefore it should typically be instantiated inside the Activity.onStart method and should be unregistered in the Activity.onStop via LocalBroadcastManager.getInstance(context).unregisterReceiver(receiver). It is important to always use the androidx.localbroadcastmanager.content.LocalBroadcastManager otherwise the events will not be received.
Detailed information on the events can be found inside the IUnbluEventApiVisitor/IUnbluEventApi and UnbluUiEventReceiver class. They also provide constants to get the values out of an Intent if this is done manually without a subclass.
A very important event is the UiVisibilityRequest. As soon as push notifications are used, it is recommended to listen for this event. For example, there is a push notification when there is an incoming call. If the user opens the app by clicking the notification, the SDK will directly fire this event and assumes that the app will initialize and open the Unblu UI as soon as possible.
4.5.8.4.5. Initialization and deinitialization
To initialize an instance of UnbluVisitorApi/UnbluAgentApi the function initApi(..) can be called.
The callback parameters can be used to get information about success and errors. Additionally the IUnbluEventApi.Error event can be used as described in the events section. Regarding errors, it is highly recommended to register for the API error event globally in order not to miss an error, as they can happen independently of any explicit call to the API.
After the success callback was triggered, the Unblu UI can be displayed, new conversations can be started, agent availability can be checked, etc.
The API can either be initialized directly or only on demand. For example when co-browsing is needed. Note that when the API is initialized on demand, the SDK will take some time until it is ready and a session can be started. Additionally if push notifications are used, it is required at least once to have the API initialized. Otherwise the Unblu server has no connection between a user and the device. Therefore in general we recommend to initialize the API as soon as it is possible (directly after login).
If the SDK is no longer needed and everything should get cleaned up, there is the deinitApi(..) function.
4.5.8.5. Unblu UI
The UnbluVisitorSDK and UnbluAgentSDK provide an Unblu UI that shows all existing conversations and can be used to chat and make a call within a conversation. This UI can be displayed on top of the app UI. It is also controlled by using the instance of the UnbluVisitorApi/UnbluAgentApi. It is possible to open/close and change its top/bottom margin.
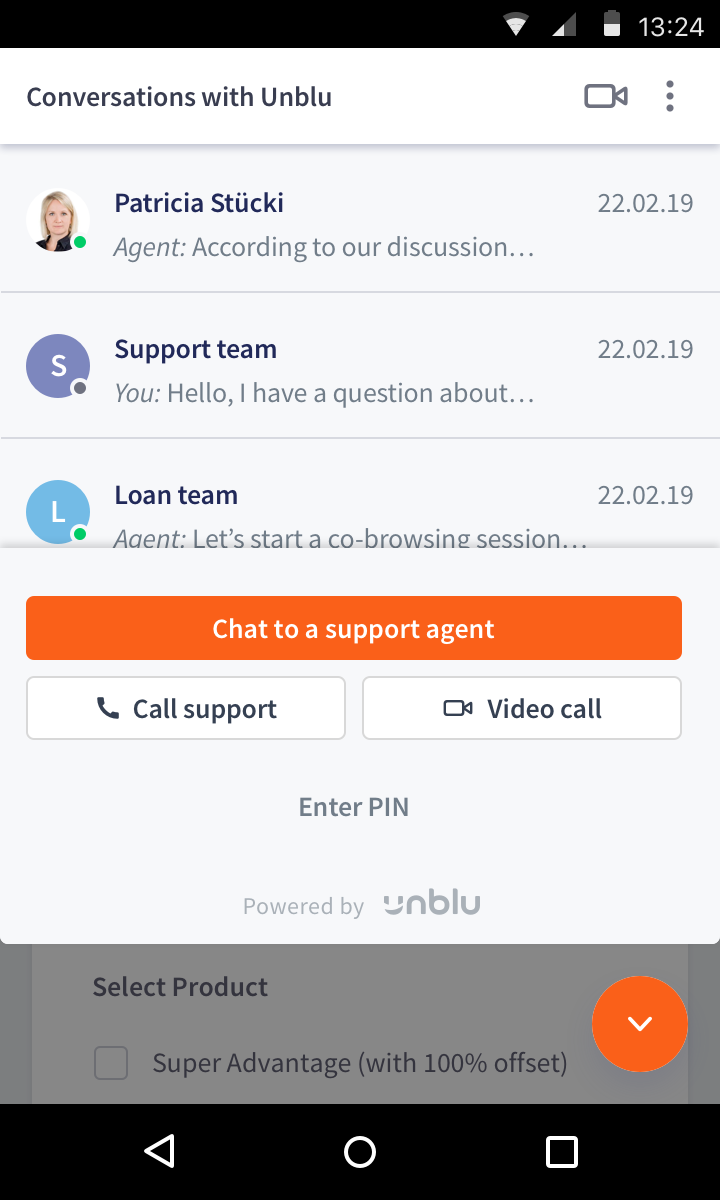
Additionally it can be checked if it is open or if a call is currently displayed. For those states there are also events defined in the IUnbluUiEventApi. Especially the events UiVisibilityRequest and UiHideRequest are very important. If one of those triggers, the app should show/hide the UI, because there is an incoming call or co-browsing just started. For the hide event, the configuration property com.unblu.conversation.ui.autoCollapseIndividualUiOnLayerActivation has to be enabled.
If there is an issue with the Unblu SDK, please be aware that the UI is rendered inside a WebView. Therefore it is possible to attach the local Chrome to check for error logs. It is a limitation of the Android WebViews that it is not possible to see the full content of logs inside the normal debugger console.
Note that several functions, like opening a conversation and starting an audio/video call, require that the UI opens at least once so that the corresponding part gets loaded by JavaScript. You can find more details in the documentation.
If, at some point, it is likely that the user would use the Unblu UI, we would recommend you preload the UI. This can be achieved by either configuring to preload the UI with the initialization (see UnbluApiConfiguration.Builder#setPreloadAfterInitEnabled(..)) or by calling UnbluCoreApi#preloadUi(..) if the API was already initialized previously.
4.5.8.6. UnbluUiButton
Next to the Unblu UI, the SDKs provide the class UnbluUiButton. This button UI can be placed inside the app UI either via xml or directly in the Code. Typically the button will be placed in the lower right corner of the screen.
The user can use the button to toggle the visibility of the Unblu UI.
The button displays a number of unread chat messages when new messages arrive and the UI is hidden. Additionally it can automatically set the bottom margin for the Unblu UI and places a semi transparent background behind it.
To integrate it, please follow the instructions in the UnbluUiButton class documentation.
4.5.8.7. Private views
The SDKs provide a simple way to add specific views which should not be shown on the remote side. To do this, the UnbluCoBrowsingModuleApi provides the function addPrivateView(..) which takes an ID as its argument. Each view has its own id.
After a view id is added, it is automatically overlaid by an image before the screen is transmitted to the remote side. It is also possible to make a view visible to the remote side again by calling the removePrivateView(..) function.
4.5.8.8. Private areas
The SDKs provide a way to specify areas which should not be shown on the remote side. To this end, the UnbluCoBrowsingModuleApi provides the function setPrivateArea(..) which takes a custom ID, values for the x and y axes, and values for the width and height of the private area. Each private area has its own ID.
After an area is added, it is automatically overlaid by an image before the screen is transmitted to the remote side. To make a view visible to the remote side again, call the function removePrivateArea(..).
4.5.8.9. Custom cookies
It is possible to define custom cookies, which should be sent with each request to the Unblu server. This can either be done (initially) by using the function UnbluApiConfiguration.Builder#setCustomCookies(..), or by setting the cookies dynamically with the setCustomCookies(..) function. Before the API is initialized, always the last cookies configured are used. If the API is already initialized, cookies with the same name are overridden and new cookies are added. The previously-defined cookies will stay until the API is de-initialized. If the API is then initialized again, only the last defined cookies are used again.
4.5.8.10. Named areas
Similar to a web page, the named area feature is also available for the mobile SDKs.
A named area can be set by calling UnbluApiConfiguration.Builder#setNamedArea(..) before initializing the API. Alternatively, it can be set by calling UnbluCoreApi#setNamedArea(..) on the UnbluVisitorApi or UnbluAgentApi instance.
If a named area is set before initializing the API, its specific configuration is loaded upon initialization. If it is set later, it only changes the requests for new conversations in the agent desk queue in the way that the agent can filter by the named area. The named area has no effect for existing conversations.
As a result, it’s important to know if there will be specific configuration on the named area scope. If there is, the named area must be configured/set in the SDK before initializing the API, but then it should be always considered to change the configuration on API Key level. If a named area is only used for the queue, it can be set at any time before starting a new conversation.
4.5.8.11. Uploading files and camera pictures or videos
When the user of the app tries to upload a file in the Unblu chat UI, the file chooser appears. By default, the user may select either an existing file or create a new picture/video with their phone’s camera app.
You can restrict the file types that users may upload with the following configuration properties:
Unfortunately, the specific behavior of com.unblu.filemanager.fileTypeInputTagHint varies between device vendors. Android may filter out file types that you don’t want to exclude. You should take this into account when deciding whether to enable the configuration property for Android devices.
In Android, the camera app can’t write a picture directly to the app’s internal storage, so it stores a temporary file in the external storage of the Android system. This can be a security issue, so the SDK allows you to disable the upload of new pictures/videos from the camera app. Use UnbluApiConfiguration.Builder#setCameraUploadsEnabled(..) to change the configuration.
You can also disable only photo or video uploads individually using link:{android-sdk}com/unblu/sdk/core/UnbluApiConfiguration.Builder.html#setPhotoUploadsEnabled-boolean-[`UnbluApiConfiguration.Builder#setPhotoUploadsEnabled(..)`] or link:{android-sdk}com/unblu/sdk/core/UnbluApiConfiguration.Builder.html#setVideoUploadsEnabled-boolean-[`UnbluApiConfiguration.Builder#setVideoUploadsEnabled(..)`], respectively.
4.5.8.12. Push notifications
If the SDK is configured to use push notifications, there are currently two possible types of notifications visible for the user: Whenever there is a new message and if there is an incoming call. For both types of notification, the system default sounds for notifications and calls should be used to ensure the best user experience. The SDK accomplishes this by using two different notification channels which use the default system sounds.
However, this is only possible for Android 8.0 Oreo or newer. Before Android 8.0 Oreo, you had to define custom sounds. The name of the sound files must be configured on the Unblu server via the configuration properties com.unblu.mobile.push_notification.androidNewMessageSound and com.unblu.mobile.push_notification.androidIncomingCallSound. We recommend only changing the incoming call sound. The value has to be the name of the file without the file type ending. Within the app, the file must be located at res/raw/<file>.
By default, the icon of the push notifications matches the app icon. Only the parts of the image with an alpha value are displayed. This can lead to a completely gray icon if the app icon has no transparent area. To change the icon to a different image, you can specify a meta-data area inside the app manifest, as in this example:
<meta-data
    android:name="com.google.firebase.messaging.default_notification_icon"
    android:resource="@drawable/ic_notification" />
See the Firebase configuration documentation for further details.
4.5.8.13. Advanced screen capture module
Currently, the standard official Android SDK tools do not provide a way to capture all of the views required to deliver a broad co-browsing experience. The advanced screen capture module contains an implementation that uses reflections to capture all dialogs, alerts, and GPU-generated views. This is not possible otherwise.
To use the module, add the following lines to your app/build.gradle file:
dependencies {
    ...
//if you are using the Visitor SDK
    implementation 'com.unblu.mobile-sdk-android:visitorsdk:$version'

    //or if you are using the Agent SDK
    //implementation 'com.unblu.mobile-sdk-android:agentsdk:$version'

    //the advancedscreencapturemodule
    implementation 'com.unblu.mobile-sdk-android:advancedscreencapturemodule:$version'
}
Next, provide the UnbluCoBrowsingModuleApi#setScreenCapturer with the AdvancedScreenCapturer instance by calling the function AdvancedScreenCapturerProvider#createAdvancedScreenCapturer. Do so before you configure the API instance.
4.5.8.14. Logging
The Unblu SDK uses an internal Logger, which can be configured. Per default the logger does not print any additional and potentially security related information. To change this behavior for debugging purposes, set the flag UnbluCoreApi#enableDebugOutput to true. Even though the default value of the log level is VERBOSE, in release builds, the verbose and debug logs are removed via proguard rules. You can change the log level by means of the function UnbluCoreApi#setLogLevel(..).
It is also possible to enable the flag UnbluCoreApi#enableCapturingPerformanceLogging to get logs about mobile co-browsing performance. For this the log level has to be DEBUG or less and also the enableDebugOutput flag has to be enabled.
If, for security reasons, you want to strip out the complete log statements from the compiled app, please review the section on log stripping first.
4.5.8.15. Security-relevant configuration
There are several security-related configuration possibilities when integrating the Android Mobile SDK. The following points should be taken into consideration to ensure the SDK is configured in the most secure way without limiting the features available.
4.5.8.15.1. Whitelist URLs
By default, only the configured Unblu base URL and its subroutes can be accessed by the SDK’s internal WebView. Sometimes you may need to grant the WebView access to other URLs. Examples of situations where this need may arise include:
-
Redirecting to a different domain
-
Accessing external resources such as fonts
If your application needs access to other URLs, you can provide a list of regular expressions matching those URLs via UnbluApiConfiguration.Builder#setInternalUrlPatternWhitelist(..). Otherwise there is no need to configure the internal pattern whitelist as it is secure by default.
The URLs in the internal pattern whitelist are those used internally by your Unblu-enabled application. If you want to specify which URL patterns may be accessed by having your application open another application, modify the external link pattern whitelist described in the following section.
| If you want to use Google fonts in your mobile app, take into account that https://fonts.googleapis.com redirects to https://fonts.gstatics.com. You will have to include a pattern for the latter domain in the whitelist. |
4.5.8.15.2. Whitelist for external links
The Unblu chat UI recognizes different types of links:
-
URLs such as
https://<domain> -
mailto:<email_address> -
tel:<phone_number>
These links can be clicked by agents or visitors. Doing so opens another application such a browser or as an email client.
By default, the SDK allows only a small set of link patterns. You can check and change the patterns via UnbluApiConfiguration.Builder#setExternalLinkPatternWhitelist(..). For example, you may wish to restrict links to those within your organization’s domains.
4.5.8.15.3. Certificate pinning
From Android 7.0 Nougat (API 24) on, it is possible to use certificate pinning within your app’s network security configuration file. This may be done for the whole app including all WebViews, so there is no need for the SDK part to provide any configuration for it. Further information on certificate pinning in Android is available in the official documentation.
For Android versions prior to API 24, it is not possible to implement certificate pinning properly for all requests within a WebView. We therefore do not support it and recommend that you set the minimum version of your app to Android 7.0 Nougat (i.e. API 24) if certificate pinning is required.
4.5.8.15.4. Download Handler
During a conversation, agents and visitors may exchange files. These files can be downloaded and have to be stored somewhere on the user’s device. By default, files are store in the device’s external storage. However, you may prefer to ensure that files are only accessible from within your app for security reasons, and that the app manage downloaded files itself.
To manage downloaded files within your app, you must provide the SDK with a custom implementation of the UnbluDownloadHandler interface via UnbluApiConfiguration.Builder#UnbluDownloadHandler(..). Any downloads initiated by the user will trigger the custom download handler, which must handle the download itself and store the file somewhere within your app.
4.5.8.15.5. Log stripping
The logging section above describes how to configure the log level and whether any values are logged within a log statement.
If you prefer, you can remove log statements from the binary entirely by adapting the app’s proguard-rules.pro file. The SDK already defines the following rules to strip out debug and verbose level debug logs:
-assumenosideeffects class com.unblu.sdk.core.internal.utils.Logger {
    public static *** d(...);
    public static *** v(...);
}
You can do the same for all other log levels, too:
-
INFO:
public static * i(…); -
WARN:
public static * w(…); -
ERROR:
public static * e(…);
4.5.8.15.6. Encrypting stored preferences
The SDK needs to store some internal values inside the app to properly identify the user device against the collaboration server even after restarting the app. By default, shared preferences in private mode are used to store those values.
In many cases this is secure enough because normally, only the app itself has access to this data. Sometimes, though, you may wish to encrypt the values before storing them. To do so, provide the SDK with a custom implementation of UnbluPreferencesStorage interface via UnbluApiConfiguration.Builder#setPreferencesStorage(..). The SDK will use this storage whenever it needs to write or read the value of a preference to persistent storage.
4.5.9. iOS mobile SDK integration
This section describes how the visitor/agent SDK can be integrated into an iOS app. It describes step by step from adding the framework files to use the API, whereby it gives some hints to get a good user experience and avoid some common pitfalls.
| The information here refers to version 3 of the Unblu mobile SDK. Please refer to the Unblu 5 documentation for information on version 2 of the SDK. |
4.5.9.1. Requirements
The required version of iOS depends on the version of both the Unblu server and the iOS mobile SDK you are using:
Unblu 6 |
Unblu 7 |
|
mobile SDK v3 |
iOS 12 or newer |
iOS 14.5 or newer |
mobile SDK v4 |
N/A |
iOS 14.5 or newer |
4.5.9.2. Framework composition
Unblu is divided into modules, and depending on your implementation, you may use all, or only some of them.
Each module is distributed as an XCFramework, Apple’s binary framework format. In total, there are six frameworks. First, there is the core framework, which must always be added:
-
UnbluCoreSDK.xcframework
Then there are the entry points for visitor- and agent-specific functionality:
-
UnbluVisitorSDK.xcframework -
UnbluAgentSDK.xcframework
Finally, there are the optional modules:
-
UnbluCoBrowsingModule.xcframework -
UnbluCallModule.xcframework -
UnbluFirebaseNotificationModule.xcframework
All of Unblu’s iOS modules are currently distributed as static frameworks. To add the files to an Xcode project, you need to add them to your app target under General > Frameworks, Libraries, and Embedded Content. They can be dragged and dropped directly into this section.
As Unblu only provides static frameworks, it does not deliver the dependencies with them. Which dependencies you need will depend on the Unblu modules you use. The following table shows the dependencies you need to add to your app for different Unblu modules. We recommend adding the dependencies via CocoaPods, but the table includes links to instructions on how to integrate the libraries manually.
| Unblu module name | Dependency name | Version | CocoaPods podfile | Manual integration link | Purpose |
|---|---|---|---|---|---|
|
OpenTok |
~> 2.18 |
pod ‘OpenTok’, ‘~> 2.18’ |
Needed for audio/video calls |
|
|
Firebase Core |
~> 7.0 |
pod ‘Firebase/Core’, ‘~> 7.0’ |
Base for Firebase messaging |
|
|
Firebase Messaging |
Derived from Firebase Core |
pod ‘Firebase/Messaging’ |
Needed for push notifications |
For Firebase to work correctly, you must add the GoogleService-Info.plist file from the Firebase project to your app. To do so, please follow the instructions here.
It is not necessary to set up Firebase in your code. This is done automatically by the SDK when push notifications are enabled.
4.5.9.3. Swift compatibility
4.5.9.3.1. Objective-C
The frameworks provided by Unblu are written in Swift, not Objective-C, as Swift is the new standard from Apple. In principle Swift code can be used in Objective-C, but there are some limitations. For example, enums in Swift need to have a raw type of Int. It is therefore not simply possible to use the SDKs in an Objective-C environment. If your project is formally an Objective-C project, you will need to convert it to a Swift project that mainly uses Objective-C. The usage of an SDK must then be wrapped in a Swift helper which in turn can be used in Objective-C. Currently Unblu does not provide any Swift helper classes.
4.5.9.3.2. Swift versions
In 2014, Apple wrote:
if your project uses frameworks to share code with an embedded extension, you will want to build the frameworks, app, and extensions together. It would be dangerous to rely upon binary frameworks that use Swift —- especially from third parties. As Swift changes, those frameworks will be incompatible with the rest of your app. When the binary interface stabilizes in a year or two, the Swift runtime will become part of the host OS and this limitation will no longer exist.
Swift is ABI stable as of version 5.0, so if your project is running Swift 5.0 or newer, it should be able to interface with the Unblu SDK. If you require a version of the Unblu SDK built with an older version of Swift, please contact the Unblu support team.
Unblu aims to provide the iOS SDKs for the newest Swift version.
4.5.9.4. Permissions
Various features require that you include certain permissions in your application’s Info.plist.
-
NSPhotoLibraryAddUsageDescription -
Required to add downloaded images to the Photos app
-
NSPhotoLibraryUsageDescription -
Required to upload images from the Photos app to a conversation
-
NSCameraUsageDescription -
Required to upload images taken by the camera into a conversation. It is also required by OpenTok for audio and video sessions. OpenTok is a dependency of
UnbluCallModule. -
NSMicrophoneUsageDescription -
Required by OpenTok for audio and video sessions. OpenTok is a dependency of
UnbluCallModule.
You should also enable the following background modes:
- Audio, Airplay, and Picture in Picture
-
Required to continue calls when your app is in the background
- Remote notifications
-
Required to receive all push notifications
4.5.9.5. Code setup and initialization
Before using the Unblu SDK in your code, you need to import the corresponding SDK. Use either import UnbluVisitorSDK or import UnbluAgentSDK.
4.5.9.5.1. Firebase module
If you use Firebase to receive push notifications from Unblu, you’ll need to import the UnbluFirebaseNotificationModule.
As part of the Firebase module, Unblu provides some helper classes to make integration with Firebase easier. One of the classes, UnbluFirebaseUIApplicationDelegate, can be used as the base class for your AppDelegate:
import UnbluFirebaseNotificationModule

class AppDelegate: UnbluFirebaseUIApplicationDelegate {

}
If you choose to subclass UnbluFirebaseUIApplicationDelegate, Unblu will be able to configure Firebase push notifications for you automatically.
To receive push notification data in your AppDelegate, you can override a number of functions:
override func on_application(
    _ application: UIApplication,
    didReceiveRemoteNotification userInfo: [AnyHashable: Any])
{

}

override func on_application(
    _ application: UIApplication,
    didReceiveRemoteNotification userInfo: [AnyHashable: Any],
    fetchCompletionHandler completionHandler: @escaping (UIBackgroundFetchResult) -> Void)
{

}
To receive the device push token provided by Firebase, you can override the following function:
override func on_messaging(
    didReceiveRegistrationToken fcmToken: String?)
{

}If you choose not to use UnbluFirebaseUIApplicationDelegate, you’ll need to manually integrate with Firebase and pass relevant push notification data to Unblu, such as device tokens, and remote notification data, when it is received. This is not covered by this documentation. Please ask the Unblu support team for more details.
4.5.9.5.2. Unblu API instance
The most important class of the visitor SDK is UnbluVisitorApi and of the agent SDK it is UnbluAgentApi . They provide an instance function, which can be used to get an instance of the API.
It is highly recommended to get an instance of the UnbluVisitorApi/UnbluAgentApi class inside the AppDelegate.application function by calling instance. In this way the SDK can register itself for all required app events before one of them is fired.
The UnbluApi is defined as a singleton. Further usages of the instance member will not create additional instances. |
4.5.9.5.3. Unblu API configure
Before using the instance of the UnbluVisitorApi/UnbluAgentApi, it needs to be configured. The API can be configured using the function configureApi. It accepts an instance of UnbluApiConfiguration. This class can be instantiated with the base URL of the Unblu server and the API key of the Unblu account.
For all possible configurations and their effects, take a look at the documentation of UnbluApiConfiguration. Only a limited number of settings can be configured via the Unblu SDKs. All configurations which are independent of the client (the app) can be done via the Unblu agent desk.
To properly separate the configuration for the mobile visitor and agent SDK and also from configurations done for the webpage where Unblu is integrated, we recommend to use different API Keys for each environment.
Inside the Unblu API instance, only a copy of the configuration is stored. So it can not be changed by the reference. A new call to configureApi has to be done. Configuring the API can only be done while it is not initialized and it would throw an exception if it is already initialized.
Normally the configuration should only be done once at the beginning.
4.5.9.5.4. Events
Before you initialize the API you should register for events in order to be sure not to miss any.
In iOS this can be done by using NotificationCenter. Inside the Notification.Name object all Unblu events are available with “Unblu” as the prefix. Detailed information on the events can be found inside the UnbluEventApi and UnbluUiEventApi class. They also provide constants to get the values out of the Notification.userInfo member.
A very important event is the UiVisibilityRequest. As soon as push notifications are used, it is recommended to listen for this event. E.g. there is a push notification, when there is an incoming call. If the user opens the app by clicking the notification, the SDK will directly fire this event and assumes that the app will initialize and opens the Unblu UI as soon as possible.
4.5.9.5.5. Initialization and deinitialization
To initialize an instance of UnbluVisitorApi/UnbluAgentApi the function initApi can be called.
The callback parameters can be used to get information about success and errors. Additionally the UnbluEventApi.Error event can be used as described in the events section. Regarding errors, it is highly recommended to register for the API error event globally in order not to miss an error, as they can happen independently of any explicit call to the API.
After the success callback was triggered, the Unblu UI can be displayed, new conversations can be started, agent availability can be checked, etc.
The API can either be initialized directly or only on demand. For example when co-browsing is needed. Note that when the API is initialized on demand, the SDK will take some time until it is ready and a session can be started. Additionally if push notifications are used, it is required at least once to have the API initialized. Otherwise the Unblu server has no connection between a user and the device. Therefore in general we recommend to initialize the API as soon as it is possible (directly after login).
If the SDK is no longer needed and everything should get cleaned up, there is the deinitApi function.
4.5.9.6. Unblu UI
The UnbluVisitorSDK/UnbluAgentSDK provides an Unblu UI which shows all existing conversations and which can be used to chat and make a call inside a conversation. This UI can be displayed on top of the app UI. It is also controlled by using the instance of the UnbluVisitorApi/UnbluAgentApi. It is possible to open/close and change its top/bottom margin.

Additionally it can be checked if it is open or if a call is currently displayed. For those states there are also events defined in the UnbluUiEventApi. Especially the events UiVisibilityRequest and UiHideRequest are very important. If one of those triggers, the app should show/hide the UI, because there is an incoming call or co-browsing just started. For the hide event, the configuration property com.unblu.conversation.ui.autoCollapseIndividualUiOnLayerActivation has to be enabled.
If there is an issue with the Unblu SDK, please be aware that the UI is rendered inside a WebView. Therefore it is possible to attach the local Safari to check for error logs. It is a limitation of the iOS WebViews that it is not possible to see the logs inside the normal debugger console.
Note that several functions, like opening a conversation and starting an audio/video call, require that the UI opens at least once so that the corresponding part gets loaded by JavaScript. You can find details in the documentation of each function.
If, at some point, it is likely that the user would use the Unblu UI, we would recommend you preload the UI. This can be achieved by either configuring to preload the UI with the initialization (see UnbluApiConfiguration) or by calling preloadUi if the API was already initialized previously.
4.5.9.7. UnbluUiButton
Next to the Unblu UI, the SDKs provide the class UnbluUiButton. This button UI can be placed inside the app UI either via the Xcode Interface Builder or directly in the Code. Typically the button will be placed in the lower right corner of the screen.
The user can use the button to toggle the visibility of the Unblu UI.
The button displays a number of unread chat messages when new messages arrive and the UI is hidden. Additionally it can automatically set the bottom margin for the Unblu UI and places a semi transparent background behind it.
To integrate it, please follow the instructions in the UnbluUiButton class documentation.
4.5.9.8. Private views
As part of the UnbluCoBrowsingModule, Unblu provides a simple way to add specific views which should not be shown on the remote side. To do so, the UnbluCoBrowsingModuleProvider.api provides the function addPrivateView which takes a tag as its input parameter. You can define a different tag for each view.
After a view’s tag is added, the view is then automatically overlaid by an image before the screen is transmitted to the remote side. It is also possible to make a view visible to the remote side again by calling the removePrivateView function, which is also exposed on UnbluCoBrowsingModuleProvider.api.
4.5.9.9. Private areas
The SDKs provide a way to specify areas which shouldn’t appear on the remote side. To do so, the UnbluCoBrowsingModuleApi provides the function addPrivateArea which takes a tag as its input parameter. Each private area has its own ID.
After an area is added, it is automatically overlaid by an image before the screen is transmitted to the remote side. You can make an area visible to the remote side again by calling the function removePrivateArea, which is also exposed on the UnbluCoBrowsingModuleApi.
4.5.9.10. Custom cookies
It is possible to define custom cookies, which should be sent with each request to the Unblu server. This can either be done (initially) by using the UnbluApiConfiguration or by setting the cookies dynamically via the setCustomCookies function on the UnbluVisitorApi/UnbluAgentApi instance. Before the API is initialized, always the last cookies configured are used. If the API is already initialized, cookies with the same name are overridden and new cookies are added. The previously-defined cookies will stay until the API is de-initialized. If the API is then initialized again, only the last defined cookies are used again.
4.5.9.11. Named areas
Similar to a web page, the named area feature is also available for the mobile SDKs.
A named area can either be set via the UnbluApiConfiguration before initializing the API. Or else it can be set by calling setNamedArea on the UnbluVisitorApi/UnbluAgentApi instance.
If a named area is set before initializing the API, also the specific configuration for it is loaded on initialization. If it is set later, it only changes the requests for new conversations in the agent desk queue in the way that the agent can filter by the named area. The named area has no effect for existing conversations.
As a consequence it’s important to know if there will be specific configuration on the named area scope. In this case the named area has to be configured/set in the SDK before initializing the API, but then it should be always considered to change the configuration on API Key level. If a named area is only used for the queue, it can be set at any time before starting a new conversation.
4.5.9.12. File uploads
You can restrict the file types that users may upload with the following configuration properties:
These options affect the Unblu mobile SDK, too. However, the restrictions in place aren’t reflected in the iOS UI. Use com.unblu.filemanager.fileTypeInputTagHint to provide the iOS with a hint as to which file types a user may upload.
Consult the article on configuring file uploads for further information.
4.5.9.13. Push notifications
If the SDK is configured to use push notifications, there are currently two possible types of notifications visible to the user. Whenever there is a new message and if there is an incoming call. Basically for both types the system default sounds for notifications and calls should be used to provide the best user experience. As for the incoming calls notification, you can’t use the default sound on iOS. We therefore recommend that you define a custom sound for the incoming call push notification. This can be done on the collaboration server via the config property com.unblu.mobile.push_notification.iOSIncomingCallSound or also for the new message notifications com.unblu.mobile.push_notification.iOSNewMessageSound. The value has to be the name of the file including the file type ending. The file itself has to be available inside the app. Make sure it is added to the Build Phases step Copy Bundle Resources.
4.5.9.14. Logging
The Unblu SDK uses an internal Logger, which can be configured. By default, the logger doesn’t print any additional, potentially security-related information. To change this behavior for debugging purpose, set the flag UnbluCoreApi#enableDebugOutput to true. The log level can be changed using the field UnbluCoreApi#logLevel.
You can also enable the flag UnbluCoreApi#enableCapturingPerformanceLogging to get logs about mobile co-browsing performance. To do so, enable the log level .debug or less as well as the enableDebugOutput flag.
4.5.9.15. Security-relevant configuration
There are several security-related configuration possibilities when integrating the Unblu iOS SDKs. The following points should be taken into consideration to ensure the SDK is configured in the most secure way without limiting the features available.
4.5.9.15.1. Whitelist URLs
By default, only the configured Unblu base URL and its subroutes may be accessed by the SDK’s internal WebView. On the other hand, you must be able to specify that a URL is also accessible if, say, the initial URL is redirected to another domain. To this end, you can provide a list of regular expressions by way of the UnbluApiConfiguration.internalUrlPatternWhitelist variable. If you do not have this requirement, there is no need to configure the internal pattern whitelist as it is secure per default.
The patterns in the internal pattern whitelist are those used by the Unblu-enabled application itself. If you want to specify URL patterns which may be accessed by having your application launch another application, modify the external link pattern whitelist described in the section below. This applies even if the patterns describe URLs within your organization’s domain.
| If you want to use Google fonts in your mobile app, take into account that https://fonts.googleapis.com redirects to https://fonts.gstatics.com. You will have to include a pattern for the latter domain in the whitelist. |
4.5.9.15.2. Whitelist external links
The Unblu chat UI recognizes different types of links, such as https://…; URLs and mailto:<mail-address>. When agents or visitors click on such a link, this launches another application, such as a browser or an email client.
By default, the SDK allows only a limited set of link patterns. You can check and change these patterns using the UnbluApiConfiguration.externalLinkPatternWhitelist variable. For example, you may wish to restrict links to those within you organization’s domain.
The mobile SDK will ignore links that don’t match any of the patterns you specified.
4.5.9.15.3. Certificate pinning
The SDK uses a WKWebView for most of it’s communication, and URLSession for file downloads. For certificate pinning the WKNavigationDelegate method is called to handle URLAthenticationChallanges and file download challenges triggered via URLSessionDelegate method.
To define a handler for these challenges, you need to provide an object that conforms to the UnbluCoreSDK.AuthenticationChallengeDelegate protocol, and pass it to UnbluApiConfiguration.authenticationChallengeDelegate.
UnbluAuthenticationChallengeHandler
If you do not want to write the code to handle certificate pinning yourself, Unblu provides a class that does the heavy lifting for you, and all you have to do is pass the certificate data, or public keys. This class is called UnbluAuthenticationChallengeHandler. Please refer to the documentation for this class for more information on how to use it.
4.5.9.15.4. File downloads
The SDK needs to know how to download files.
Usually the default handling provided by UnbluDefaultFileDownloadHandler is sufficient, and so passing an instance of this class to the initializer of UnbluApiConfiguration is all you’ll need to do. If you want to implement your own solution, you must pass your own object conforming to the UnbluFileDownloadHandler protocol to the initializer of UnbluApiConfiguration. This can then be used to define a specific download location within your app, rather than using the downloads folder shared with other apps.
4.5.9.15.5. Log stripping
In iOS, there is no need to explicitly strip out log statements as they aren’t accessible from the binary of the app by simple means anymore, although they’re visible within the binary files delivered by Unblu.
4.5.9.15.6. Encrypting stored preferences
The SDK needs to store some internal values inside the app to properly identify the user device against the collaboration server even after restarting the app. By default, UserDefaults.standard is used to store those values and this is achieved by passing an instance of UserDefaultsPreferencesStorage to UnbluApiConfiguration when it is initialized.
In many cases this is enough because normally, only the app itself has access to this data. You may, however, wish to encypt the values before storing them. To do so, you have two options. You can either provide the SDK with a custom implementation of UnbluPreferencesStorage when you initialize UnbluApiConfiguration. The SDK will then use this storage whenever it needs to write or read the value of a preference to persistent storage.
Or, if you want to use the iOS Keychain to store preferences, you can use UnbluKeychainPreferencesStorage. Please refer to the documentation for this class for more information on how to use it.
4.5.9.16. Known issues
-
UIDocumentInteractionControlleris incompatible with the Unblu co-browsing engine. If you are usingUIDocumentInteractionControllerto display a PDF and you want this PDF to be captured by Unblu during mobile co browsing, please either display your PDF usingWKWebView, or Apple’s PDFKit framework.
4.6. External messenger integration
| External messengers are supported with Unblu version 6. |
4.6.1. Overview
At the moment Unblu provides a generic way to integrate external messengers. An external messenger can be any communication tool which is basically text based, e.g. Email, SMS, WhatsApp.
One external messenger can be represented as multiple external messenger channels inside Unblu server. E.g. In WhatsApp a company can have two business accounts. For each account a channel would be created inside the Unblu server. Those channels are named CustomExternalMessengerChannel. In the future there will be also be tighter integrations of some messengers like WhatsApp into the product.
A conversation is always linked to one channel. Either to Unblu internally itself or to one external messenger channel. This can not be changed afterwards. It means if a conversation should be continued via Unblu internal messaging, a new conversation needs to be created.

4.6.2. Integration
4.6.2.1. Integration custom channel

A custom channel works via the Unblu server Web API and Webhooks. Typically a custom channel is connected with some Custom Middleware which creates conversations in the Unblu server when needed and it translates the messages from the Unblu server into the format of the external messenger and vice versa.
4.6.2.1.1. Channel creation
To integrate an external messenger via a custom channel, a custom channel first needs to be created via the WebAPI (see step 1 in image below) or the UI. The custom channel defines the webhook endpoint, to which messages are send to and how the external messenger is displayed in the UI. The Unblu server ensures, that only those messages which were initially not send by the external messenger channel, are send out to the webhook. Otherwise there would be a feedback loop.
4.6.2.1.2. Create Linked conversation
After a channel was created, new conversations which should be connected via this channel can be created.
The reason why and especially when a conversation should be created, depends on the integration scenario. A conversation could be created when the custom middleware receives a message from the external messenger (step 2a) and no corresponding conversation on the Unblu server exists. In this case typically a conversation with initial engagement type CHAT_REQUEST would be created with only the visitor person to directly send it to the queue.
Alternatively if there is already a mapping between the contacts inside the external messenger and agents inside the Unblu server, these conversations can be created at the very beginning.
A conversation is connected to the custom external messenger channel by giving the ID of the channel in the creation call (step 2b).
Optionally a source ID in the conversation can be defined to link the conversation back to the external source. Using the service Conversations#findBySourceIdAndChannelId, it is then possible to find an Unblu conversation for the corresponding conversation inside the external messenger.
As a conversation can have some participants connected via Unblu and other participants connected via an external messenger, it is necessary to distinguish between them. To achieve this, the participants need to have the flag connectedViaExternalMessenger set accordingly. This means an agent which should use the Agent Desk, but is marked as connectedViaExternalMessenger will not be able to write messages from the Agent Desk.
4.6.2.1.3. Sending and receiving messages
Whenever the custom middleware receives a new message from the external messenger (step 3a), the message needs to be transformed into an Unblu message via the middleware. This message can then be send into Unblu by using the ExternalMessengers#sendMessage API (step 3b). Afterwards those message will be visible in the Unblu UI of a chat.
Whenever the Unblu server receives a message that should be propagated to the external messenger, a new webhook event of type external_messenger.new_message is emitted to the custom middleware (step 4a). When the custom middleware receives this event, it needs to be transformed into a message of the external messenger and send it into that system (step 4b).
Step 3 and Step 4 are independent of each other. There can be multiple message from the external messenger as well as from the Unblu server, and they not need be linked technically or contextually to each other.
4.6.2.1.4. Managing read and delivered states
Please refer to the appropriate section of the Message states article for information on how to handle message state with external messengers.
4.6.2.1.5. Distinguishing between agents when using a central business account
In many external messengers, the custom middleware is represented as one central business account. This means that all messages sent from the Unblu server are shown as originating from this business account, regardless of which agent they are from. To distinguish between the different senders, the middleware may need to add a prefix such as <senderName>: to each message.
4.7. Bot integration
| Bot integration is supported with Unblu version 6. |
4.7.1. Overview
Unblu allows integration of different bot types using webhooks and the Unblu Web API. An integration of a bot usually will look something like this:

The center "Bot Integration" piece connects the actual bot framework (like RASA, Microsoft Bot Framework, etc.) with the Unblu server. Webhooks received from the Unblu server are translated into a format understandable by the bot framework and messages and actions from the bot framework are translated to the correct Web API calls on the Unblu server. This allows for the integration of any existing bots into Unblu.
4.7.2. Bot types
Unblu supports several bot types which may be divided into two groups: dialog bots and conversation-observing bots.
Dialog bots are bots that have a one to one dialog with a visitor during the onboarding, reboarding or offboarding phase of that person.
Conversation-observing bots are bots that can listen to any message in any conversation (or even other webhook events that the Unblu server sends) and chime in when they please.
4.7.3. Bot persons
To participate in a conversation and write messages, a bot always needs a "person" that will represent it. This includes things like the name and the avatar that will be displayed when the bot writes messages.
Like humans, a bot must first join a conversation with their person (giving them an active participation) to enable them to send messages in that conversation. While this is done automatically for dialog bots, it must be done via separate Web API calls for the conversation-observing bots.
Bot persons can be created and updated using the Person API. Different bot backends may share the same bot person.
4.7.4. Conversation-observing bots
These bots use generally available webhooks from the Unblu server to detect a situation in which they want to contribute to a conversation.
The integration of this sort of bot uses a rather low-level API that allows a very flexible integration of bots into any conversation. Unblu provides Web APIs to join a conversation with a bot-person and then write different types of chat messages in the name of that bot-person.
When adding a bot to a conversation, one can choose whether the bot’s participant should be visible or hidden. A visible participant behaves like a normal human participant. Hidden participants, on the other hand, will not be displayed in the list of participants (e.g. in the title bar), and no messages are displayed when they join or leave the conversation.
4.7.5. Dialog bots
Dialog bots allow tapping into the onboarding, reboarding or offboarding process of a person into or out of a conversation.
Unblu provides a tailored API to participate in this process allowing maximum focus on integrating the underlying bot framework with Unblu and minimum overhead of API calls:
-
Unblu makes sure only one person is in the dialog with the bot to allow seamless integration with existing bot frameworks.
-
Dialogs can be
-
handed off to the next bot or an agent,
-
solved so no further involvement from other bots or agents is required, or
-
canceled to stop the boarding process.
-
-
Dialog bots can use all Unblu Web API services during the dialog to alter conversations and persons.
Adding a dialog bot to the onboarding process precludes fast onboarding, because Unblu doesn’t know whether the bot will ask the visitor to answer any questions. This does not mean that the onboarding process will be slower than usual; it merely means that Unblu won’t be able to complete the onboarding process without the visitor opening the conversation.
4.7.5.1. Setting up a dialog bot
The initial step of integrating a dialog bot is to set it up.
-
If no bot person has been created beforehand a bot person has to be created.
-
Next, a dialog bot has to be created. This involves defining things such as the webhook endpoint, which persons should be on- and offboarded etc.
Reboarding can only be enabled or disabled as it only involves the visitor. For more details see the create DialogBot API.
Once this is done, your bot is ready to participate in the onboarding/reboarding/offboarding of the configured persons.
| Bots must be enabled for a conversation type to be offered the interaction. This can be changed in the settings for the conversation type. Look for the setting called com.unblu.conversation.bot.externalBotsEnabled. |

4.7.5.2. Receiving and responding to a dialog offer
Once the dialog bot is set up, the Unblu server will send a dialog offer webhook (more specifically, an onboarding, reboarding or offboarding offer) each time a person matching the configured filter joins or leaves the conversation, respectively. We will only consider the onboarding case here, but the reboarding and offboarding case follows the same lines.
| When we speak of the visitor below, we actually mean the dialog counterpart person. We have chosen to refer to them as the visitor since this is the most common case. However, it is also possible to onboard or offboard agents using a bot. (Reboarding, on the other hand, is only possible for the main visitor of a conversation.) |
The onboarding offer webhook serves two purposes:
-
It allows the bot to decide whether they want to be part of the onboarding, with the full context of the onboarding person and the conversation they are entering.
-
It ensures that the bot is available. This keeps visitor waiting time to a minimum if the bot were to malfunction.
When a bot receives an BotOnboardingOfferEvent webhook, it must respond to that offer as fast as possible. Otherwise the server will deem the bot dysfunctional and automatically exclude it from the further onboarding after a short timeout. Using the Web API, a bot can either accept or decline the onboarding offer.
If the offer is declined, the bot’s participation in this onboarding ends here. No further webhooks will be sent for this onboarding.
If the bot accepts the offer, the Web API call returns the dialog token that will be used later on for all webhooks of this dialog. The bot will be placed in the onboarding queue with all other bots that have accepted the offer. When it is its turn to complete the onboarding for the visitor, it will receive a BotDialogOpenEvent webhook. This is the signal that the dialog between the bot and the visitor is now open and the bot can start sending messages.
All state that is connected to this dialog should be linked to the dialog token. The dialog token is sent in every webhook related to this dialog and will be needed for every dialog-related Web API call. If a new context or conversation must be created for the underlying bot framework, this is the time to do it. The new context or conversation should be linked to the dialog token which may be used to reference it later on.
The dialog remains open, and the bot is the only party interacting with the visitor, until the BotDialogClosedEvent webhook is received. More details about this can be found in closing a dialog
Even though a bot may have accepted a dialog offer there is no guarantee that it will receive the DialogOpen event for this dialog. Reasons for this can be that the conversation is ended or deleted before it is the bot’s turn, or another bot solves or aborts the dialog. Therefore make sure that your bot implementation does not keep any state during the dialog offer and the dialog open events to avoid memory leaks. |

4.7.5.2.1. Disable file upload during onboarding and offboarding
By default, the Visitor UIs provide the same functionality during onboarding and offboarding as they do in other phases of a conversation. In particular, if the configuration property com.unblu.conversation.file.allowFileCobrowsing is true, visitors can upload files to a conversation during onboarding and offboarding.
If you wish to prevent this, set the following two configuration properties to false:
This will ensure that visitors cannot upload files to a conversation unless it is either in the queue or has been answered by an agent.
4.7.5.3. The active phase of a dialog
During the active phase of a dialog, the bot can use the Web API to send different types of chat messages to the visitor. The bot integration code may also use other Web API services, e.g. the Conversations or Persons services to influence the routing of the conversation or the visitor’s details. Additionally, the bot receives a BotDialogMessageEvent webhook for every message either the bot or the visitor sends.
If an anonymous user logs in during this phase, this triggers a user change. Please refer to the section handling user changes below for further information

4.7.5.4. Closing a dialog
When the bot has solved the visitor’s issue, doesn’t know what to do, or has finished its onboarding tasks, it is time to close the dialog.
There are several ways how this can be accomplished, but the usual way is by making the appropriate Web API call. When finishing a dialog via Web API, the reason for ending the dialog may be either HAND_OFF, SOLVED or ABORTED.
4.7.5.4.1. HAND_OFF
HAND_OFF means proceeding to the next step of the boarding process. If more than one bot responded to the boarding offer, and the current bot is not the last one in the queue, this is accomplished by handing the process over to the next bot in the queue.
If there is no further bot in the queue, what happens depends on the type of dialog.
-
For onboarding dialogs, hand-off will either
-
activate the onboarding participation and put the conversation in the incoming queue if the conversation is a chat request, or
-
activate the person being onboarded and allow them to interact with others for other conversation types or if the person was invited to join an ongoing conversation.
-
-
For reboarding dialogs, this will put the conversation back into the incoming queue if there is no further bot.
-
For offboarding dialogs, this will do one of the following either
-
end the conversation if the offboarding was triggered by ending a conversation, or
-
end the participation of the offboarding person if the offboarding was triggered by that person leaving.
-
4.7.5.4.2. SOLVED
SOLVED means that no further bot or human agent is required. The boarding process is stopped with a success indication. Any further bots that responded to the boarding offer will be ignored.
For onboarding and reboarding dialogs, this will also
-
Put the conversation into the
UNASSIGNEDstate if com.unblu.conversation.lifecycle.enableUnassignedState is enabled and the conversation was initiated by a visitor. -
End the conversation if com.unblu.conversation.lifecycle.enableUnassignedState is disabled.
For offboarding dialogs, it will also
-
End the conversation if the offboarding was triggered by ending a conversation.
-
End the participation of the offboarding person if the offboarding was triggered by the leaving of that person.
4.7.5.4.3. ABORTED
ABORTED means that no further bots should be called. The boarding process is stopped with a failure indication. Any further bots that responded to the boarding offer will be ignored.
-
For onboarding dialogs, the participant is directly moved to the offboarding phase and won’t be allowed to enter the conversation.
-
For reboarding dialogs, the conversation is put into the
UNASSIGNEDstate. -
For offboarding dialogs, the participation of the person being offboarded is ended.
This reason can be used when, for example, the visitor doesn’t accept mandatory terms and conditions.
4.7.5.4.4. The BotDialogClosedEvent webhook
When a dialog is closed, a BotDialogClosedEvent webhook will be sent. This may occur as a result of the finishDialog API call. However, it may also be sent for other reasons: a timeout, the visitor leaves or ends the conversation manually etc.
| Make sure your code integrating the bot can always handle this event and is able to clean up everything related to that dialog, even if the event isn’t expected at that point. |

4.7.5.5. Handling user changes
If a visitor logs in during an active bot dialog phase, this may trigger a user change within Unblu. The user change will occur if
-
the configuration property com.unblu.authentication.allowVisitorLoginDuringSession is
true, and -
the configuration property com.unblu.conversation.lifecycle.replaceUserOnLogin is set to
ALWAYSorIF_ACTIVE_CONVERSATIONfor the current conversation.
As a result of the user change, the bot’s counterpart in the dialog will change their identity from an anonymous to an authenticated person.
To inform the bot of this change, Unblu sends an additional BotDialogCounterpartChanged webhook event. The event contains both the old and the new person identifying the bot’s counterpart in the dialog. Once this event has been received, any further messages sent by the visitor will reference the new person and the new person’s PersonPresence. Unblu will make sure that any messages sent by the bot will be received and displayed to the person’s new identity.
You must ensure that all bot logic referring to the identity of the counterpart person (like their name, email address, authentication etc.) references the new, authenticated person after a BotDialogCounterpartChanged webhook event. |
4.7.5.6. Managing read and delivered states
Please refer to the appropriate section of the message states article for information on how to handle message state with dialog bots.
4.8. Web API and webhooks
The Unblu Web API provides an HTTP-based interface that allows other systems to perform actions on the Unblu server. It supports many of the same actions accessible through the conventional user interfaces. This enables the integration of Unblu with third-party applications. For example, the Web API could be used to implement the following functions:
-
A customer relationship management application that pre-initializes a conversation between each relationship manager and each of their customers, based on the relationships already recorded in a CRM system.
-
A call center application that dispatches incoming conversation requests to the appropriate agents connecting through Unblu.
-
An identity management system that automatically updates the status of agents and composition of teams based on changes to its database.
Unblu Webhooks enable integration in the reverse direction; They allow you to configure the Unblu server to react to internal events by triggering an HTTP request to an external system. This functionality can be used to implement features such as:
-
An identity management system that is updated whenever some agent user data is updated on Unblu.
-
A third-party dashboard system that is updated whenever a conversation is started or ended.
-
An archive of conversations that is updated every time a conversation ends.
The Web API and webhooks are fully documented in the Web API reference.
4.8.1. Web API
4.8.1.1. Introduction
The Unblu Web API exposes all the major entities that make up the internal data model of the Unblu server and offers methods to create, read, update and delete these entities via HTTP GET and POST requests. The entities are represented as a JSON objects in the bodies of HTTP requests and responses.
Examples of entity types include user, team, conversation and account. Definitions of all the entity types can be found in the Web API Reference, under Schemas.
The API methods (the actions that can be performed through the API) are organized into services. Most services are associated with a specific entity type. For example, the services associated with the above entity types are, respectively, users, teams, conversations and accounts. The services are documented in the Web API Reference, under Operations.
Under each service, several methods are typically available, for example, read, getAll, create, update and so forth. The API is designed to be as consistent as possible (the same methods are offered for the different entities), but for some entities more methods are available than for others.
4.8.1.2. Structure of a request
Calls to the Web API are made by sending HTTP GET, POST, or DELETE requests to the Unblu server.
The following grammar shows the structure of the request URL:
<url> ::= <serverinfo>/<pathprefix>/rest/<version>/<entity>/<action>[<params>]
<serverinfo> ::= https://[<username>:<password>@]<hostname>[:<port>]
<pathprefix> ::= co-unblu | unblu  // By default
<version> ::= v1 | v2 | v3  // Depends on server version
<service> ::= // See reference documentation
<action> ::= // See reference documentation
<params> ::= // Depends on action
The significant parts of the grammar are described below:
4.8.1.2.1. <username>:<password>@
Optional. If using basic authentication, the sender can embed the username and password in the URL itself. See Basic authentication, below.
4.8.1.2.2. <hostname>
The name of the server to which you are directing your request. For on-premises installations this will, of course, depend on the location of your own installation. For the Unblu Financial Cloud, this is always unblu.cloud.
4.8.1.2.3. <port>
Optional. An on-premises installation may require a port to be specified, depending on your set up. For the Unblu Financial Cloud, there is no port number.
4.8.1.2.4. <pathprefix>
The path prefix indicating the call origin of the request. In most cases this is unblu or co-unblu, but see Call origin, below.
4.8.1.2.6. <version>
This specifies the version of the API that you wish to use: v1, v2 or v3. See API versioning, below.
4.8.1.2.7. <service>
Web API actions are organized into services where each service corresponds to the type of internal entity being addressed, for example accounts, users, teams, etc.
4.8.1.2.8. <action>
The action to be performed on the entity indicated by the service, for example, create, delete, getAll, etc.
4.8.1.2.9. <params>
Optional. Parameters that modify or fully specify the action. These may be either URL query parameters (the ones after the ?) or additional elements in the path. See Parameters for details.
4.8.1.3. Authentication
In order to make most API calls, the client must be authenticated by the server to determine whether it has sufficient permissions to perform the operation. The permission level in Unblu is defined by the client’s role: ANONYMOUS_USER, WEB_USER, REGISTERED_USER, SUPERVISOR, ADMIN or SUPER_ADMIN (see User roles). For each call, the required minimum role is noted as "required-role" in the Web API reference section.
There are two mechanisms available for authentication with the Unblu Web API: Basic Authentication and the Authenticator Service.
4.8.1.3.1. Basic authentication
Basic Authentication is the standard authentication mechanism supported natively by all browsers and built-in to HTTP. To authenticate using this method the client can either:
-
Add the header
Authorization: Basic <credentials>to the request, where<credentials>is the base64 encoding of the user ID and password joined by a single colon,:. -
Prepend
<userid>:<password>to the URL, as mentioned above.
4.8.1.3.2. Authenticator service
The Authenticator Service of the Web API provides an alternative mechanism for authentication. Under this method the client uses their user name and password to request an authentication token (which can then be used to login), or to login directly. In either case, a successful login will result in a response that includes a Set-Cookie header. The client can then cache the provided cookie and include it with any subsequent requests.
See Authenticator Service reference section.
4.8.1.4. Data and types
All data sent and received via the API is in JSON format. It is recommended to set the Content-Type and Accept headers accordingly on each request:
Content-Type: application/json
Accept: application/json
The types of JSON objects sent and received are all documented in Web API Schemas.
4.8.1.5. Call origin
The <origin> segment of the Web API URL is used to indicate the call origin of the request.
The call origin system is an optional security mechanism that can complement the standard role-based authentication and authorization. If enabled, it applies to all requests made to the Unblu server, including Web API requests.
Just as every Web API call has a minimum required role, so it has a minimum required call origin: either UNTRUSTED or TRUSTED. This is documented in the reference material.
A TRUSTED call origin can perform both TRUSTED and UNTRUSTED operations, whereas an UNTRUSTED call origin can only perform UNTRUSTED operations.
In a system with call origin enabled, TRUSTED API calls must use the TRUSTED path prefix. UNTRUSTED API calls may use either the TRUSTED or UNTRUSTED path prefix. The default TRUSTED path prefix is co-unblu, and the default UNTRUSTED path prefix is unblu, though these can be configured to different values.
In a system with call origin disabled, a single path prefix, by default unblu, is used for both TRUSTED and UNTRUSTED calls. Again, this path prefix can be configured.
4.8.1.5.1. Example
For example, if call origin is enabled on the target Unblu server example.com and the default path prefixes have not been changed from the defaults, then a call to perform the TRUSTED operation accounts/getAll on API v2 would look like this:
GET https://example.com/co-unblu/rest/v2/accounts/getAll
Whereas a call to perform the UNTRUSTED operation authenticator/login could look like this:
POST https://example.com/unblu/rest/v3/authenticator/login

{
    "username" : "...",
    "password" : "..."
}
or like this:
POST https://example.com/co-unblu/rest/v3/authenticator/login

{
    "username" : "...",
    "password" : "..."
}
The Unblu Financial Cloud does not support call origin and the path prefix configuration is fixed to the default. Consequently, all Web API calls always use the path prefix unblu. In fact, since the hostname of the Unblu Financial Cloud is also fixed, we know that all Web API calls to the Unblu Financial Cloud have the form:
GET https://unblu.cloud/unblu/rest/<version>/<entity>/<actions>[params]
4.8.1.6. API versioning
The Unblu Web API is versioned. As shown above in the request URL structure, the version indicator can be specified as part of the path. Current possible values are: v1, v2 or v3.
A new API version is introduced as soon as a breaking change is introduced into the API. When a new API version is introduced, the old version is kept for the duration of one major version life cycle of the product to ensure compatibility with existing consumers of the old API.
Adding properties to the entities transferred by the Web API is not considered a breaking change. It is your responsibility to ensure that the application consuming the Unblu Web API can deal with unknown properties. For example, if the application that consumes the Web API was written using Jackson, you should set DeserializationFeature.FAIL_ON_UNKNOWN_PROPERTIES to false. |
4.8.1.6.1. Changes between server versions
The API version and the Unblu product version are related as follows:
-
Unblu 4.3 supports only API
v1 -
Unblu 5 supports only API
v1andv2 -
Unblu 6 supports only API
v1,v2andv3
In Unblu 4.3 the version indicator in the request URL is optional, but if it exists, it must be v1.
In Unblu 5 and later, the version indicator (even when performing a v1 request) is required.
Additionally, in Unblu 4 it was possible to use both upper and lower case text in calls. In Unblu 5 and later the correct case must be used, as documented.
4.8.1.7. Parameters
Depending on the action, various parameters may be required. In some cases these are to be specified as query parameters, as in
GET <prefix>/rest/v3/accounts/isAccountNameAvailable?name=<name>&accountId=<accountId>
or as additional path segments, as in
POST <prefix>/rest/v3/conversations/<conversationId>/setRecipient

{
    ...
}
The parameters for each call (if any) are documented in the reference section for that call.
4.8.1.7.1. The expand parameter
Many API JSON objects contain related objects within their properties. When such a sub-object is shown inside a top-level object it is usually represented by an ID.
The expand query parameter allows you to specify that one or more properties in an object are to be represented in fully expanded form, not just as IDs. Multiple properties can be specified by using a comma-delimited list. The general form of the expand query parameter is:
expand=<prop1>[,<prop2>,...,<propN>]
Only some properties in some objects are expandable. When a property is expandable, this is noted in the Web API reference.
The expand parameter can be used in three ways:
-
on read
-
on write
-
for the special properties
configuration,metadataandtext
On read, the expand parameter specifies which properties in the returned object are to be in expanded form. For example, the request
GET <prefix>/rest/v3/users/getByUsername?username=johndoe
would return something like
{
    "$_type": "User",
    "id": "VPu6G3Y0QU6Y1nRn2nPzog",
    "creationTimestamp": 1572276276000,
    "modificationTimestamp": 1572517581000,
    "version": 9,
    "accountId": "wZvcAnbBSpOps9oteH-Oxw",
    "avatar": "VJPN47X8Q4iVxIqQtT8DAQ",
    "username": "johndoe",
    "email": "johndoe@example.com",
    "phone": null,
    "teamId": "3iy_Jpd7QwilXGC_7w3KRg",
    "authorizationRole": "REGISTERED_USER",
    "displayName": "John Doe",
    "firstName": "John",
    "lastName": "Doe",
    "configuration": null,
    "metadata": null
}
whereas the request
GET <prefix>/rest/v3/users/getByUsername?username=johndoe&expand=avatar
would return something like
{
    "$_type": "User",
    "id": "VPu6G3Y0QU6Y1nRn2nPzog",
    "creationTimestamp": 1572276276000,
    "modificationTimestamp": 1572517581000,
    "version": 9,
    "accountId": "wZvcAnbBSpOps9oteH-Oxw",
    "avatar": {
        "$_type": "Avatar",
        "id": "VJPN47X8Q4iVxIqQtT8DAQ",
        "creationTimestamp": 1572517579000,
        "modificationTimestamp": 1572517579000,
        "accountId": "wZvcAnbBSpOps9oteH-Oxw",
        "imageZoomFactor": null,
        "imageXPositionRatio": 0.5,
        "imageYPositionRatio": 0.5,
        "imageRotationAngle": 0,
        "imageData": "data:image/png;base64,..."
    },
    "username": "johndoe",
    "email": "johndoe@example.com",
    "phone": null,
    "teamId": "3iy_Jpd7QwilXGC_7w3KRg",
    "authorizationRole": "REGISTERED_USER",
    "displayName": "John Doe",
    "firstName": "John",
    "lastName": "Doe",
    "configuration": null,
    "metadata": null
}
Note that in the first object, the avatar property is an ID whereas in the second example, avatar is expanded to be an object.
The expand parameter can also be used on write. Write requests typically include the data to be written as a JSON object in the request body. In this context, the expand parameter can be used to specify that one or more properties of that object will be submitted in fully expanded form.
For example, the request below will update the avatar of user johndoe. Without the expand=avatar query parameter the avatar sub-object would be ignored.
POST <prefix>/rest/v3/users/update?expand=avatar

{
    "$_type": "User",
    "id": "VPu6G3Y0QU6Y1nRn2nPzog",
    "creationTimestamp": 1572276276000,
    "modificationTimestamp": 1572517581000,
    "version": 9,
    "accountId": "wZvcAnbBSpOps9oteH-Oxw",
    "avatar": {
        "$_type": "Avatar",
        "id": "VJPN47X8Q4iVxIqQtT8DAQ",
        "creationTimestamp": 1572517579000,
        "modificationTimestamp": 1572517579000,
        "accountId": "wZvcAnbBSpOps9oteH-Oxw",
        "imageZoomFactor": null,
        "imageXPositionRatio": 0.5,
        "imageYPositionRatio": 0.5,
        "imageRotationAngle": 0,
        "imageData": "data:image/png;base64,..."
    },
    "username": "johndoe",
    "email": "johndoe@example.com",
    "phone": null,
    "teamId": "3iy_Jpd7QwilXGC_7w3KRg",
    "authorizationRole": "REGISTERED_USER",
    "displayName": "John Doe",
    "firstName": "John",
    "lastName": "Doe",
    "configuration": null,
    "metadata": null
}
The following object types
-
accounts -
users -
teams -
apikeys -
namedareas
have one or more the following special properties:
-
configuration -
metadata -
text
When these properties are returned in an object, they normally have a value of null. For example, the user object shown above includes the properties configuration and metadata are like this.
However, if one of these property is specified in the expand parameter then it is returned in full.
4.8.1.8. CRUD examples
In general the API supports full CRUD (Create, Read, Update, Delete) operations on all the entities that it exposes, subject to the permissions of the API client, of course.
The examples below use the users service as an example. Similar patterns apply to the other services.
4.8.1.8.1. Create
To create a new user, the client sends a POST with a request body holding the JSON object representing the new user entity:
POST <prefix>/rest/v3/accounts/create

{
    "$_type": null,                         // ignored
    "id": null,                             // has to be 'null' for create operation
    "creationTimestamp": null,              // ignored
    "modificationTimestamp": null,          // ignored
    "version": null,                        // ignored
    "accountId": "wZvcAnbBSpOps9oteH-Oxw",  // optional
    "avatar": null,                         // optional
    "username": "johndoe",                  // required
    "email": "johndoe@example.com",         // required
    "phone": null,                          // optional
    "teamId": null,                         // optional
    "authorizationRole": "REGISTERED_USER", // required
    "displayName": "John Doe",              // optional
    "firstName": "John",                    // required
    "lastName": "Doe",                      // required
    "configuration": null,                  // only when 'expand' is used
    "metadata": null                        // only when 'expand' is used
    }
The above object depicts the full set of properties of the user entity. In this example, comments are included for explanation. In practice comments are not permitted. See User Type.
Notice that you do not have to specify every property. Some are ignored and some are optional. That leaves the required properties username, email, authorizationRole, lastName and firstName.
On a successful creation, the server responds with the JSON object of the newly created user. The returned object will have filled in the internally generated properties $_type, id, creationTimestamp, modificationTimestamp and version.
Note also that if you want to include one of the expandable properties (avatar, configuration or metadata) inline in the submitted object then you must specify that property in the expand query parameter.
Similar details involving ignored, optional, required and expandable properties apply to the other entity types. This information is documented in the reference sections for those types.
4.8.1.8.2. Read
Reading is straightforward: A GET request is made and a JSON object is returned that represents the requested entity. See below for an example.
4.8.1.8.3. Update
Writing is done by issuing a POST request with the request body containing the data to be written. Keep in mind that the API does not support patch syntax. In other words, you cannot specify only the properties that you want to change on a write. You must send the entire object even if you are making a change to only one property in the object.
The best way to perform a change to an entity, therefore, is:
-
Request the entity.
-
Take the returned JSON and alter the property or properties that you wish to change.
-
Send back the newly updated JSON using the appropriate update call for that entity type.
For example, let’s say you want to update the phone number of a registered user, you might perform the following series of calls:
GET <prefix>/rest/v3/users/getByUsername?username=johndoe
returning
{
    "$_type": "User",
    "id": "VPu6G3Y0QU6Y1nRn2nPzog",
    "creationTimestamp": 1572276276000,
    "modificationTimestamp": 1572517581000,
    "version": 9,
    "accountId": "wZvcAnbBSpOps9oteH-Oxw",
    "avatar": "VJPN47X8Q4iVxIqQtT8DAQ",
    "username": "johndoe",
    "email": "johndoe@example.com",
    "phone": "+1 416 555 0105",
    "teamId": "3iy_Jpd7QwilXGC_7w3KRg",
    "authorizationRole": "REGISTERED_USER",
    "displayName": "John Doe",
    "firstName": "John",
    "lastName": "Doe",
    "configuration": null,
    "metadata": null
}You change the phone property from +1 416 555 0105 to +1 416 555 0162, leaving everything else the same.
And now you send back the newly updated object as the body of the POST request:
POST <prefix>/rest/v3/users/update

{
    "$_type": "User",
    "id": "VPu6G3Y0QU6Y1nRn2nPzog",
    "creationTimestamp": 1572276276000,
    "modificationTimestamp": 1572517581000,
    "version": 9,
    "accountId": "wZvcAnbBSpOps9oteH-Oxw",
    "avatar": "VJPN47X8Q4iVxIqQtT8DAQ",
    "username": "johndoe",
    "email": "johndoe@example.com",
    "phone": "+1 416 555 0162",
    "teamId": "3iy_Jpd7QwilXGC_7w3KRg",
    "authorizationRole": "REGISTERED_USER",
    "displayName": "John Doe",
    "firstName": "John",
    "lastName": "Doe",
    "configuration": null,
    "metadata": null
}
Assuming you have sufficient permissions to make the change, the server should respond with the updated object:
{
    "$_type": "User",
    "id": "VPu6G3Y0QU6Y1nRn2nPzog",
    "creationTimestamp": 1572276276000,
    "modificationTimestamp": 1572517581010,
    "version": 10,
    "accountId": "wZvcAnbBSpOps9oteH-Oxw",
    "avatar": "VJPN47X8Q4iVxIqQtT8DAQ",
    "username": "johndoe",
    "email": "johndoe@example.com",
    "phone": "+1 416 555 0162",
    "teamId": "3iy_Jpd7QwilXGC_7w3KRg",
    "authorizationRole": "REGISTERED_USER",
    "displayName": "John Doe",
    "firstName": "John",
    "lastName": "Doe",
    "configuration": null,
    "metadata": null
}Notice that the phone number has changed. It now reflects the value you submitted in the update call. However, you will also see that some other properties are do not reflect the values that you submitted:
-
The
modificationTimestampis different. This makes sense since the entity has indeed been updated and therefore so has the timestamp. -
The
versionhas been incremented. This is a mechanism used to avoid concurrent update conflicts. On update the server checks if the version number on its copy of the entity is the same. If it is, that means no change took place in the meantime. The change is only applied if no conflict is detected. If you receive an "out of date" error, you have to re-request the original object and attempt the update again.
4.8.1.9. Searching
The Web API provides a search endpoint for many of the entities it exposes. The endpoint expects a POST HTTP request with the search criteria specified in the request body.
The body of a search request consists of
-
An array of one or more search filters
-
An optional ordering of the search results
-
An optional offset
-
An optional limit
The offset and limit can be used to paginate search results.
The examples below give you an idea of how to use the search endpoints.
Please refer to the Web API reference for details about the schema for the body of each search request.
4.8.1.9.1. Search filter operators
Below is a complete list of the operators you can use in the body of a search request.
-
CONTAINS -
Checks if the value contains the string provided in the operator
-
EQUALS -
Checks if the value is equal to the one provided in the operator
-
NOT_EQUALS -
Checks if the value is not equal to the one provided in the operator
-
GREATER_THAN -
Checks if the value is greater than the one provided in the operator
-
LOWER_THAN -
Checks if the value is lower than the one provided in the operator
-
IN -
Checks if the value is one of the ones provided in the operator
-
NOT_IN -
Checks if the value is not one of the ones provided in the operator
-
IS_NULL -
Checks if the value is null
-
IS_NOT_NULL -
Checks if the value is not null
-
IN_RANGE -
Checks if the value is in the range of the provided values. Results equal to the provided values are included.
-
NOT_IN_RANGE -
Checks if the value is outside the range of the provided values. Results equal to the provided values are not included.
Which operators are available depends on the value of the field object they refer to. For example, it would make little sense to search for a string with the IN_RANGE operator. In fact, three operators are only available with the PARTICIPANT_PERSON_ID field of the body sent to the endpoint <serverUrl>/rest/v3/conversation/search:
-
ALL_OF -
Checks if all of the values are present in the value list provided by the operator
-
ANY_OF -
Checks if any of the values is equal to any of the values in the list provided by the operator
-
ALL_EQUAL -
Check if the lists are of the same length and contain the same values
Again, please refer to the Web API reference for details about the operators available for each search request.
4.8.1.9.2. Example 1: webhook log error entries
Say you want to retrieve all entries in the webhook log that logged errors. To do so, you would call the webhookcalllogs/search endpoint:
webhookcalllogs/search endpoint to retrieve webhook log entries
POST <serverUrl>/rest/v3/webhookcalllogs/searchThe body of the call would look like this:
{
  "searchFilters": [
    {
      "field": "HTTP_RESPONSE_CODE",
      "operator": {
        "type": "NOT_IN_RANGE",
        "minimum": "200",
        "maximum": "299"
      }
    }
  ],
  "orderBy": [
    {
      "field": "ID",
      "order": "ASCENDING"
    }
  ],
  "offset": 0, (1)
  "limit": 10 (2)
}| 1 | With the offset set to 0, the call will return the first results found. |
| 2 | With the limit set to 10, the search will return at most 10 results. The response will tell you whether there are more results that match your search criteria. |
The response to your request will look something like this:
webhookcalllogs/search with more than 10 matches
{
  "$_type": "WebhookCallLogResult",
  "hasMoreItems": true, (1)
  "nextOffset": 10, (2)
  "items": [
    {
      "$_type": "WebhookCallLog",
      "id": "wxKdh3-DSJKvMrKz8PcXaw",
      "creationTimestamp": 1610725688976,
      "modificationTimestamp": 161072568898,
      // ...
    },
    // ...
  ]
}| 1 | "hasMoreItems": true tells you that there are more than 10 results matching your search criteria. |
| 2 | "nextOffset": 10 can be used to retrieve the next n results with a new request to the same endpoint. |
If there are 10 or fewer log entries matching you search criteria, the beginning of the response will look like this:
webhookcalllogs/search with 10 matches or fewer
{
  "$_type": "WebhookCallLogResult",
  "hasMoreItems": false,
  "nextOffset": null,
  "items": [
    {
      "$_type": "WebhookCallLog"
      // ...
    }
  ]
}
If there are no results matching your criteria, "items" will be an empty array:
webhookcalllogs/search with no matches
{
  "$_type": "WebhookCallLogResult",
  "hasMoreItems": false,
  "nextOffset": null,
  "items": []
}
4.8.1.9.3. Example 2: All webhook log entries of a given day
Including the following body in your HTTP request to the endpoint <serverUrl>/rest/v3/webhookcalllogs/search will return all webhook log entries for 1 April 2021:
{
  "searchFilters": [
    {
      "field": "CREATION_TIMESTAMP",
      "operator": {
        "type": "IN_RANGE",
        "minimum": "1617228000000", (1)
        "maximum": "1617314399999" (2)
      }
    }
  ],
  "orderBy": [
    {
      "field": "CREATION_TIMESTAMP",
      "order": "ASCENDING" (3)
    }
  ]
}| 1 | 2021-04-01 00:00:00.000 |
| 2 | 2021-04-01 23:59:59.999 |
| 3 | The oldest log entry will be the first result. |
4.8.1.9.4. Example 3: Group of users
The following body returns all users in the team "Support" or "Advisory" created in March 2021 whose email address is blank.
{
  "searchFilters":  [
      {
        "field": "EMAIL"
        "operator": {
          "type": "IS_NULL"
        }
      },
      {
        "field": "TEAM_ID"
        "operator": {
          "type": "IN",
          "values": [
            "v01giHTYRvmoWClaPu3brw", (1)
            "xN7MxXZVT4ComUoHSOuijA" (2)
          ]
        }
      },
      {
        "field": "CREATION_TIMESTAMP",
        "operator": {
          "type": "IN_RANGE",
          "minimum": "1614553200000",
          "maximum": "1617227999999"
        }
      }
  ],
  "orderBy": [
    {
      "field": "TEAM_ID",
      "order": "ASCENDING" (3)
    },
    {
      "field": "CREATION_TIMESTAMP",
      "order": "DESCENDING" (4)
    }
  ]
}| 1 | The team ID for the "Support" team |
| 2 | The team ID for the "Advisory" team |
| 3 | The results will be grouped by team ID first |
| 4 | Within each team, the most recently created users will be shown first |
The HTTP request must be sent to the endpoint <serverUrl>/rest/v3/users/search.
4.8.1.9.5. Example 4: Conversation participation
If you send the HTTP request body below to the endpoint <serverUrl>/rest/v3/conversations/search, you can retrieve all of the conversations in March 2021 that two particular people participated in:
{
  "searchFilters": [
    {
      "field": "PARTICIPANT_PERSON_ID",
      "operator": {
        "type" : "ALL_OF",
        "values" : ["-kQOBaTdTZ20QRqrlwOvqQ", "sPNlrHvzRQSrUm3GxCOGVg"] (1)
      }
    },
    {
      "field": "CREATION_TIMESTAMP",
      "operator": {
        "type": "IN_RANGE",
        "minimum": "1614553200000", (2)
        "maximum": "1617227999999" (3)
      }
    }
  ]
}| 1 | The participant person IDs of the participants you are interested in. |
| 2 | 2021-03-01 00:00:00.000 |
| 3 | 2021-03-31 23:59:59:999 |
4.8.1.10. Unblu web API Java library
Since the release of Unblu 6.48.0, the Java libraries containing the web API models and the Jersey client are available on Maven Central. For more information, refer to the project’s home page on GitHub.
4.8.2. Webhooks
While the Unblu Web API is useful for making changes to the Unblu server, it is not always ideal for cases where the external system must respond to events generated by the server, since this would involve constantly polling the server to check for changes. The Unblu webhooks provide an alternative mechanism for such use cases.
Webhooks are user-defined HTTP callbacks. They are usually triggered by some event, such as pushing code to a repository or a comment being posted to a blog. When the event occurs, the source site makes an HTTP request to the URL configured for the webhook. Users can configure webhooks in such a way that events on one site invoke behavior on another site.
The webhook mechanism in Unblu lets you register a URL of your choosing to be called by the Unblu server when a specific event occurs. The listening system can then be configured to respond appropriately. For example, an incoming message from a customer could trigger a notification being displayed in the relationship manager’s CRM interface.
Unblu webhooks can be configured either via the Account Configuration interface or the WebhookRegistrations service of the Web API. The available events that can be listened for are documented in the Webhook Events section of the Web API reference. They can be grouped according to the entities they are related to:
- Agent invitation and forwarding events
-
Events related to the creation, revocation and redemption of invitations sent to agents, or of forwarding of a conversation to an agent.
- Conversation events
-
Events related to when conversations are created, updated, and ended, and to new messages sent to a conversation.
- CRUD events
-
Events triggered when an entity is edited. The entities that can trigger such events are:
-
account
-
API key
-
domain
-
named area
-
person
-
team
-
user
-
- PIN events
-
Events related to the creation, renewal, revocation, and redemption of PIN invitations.
- Push notifications
-
Events triggered by new messages, messages being read, incoming calls, and calls being revoked.
- Queue events
-
Events that are triggered by creating, revoking or redeeming assignment requests in the queue.
- Visitor invitation events
-
Events related to creating, renewing, revoking, or redeeming invitations sent to visitors.
4.8.3. Reference material
The Web API and webhooks are fully documented in the Web API reference.
The same information is also served from your installed Unblu server and can be found at <unblu-server>/unblu/servicesdocumentation. This server-bundled documentation is, of course, aligned with the version of Unblu that you are running.
Additionally, the Web API specification is available in the Open API format to allow for easier integration with third party software. The OpenAPI Specification is a standard way to describe REST web services in a machine-readable format (JSON or YAML).
The Unblu OpenAPI file can be used with other tools supporting this standard, to visualize the endpoints, to perform calls on the Unblu Server or to generate code that can be integrated into your calling application.
The Unblu Server provides one specification file per API version corresponding to the Unblu version that is running. Those are available at this location:
-
<unblu-server>/rest/v1/openapi -
<unblu-server>/rest/v2/openapi -
<unblu-server>/rest/v3/openapi
The documents are dynamic and display only the endpoint available to the user currently logged in, depending on the call origin used. They are also available either in YAML (default) or JSON format depending on the Accept header or an optional format query parameter (with value JSON or YAML).
| To obtain the OpenAPI specification directly from the server, you will need Unblu version 6.13.2 and newer. |
5. Configuration
Unblu is highly configurable in order to be able to serve a wide range of use cases.
5.1. Overview
Configuration in Unblu is governed by a single namespace of configuration properties which can be adjusted both in configuration property files and through the web-based configuration UI.
A configuration property is a string of the form:
com.unblu.<x>.<y>.<z>=<value>
An example would be:
com.unblu.storage.database.driver=oracle.jdbc.driver.OracleDriver
5.2. Global configuration page
An Unblu installation can serve multiple customers. This multi-tenancy capability is implemented using the account entity. All configuration entities (users, teams, API-keys, canned responses) and business-data (conversation content) are coupled with one specific account. When an account is deleted, all associated data is also deleted from the system.
5.2.1. Superadministrator
Only user with the superadmin role can manage accounts and can access configuration information (settings, user management, site integration, …) across multiple accounts. In order to preserve privacy and to be compliant with regulation such as GDPR, a superadmin can not access to conversation content or to any other visitor information of other accounts. Working on data of other accounts is called impersonation.
The configuration page for superadmin is called Global Server Settings and can be accessed with the user menu on the top right corner.
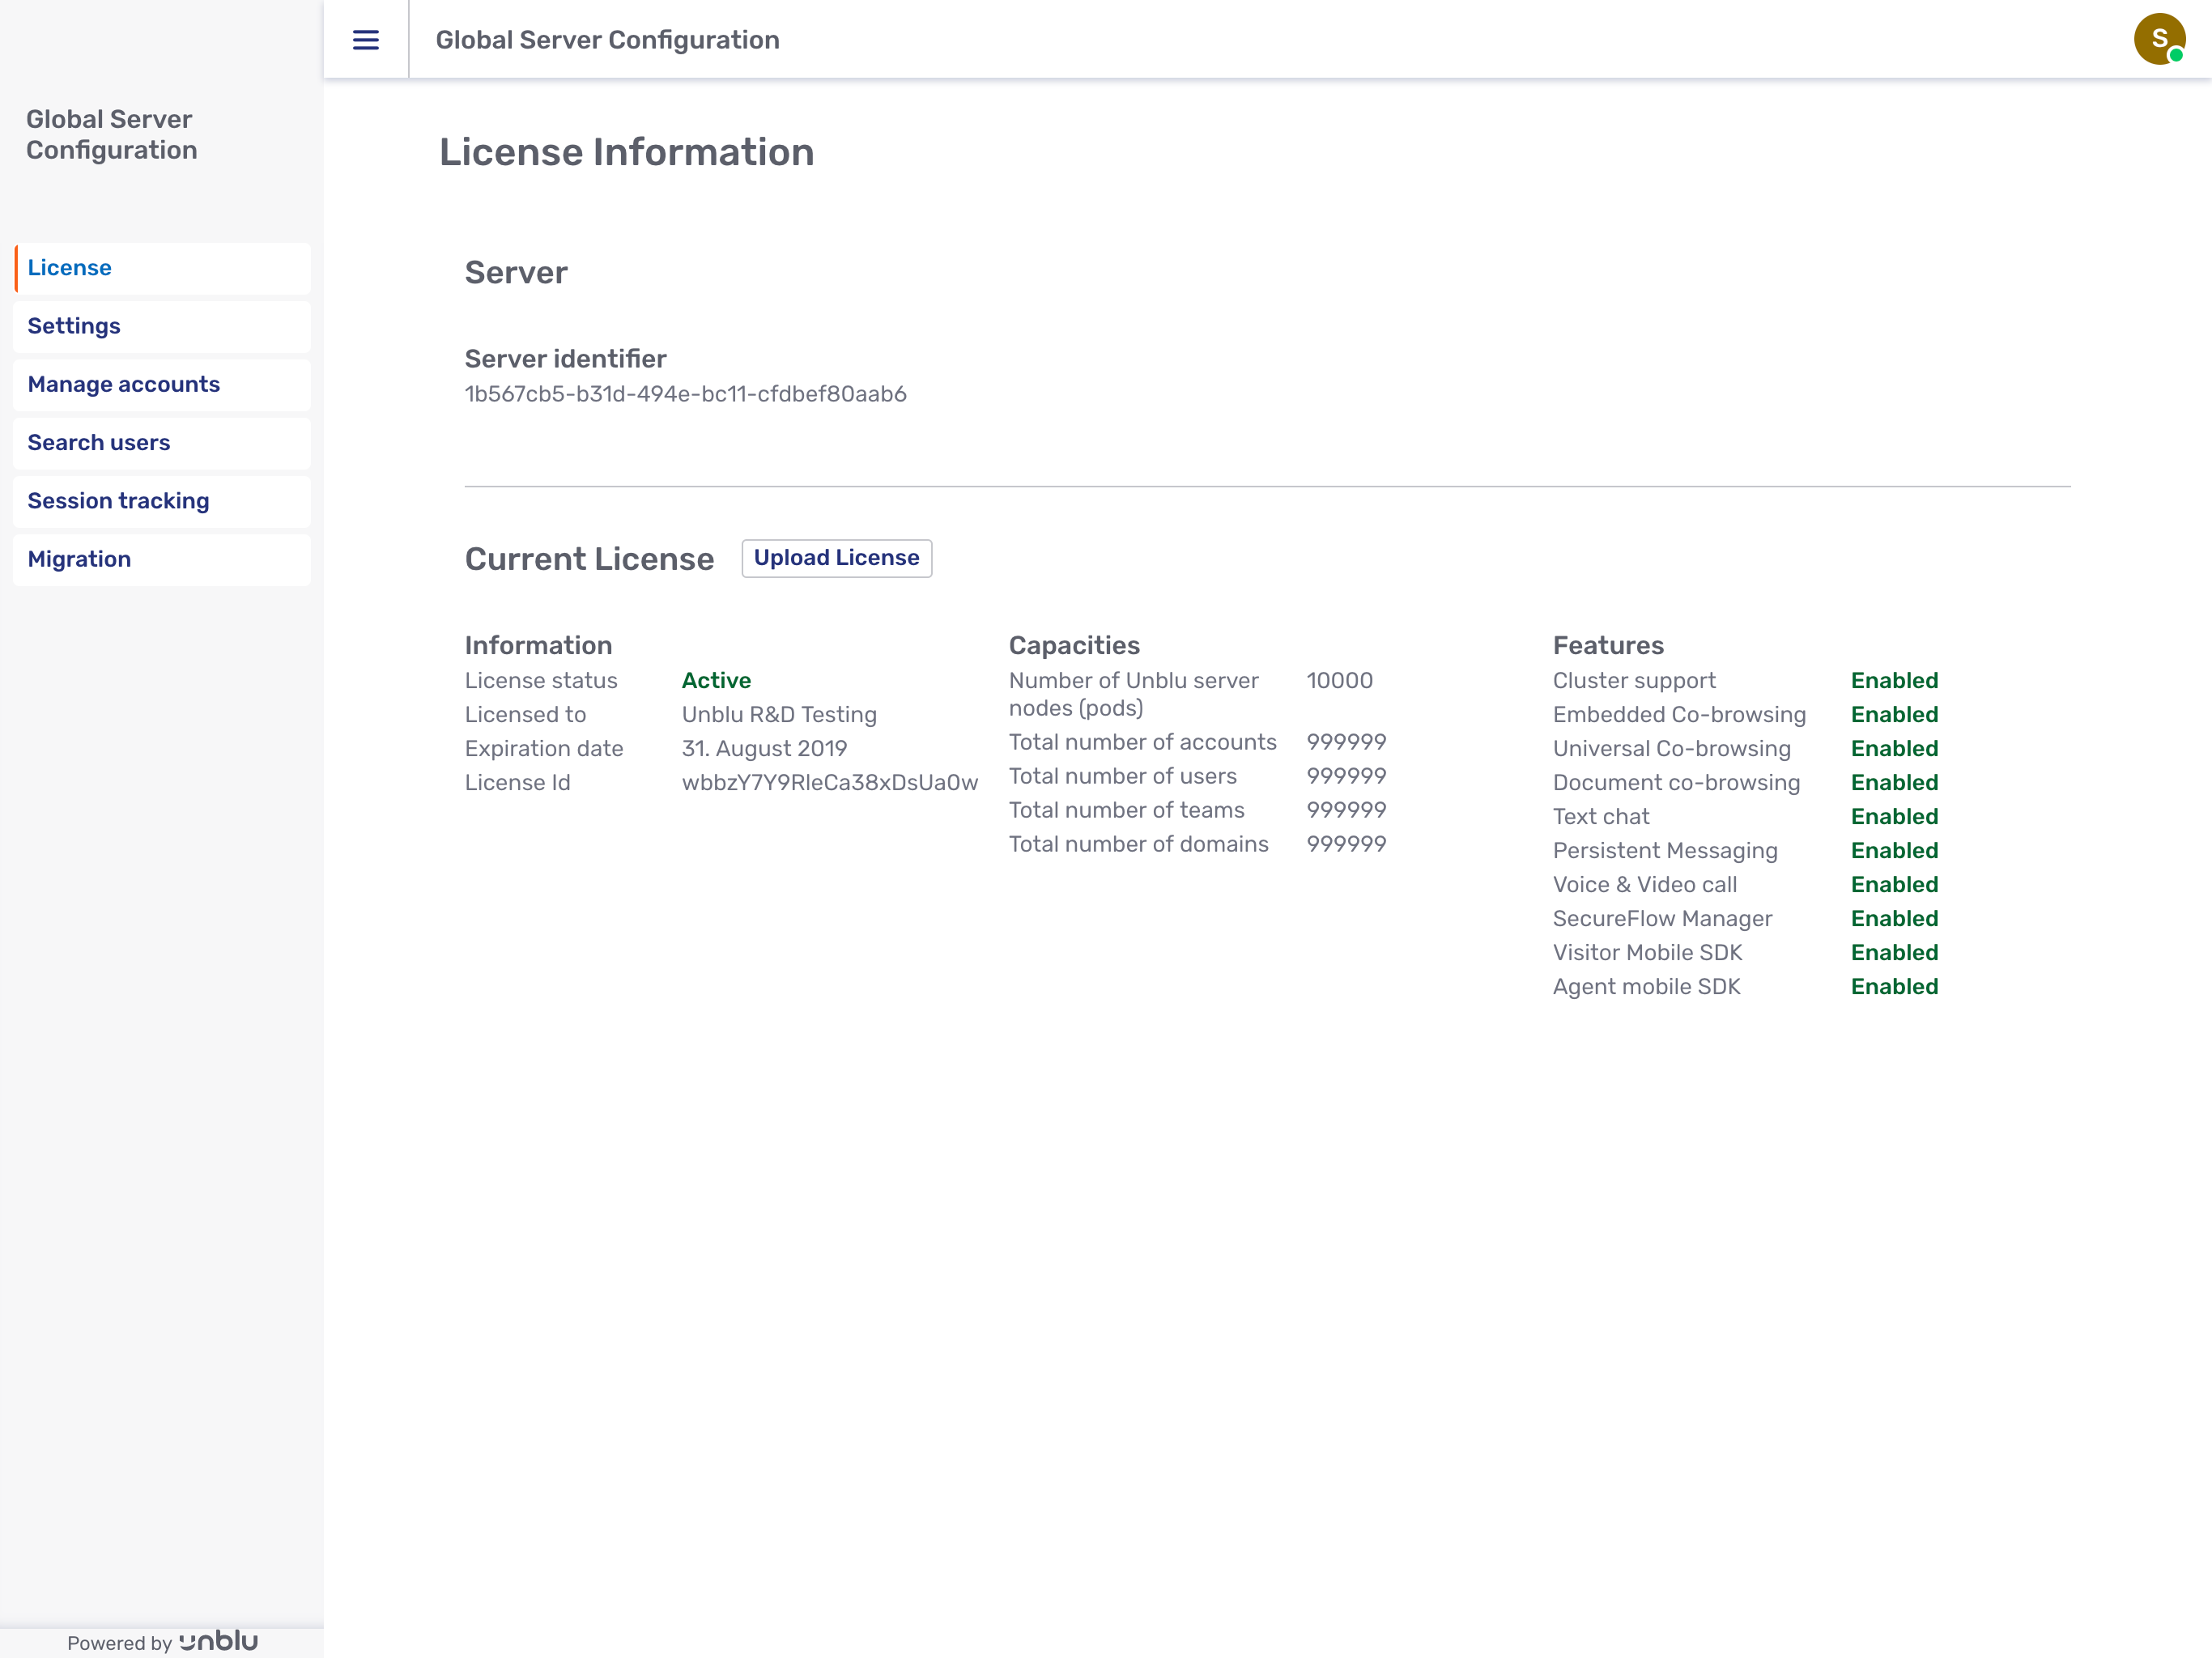
Under Manage accounts, a superadmin can see a list all accounts, create new one and delete existing accounts. To configure a specific account in the list, click on the arrow symbol next to the account name. This causes the current user (the superadmin) to impersonate the admin of that account and opens that account’s configuration page. There, the superadmin can change the configuration settings of the account as if they were the normal admin of that account.
Beside account management the Global Server Settings page is also the place where the current license can be checked and updated by uploading a new file. As well, global settings (valid for all accounts) and translations can also be configured here. The values configured here will be valid for all accounts, unless another value is set at the account level.
The superadmin also has access to some assistance and maintenance tools:
-
Search user allows you to search for a user across multiple accounts.
-
Session tracking allows you to see the sessions currently running on the Unblu server.
-
Migration provides tools to migrate configuration property files between Unblu versions.
5.3. Account configuration
Any user having the admin role can open the "Account configuration" page from the top right menu. There, all account-level configuration settings can be set and modified.
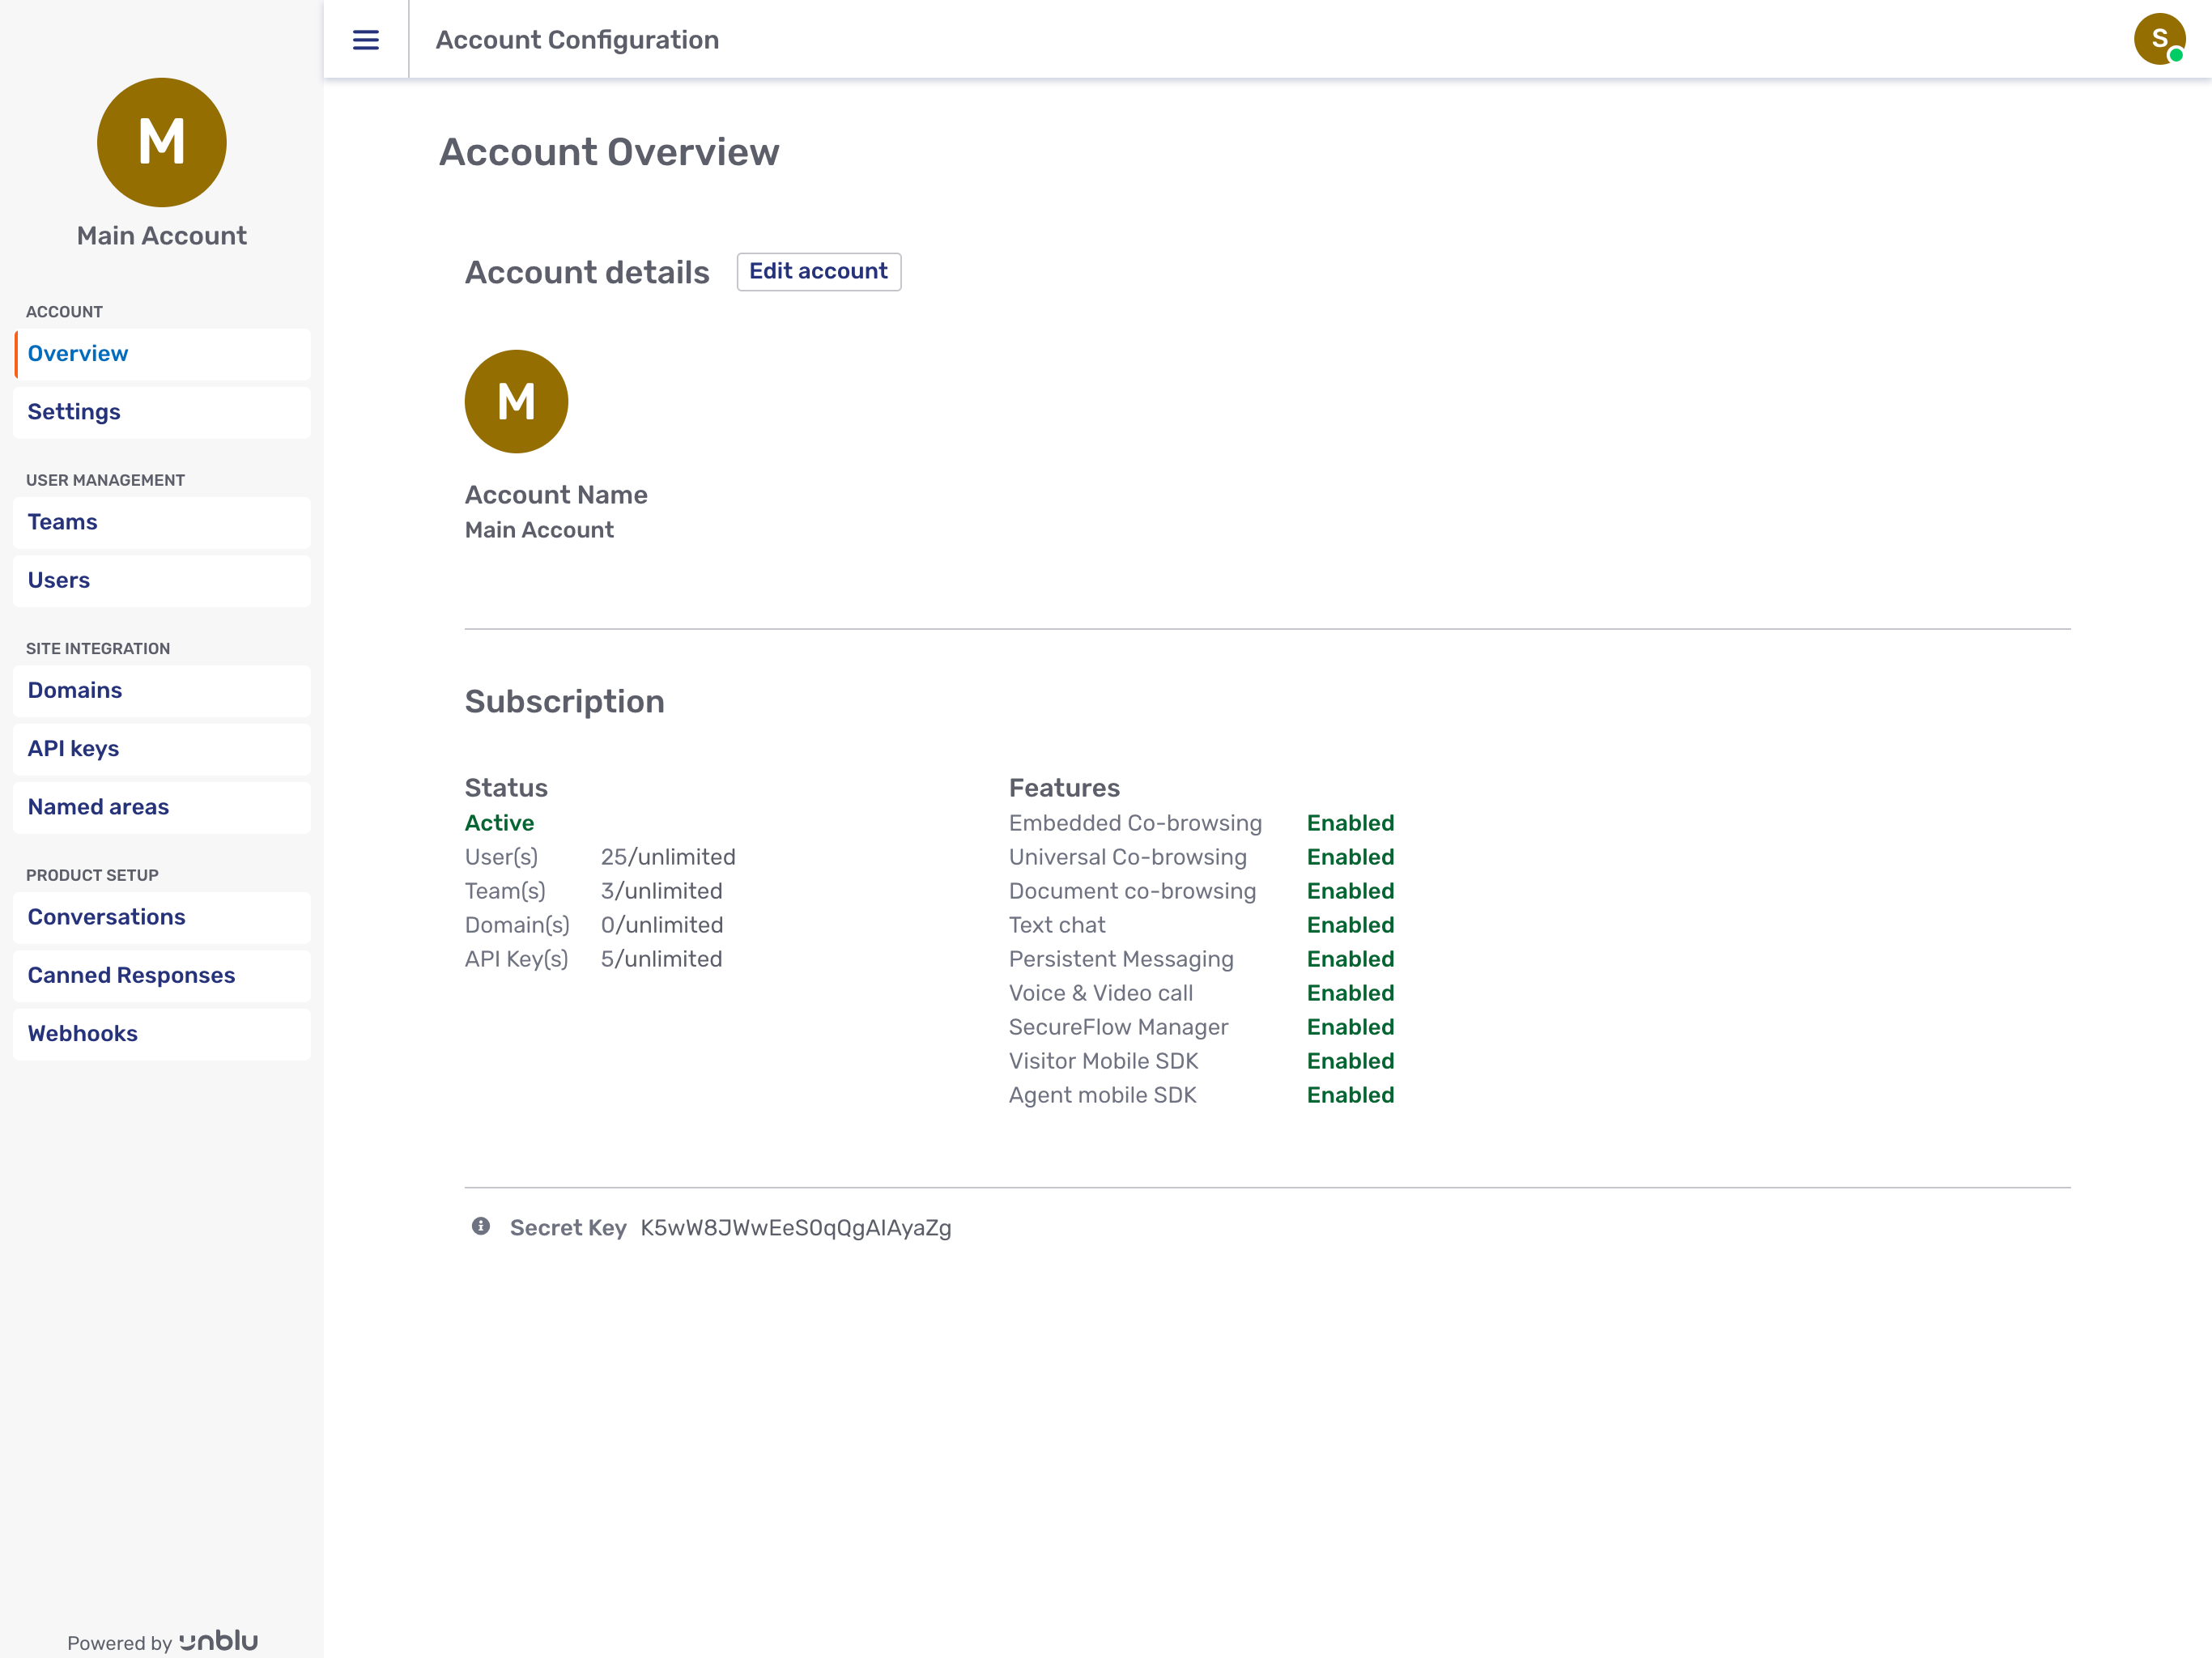
5.3.1. Account
The account overview gives you general information about the current account. You can see the product features available for this account (even if a feature is activated with the global server licence it is possible to prevent its usage at the account level) and you can perform some account modification (account name, account avatar, etc.)
At account level, it is possible to set settings values and translations values that will be valid for the entire account. Some of those configurations can be overridden to a specific value at one of the sublevels (if you want a specific configuration for a given team or for a given named area).
5.3.2. User management
Unblu does user management with the user entity and the team entity (to group users together).
Teams are organized in a tree where each team can be assigned 0 or more sub-teams. It is also possible to not use teams at all, as there is always a default team that is hidden from the user-interface.
Each user belongs to one (and only one) team. Each user also has one (and only one) role, such as REGISTERED_USER for a regular agent.
Different roles have different permissions when managing users. For example, admins can manage users and teams, and supervisors can manage users, in the Account Configuration interface. However, users and teams can only be created, updated, and deleted within Unblu if they are not externally managed, or if the ADMIN role is authorized to override external entity management.
Users cannot create a user with a higher role. This applies to all roles in the system. For other role-based restrictions on user management, please review the descriptions of the various user roles.
5.3.3. Site integration
To integrate Unblu into the visitor website, some configuration is requested.
An API key is requested to be able to load Unblu from a visitor webpage. If this page is instrumented with the snippet, the API key is part of the URL used to load the snippet. If the page is instrumented using the JS-API, the API key is one of the mandatory parameter used to configure the API before initializing Unblu. Every account has an API key "default" that can be used. For some more advanced scenario (other configurations on different visitor websites) it might be use-full to create additional API Keys.
If the Unblu server is deployed to a different domain than the visitor webpage, which is typically the case when using a cloud solution, then this domain must be declared in the domain section. This ensures that, for a given account, Unblu is not used from unexpected visitor websites.
Named areas are an additional way to change the behavior of Unblu on the visitor website. It is a way to create sub-division of the website. If you are instrumenting the website of a bank, you might want to create named areas for the different services offered by the bank (credit-card, loans & mortgages, investments…) and connect the corresponding pages with the related named area. It is then possible to have different configuration for a named area (other look-and-feel, different concierge flows, …) Agents can filter incoming chat request based on the named area coupled with the page it was started from.
There are 2 types of named areas, based either on domains or meta tags. If a named area is coupled with a domain, then all pages of the domain will we considered to be part of this named area. With the meta-tag option: a Meta Tag ID is associated with the named area. If you are using the snippet to instrument your must put an additional <meta> tag containing the Meta Tag ID into your HTML If you are using the JS-API or the Mobile SDK you can pass this value to configure the API before initializing Unblu.
5.3.4. Product setup
Customizing the conversations is an important way change the experience for the visitor.
5.3.4.1. Conversation template
A conversation template holds a set of configuration settings and translations properties for conversations. When a new conversation is created, all the values of a template are copied to configure the new conversation. This allow to have different behavior for the conversation (different permissions, restriction of the collaboration features, activation of audio and/or video channel, specific concierge flows…).
For each conversation engagement type there is at least one template (the default one), and additional templates can be created. Per configuration at account, API-key or named area level, it is possible to define which conversation template will be used for each engagement type. If nothing is defined, the default template for this engagement type will be used.
If a conversation template is modified (for example a configuration is changed), it will only affect the next conversations created based on this template. All existing conversation created with the template will stay configured the way they are.
5.3.4.2. Canned responses
Canned responses allow agents to use shortcut for the messages they send instead of having to type them manually. Canned responses can be personal (for one specific agent) shared with all agents of an account or of a specific team.
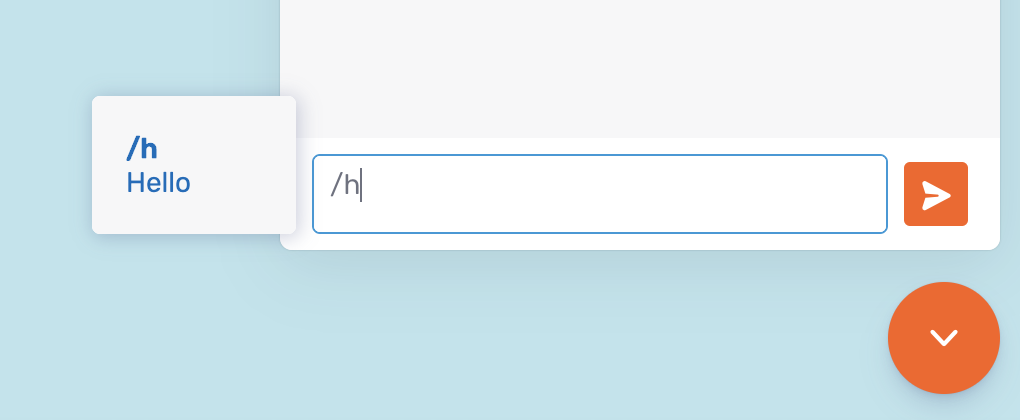
Canned responses can be managed from the "Account configuration" page at different locations. The item "Canned responses" in the menu is for the canned responses associated with the account. Each team or user has also a tab "Canned responses".
Placeholders $(visitor_name) and $(agent_name) can be added in the message text. When the canned-response is used, the placeholders will be replaced by the correct value for the conversation.
5.3.5. Supervisor
Supervisors can also access the “Account Configuration” page but the scope of their actions is limited.
-
They can edit their teams and sub-teams.
-
They can reorganize them but cannot create a new teams.
-
They can see all members of their own team and sub-teams.
-
They can edit the team assignment of the users belonging to their teams or sub-teams, but cannot create new users.
-
Finally, supervisors can manage canned responses for their teams and sub-teams.
5.4. Configuration interface
The Unblu configuration interface is used to configure the system settings. Unblu is a highly configurable product where almost every significant feature can be adjusted. Consequently the configuration interface is quite extensive.
5.4.1. Configuration levels
There are two levels of configuration: the Account level and the Global Server level. The Account level provides settings for managing a single Unblu account. The Global Server level provides settings for managing things at the server machine level, which may include multiple Accounts. The Account Configuration main page looks like this:
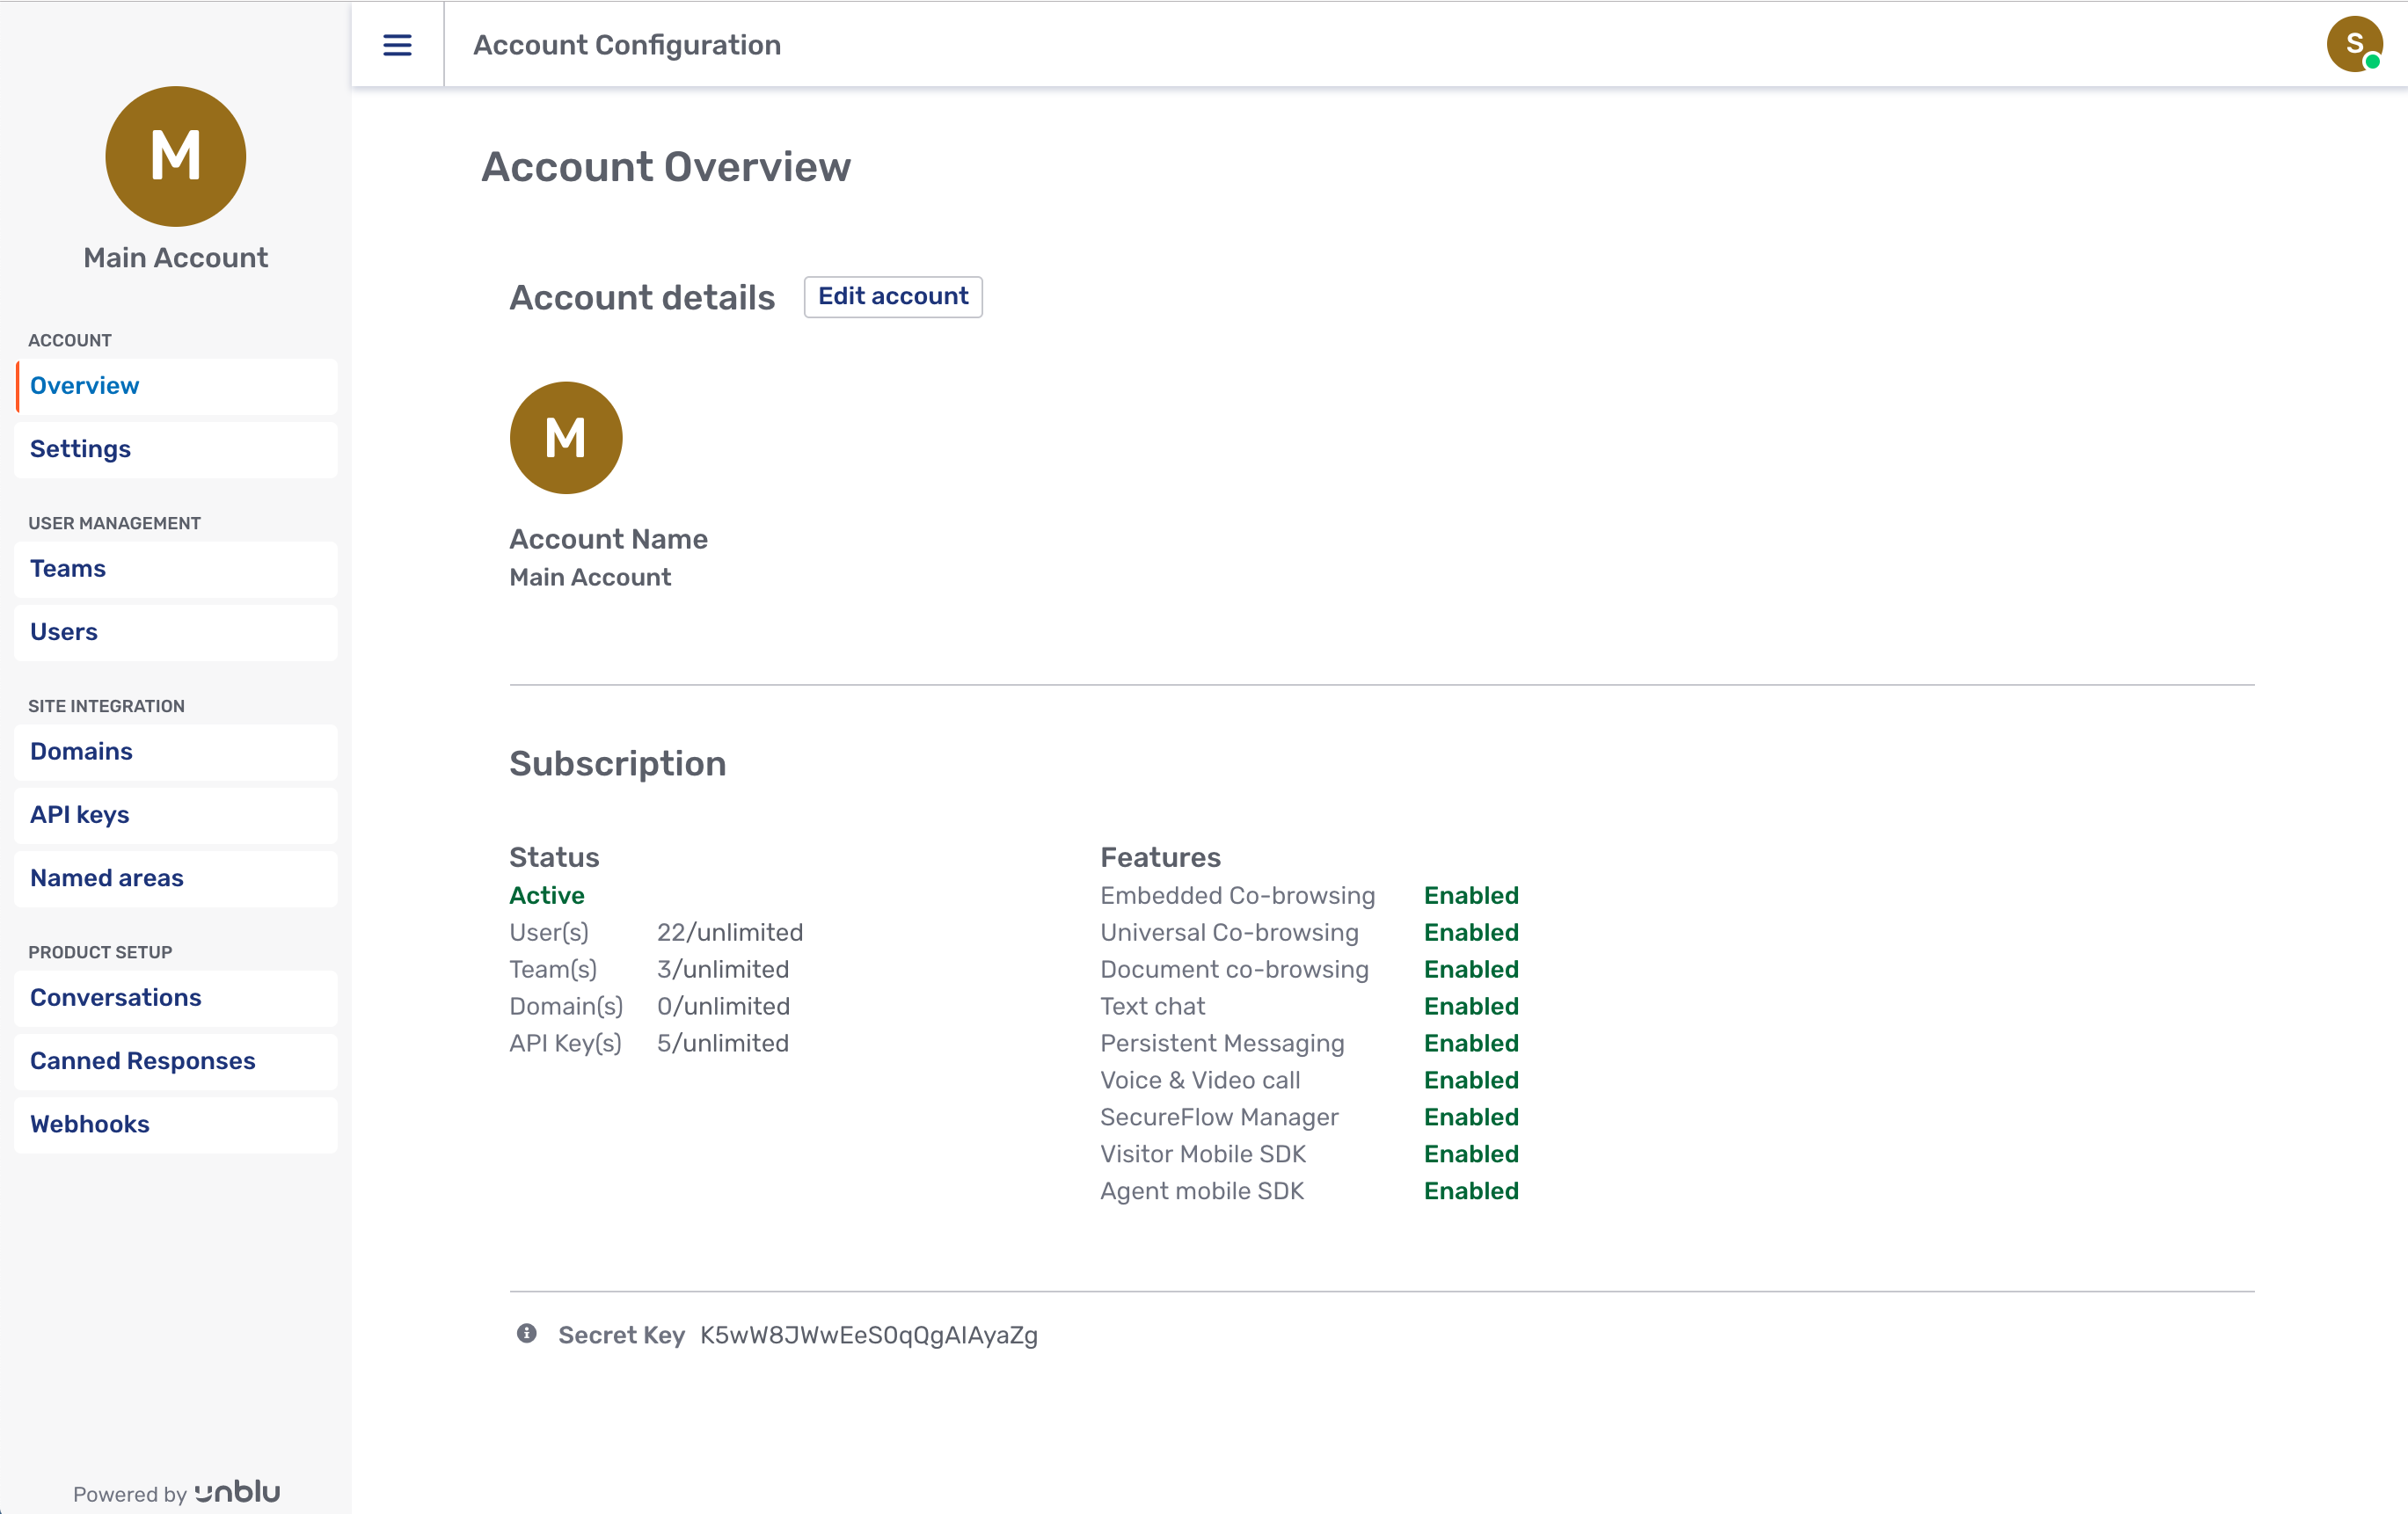
The Global Server Configuration main page looks like this:
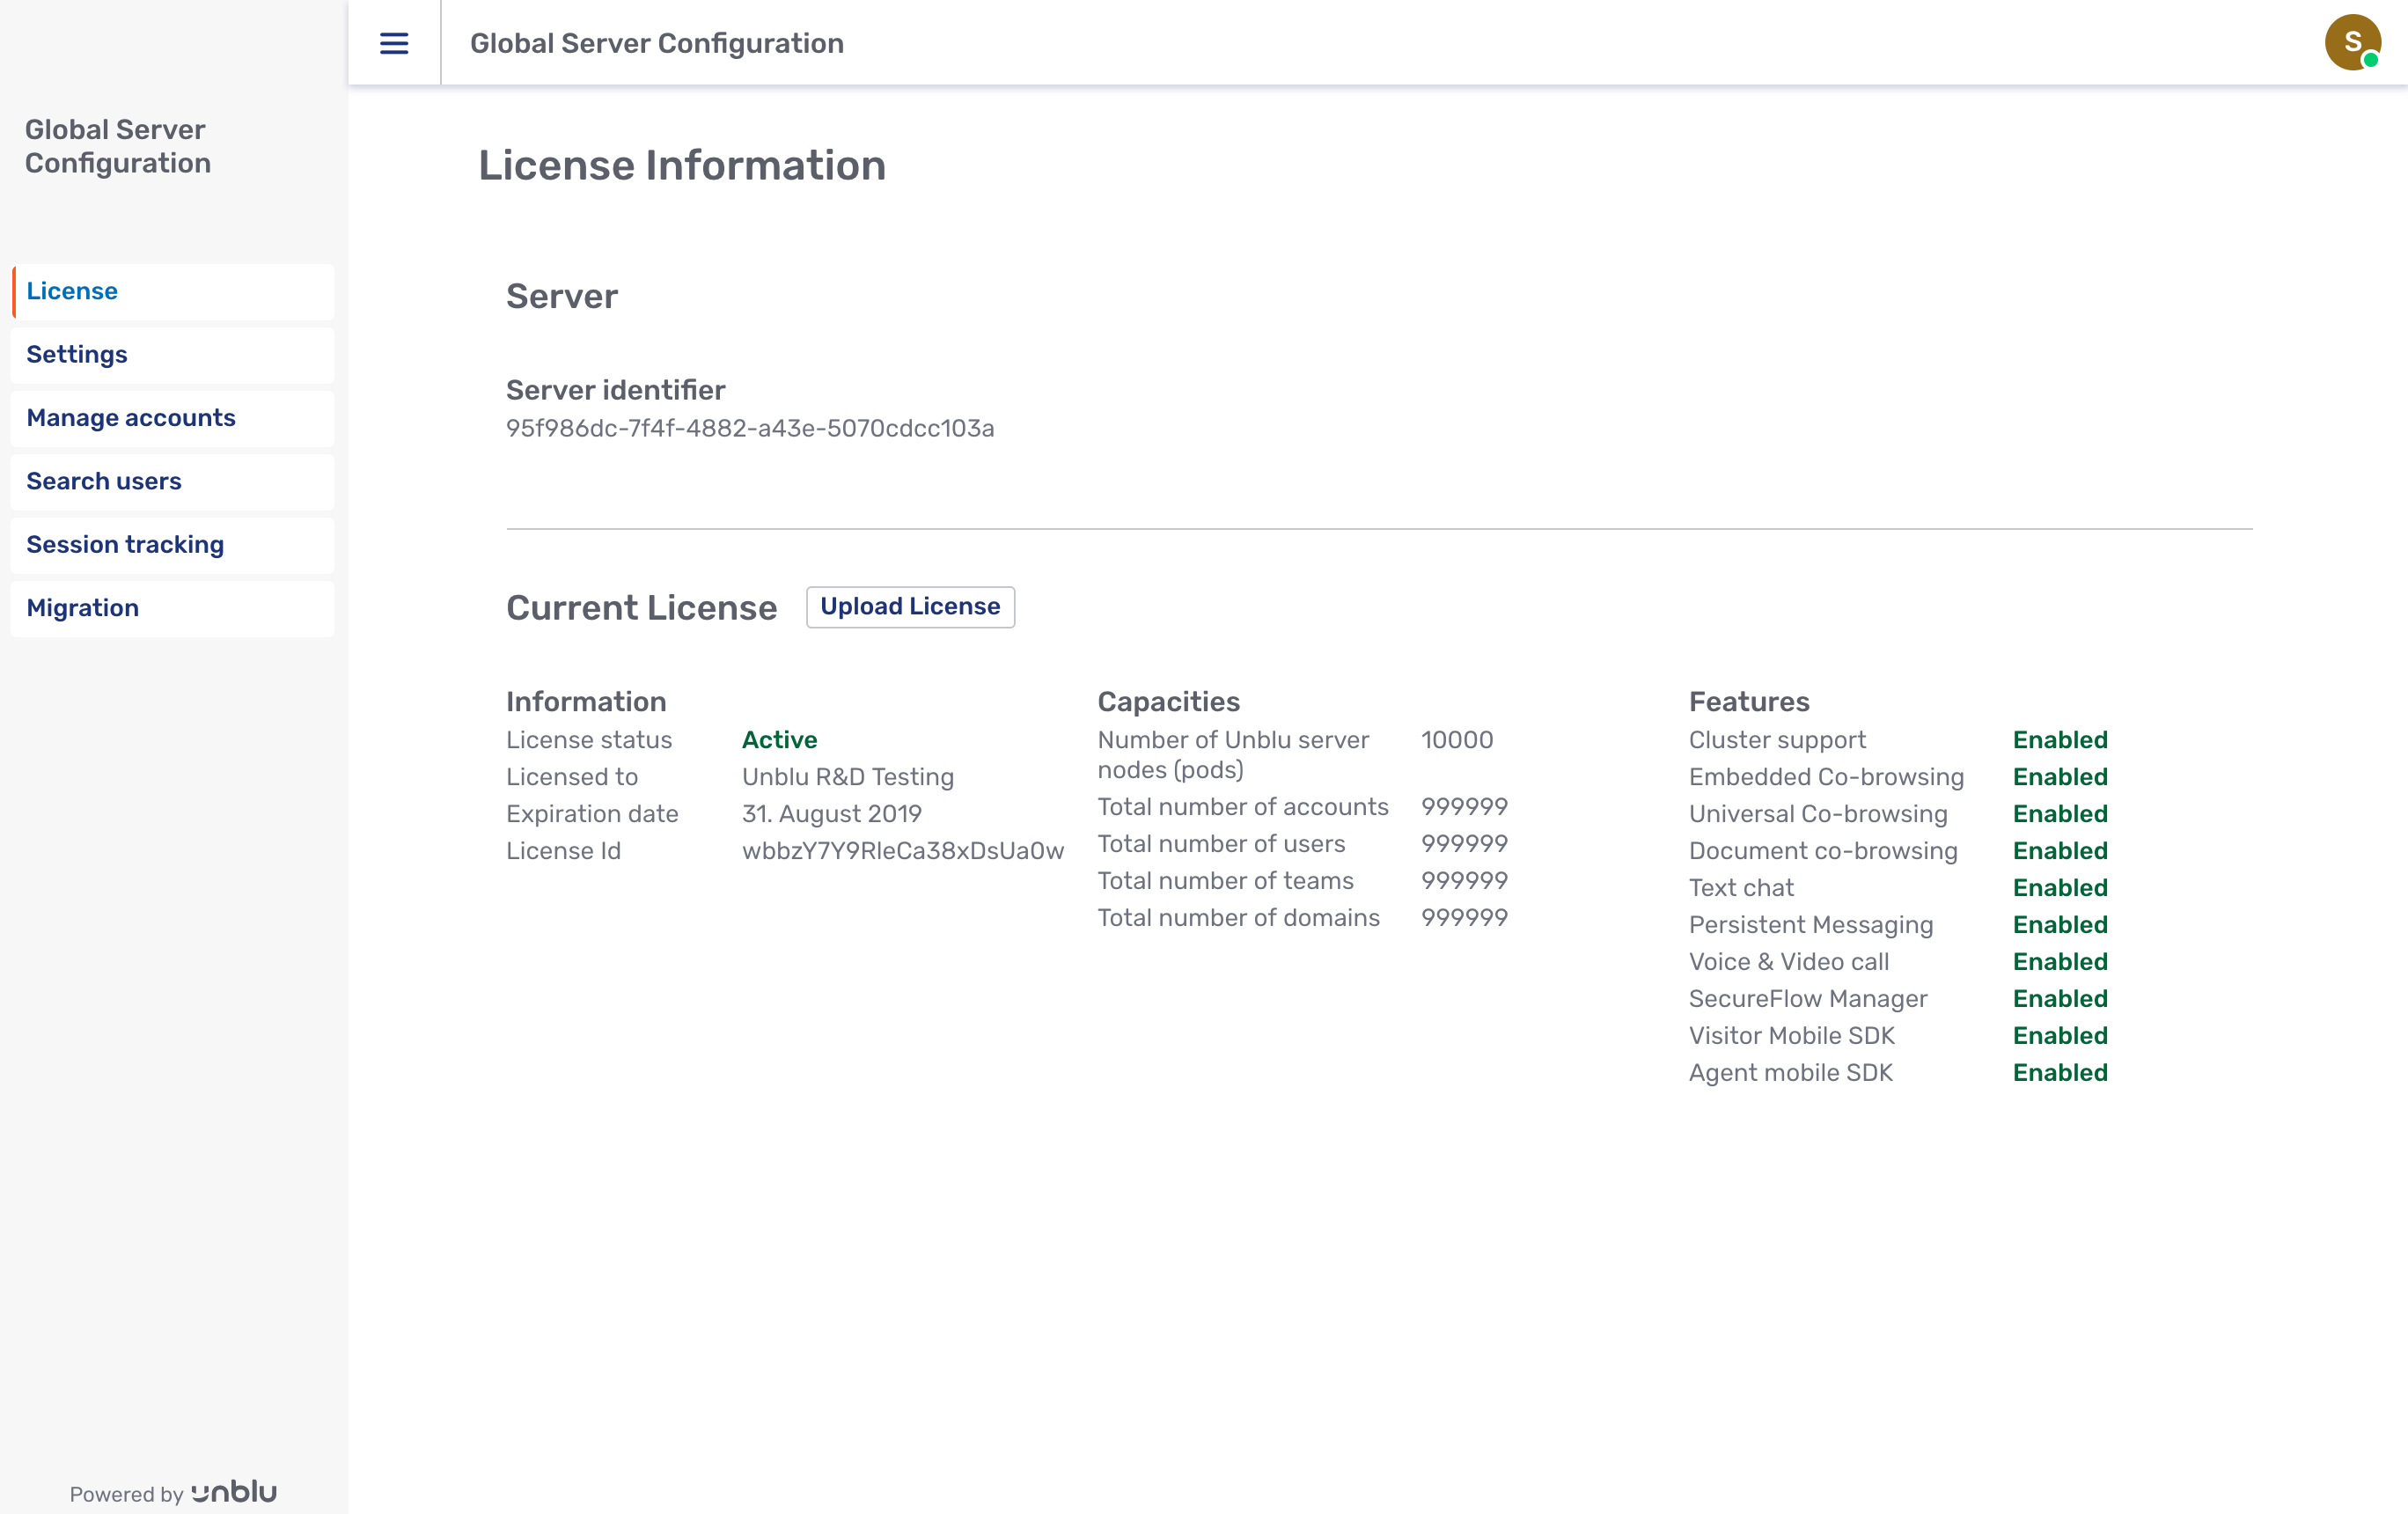
6. Security
6.1. Overview
Unblu is designed with the stringent security standards of the financial industry in mind. In the following section we describe how these standards are implemented in practice in an Unblu on-premises installation and in the Unblu Financial Cloud.
6.2. User roles
Everyone who connects to Unblu, whether a visitor on your public website or someone within your organization, requires a user identity on the system. Unblu classifies user identities by role. The possible roles are:
6.2.1. ANONYMOUS USER
When an anonymous visitor launches the Unblu interface on a public website, an ephemeral identity will be automatically generated on the Unblu system for that user and assigned the ANONYMOUS_USER role.
6.2.2. WEBUSER
When a customer is authenticated by a protected web application such as an e-banking portal, that authentication is also used by the Unblu server. The user is assigned the WEBUSER role. Users with the WEBUSER role cannot access the Agent Desk.
6.2.3. REGISTERED_USER
The REGISTERED_USER role is used for agents using Unblu in your organization. This role grants access to the basic functions of the Agent Desk.
6.2.4. SUPERVISOR
The SUPERVISOR role provides access to the team management functions of the agent desk as well as to the functions enabled by the REGISTERED_USER role.
6.2.5. ADMIN
The ADMIN role grants access to the account-related functions of the Account Configuration interface. In addition, users with this role have access to the same Agent Desk functions as users with the SUPERVISOR role.
6.2.6. TECHNICAL_ADMIN
The TECHNICAL_ADMIN role is intended for IT specialists who are not authorized to access personally identifiable information (PII) stored in Unblu. The role entails a number of limitations compared to the ADMIN role:
-
Users with the
TECHNICAL_ADMINrole have no access to the Agent Desk. -
In the Account Configuration interface, they can only access account-related functions.
-
Users with this role cannot configure webhooks, bots or external messengers. If they could, they would have an indirect way to access the contents of conversations.
-
The
TECHNICAL_ADMINuser role has limited user management capabilities. Specifically, users with the role:-
Can modify the settings of users and teams
-
Can create, modify, or delete canned responses of a user or team
-
Cannot create, modify, or delete users, including themselves
-
Cannot create, modify, or delete teams
-
6.2.7. SUPER_ADMIN
In addition to the permissions granted with the ADMIN role, the SUPER_ADMIN role grants access to the Global Server Configuration interface, enabling users to create and manage accounts on the Unblu server.
When not impersonated into another account, users with the SUPER_ADMIN role can:
-
create, modify, or delete any type of user and team
-
create, modify, or delete canned responses for users or teams
When impersonated into another account, users with the SUPER_ADMIN role have the same privileges as if they were in their own account. This may raise concerns about unwarranted access to PII. The configuration property com.unblu.storage.management.limitedImpersonatedSuperAdminUserManagementEnabled addresses these concerns by limiting what SUPER_ADMIN users can do when managing users and teams in another account. When the configuration property is set to true, a SUPER_ADMIN who is impersonated into another account:
-
Can only create
TECHNICAL_ADMINusers in the account -
Cannot create, modify, or delete teams in the account
The default value of the configuration property is false.
6.2.8. Role-based feature access
As the role descriptions above suggest, Unblu’s roles are hierarchical in nature: permissions granted to a role further down the hierarchy are inherited by roles further up in the hierarchy. For example, since administrators are able to create teams, superadministrators can, too.
By and large, permission inheritance makes configuration management easier. It can, however, also lead to roles being granted access to features that you don’t want them to have. For this reason, access to some features can be granted to roles individually.
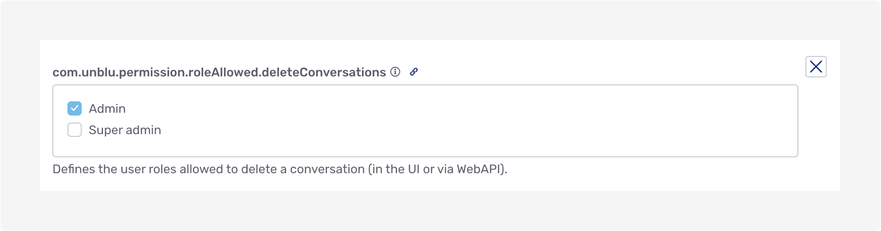
The picture above shows the setting that specifies which roles may delete conversations. As you can see, superadministrators may not do so even though administrators may.
The features that you can grant access to on a per-role basis all have configuration properties whose key begins com.unblu.permission.roleAllowed. Access to the feature to delete conversations, for example, is determined by the configuration property com.unblu.permission.roleAllowed.deleteConversations.
|
Superadministrators can change the settings that define role-based feature access. In principle, they can therefore grant themselves access to any feature. |
6.3. Call origin
The key security issue in any on-premises Unblu installation is the fact that the system spans both the public internet and the private network within your organization.
The public part of the Unblu installation is the visitor interface that appears on your firm’s website. Because the interface forms part of the website, it is transmitted to the visitor’s browser and transmits information from the visitor’s browser back to the Unblu server.
Inside your organization’s network perimeter, on the other hand, you have the actual Unblu server itself, as well as the agents that interact with the visitors. Because the agents are trusted employees of your firm, they have access to your internal network, through which they access the agent interface with their browsers.
To maintain the separation between these realms, Unblu is designed to leverage your existing secure infrastructure as much as possible. It does this through the call origin system.
Under this system, every resource in the Unblu system has a minimum required trust level. There are three trust levels. From least to most trusted, these are:
-
UNTRUSTED(also called public) -
TRUSTED(also called restricted) -
SYSTEM
In order for a request to succeed against a resource, the request itself must have at least the same trust level as the resource.
-
An
UNTRUSTEDresource can be accessed from anUNTRUSTED,TRUSTEDorSYSTEMcall origin. -
A
TRUSTEDresource can only be accessed from aTRUSTEDorSYSTEMcall origin but not from anUNTRUSTEDone. -
A
SYSTEMresource can only be accessed from aSYSTEMcall origin but not anUNTRUSTEDorTRUSTEDone.
The trust level of a request is determined by its call origin, that is, where the request came from.
| The call origin system is not needed in all use cases. If your use case doesn’t require it, you can turn it off by setting com.unblu.identifier.restrictedPathPrefix to be identical to com.unblu.identifier.publicPathPrefix. If, on the other hand, your use case does require the call origin system, it must be enabled. Furthermore, the call origin system is only applicable to site-embedded installations. Consequently, it is not available on cross-origin on-premises installations or on the Unblu Financial Cloud. |
6.3.1. Call origin is determined by path prefix
Clearly then, in order to judge the trust level of a request, the Unblu server needs a way of determining the origin of the request. This is done simply: The calling component embeds its call origin in the path prefix of the request URL.
Specifically,
-
UNTRUSTEDrequests use the path prefix/unbluin the URL, -
TRUSTEDrequests use the path prefix/co-unblu, and -
SYSTEMrequests use the path prefix/sys-unblu.
These default path prefixes can be changed via the configuration properties:
-
com.unblu.identifier.publicPathPrefix for the
UNTRUSTEDpath prefix, -
com.unblu.identifier.restrictedPathPrefix for the
TRUSTEDpath prefix, and -
com.unblu.identifier.systemPathPrefix for the
SYSTEMpath prefix.
By default, SYSTEM is disabled. However, it must be enabled if the SecureFlow Manager and/or the rendering service (for Universal and Document Co-browsing) are in use. If so, enable SYSTEM with the configuration property com.unblu.systempath.enabled. |
If SYSTEM is enabled, it is essential that access to the SYSTEM path prefix be protected. This can be done by enabling basic authentication configuration properties and com.unblu.systempath.basicHTTPAuthenticationPassword or by implementing protection outside of Unblu (e.g. in a reverse proxy). |
Contrast the following two scenarios:
-
When you integrate the Unblu visitor interface into your public website, a
<script>element similar to the one below will be embedded in your website’s code:<script src="https://unblu.example.com/unblu/visitor.js"></script>This HTML element loads the bootstrap code that, in turn, loads the Unblu individual UI. Since this call comes from the public internet, it uses the
UNTRUSTEDpath prefix/unblu/. -
When an agent at your organization wants to navigate to their Unblu Agent Desk inbox, they point their browser to
https://unblu.example.com/co-unblu/desk/#/inbox
This pattern of distinguishing request URLs by path prefix is used across all requests to the Unblu server.
6.3.2. Call origin is enforced by reverse proxy
An immediate question that comes to mind is: "How can relying on the form of the request URL improve security?" After all, any client could potentially construct a query using any path prefix.
In fact, the point of the call-origin system is not really to provide security, but to enable the provision of security, in the larger context of your Unblu server installation.
With call origin enabled, the Unblu server’s URL space is partitioned according to trust level. Enforcing those trust levels requires the framework around the server to ensure that requests requiring a specific trust level only originate from sources that meet that level. To this end, you must set up a reverse proxy in front of the Unblu server that enforces the following restrictions:
-
If a request originates in the public internet, it will only be passed on to the Unblu server if it has the path prefix
/unblu/. -
If a request comes from the network zone accessible to agents, it will only be passed on to the Unblu server if it has the path prefix
/co-unblu/. -
If a request is made by other components closely connected to the Unblu server, it will only be passed on to the Unblu server if it has the path prefix
/sys-unblu/.
Since any organization installing Unblu on-premises will almost certainly already have some type of reverse proxy in place, Unblu’s call-origin system can take advantage of this pre-existing security infrastructure.
The following diagram depicts the key elements related to call origin and authentication of a typical on-premises installation:

6.4. CSP headers
Unblu comes with three predefined sets of directives for the Content Security Policy (CSP) HTTP response header of its various interfaces.
6.4.1. Activating Unblu CSP directives
By default, the Unblu CSP response headers are turned off. To use the Unblu CSP headers, set com.unblu.contentsecuritypolicy.mode to ON.
Activating CSP improves the security of Unblu by limiting access to resources that comply with the policies you specify. However, sometimes a policy may have unintended side-effects. It may block access to resources that are, in fact, required for your application to function correctly. If you would first like to see whether activating the Unblu CSP headers would result in problems, set com.unblu.contentsecuritypolicy.mode to REPORT_ONLY. Unblu will then send Content-Security-Policy-Report-Only headers rather than Content-Security-Policy headers. Violations of the CSP directives will be displayed in the console of your browser’s developer tools, but the resource will still be loaded. This way, you can verify that all the content security policy directives you have specified will not block access to required resources.
The sets of CSP directives Unblu provides are:
-
A set of directives for the Agent Desk, Visitor Desk, and Single Conversation Desk:
Listing 52. Contents of the CSP response header for the Agent Desk, Visitor Desk, and Single Conversation DeskContent-Security-Policy: style-src 'unsafe-inline' 'self'; default-src 'none'; connect-src wss: 'self' *.opentok.com *.tokbox.com wss://*.tokbox.com ws:; img-src 'self' data:; media-src 'self'; font-src 'self' data:; script-src 'unsafe-inline' 'self' *.opentok.com *.tokbox.com wss://*.tokbox.com 'unsafe-eval'; frame-src 'self' blob: -
A set of directives for the Account Configuration interface, Global Server Configuration interface, Agent SDK, and Visitor SDK:
Listing 53. Contents of the CSP response header for the configuration interfaces and mobile SDKsContent-Security-Policy: style-src 'unsafe-inline' 'self'; default-src 'none'; connect-src 'self'; img-src 'self' data:; media-src 'self'; font-src 'self' data:; script-src 'unsafe-inline' 'self' 'unsafe-eval'; frame-src 'none' -
A set of directives for the content of a visitor’s browser displayed to an agent in the Agent Desk during an embedded co-browsing session:
Listing 54. Contents of the CSP response header for embedded contentContent-Security-Policy: style-src 'unsafe-inline' 'self' *; default-src 'none'; img-src 'self' * data:; media-src 'self' *; font-src 'self' * data:; script-src 'unsafe-inline'; frame-src 'self' blob:
6.4.2. Modifying CSP header directives
The directives for embedded content include the * wildcard for CSS, fonts, images, and media. This is the default value of the setting com.unblu.contentsecuritypolicy.allowedDomainsForUiResources. If you wish to make the directive more restrictive, simply change the value of this setting accordingly. For example, if static resources for your public website are retrieved from imgs.static.company.com and resources.company.com, you can make the CSP directive more restrictive by one of the following means:
-
Add
*.company.comto com.unblu.contentsecuritypolicy.allowedDomainsForUiResources. -
Add both
imgs.static.company.comandresources.company.comto com.unblu.contentsecuritypolicy.allowedDomainsForUiResources.
If you do not use Unblu’s video and voice features at present, you can also remove the directives granting access to the domains opentok.com and tokbox.com from the set of directives for the Agent Desk. Simply delete all values of the setting com.unblu.contentsecuritypolicy.tokboxDomains in the Global Server Configuration interface. (This must be done by a user with the superadministrator privileges.)
6.4.3. Limitations
The Unblu CSP headers are always delivered as HTTP response headers. It is not possible to include them in a meta tag.
Internet Explorer does not support the CSP response header.
6.5. The superadmin user
If the value of the configuration property com.unblu.storage.createSuperAdmin is true, then a superadmin user will be created as part of the initial installation of the Unblu collaboration server. The username can be specified in the configration property com.unblu.storage.superAdminUsername. If no username is provided, a username will be generated from a WebUUID.
Specifying a username for the superadmin is only required from Unblu version 6.18.0 onwards. In earlier versions of Unblu, the username was always superadmin. |
6.5.1. Initial superadmin password
There are two ways to set the initial password for the superadmin user, depending on the configuration property com.unblu.storage.superAdminPassword:
-
If the property is not empty, the superadmin password will be set to whatever value the property has.
-
If the property is empty, a random password will be generated and stored in a file called
credentials.txt. The file is located either within the directory specified in com.unblu.logging.outputDirectory (if present) or in the system’s default temporary folder.The file
credentials.txtis also created when the configuration property com.unblu.storage.createSuperAdmin istrueand the property com.unblu.storage.superAdminUsername is empty.
Prior to Unblu version 6.18.0, the file containing the generated password was called superadmin.password. |
| Store this password securely! It is required to access the server’s agent desk and to administer the installation. |
| The password file must be deleted after the initial server startup, otherwise the server will not allow ordinary, non-superadmin users to log in. |
6.5.2. Restoring the superadmin password
If the superadmin password is lost, a new one can be generated by setting the configuration property com.unblu.storage.resetSuperAdmin to true and restarting the collaboration server. This will cause Unblu to generate a new random password and store it in the file credentials.txt, as if no value for the password had been provided during initial setup.
Once the server has restarted, set the aforementioned property to false again, retrieve the password from the file, then delete the file from where it was generated.
7. User guides
Unblu’s user interfaces are designed to help your organization communicate effectively and build strong, lasting relationships with clients.
There a number of user interfaces for the different groups of users that interact with the Unblu system:
-
The Visitor Individual UI enables your organization’s clients and prospects to converse with you.
-
The Agent Desk allows agents and relationship managers to communicate with Visitors. It is also by supervisors to manage their teams.
-
Administrators of an Unblu Account can use the Account Configuration interface to configure and customize numerous aspects of the Account.
-
To configure an entire Unblu server installation, Superadministrators have access to the Global Server Configuration interface.
This section shows you how to make the most of the user interfaces
7.1. Visitor Individual UI guide
Unblu provides a default interface for visitors called the Individual UI. This user guide will focus on the functionality that the Individual UI provides out of the box.
The Visitor Individual UI guide is written from a visitor’s perspective. However, it should help agents and administrators to understand better what Unblu looks like to visitors. It should be useful if you need to assist visitors who have problems operating the Individual UI.
| Depending on the configuration your organization chose to implement, the look and feel of the interface may differ from the pictures in this guide. Additionally, some functions may not be available if they have not been licensed by your organization. However, you should have no difficulties applying the explanations in this guide to your particular circumstances. |
7.1.1. Launching the Individual UI
When you are on an Unblu-enabled website, all you can see of Unblu to start with is the launcher button. On the web page pictured below, the launcher button is located in the lower right-hand corner of the screen:
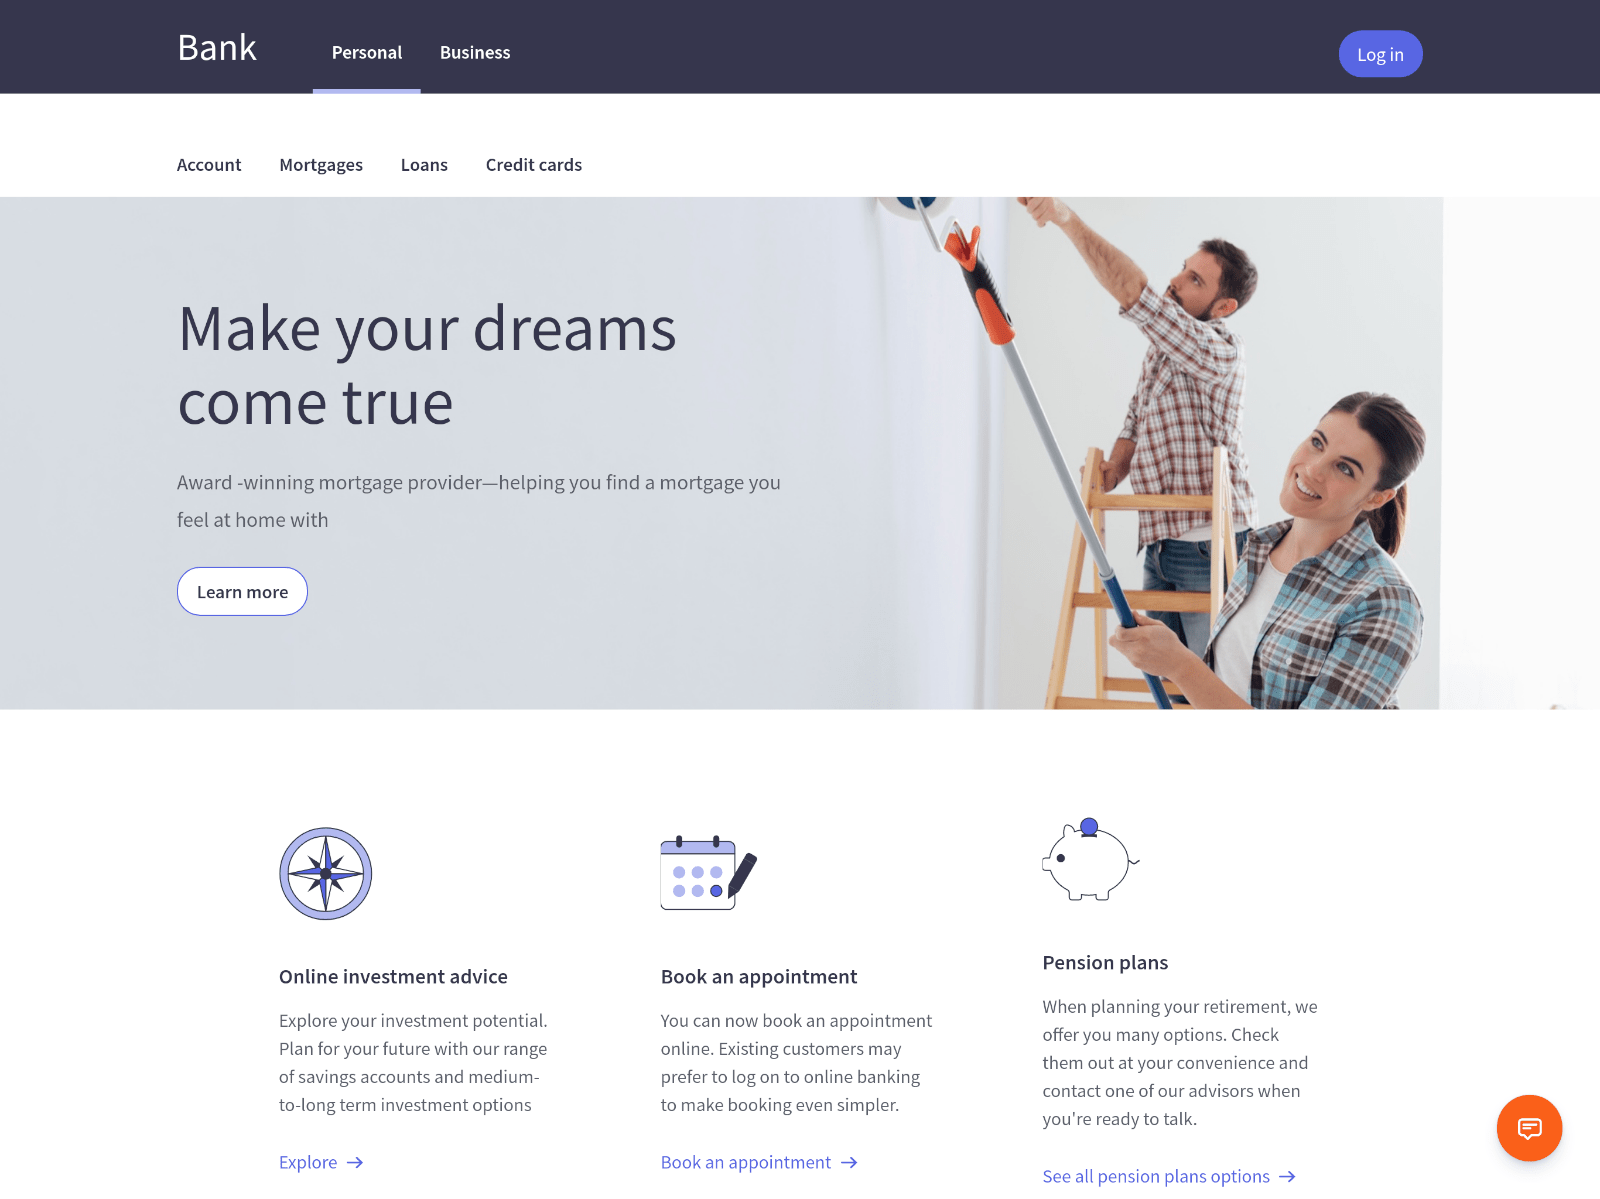
By default, clicking on the launcher button opens the Individual UI conversation panel. The panel displays the overview page:
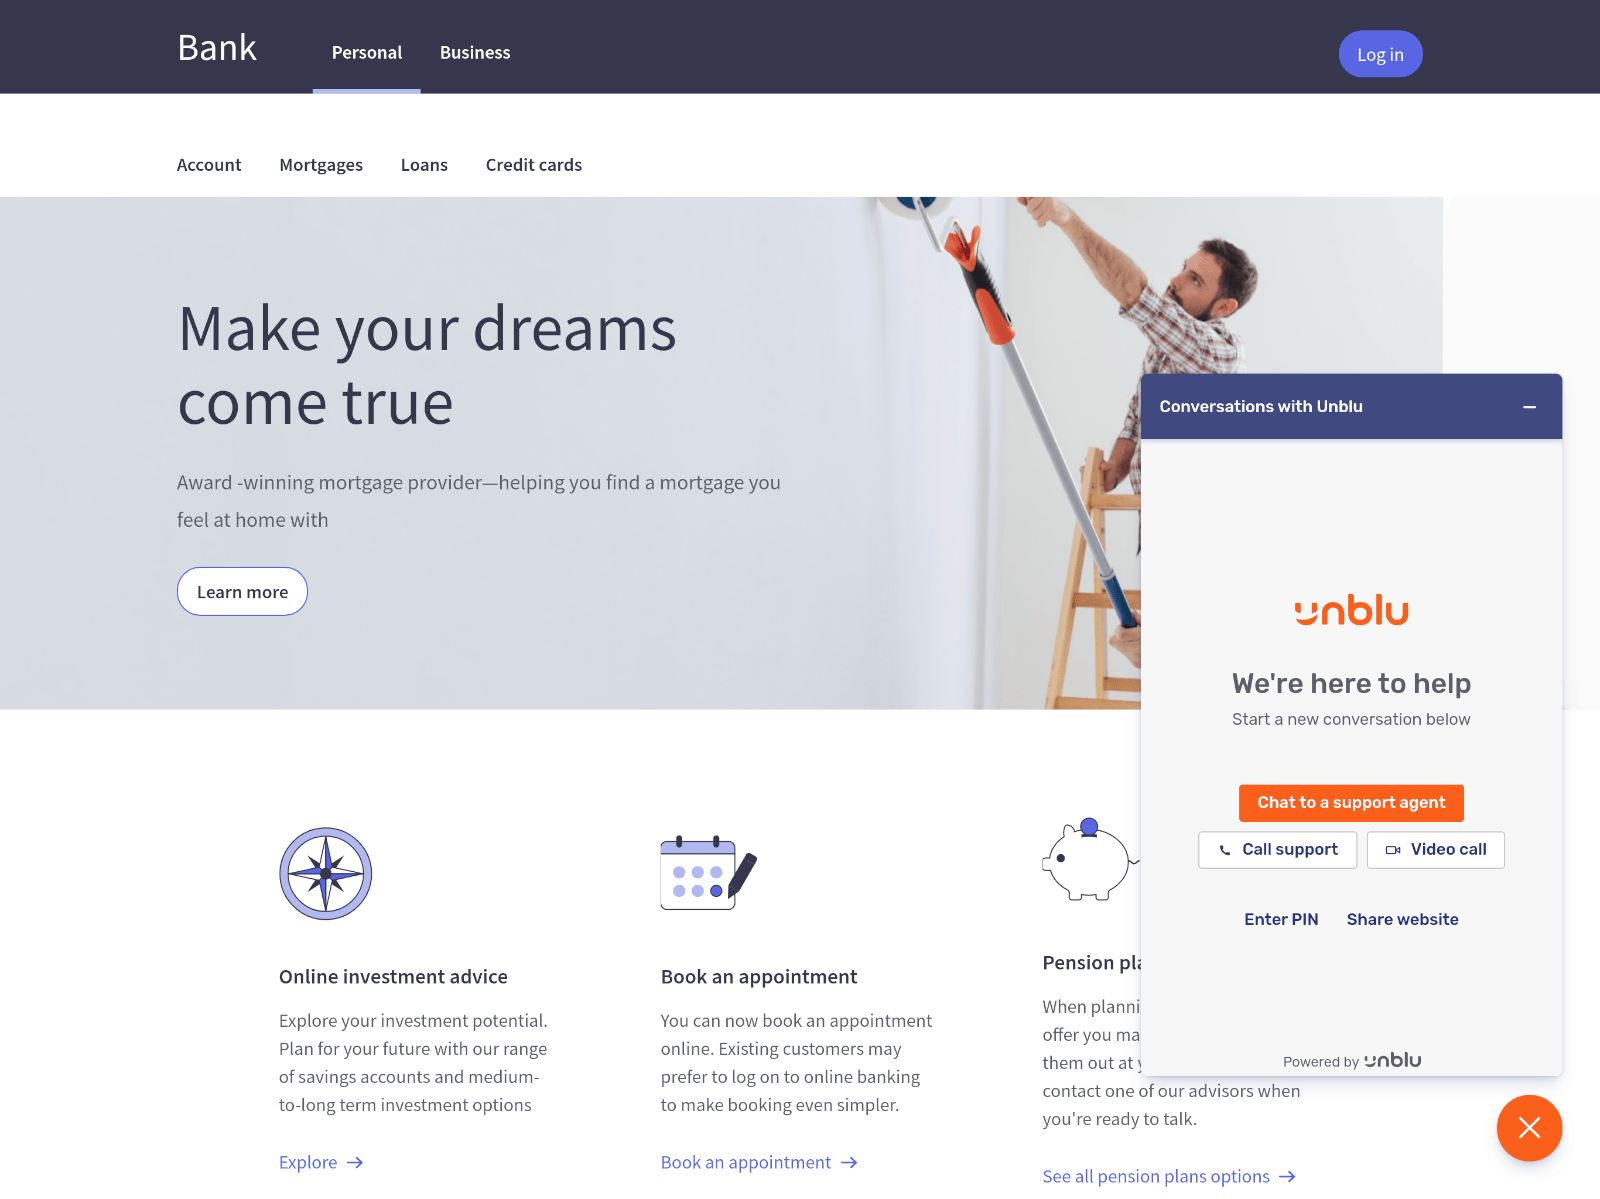
What exactly you see on the overview page depends on a number of factors, such whether it is your first time using Unblu, whether any agents are available to engage with you, and which features of Unblu are available on the page you are currently viewing.
The overview page in the picture above displays five different methods to get in touch with an agent (the actual texts used on your organization’s website may differ):
-
The Chat to a support agent button initiates a Live Chat conversation.
-
The Call support button launches a Voice conversation.
-
The Video call button launches a Video conversation.
-
Enter PIN allows the visitor to join an embedded, universal, or document co-browsing conversation initiated by an agent.
-
Share website starts a Live chat conversation with embedded co-browsing.
7.1.2. Chat to a support agent
When you select Chat to a support agent, the conversation panel displays the chat panel. In the example below, the Unblu account has been configured in such a way that the concierge guides visitors through the onboarding process. If active, the concierge asks you some standard questions, e.g. what your name, or which topic you assistance with, before handing your chat request over to an actual agent. Unblu refers to this preparatory work to start a conversation as the onboarding process.
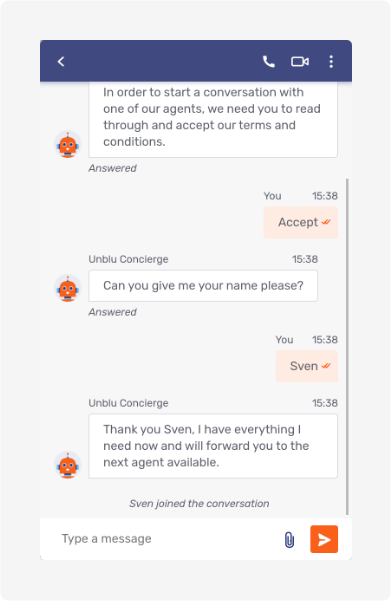
Once you have completed the onboarding process, you can enter messages in the text field at the bottom of the chat panel and send them using the send message button ![]() . The messages you receive are shown in the same view, so you can review the entire conversation thread.
. The messages you receive are shown in the same view, so you can review the entire conversation thread.
If you hover over a message, the copy icon ![]() appears. This allows you easily to copy the contents of a message.
appears. This allows you easily to copy the contents of a message.
The conversation thread also contains system messages with information about what has happened during the conversation, e.g. when a participant joined or left the conversation, or when a participant launched a video call. In the picture above, Sven joined the conversation is such a system message.
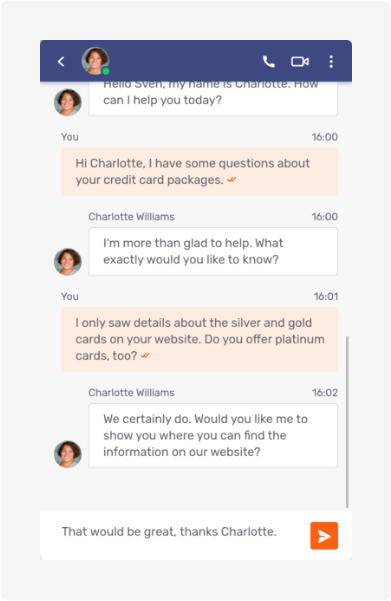
7.1.2.1. Additional Individual UI controls
Besides the controls necessary to read, write, and send messages, the messaging view has elements to access a number of other functions. Most of these controls are in the action bar above the message view.
| UI element | Function |
|---|---|
|
Return to the previous screen of the conversation panel. |
|
Show information on the other participants in the conversation. Only visible participants are shown. The badge in the lower right-hand corner of the avatar indicates that participant’s online status. Clicking on a participant’s avatar displays more information about them. |
|
Start a voice call in the conversation. |
|
Initiate a video call in the conversation. |
|
Display additional options (see below). |
One control is located in the message input area, between the text input field and the send message button.
| UI element | Function |
|---|---|
|
Send a file to share with the other participants in the conversation. The icon is only displayed if you haven’t entered any text in the text field. |
7.1.2.1.1. Return to previous screen
If you return to the overview page while you are in a conversation, you will see the conversation listed at the top of the page:
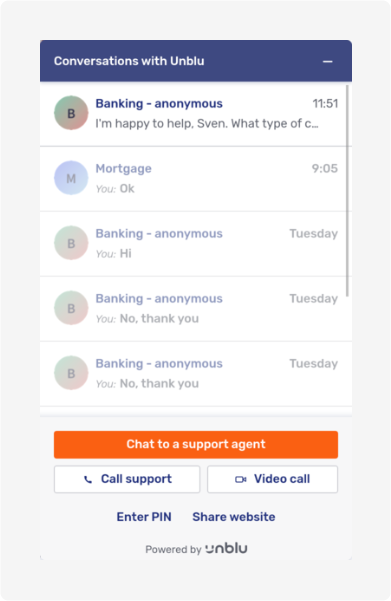
Active conversations are shown in normal colors; conversations that have ended are grayed out. In the picture above, you can see four ended conversations and one active conversation.
To return to an active conversation, simply click on the conversation in the list. You can then continue the conversation.
If you click on a conversation that has ended, you can review its contents and download any files that were shared in the conversation, but you can’t make any changes to the conversation.
7.1.2.1.2. Additional options menu
The additional options menu ![]() provides access to the following features:
provides access to the following features:
| Menu item | Function |
|---|---|
All shared files |
Opens the files view, which shows all of the files shared in the course of the conversation.
This option is not available if you are already in the files view. |
Maximize UI |
Enlarge the conversation panel to fill the current browser tab. If the conversation panel is already maximized, this menu item is replaced by Minimize UI, which reverts the conversation panel to its default size and location in the browser tab. |
Collapse UI |
Hide the conversation panel completely, leaving only the launcher button visible. By default, the launcher button will now display an arrow to indicate that a conversation is in progress. |
End conversation |
Start the offboarding process, which ultimately ends the conversation. Depending on how Unblu is configured, it may display a dialog asking you whether you really want to end the conversation. + By default, this option isn’t available to visitors. |
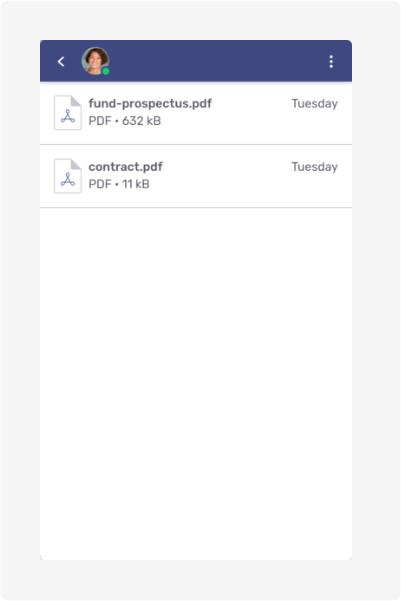
| Which features are accessible in the additional options menu is configurable. You may have more or fewer options. |
7.1.2.2. Chat panel hints
The chat panel uses hints to point out things that might otherwise not be visible in the UI:
-
The Return to call hint is displayed when the visitor has returned to the conversation thread find a better term) while a Video or voice call is in progress. Clicking on the hint will return the visitor to the call view.

-
When there are newer messages in the conversation thread that are not currently visible, Unblu shows the Jump to latest hint. Clicking on the hint will take the visitor to the end of the conversation thread.

-
When you are not at the end of the conversation thread and you receive a new message, Unblu displays the unread messages hint. The number of unread messages is displayed in the hint and as a badge on the launcher button.

As with the jump to latest hint, clicking on the hint takes the visitor to end of the conversation thread. Depending on how many unread messages there are, the visitor may not see the first unread message and may have to scroll up to read it.
The picture below shows two of these hints in the chat panel at once. If there were unread messages, the chat panel would display the unread messages hint instead of the jump to latest hint.
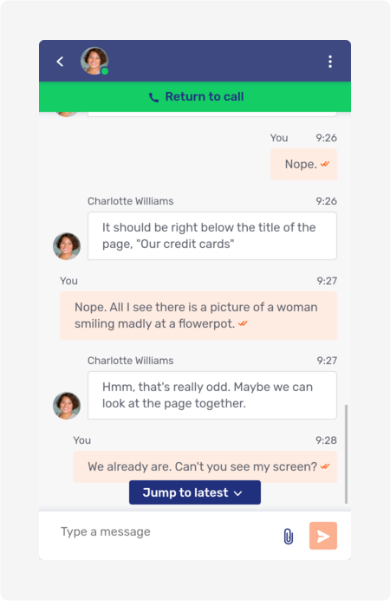
7.1.2.3. Sharing files
The send file icon ![]() allows conversation participants to share files with one another. The icon is only visible if the message text field is empty. Clicking on the icon opens the browser’s file selection window. Once the file has been uploaded, it appears in the conversation thread.
allows conversation participants to share files with one another. The icon is only visible if the message text field is empty. Clicking on the icon opens the browser’s file selection window. Once the file has been uploaded, it appears in the conversation thread.
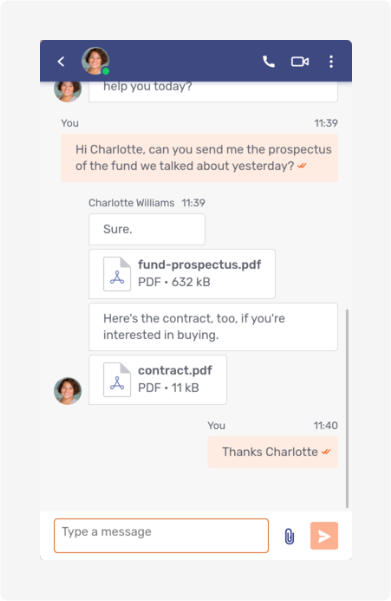
Hovering over a file displays a set of three icons:
| Icon | Function |
|---|---|
|
Open a document co-browsing collaboration layer so the participants can view the file together. |
|
Download a copy of the file to your computer. |
|
Delete the file from the conversation. Any participant may delete any shared file, and doing so affects all of the conversation’s participants. |
If the file shared is an image, Unblu will display a preview of the image (unless your administrator turned this feature off).
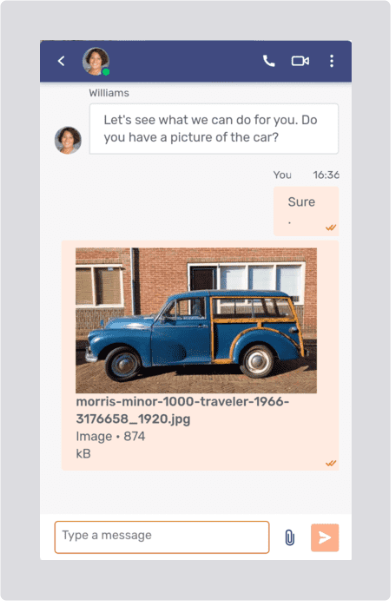
Transparent images are rendered with a white background.
When you click on the image, Unblu will enlarge the image to fill the conversation UI.
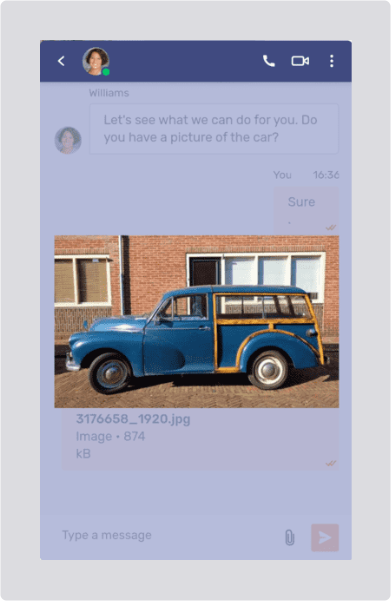
Of course, this is more useful if the conversation UI is maximized:

If the uploaded image is animated, the preview in the conversation will sport a "play" button. Clicking on the image will enlarge it and play the animation.
Hovering over the image displays the same icons as for other file types.
7.1.3. Call support and video call
Call support launches an audio call with your organization; Video call launches a video call. If the visitor has to go through an onboarding process — to ensure that they have accepted the terms and conditions for the service, for example — the actual call will be started once they have successfully completed the process.
Starting a call launches the call view. Since both audio and video calls use the call view, we will discuss the two conversation types together, pointing out differences where they exist.
The picture below shows the call view of a call in progress.
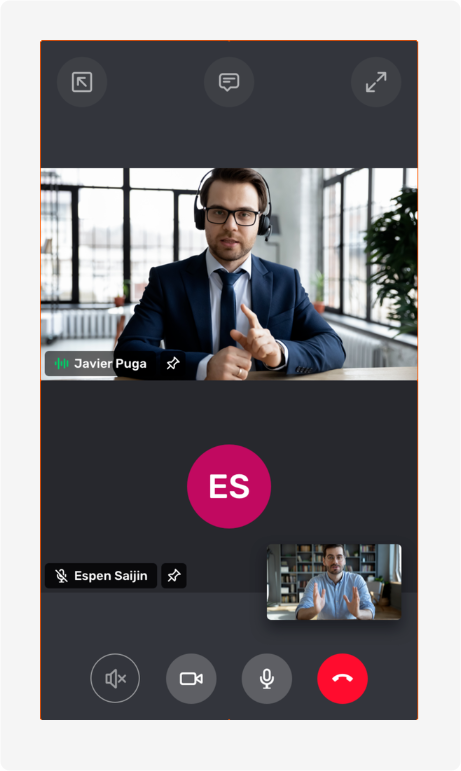
The main area of the call view is dedicated to the other people in the call. A video call may have up to six participants.
7.1.3.1. Video call participant information
In a video call, the main area displays the other participant’s video feeds, provided their camera is turned on. If their camera is turned off, or in an audio call, the main area displays the other participant’s avatar. Furthermore, you can see the other participant’s view of yourself in the lower right-hand corner of call view’s main area.
Each participant’s video stream or avatar sports a label that displays the participant’s name and a microphone icon ![]() . If a participant is muted, the microphone icon is struck through
. If a participant is muted, the microphone icon is struck through ![]() . When a participant is speaking, the microphone icon is replaced by an audio level icon
. When a participant is speaking, the microphone icon is replaced by an audio level icon ![]() .
.
The pin icon ![]() beside the labels allows participants to focus on a single participant’s video stream. Pinning a video stream hides the video streams and avatars of other participants.
beside the labels allows participants to focus on a single participant’s video stream. Pinning a video stream hides the video streams and avatars of other participants.
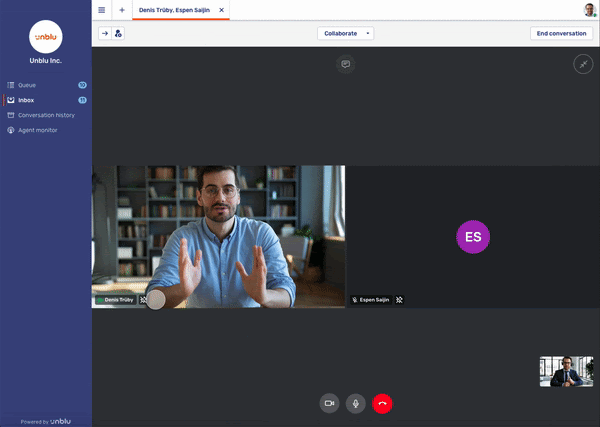
In a pinned video stream, the pin icon is replaced by the unpin icon ![]() .
.
7.1.3.2. Call view controls
The call view provides visitors with a number of new controls. These controls are distributed between two action bars above and below the main area of the call view.
| Control | Function |
|---|---|
|
Answer an incoming call. This control is no longer available once you have answered a call. |
|
Open the call view in a separate window. Once the call view has opened in a new window, the control is replaced by the dock call to original window icon Closing the window doesn’t end the call or the conversation. When the call is open in a separate window, the launcher button displays the dock call to original window icon, too. If you accidentally close the new window, you can return to the call by clicking on the launcher button on the original page. |
|
Open the messaging view. If you receive any messages during a call, the icon will have a badge displaying the number of unread messages in the conversation. Since opening the chat panel hides the call view, Unblu displays the Return to call hint (see above) to remind users that they are still in a call. |
|
Maximize the call view so that it takes up the entire browser tab. This control is not available when the call view has been popped into a separate window, since in that case, the call view already take up the entire window. When the call view is maximized, the control is replaced by the minimize icon |
|
Toggle the camera: if the camera is off, it turns it on. If the camera is on, it turns it off. When you start a video call, the camera is on by default. When you start an audio call, the camera is off by default. Visitors can, however, turn it on and convert the call to a video call. The icon to the left is shown when the camera is on. When the camera is off, the icon’s colors are slightly muted, and the icon is crossed out |
|
Toggle the microphone: if the microphone is off, it turns it on. If the microphone is on, it turns it off. The microphone is on by default when you start a call, be it an audio or a video call. The icon to the left is shown when the microphone is off. If the microphone is on, the colors of the icon are slightly brighter, and the icon isn’t crossed out |
|
Take a screenshot of the video stream. The snapshot is posted to the conversation’s chat. |
|
End the call. Ending a call does not end the conversation. |
| The controls are functional even before an agent answers the call. |
7.1.3.3. Allowing access to the microphone and camera
Once an agent answers your call, be it an audio or a video call, your browser will usually ask for permission to access the camera and microphone on your computer. It does so by displaying a message similar to the one below:
If you don’t grant the browser access to the camera and microphone, Unblu displays a modal dialog:
However, the call proceeds, and you will be able to hear the agent.
| If you accidentally deny access, many browsers provide a means of granting access after denying it. How to do so is beyond the scope of the Unblu documentation. |
7.1.4. Enter PIN
Enter PIN allows you to join a conversation initiated by an agent.
The agent provides you with a PIN, e.g. on the phone, and you enter the PIN in the Individual UI. The PIN is validated once you enter the last digit.
If you enter an invalid PIN, an error message appears beneath the field:
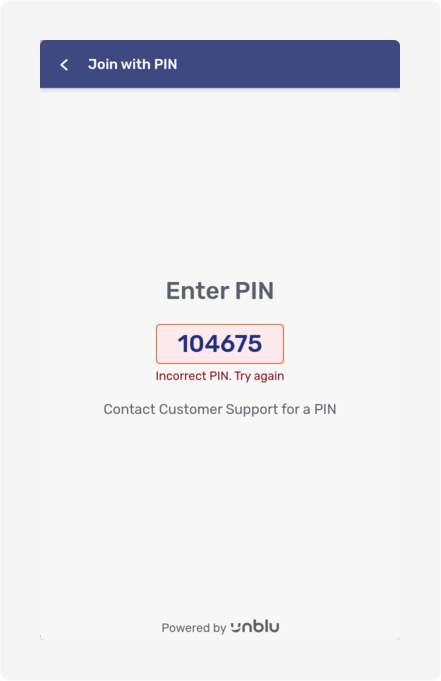
If, on the other hand, you enter the correct PIN before it expires, collaboration starts immediately.
The kind of collaboration that starts is determined by the type of invitation the agent created in the agent desk. In the picture below, the agent invited the visitor to join an embedded co-browsing session. Note the green frame around the tab being shared.
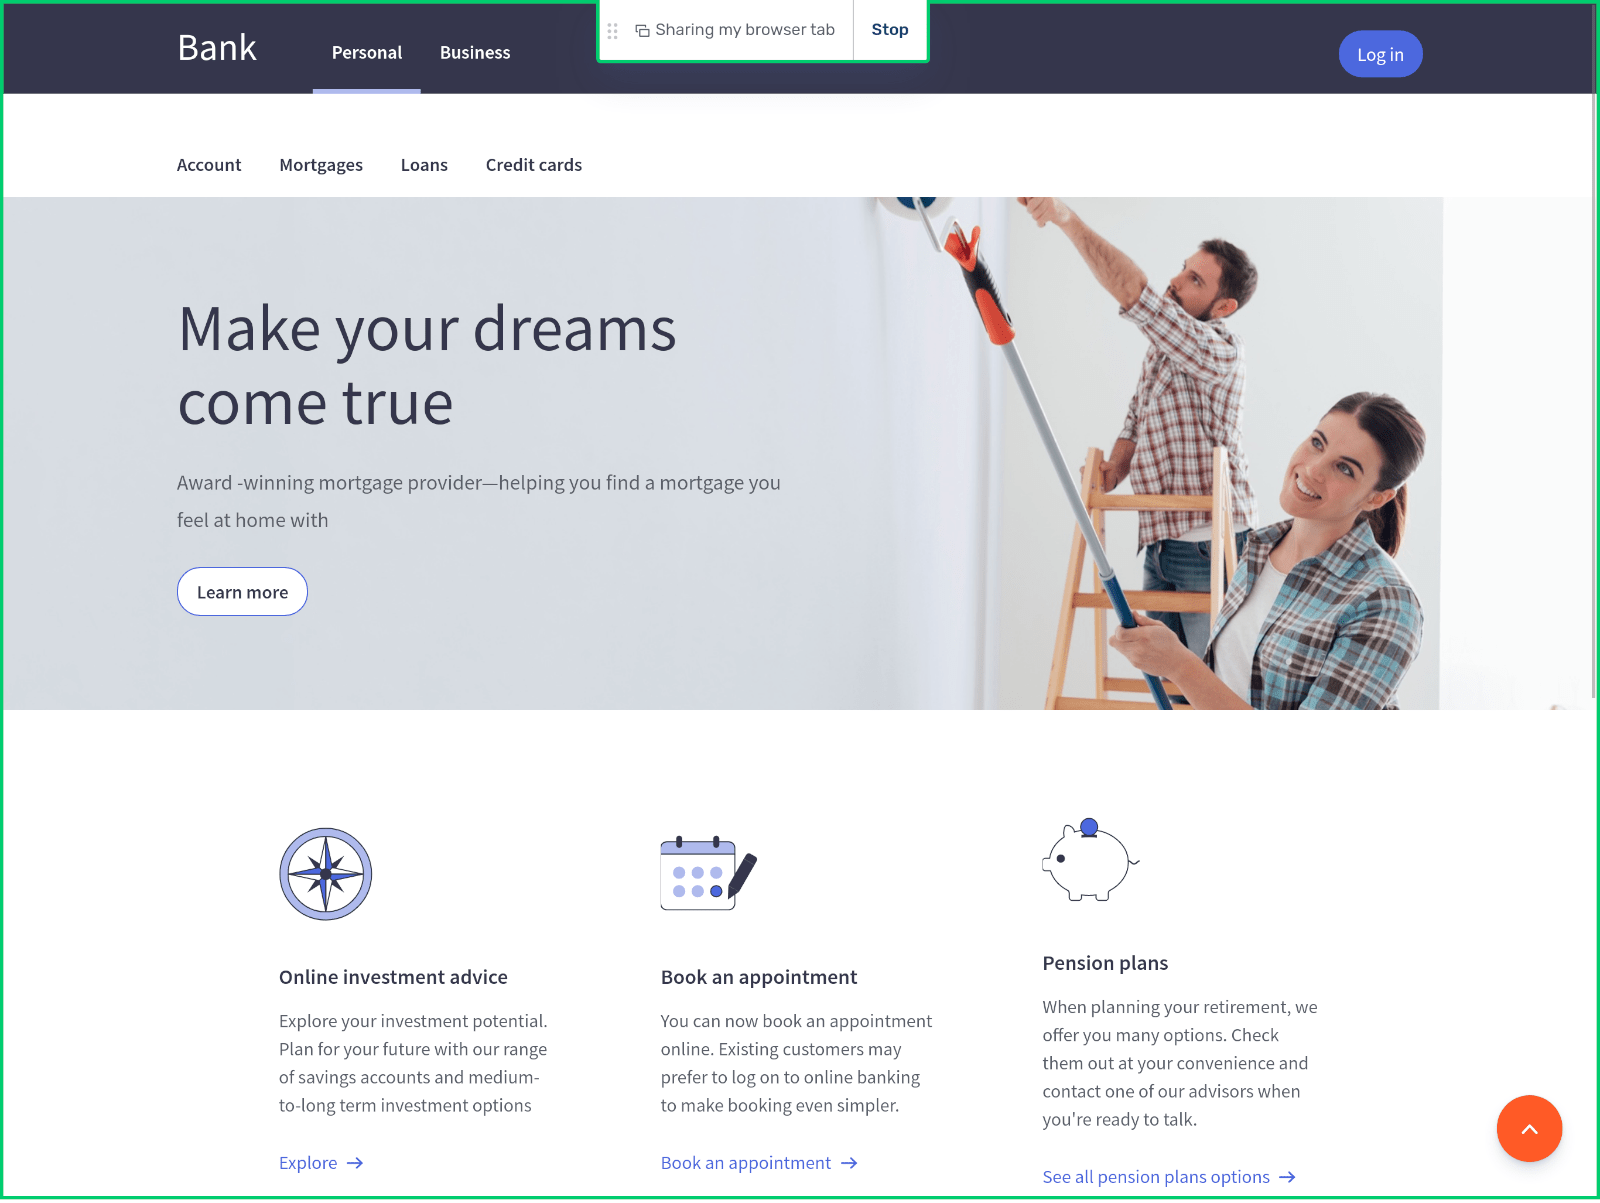
At the top of the screen, the collaboration control states what is being shared and who is sharing it. If you are the one sharing content, the control element provides a button to stop sharing.
The nubs on the left of the collaboration controls allow you to move the controls if they are in the way. Simply grab them with the cursor and move the controls to the left or right. Release them once you happy with the new location of the controls.
If you are collaborating on an embedded co-browsing session, the Individual UI is collapsed, but you can open it and send messages. What’s more, the Individual UI doesn’t appear on the agent’s view of the website you are co-browsing, so they can still see the whole of the page you are on, even if you are typing them a message.
| If you stop collaborating, the conversation continues. Only the collaboration layer is shut. |
7.1.4.1. Multiple collaboration layers
It is possible to collaborate in different ways at the same time. For example, you could share your browser tab with an agent while they share their screen with you. You can only ever see one of the collaboration layers at any one time. However, running more than one collaboration layer simultaneously makes it easier to switch between them.
When there are multiple collaboration layers active in a conversation, you will see a dropdown menu with the active collaboration layers in the collaboration control. The collaboration layer currently in view is the shown in the collaboration control:
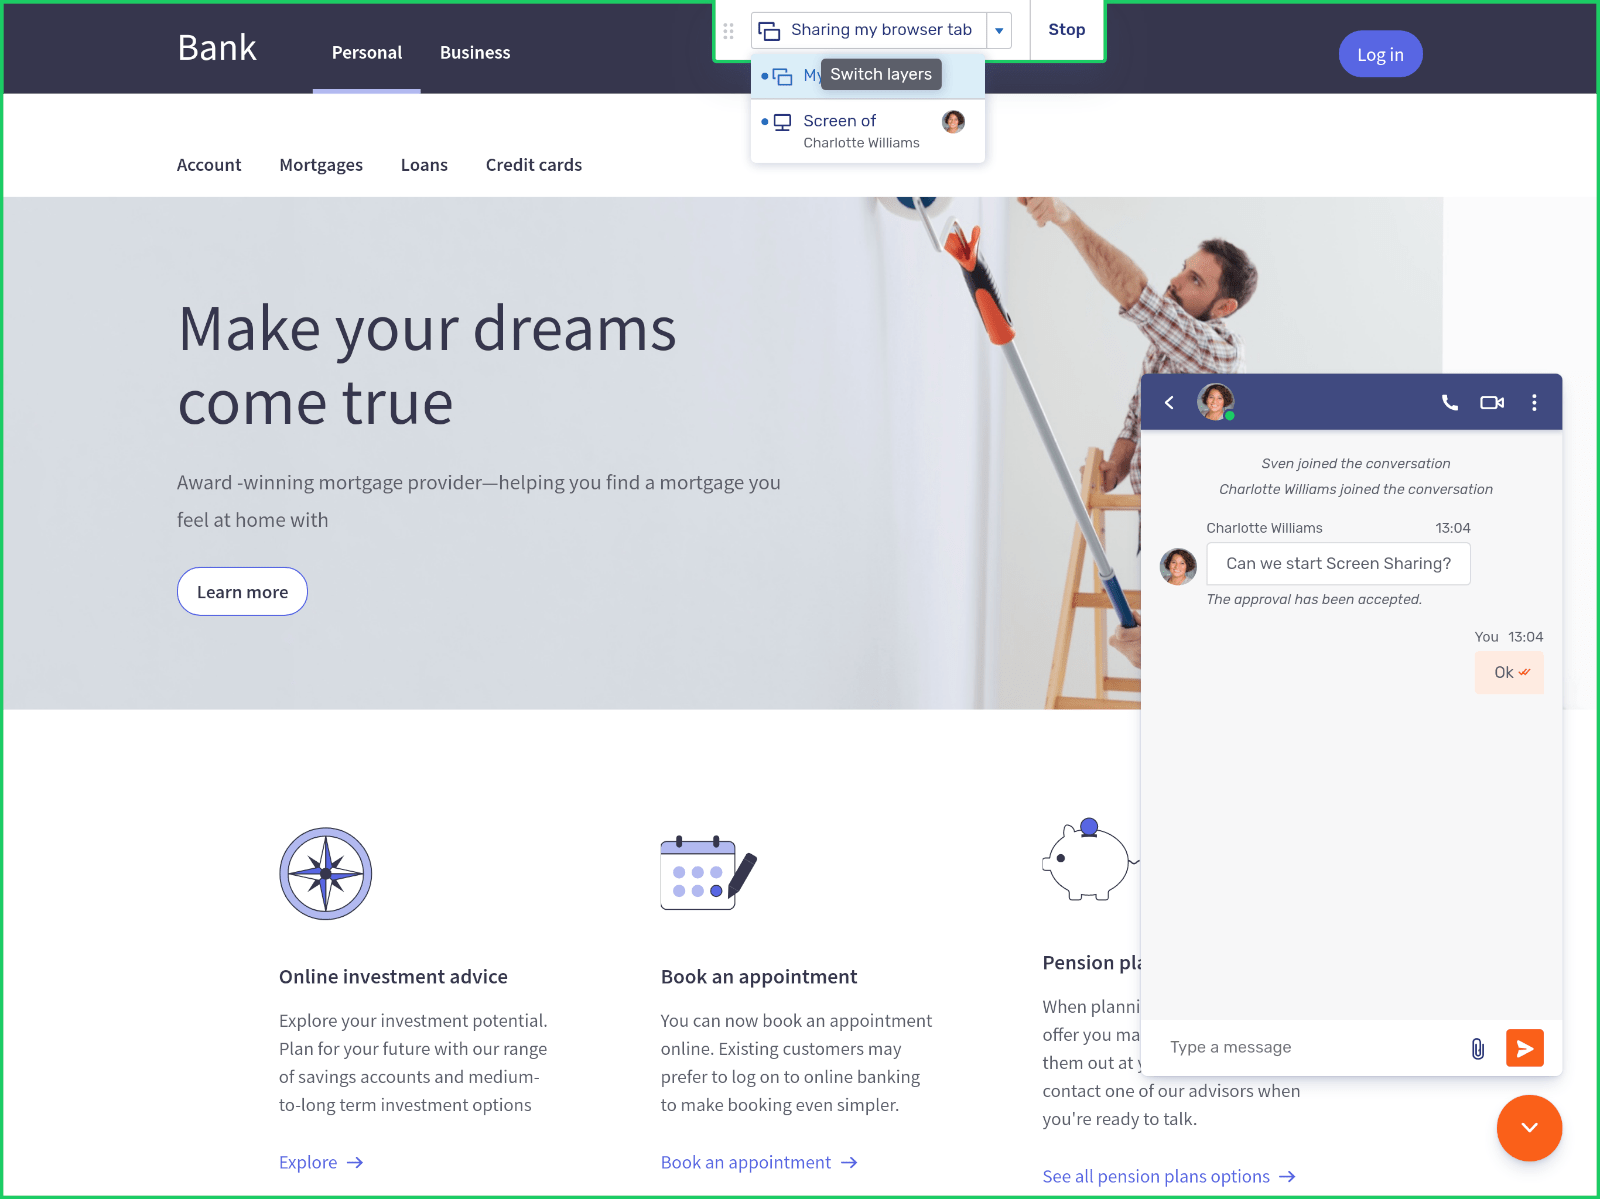
In the example above, there are two collaboration layers, an embedded co-browsing layer and a screen-sharing layer. The embedded co-browsing layer is the one currently visible in the collaboration space: its menu entry is highlighted with a shade of blue.
7.2. Agent Desk guide
The Agent Desk is the principle interface for your organization’s agents to engage with visitors using Unblu. It also provides features for Supervisors to monitor and organize agents and teams.
This guide aims to give you a good working knowledge of the Agent Desk’s features. Once you’ve read through this guide, you will be able to focus on engaging with visitors, instead of trying to work out how to do so.
| Depending on the configuration your organization chose to implement, the look and feel of the interface may differ from the pictures in this guide. Additionally, some functions may not be available if they have not been licensed by your organization. However, you should have no difficulties applying the explanations in this guide to your particular circumstances. |
7.2.1. Login
To access the Agent Desk, agents must be authenticated. Unblu offers a variety of ways to authenticate users. One way is a traditional login form that asks for your username and password:
Your organization may have opted for a different authentication method. For further information on the various authentication methods available, please consult the authentication page.
7.2.2. Agent Desk layout
The Agent Desk is made up of three areas:
-
The navigation menu provides access to the queue, the inbox, the conversation history, and (for supervisors and administrators) the agent monitor.
-
The top bar contains a number of control elements. It also holds tabs of all of the conversations you are currently participating in.
-
The main content area takes up the lion’s share of the screen. It is where conversations, collaboration layers, and other content are displayed.
7.2.2.1. Top bar
The top bar provides a number of useful features.

-
The hamburger icon
 can be used to hide the navigation menu on the left.
 -
The plus icon
 can be used to initiate various types of conversation.
 -
Next to the plus icon is a tabbed list of your open conversations. The active conversation panel is highlighted by an orange bar along the bottom edge of the tab. Any conversations with unread chat messages display a badge.
In the example above, the agent is participating in two conversations. The conversation with Pawel is currently displayed in the main content area, and there are two unread messages in the other conversation.
-
Finally, your avatar displays your current online status and provides access to your Agent Desk settings.
In the picture above, the green badge on the avatar indicates that the agent is online.
7.2.2.1.1. Plus icon menu
As mentioned above, the plus icon in the top bar allows you to start various types of conversation:
-
Join, Join screen, and Join mobile all open a modal dialog showing a PIN that you can share with a visitor to launch a conversation in Unblu:
A PIN must be redeemed within a certain time period. The dialog includes a countdown showing how much time remains to redeem the PIN.
If the PIN is not redeemed it expires. The dialog below appears when this has occurred:
It is always possible to generate a new PIN by pressing the Generate new PIN button. Doing so automatically invalidates the previous PIN.
-
Show and Show Screen both open a conversation panel with a new conversation. In both cases, you have to invite users to join you with the invite icon
 .
.
The type of conversation that is created when a user enters the PIN depends on which option you selected in the plus icon menu:
-
Join launches a conversation with embedded co-browsing.
-
Join screen launches a conversation with screen-sharing on the user’s side. The user will be required to choose whether they want to share a particular application window or their entire screen with you.
If they choose not to share anything with you, the conversation continues as a live chat.
-
Join mobile launches a conversation with mobile co-browsing.
-
Show launches a conversation with universal co-browsing on the agent’s side. Just like other users, you can choose what to share in the co-browsing session.
-
Show screen launches a conversation with screen-sharing on the agent’s side.
| The choice you make in the plus icon menu is not final. You can easily switch between types of conversation after the initial selection. For example, you might select Join to see a visitor’s view of your organization’s website, but later need to launch document co-browsing to review a file together. |
7.2.3. Inbox
Once you have been authenticated, the Agent Desk opens in the inbox view.
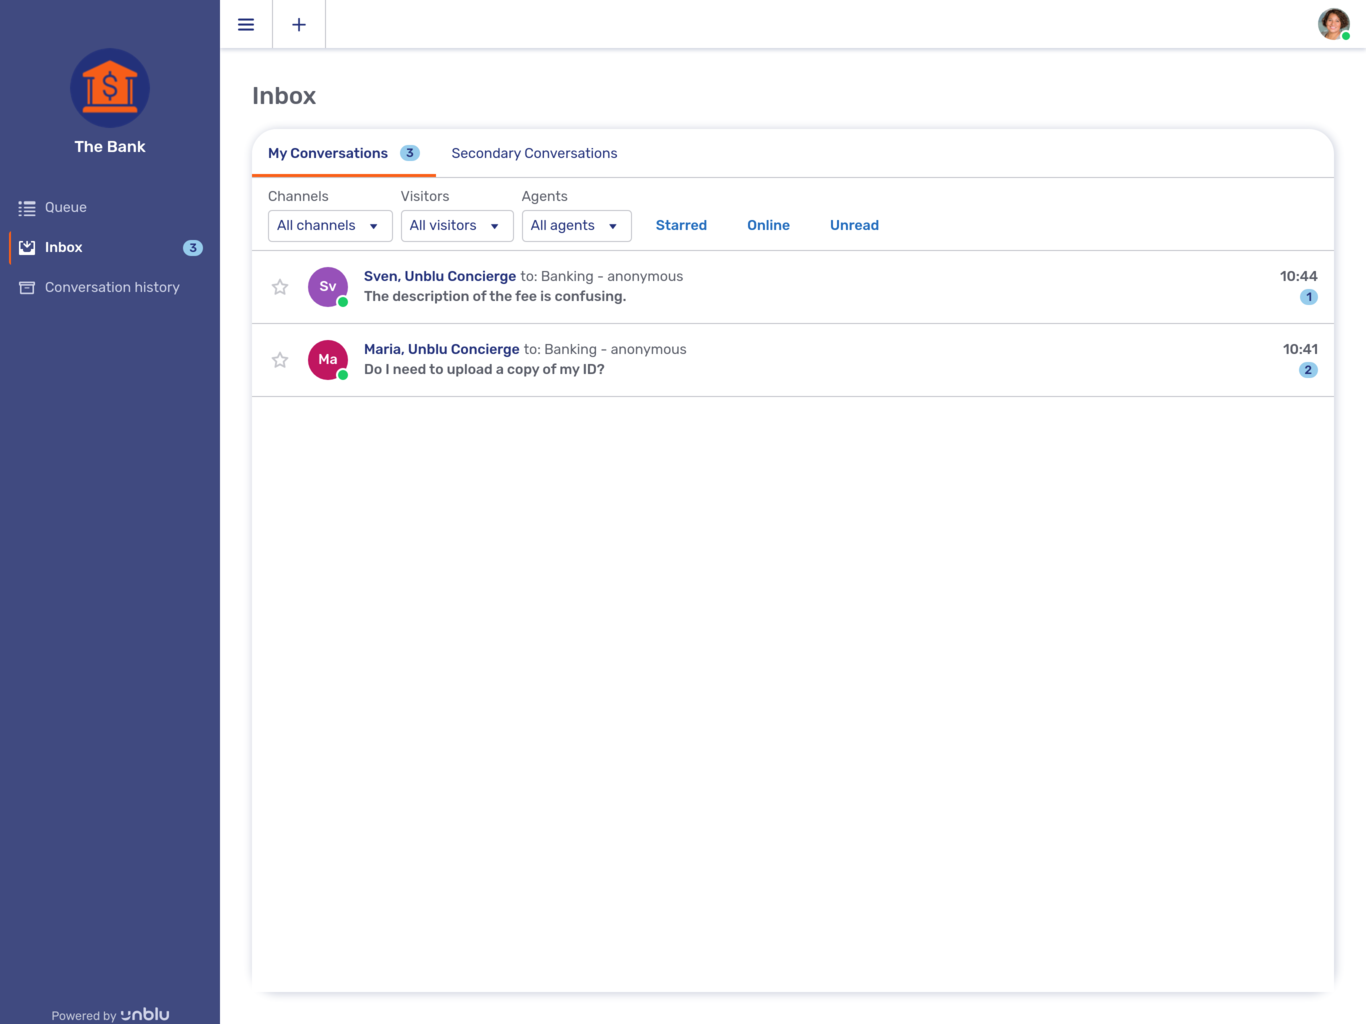
The inbox provides access to all of the conversations you are currently participating in. The conversations are grouped in two tabs, My Conversations and Secondary Conversations.
-
My Conversations lists conversations where you are the assignee.
-
Secondary Conversations lists conversations where you are a secondary agent.
Each conversation listing provides several useful pieces of information about the conversation:
-
The names of the other participants in the conversation
-
The status of the conversation’s other participants, i.e. whether they are online or not
-
The last message of the conversation
-
The time the last message was transmitted
-
The number of messages you haven’t read yet, if there are any
In the picture above, the agent is the assignee in two conversations, one with Sven, one with Maria. The green badge on each visitor’s avatar shows that they are online. The badge on the My Conversations tab indicates that the Agent has three unread messages in total. There are two unread messages in the conversation with Maria and one in the conversation with Sven.
In the picture of the Secondary Conversations tab below, the Agent Chris Johnson has invited the Agent to join a conversation with the client Viktor Rabe. Chris is online (as indicated by the green badge), but Viktor isn’t. In the top bar of the Agent Desk, you can also see three open conversation views: one with Sven, one with Maria, and one with Viktor and Chris.
The Inbox menu item sports a badge which displays the sum of unread messages in the My Conversations and Secondary Conversations tabs.
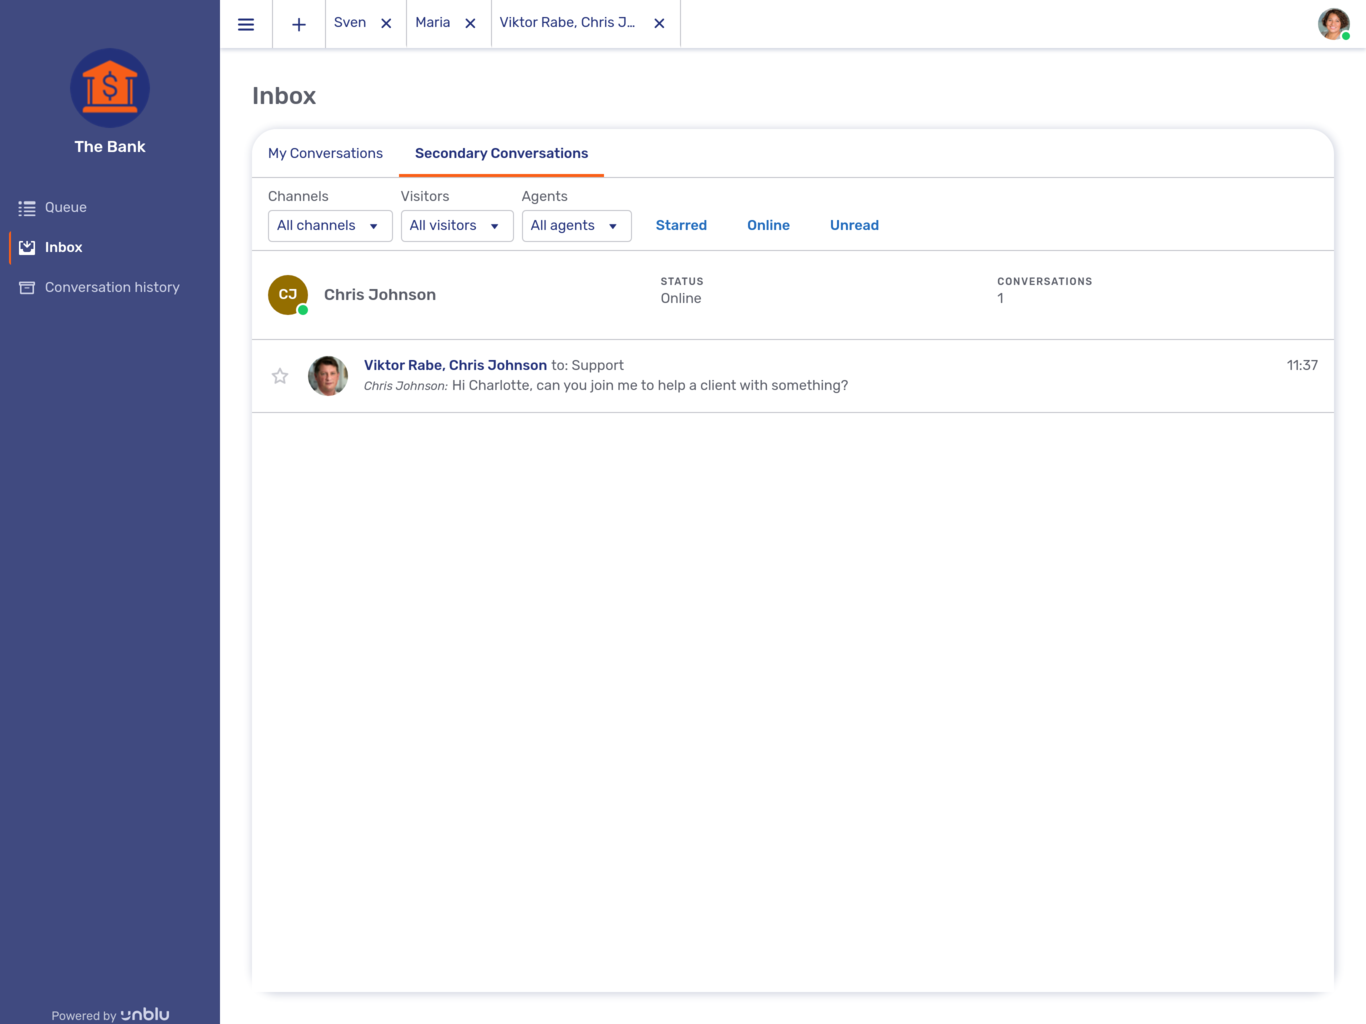
To rejoin a conversation, simply click on its listing in the inbox.
For more information on the options available once you answer a conversation, see the section Conversation panel below.
7.2.3.1. Inbox filters
On each of the inbox tabs, above the list of conversations, you can see a number of filters. These allow you to limit the conversations you see to those that satisfy certain conditions. If, for example, you were looking for an ongoing conversation with a client who contacted you via WhatsApp, you could use the Channels filter to display only WhatsApp conversations. Alternatively, you could use the Visitors filter to display only the conversations with that particular client.
On the My Conversations tab, the Agents filter can be used to look for secondary agents. On the Secondary Conversations tab, the same filter allows you to search for the assignee of conversations that you are participating in as a secondary agent.
Finally, there are three predefined filters:
-
The Starred filter shows only conversations you have starred with the star icon
 to the left of the participants' avatars.
 -
The Online filter will only show conversations where the context person is online.
-
The Unread filter only displays conversations with messages that you haven’t read yet.
The filters can be combined to limit the number of conversations displayed even further.
7.2.4. Queue
The queue displays all conversations that you could join as the assignee. Like in the inbox, the items in the queue contain useful information about each conversation:
-
The visitor’s name
-
The last message the visitor entered
-
Where the visitor started the conversation
-
How long the visitor has been waiting
-
The visitor’s approximate location
-
The operating system and browser the visitor is using
Above the queue, you can see how many conversations are waiting in the queue, and the average time visitors' conversations have been waiting in the queue.
The picture below shows a queue with just one waiting conversation. The toast in the lower left-hand corner of the Agent Desk appears when a request is added to your queue.
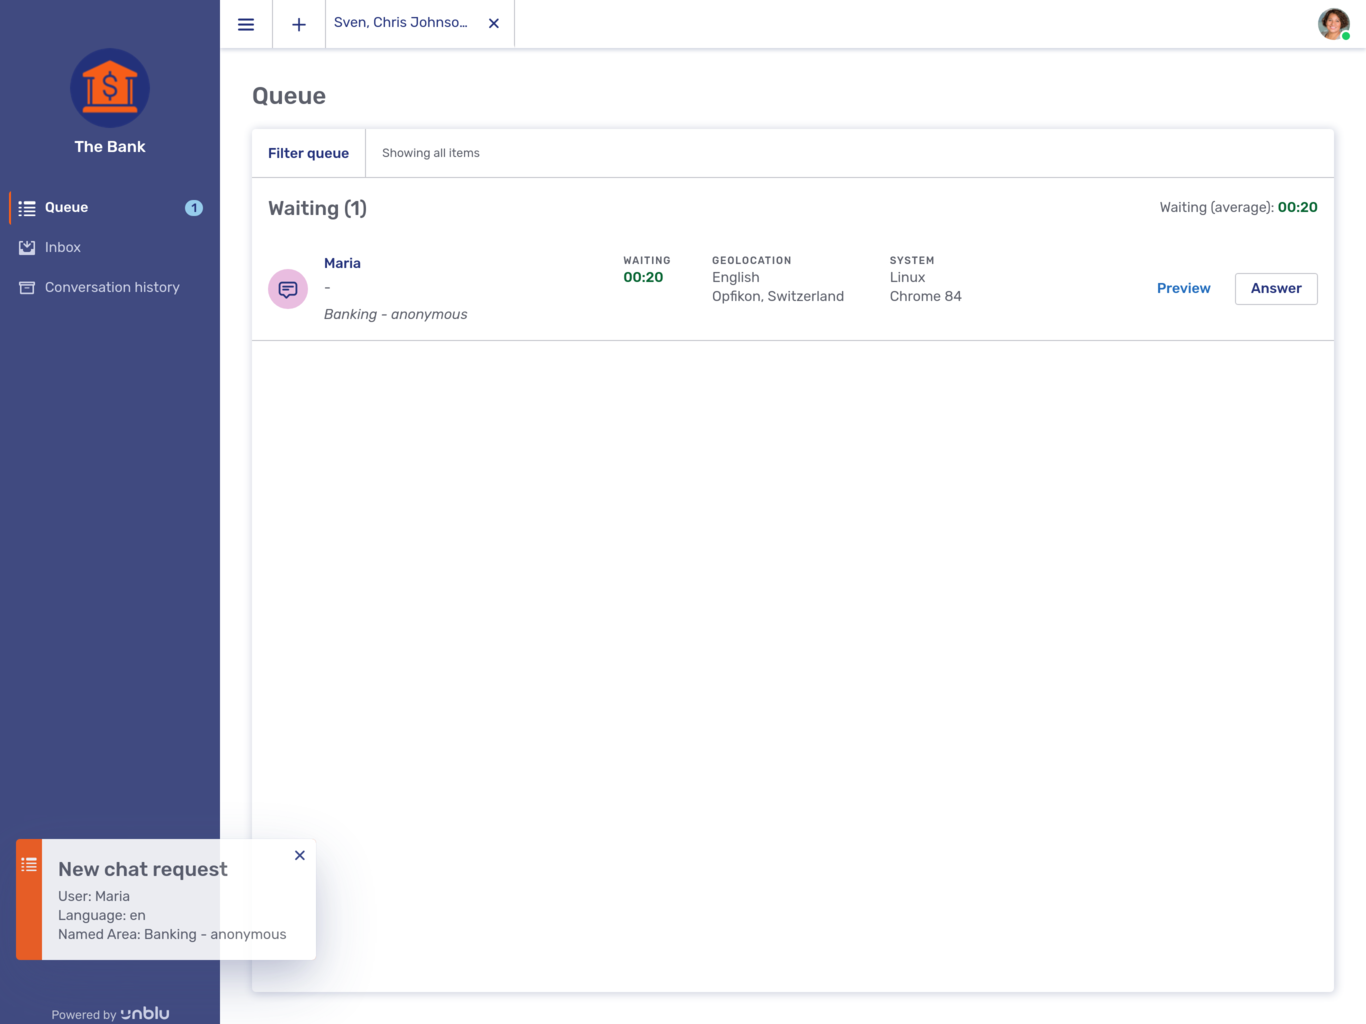
The icon to the left of the visitor’s name indicates the type of conversation request.
| Icon | Request type |
|---|---|
|
Chat request |
|
Audio call request |
|
Video call request |
|
Co-browsing request |
|
Screen sharing request |
7.2.4.1. Queue filters
The queue only provides filters for named areas and languages. However, you can select multiple named areas and languages by which to filter your queue.
The following picture shows the filter selection dialog. To confirm your selection click on Apply, then click on OK to apply the filter to the queue.
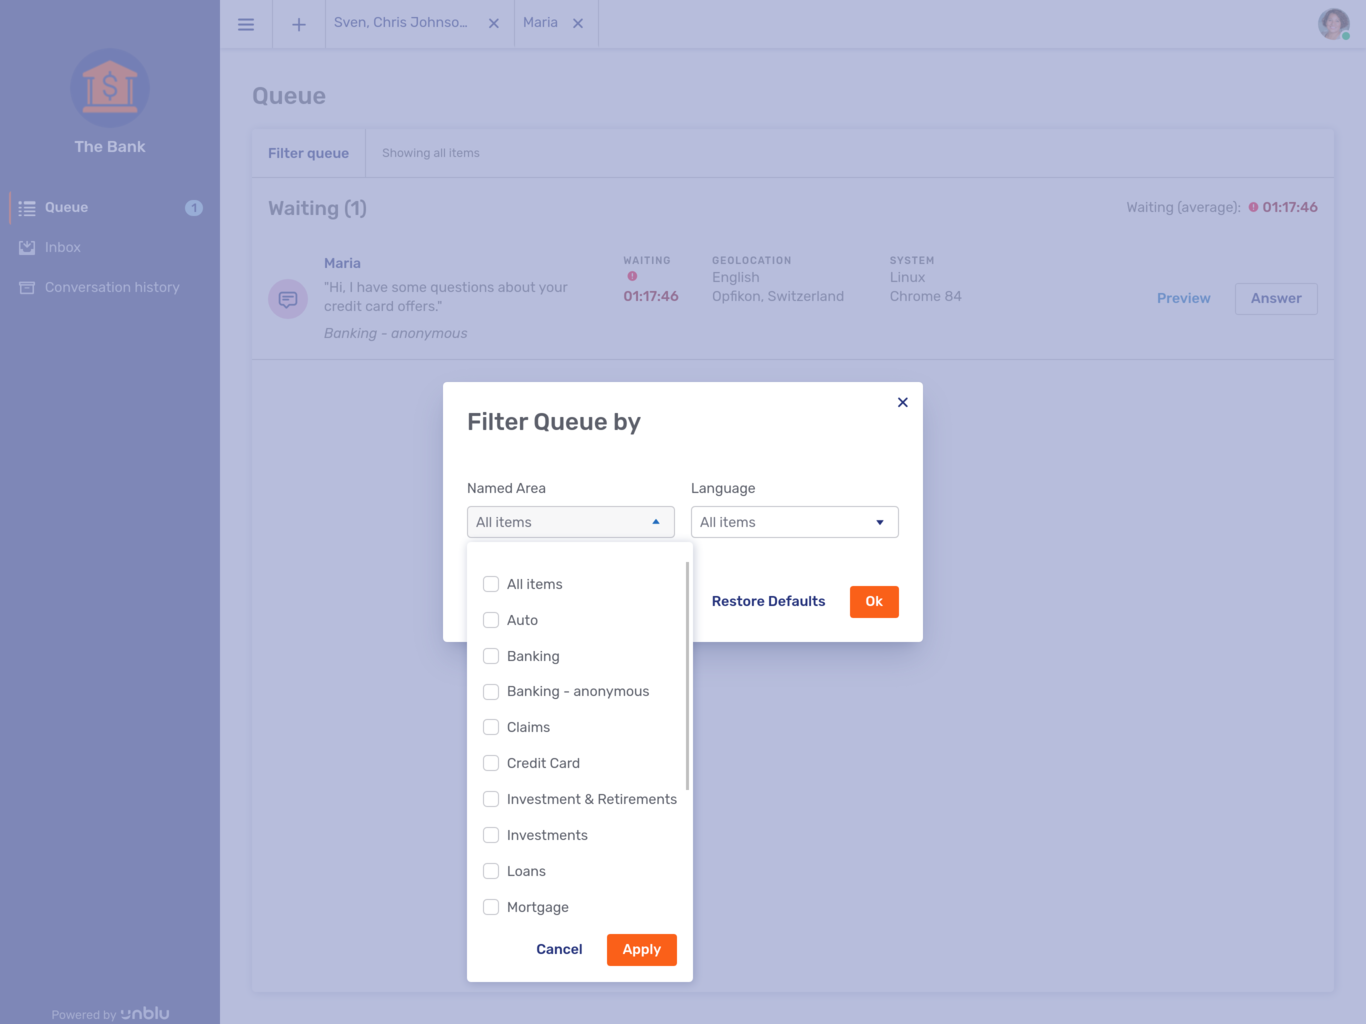
7.2.4.2. Preview and answer
In addition to the information mentioned above, the queue provides two features that aren’t needed in the inbox: a Preview button and an Answer button.
The Preview button allows you to see what has happened so far in a conversation without actually joining it. The picture below shows what a conversation preview might look like. Note the blue banner beneath the top bar that states You are previewing this conversation.
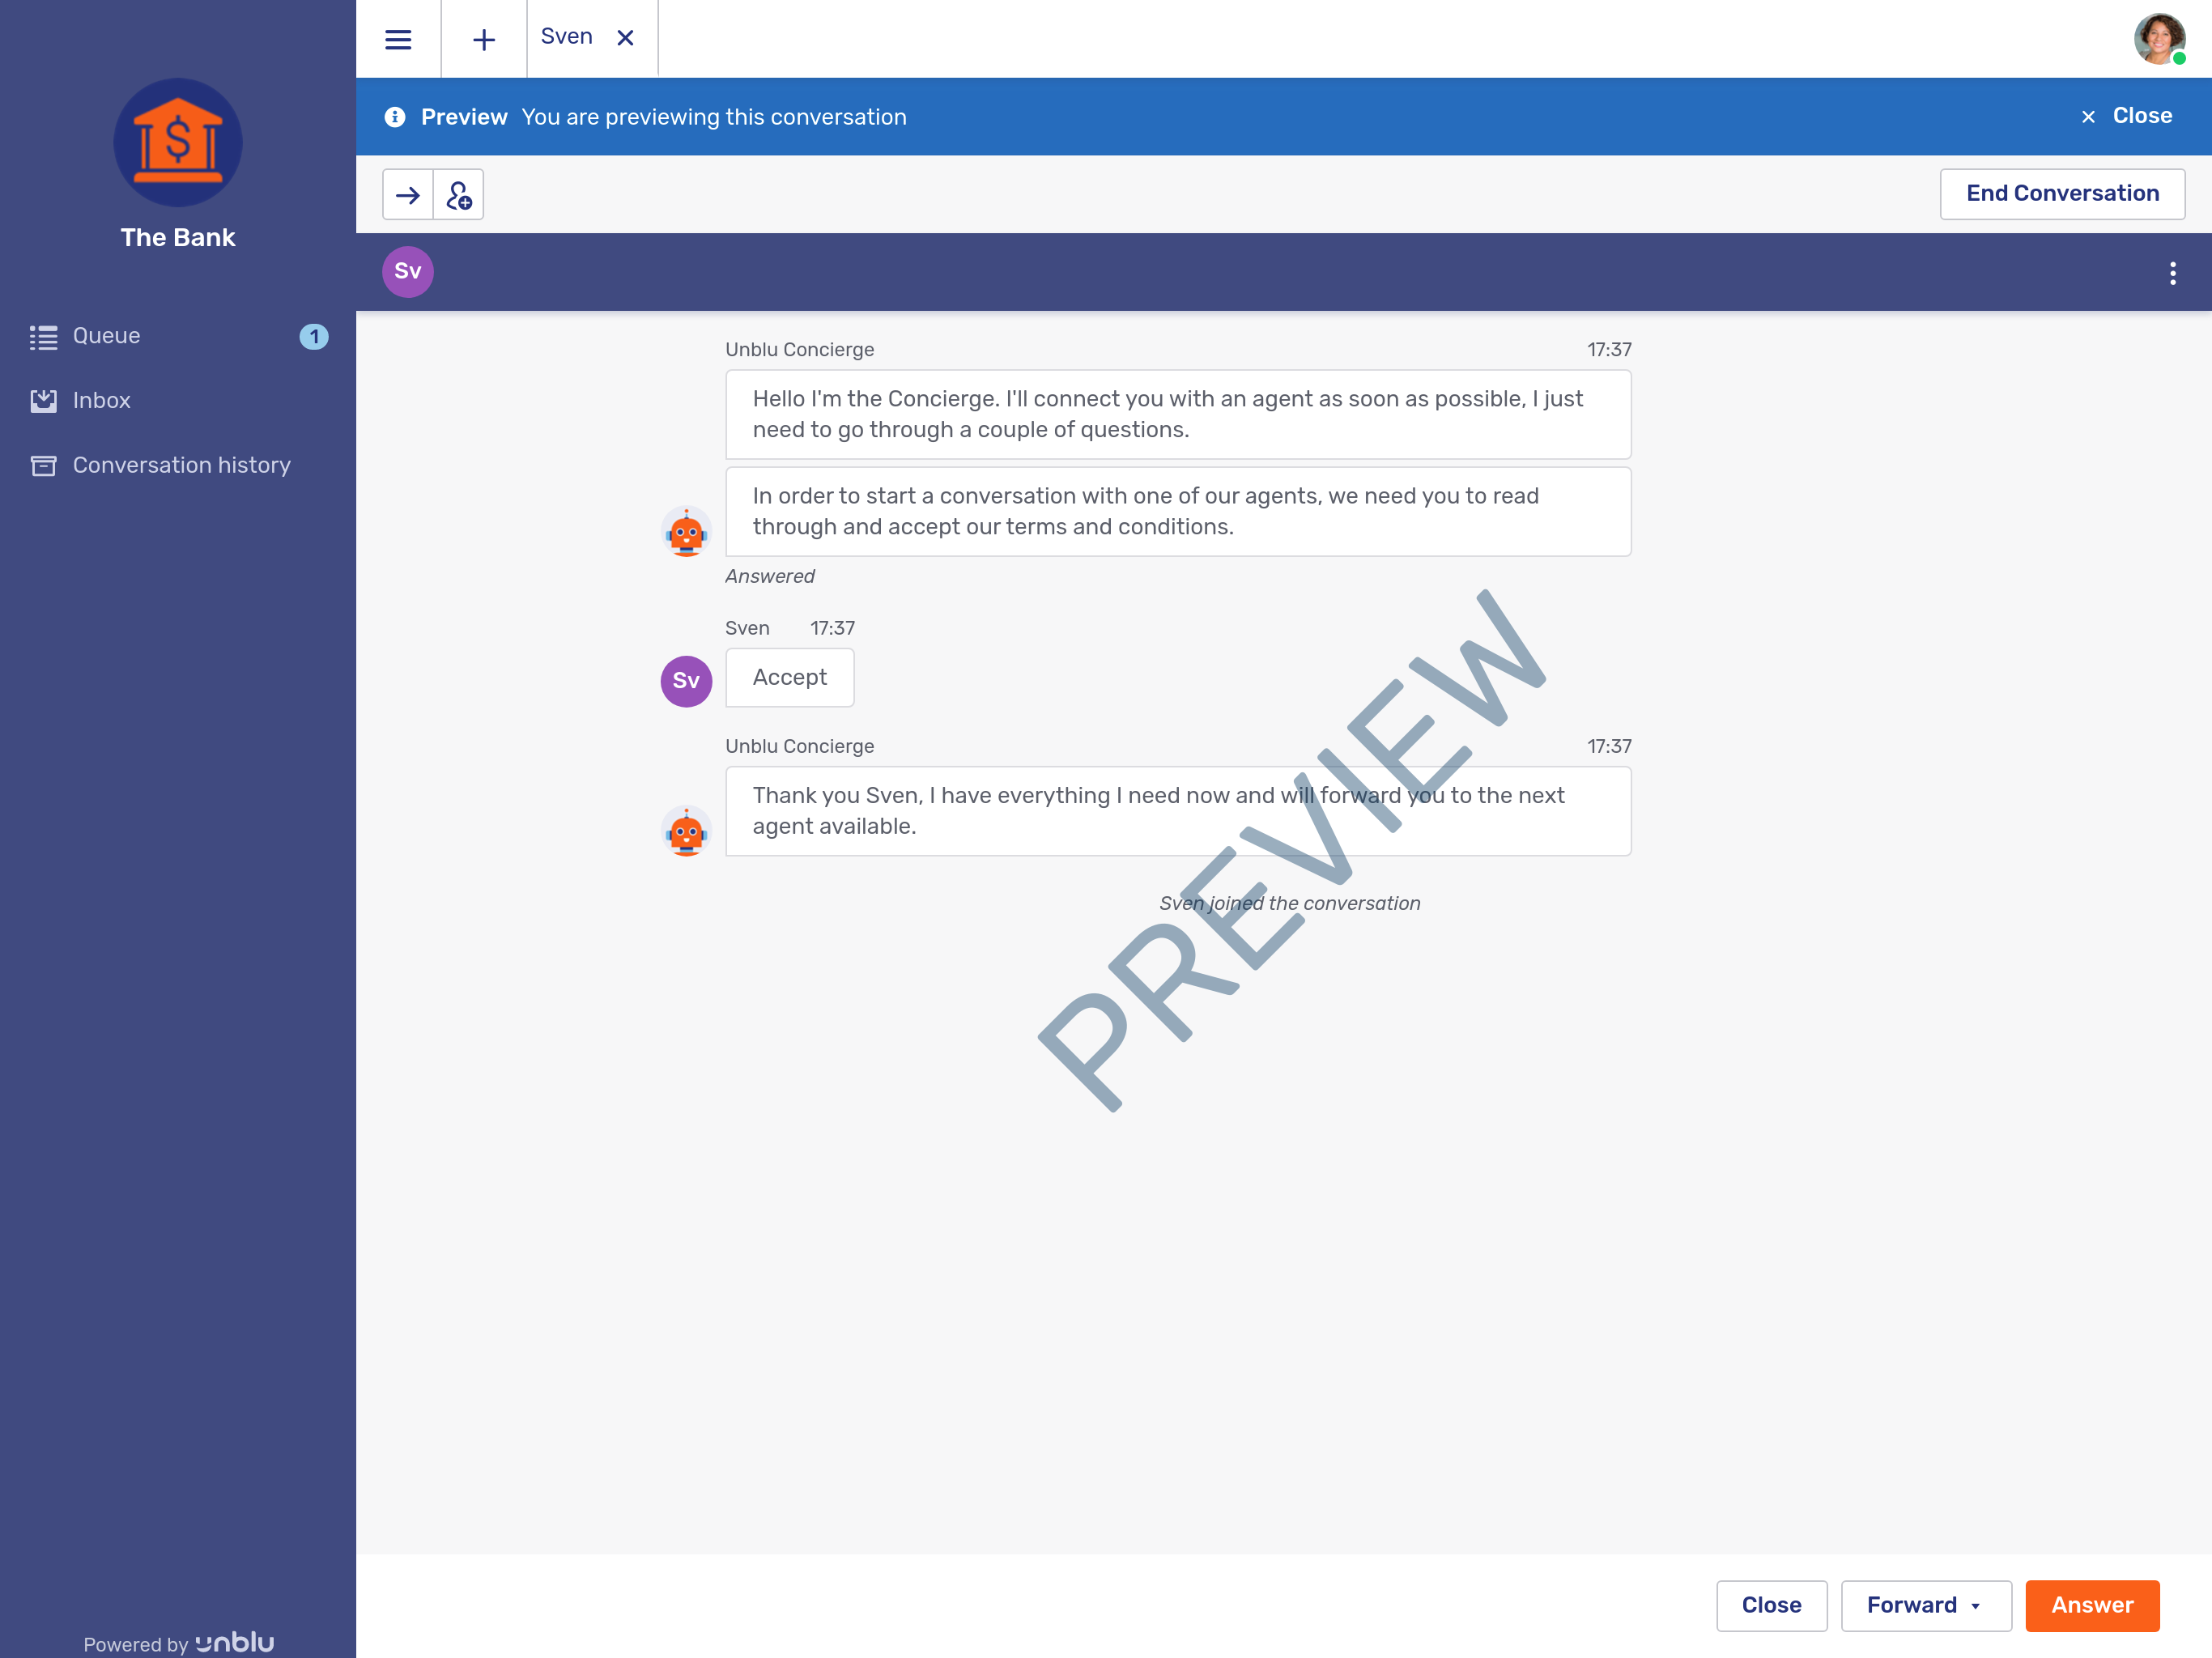
-
The Answer button allows you to join the previewed conversation without having to return to the queue view. Alternatively, you can click on the Answer button on the conversation item in the queue.
-
The Forward menu gives you the possibility to forward the conversation to an agent, team or named area without joining the conversation.
-
The Close button at the bottom of the screen simply closes the preview.
|
In the preview, the buttons for forwarding the conversation |
If another agent answers a conversation while you are previewing it, Unblu informs you in a modal dialog and disconnects you from the conversation:
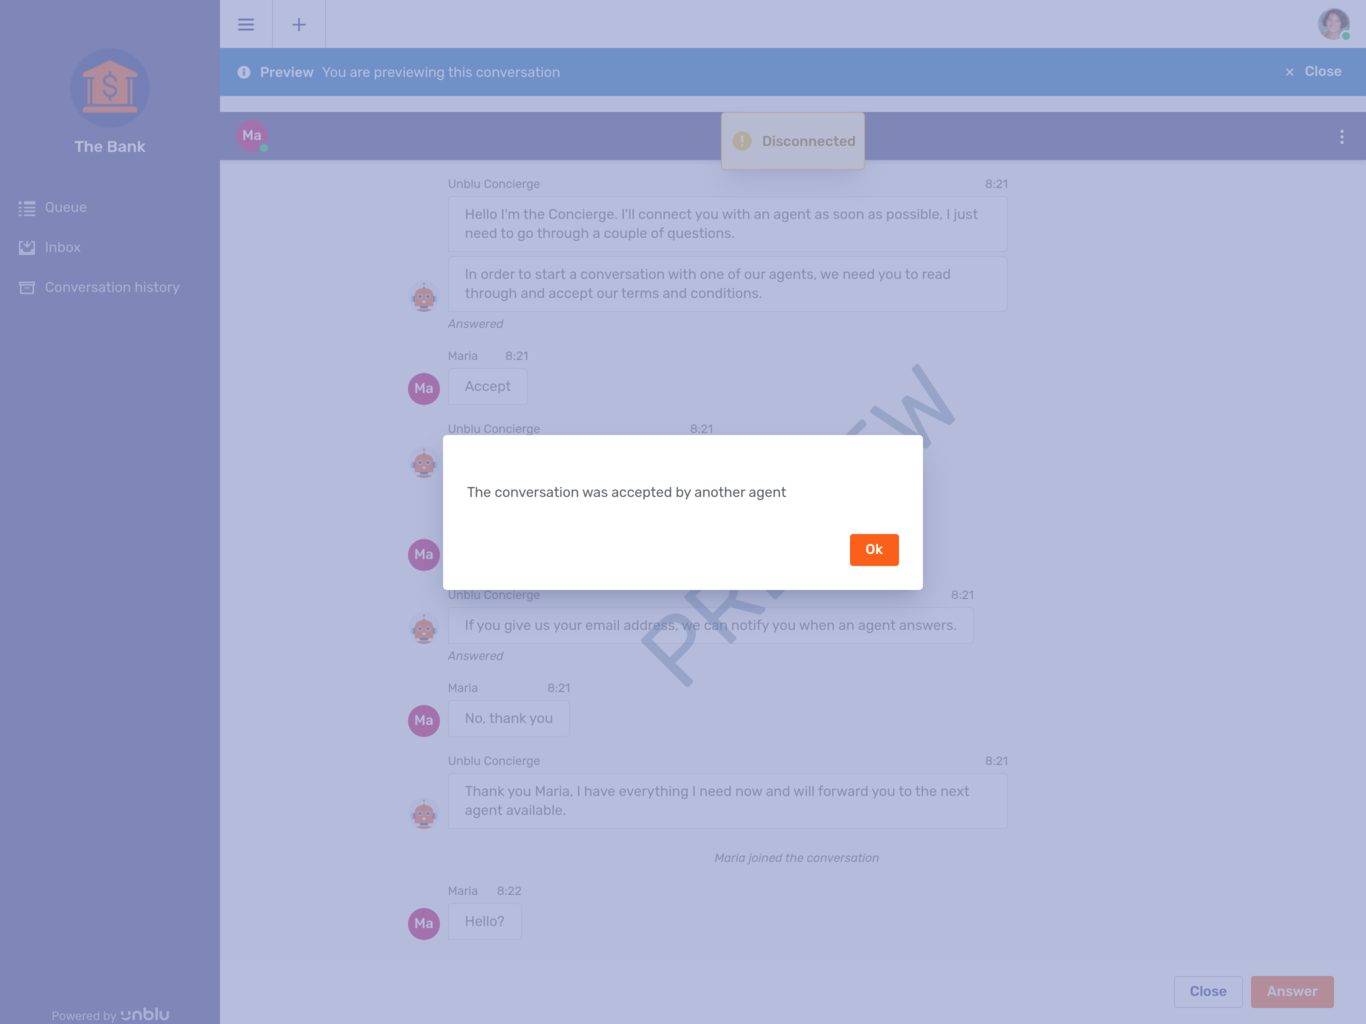
For more information on the options available once you answer a conversation, see the section Conversation panel below.
7.2.4.3. Automatic request dispatching
Automatic request dispatching is a way for your organization to automate the conversation assignment process. Rather than choosing which conversation requests to answer, Unblu reserves conversation requests for you.
If your organization uses automatic request dispatching, the queue will look slightly different from the description above. Your workflow in the queue will also be slightly different.
This is what the queue looks like in the Agent Desk when automatic request dispatching is active:
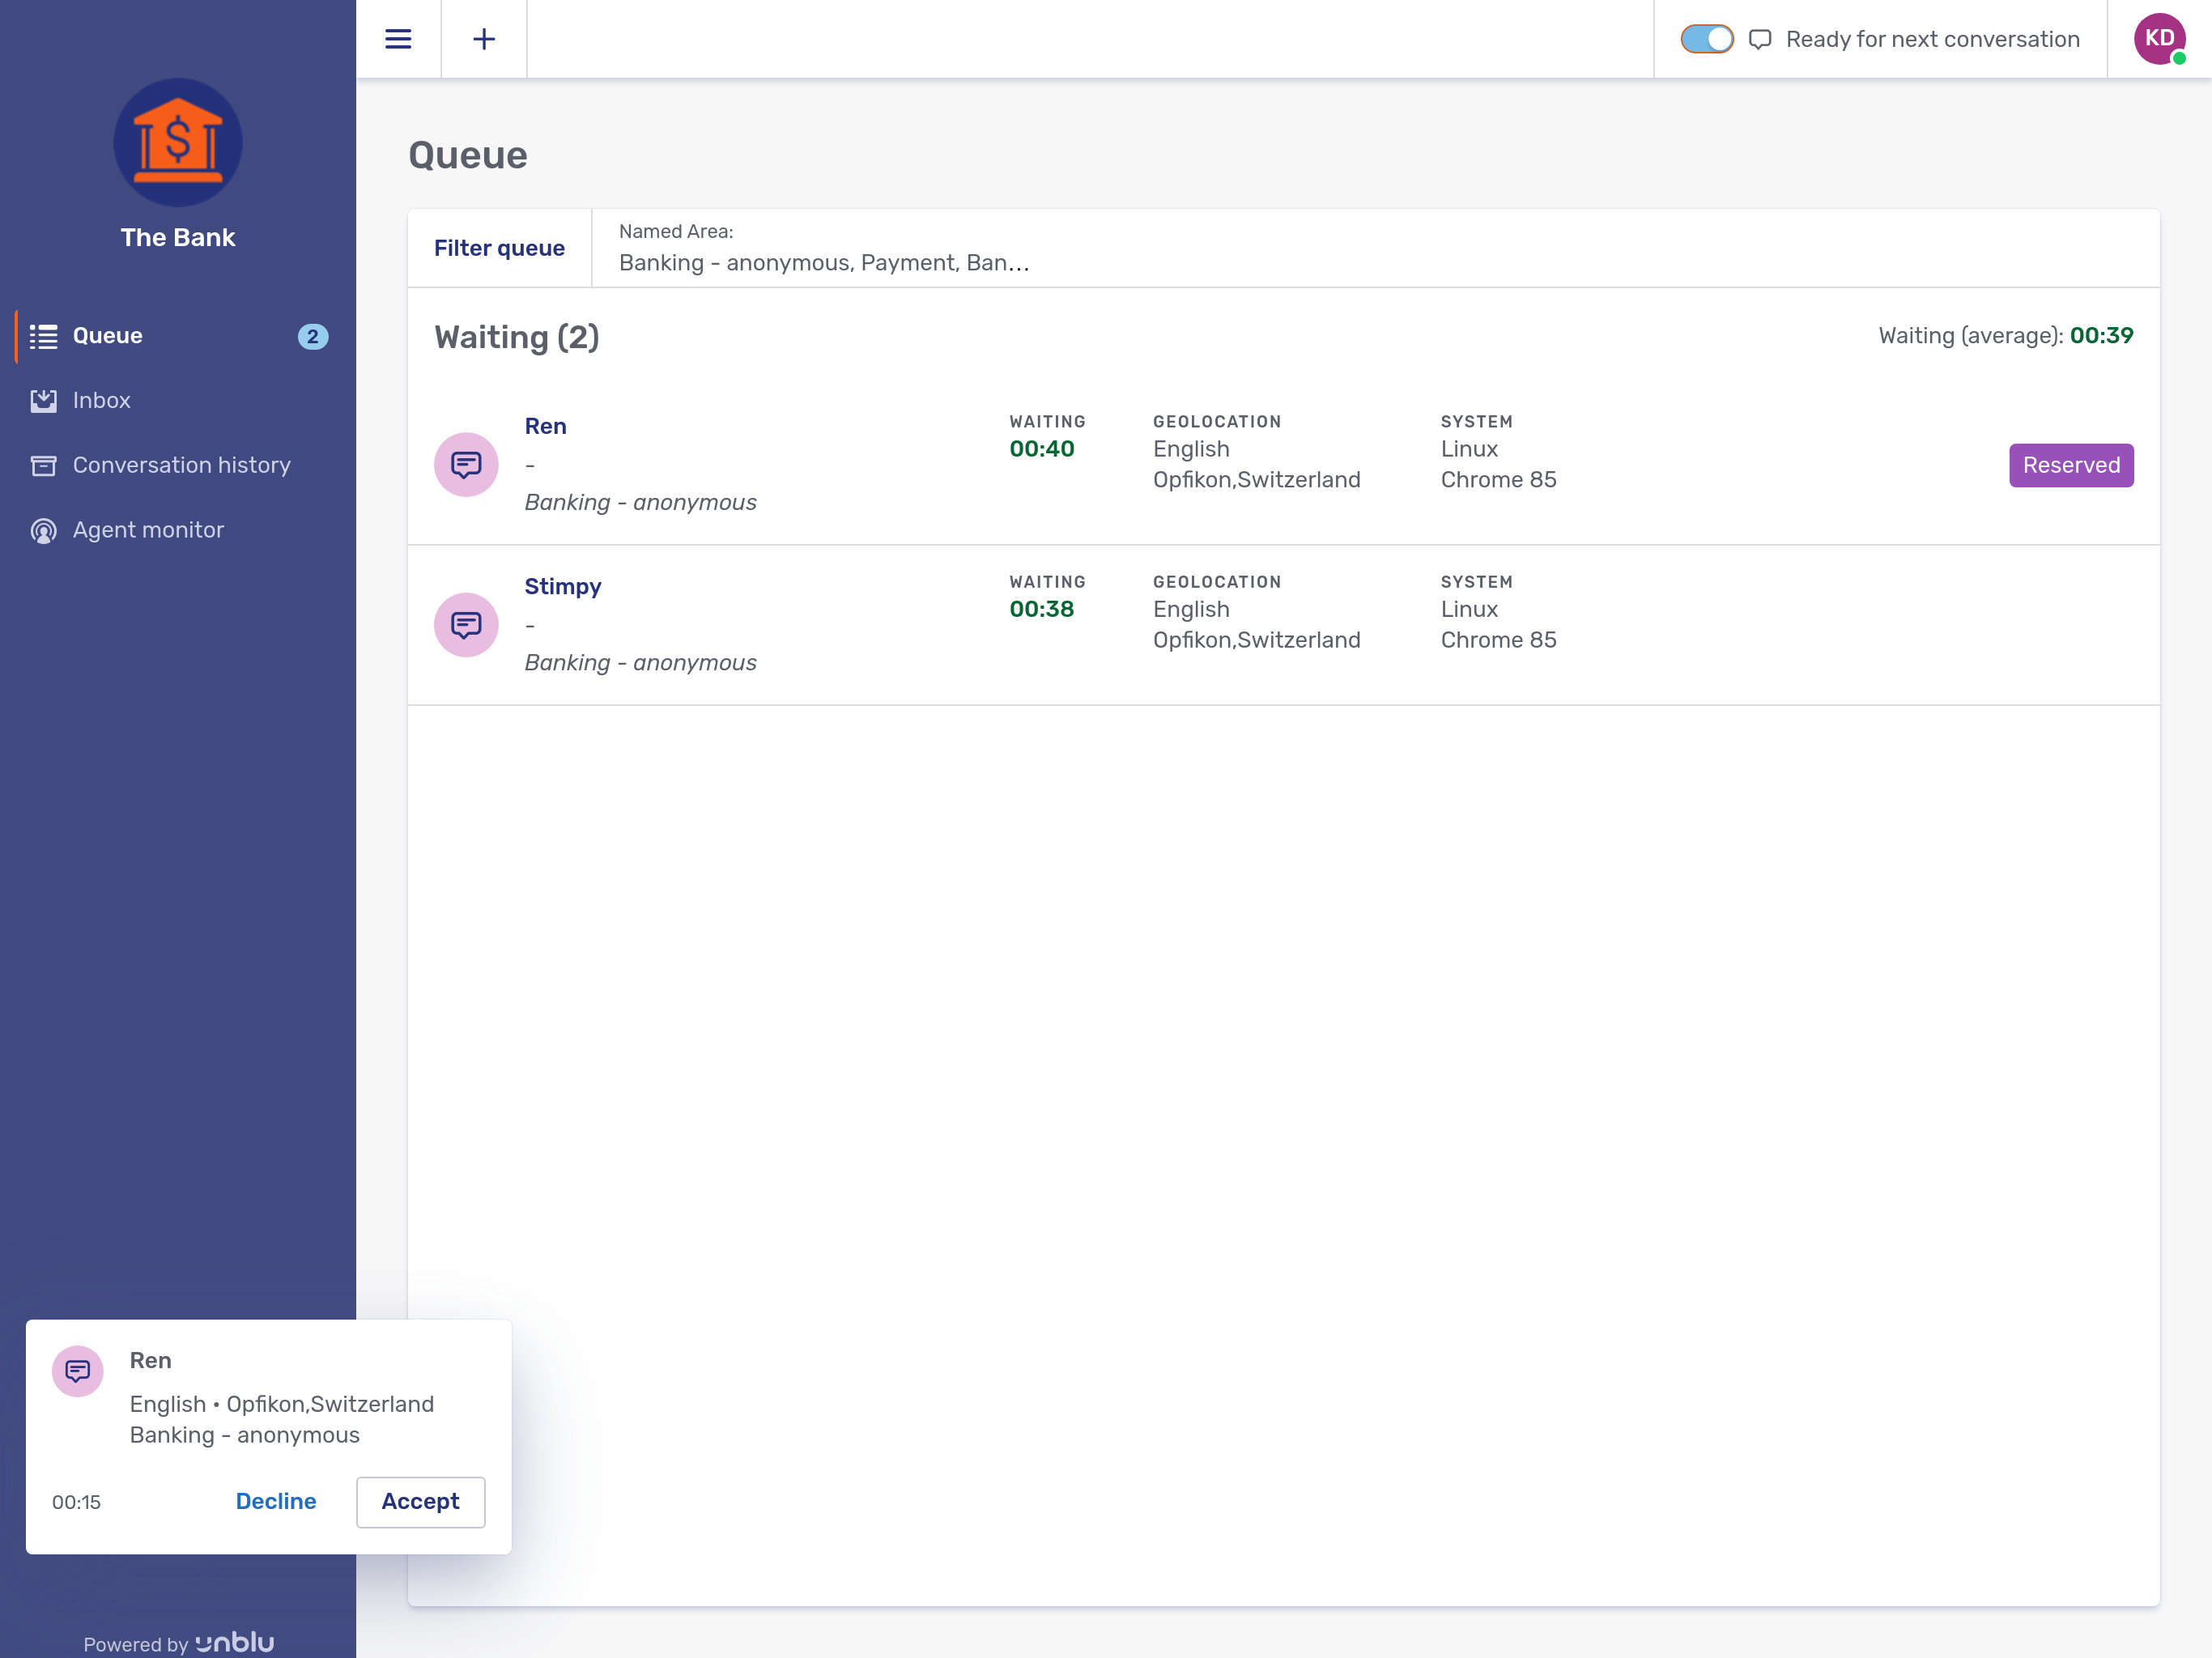
-
To the left of your avatar in the conversation bar, you can see a toggle labeled Ready for next conversation. By activating the toggle, you inform the dispatch mechanism that it may reserve conversation requests for you.
-
In the queue, the conversation will sport a Reserved label. (This label is applied to all reserved conversation requests, not just requests reserved for you.)
-
There are no buttons to accept or decline the conversation from the queue. There is also no way of previewing the conversation.
If you are available for conversations, the dispatcher will assign you (and your coworkers) conversations in turn, up to your maximum number of active conversations. When it reserves a conversation for you, a toast appears in the lower left-hand corner of the Agent Desk. The toast includes buttons for you to accept or decline the conversation. It also displays a countdown showing how much time remains for you to do so.
If you decline a conversation request, or do not react to the reservation before the countdown displayed on the toast reaches zero, your status is set to unavailable. If the reservation timed out, a modal dialog is displayed that allows you to set your status to available again or to remain unavailable.
7.2.5. Conversation panel
The effect of clicking on Answer for a conversation in the queue depends on the type of conversation request you are answering. As a rule, the Agent Desks opens the most appropriate view for the request at hand. For example, if you respond to a live chat request, the conversation panel will display the messaging view.
In the upper left-hand corner of the conversation panel, you will see one or more avatars representing the other participants in the conversation. Clicking on a participant’s avatar displays a dropdown containing information on that participant:
In the image above, the user has not been authenticated, so the lock icon in the About section of the dropdown is open. If the user’s authenticated identity had been propagated — because they launched a chat from within e-banking, say — the lock icon would be closed, and their propagated username would be displayed.
7.2.5.1. Common controls
Some controls are available in the conversation panel regardless of the conversation type. These controls are located in the agent conversation bar between the top bar and the action bar of the view opened to interact with the visitor.

The controls here affect the participants or the type of collaboration taking place in a conversation.
7.2.5.1.1. Forward conversation control
The forward conversation icon ![]() opens the following menu:
opens the following menu:
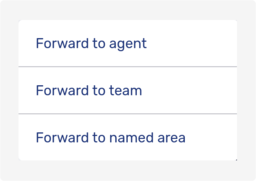
Selecting one of the menu items opens a modal page where you can select whom exactly the conversation should be forwarded to. The following picture shows the modal page after selecting Forward to team in the menu.
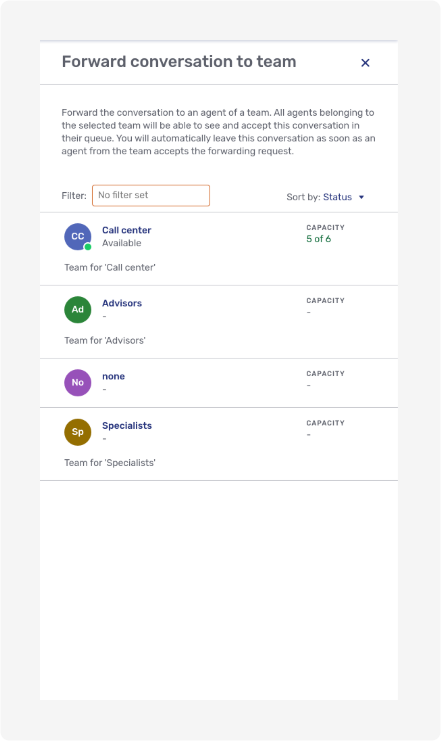
Once you click on the person, team, or named area that you want to forward the conversation to, a text field will appear where you can add a message for them. This message is optional, and it is not visible to visitors in the conversation.
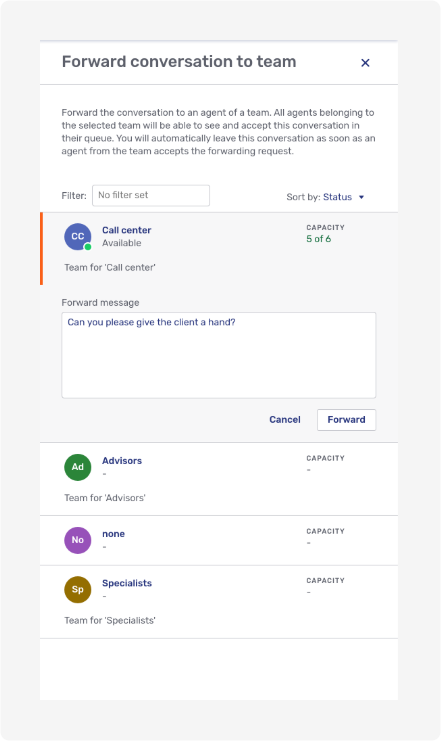
Once you have finished your message, click on Forward.
When another agent answers the forwarded request, you automatically leave the conversation. For further details about what this entails for you, please review the documentation on the conversation life cycle.
If you try to forward a conversation that you’ve already forwarded, the following dialog appears:

If you select OK, the modal page will open and you can select a different user to forward the conversation to. The agent, team, or named area you originally forwarded the conversation to will not be selectable. They may, however, be shown beneath the list of potential recipients:
-
If you originally forwarded the conversation to an agent and now want to forward it to a different agent, the original agent will be displayed beneath the list of potential selections.
-
If you originally forwarded the conversation to a team and now want to forward it to different team, the original team will be displayed beneath the list of potential selections.
-
If you originally forwarded the conversation to a team and now want to forward it to an agent, the agents in the team you forwarded the conversation to will be displayed beneath the list of potential selections.
-
If you already invited an agent or a team to join the conversation, you can still select them to forward the conversation to them instead. Customer invitations are not listed.
7.2.5.1.2. Invite participant control
The invite icon ![]() opens the following menu:
opens the following menu:
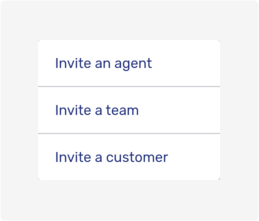
As with the forward conversation menu, selecting either Invite an agent or Invite a team opens a modal page where you can choose whom to invite and add a message to include with your invitation.
If you select Invite a customer, the modal page looks different:
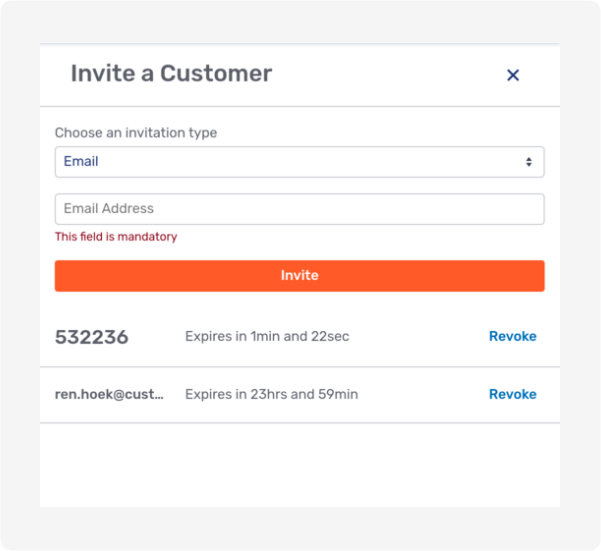
You can choose whether to invite customers by generating a PIN that you can give them, or by sending them an email with a link, and you can mix the two invitation types if you want to invite more than one customer. It is also possible to issue more than one invitation without the modal page closing.
As you can see in the example above, by default, email invitations do not expire as quickly as PIN invitations. The invitations that have already been generated are listed on the modal page, along with a countdown to each invitation’s expiry time and a link to revoke the invitation. When an invitation expires, its Revoke link is replaced by a Renew link which lets you generate a new invitation.
7.2.5.1.3. Collaboration control
The Collaborate menu provides access to the various ways for you to collaborate with other participants in a conversation.
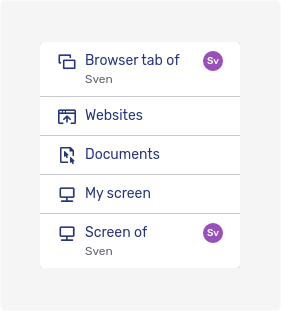
-
Browser tab of <visitor> is used to initiate an embedded co-browsing session. The browser tab shared is that of the visitor in question.
-
Websites initiates a universal co-browsing session
-
Documents initiates a document co-browsing session
-
My screen initiates a screen sharing session. The screen shared is the agent’s.
-
Screen of <participant> initiates a screen sharing session. The screen shared is that of the participant in question.
Note that you can collaborate on any participant’s screen, but only on a visitor’s browser tab.
The participants' names and avatars in the menu are particularly important if there are more than two participants in a conversation. The extra information helps to ensure that you don’t start a collaboration with the wrong contents.
The picture below shows the collaborate menu from a conversation involving two visitors and two agents:
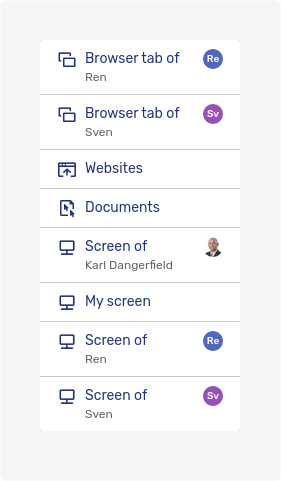
If you are already collaborating with someone, a blue dot to the left of the appropriate icon indicates which type of collaboration is currently in progress.
Selecting one of the menu items does not immediately launch a co-browsing or screen sharing session. It sends a collaboration request to the context person and to the participant whose content would be shared.
Suppose that in the conversation pictured above, Sven is the context person and Ren is a secondary visitor. If you want to share Ren’s browser tab, then both Ren and Sven will receive a collaboration request. This is what the request looks like in the individual UI:
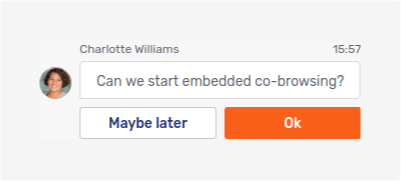
Both Ren and Sven must give their consent for the embedded co-browsing session to go ahead. If they fail to do so within a certain time, the collaboration request times out.
In the Agent Desk chat panel, you can cancel their collaboration request:
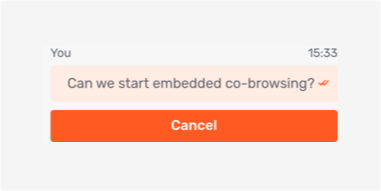
Once collaboration starts, the main content area of the Agent Desk displays the appropriate collaboration layer in the collaboration space. The following picture shows the collaboration layer of an embedded co-browsing session:
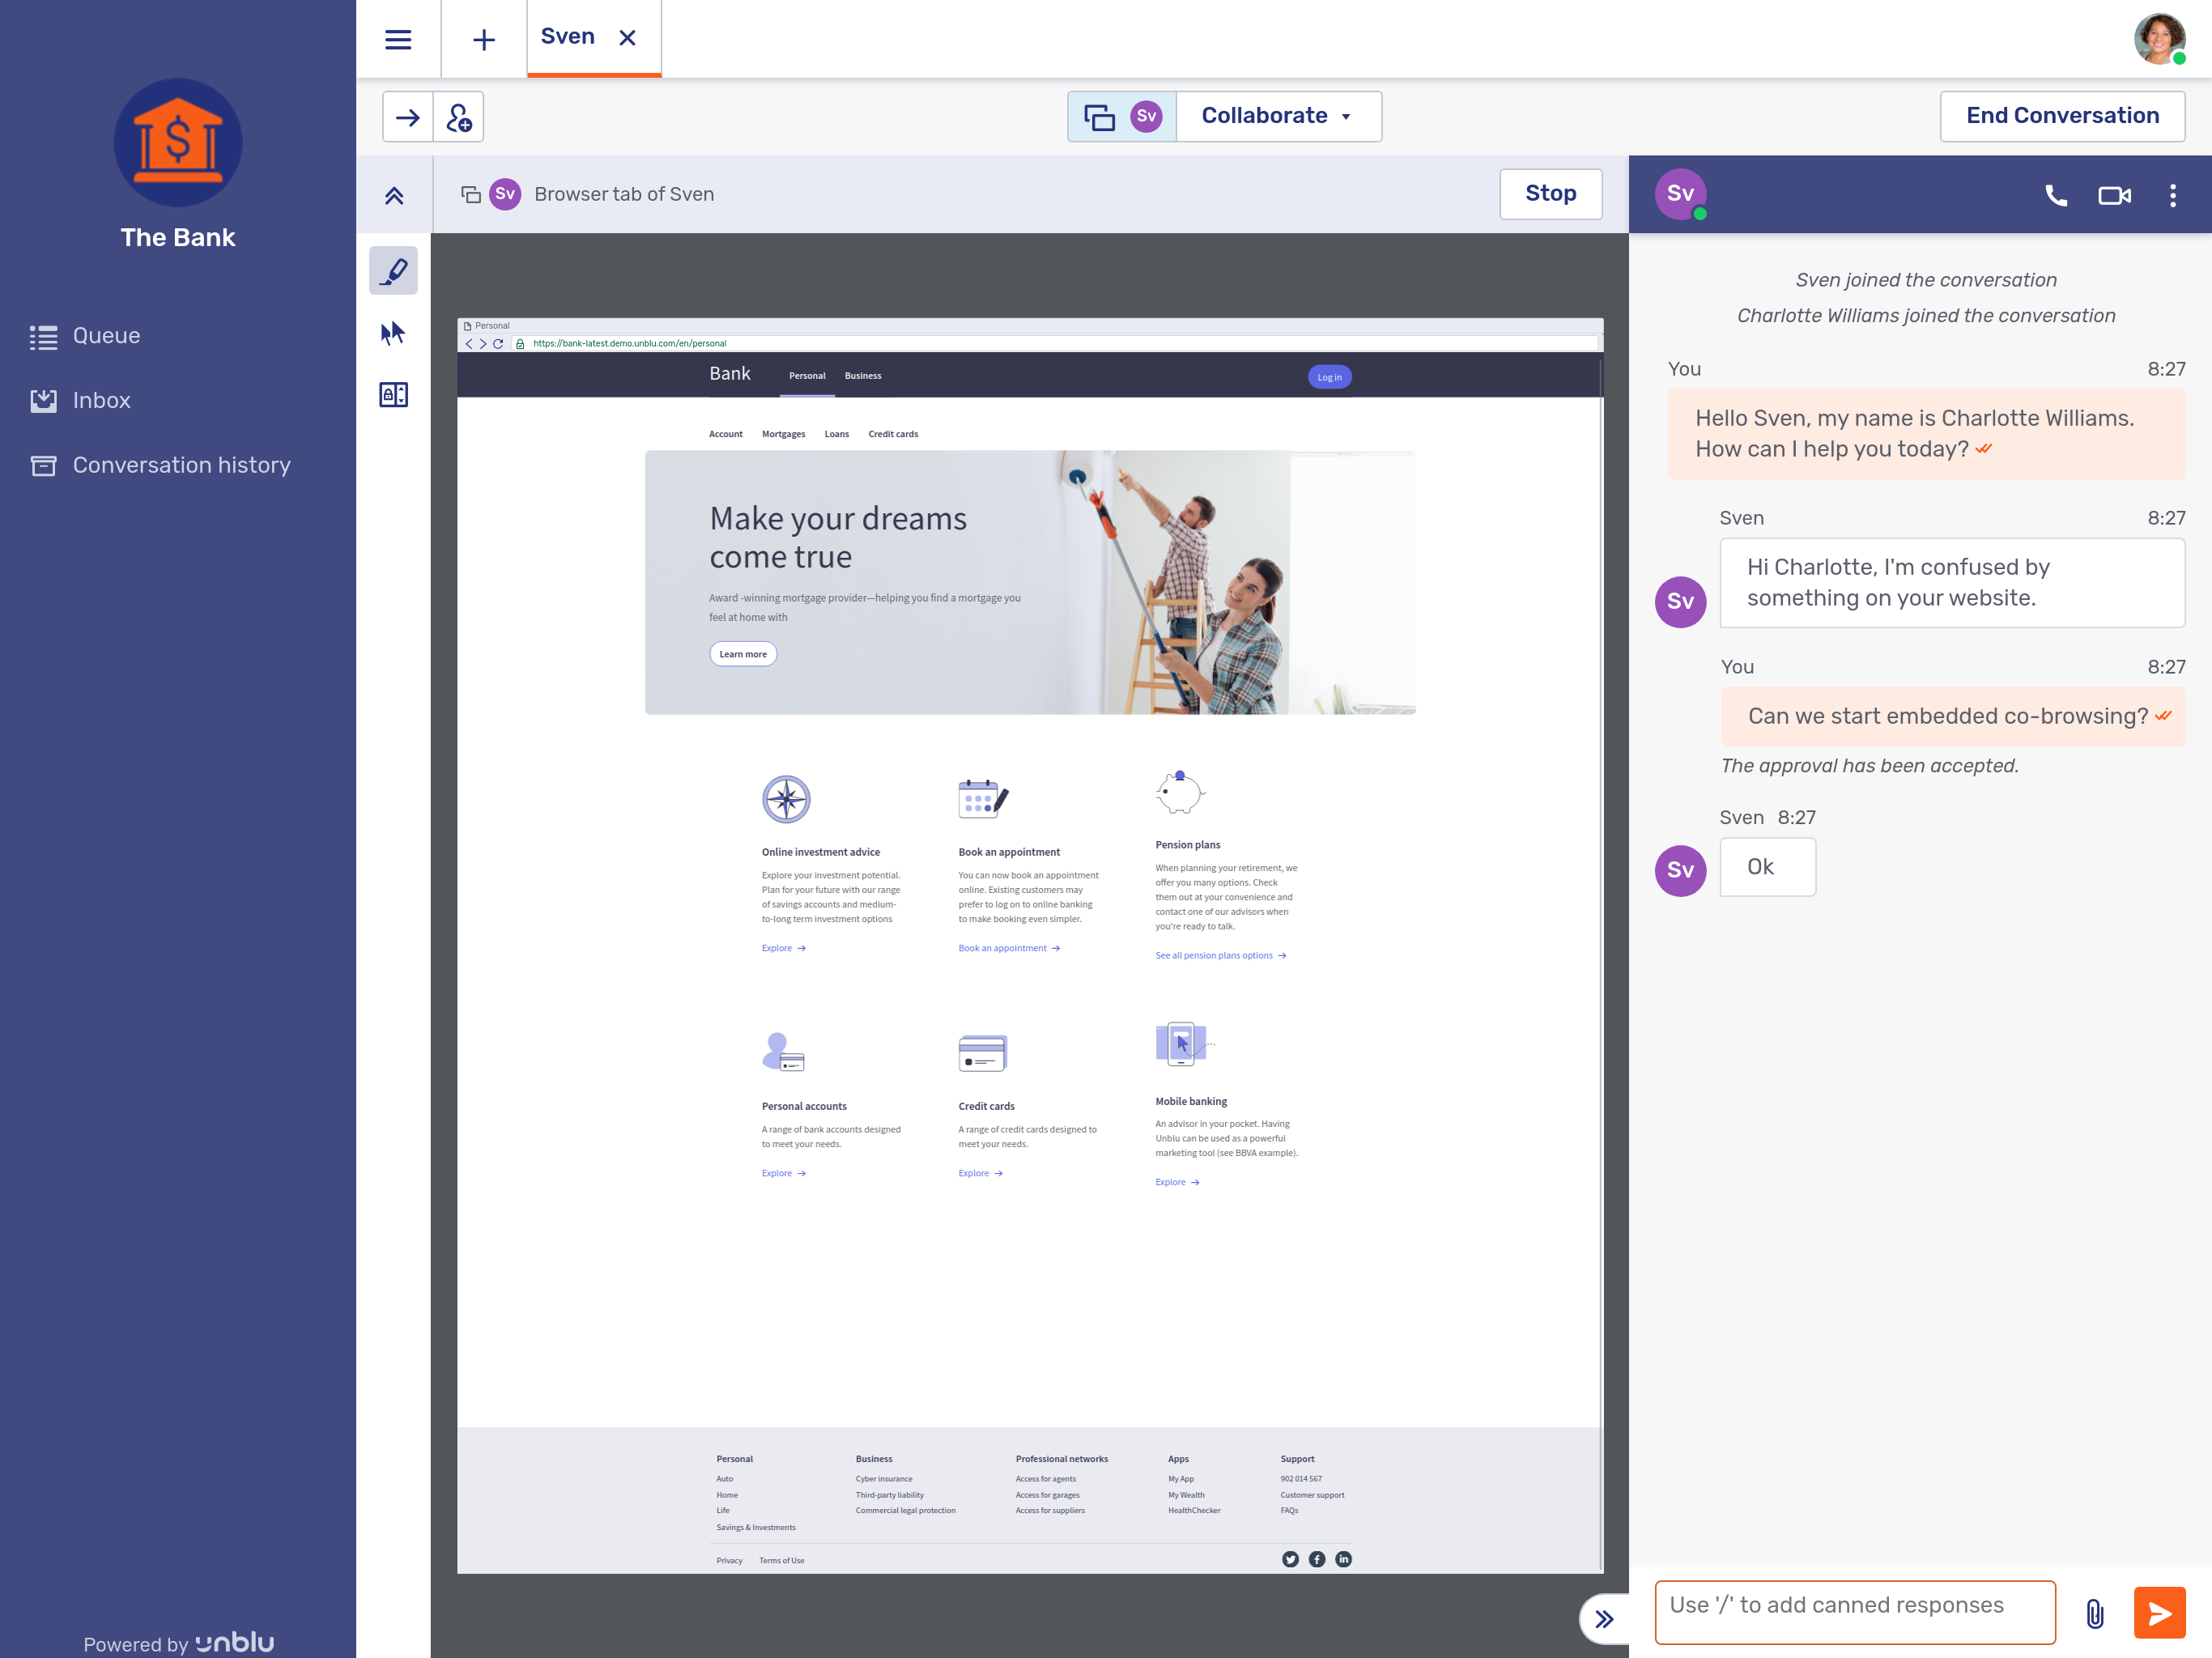
The type of collaboration you are currently engaged in is visible in three different places:
-
If you open the collaborate menu, a blue dot next to the appropriate icon indicates which type of collaboration is currently taking place.
-
The icon of the current type of collaboration is displayed to the left of the collaborate menu.
-
The icon and a brief description of the current type of collaboration is shown immediately above the collaboration pane’s main area.
Besides the hint about the type of collaboration in progress, the bar at the top of the collaboration space contains two controls.
-
The maximize content icon
 on the left hides the top bar, the agent conversation bar, and the sidebar. This increases the space available for the collaboration space.
When the content of the collaboration space is maximized, the icon is replaced by the minimize content icon
 . Clicking the icon displays the top bar and the agent conversation bar. It doesn’t reopen the sidebar.
 -
The Stop button
 on the right allows you to stop collaborating. Doing so does not end the conversation.
To the left of the collaboration pane, there is a set of three icons. These icons enable different collaboration tools.
| Icon | Description |
|---|---|
|
Toggle mark mode. This allows you to highlight areas of the screen for the other participants. |
|
Toggle remote control of the cursor in the co-browsing layer. The remote control tool allows you to control the cursor of the person you collaborating with. |
|
Turn scroll lock on or off for the co-browsing layer. Scroll lock ensures that your view of the co-browsing layer remains fixed, even if the other participant scrolls up or down on the page you are viewing together. |
| Which collaboration tools are available depends on the type of collaboration. |
To the right of the collaboration space, you can see the conversation’s messaging view. You can collapse it to give the collaboration pane more room by clicking on the hide chat panel icon ![]() . If you want to expand the chat panel, click on the show chat panel icon
. If you want to expand the chat panel, click on the show chat panel icon ![]()
![]() .
.
7.2.5.1.4. End conversation control
The End conversation button does exactly that: it ends the conversation. Depending on how Unblu is configured, it may display a dialog asking you whether you really want to end the conversation. The control is only available to users entitled to end the conversation. Who may end a conversation can be configured in the conversation templates and in the conversation itself.
Once a conversation has ended, you can no longer add content to it. You can review conversations that have ended in the conversation history.
For further details about conversation states, please consult the documentation on the conversation life cycle.
7.2.5.1.5. Multiple collaboration layers
It is possible to collaborate in different ways at the same time. For example, a visitor could share their browser tab with you while you share your screen with them. You can only ever see one of the collaboration layers at any one time. However, running more than one collaboration layer simultaneously makes it easier to switch between them.
When multiple collaboration layers are active in a conversation, you will see icons for each collaboration layer to the left of the collaborate menu in the conversation top bar. The collaboration layer currently in view is highlighted:
In the example above, there are two collaboration layers, an embedded co-browsing layer and a screen-sharing layer. The screen-sharing layer is the one currently visible in the collaboration space: its icon is highlighted with a shade of blue.
7.2.5.2. Live chat, audio call, and video call requests
If the visitor requested a live chat, an audio call, or a video call, the appropriate view will open when you answer the request. The views in the Agent Desk are almost the same as the ones in the Individual UI. The only difference is that there is no option to pop the conversation into a separate window.
For more information on the other view controls, please consult the visitor Individual UI guide.
7.2.5.2.1. Collaborating during a call
If you decide to start collaborating during a call, the visitor will have to confirm they consent to it. They will receive a message that they must confirm in the chat panel. Although the chat panel icon in the Individual UI will show a badge, visitors might not realise they have to go there before they can start collaborating with you.
Refer to the relevant section of the Individual UI guide for further details.
7.2.6. Conversation history
The conversation history provides access to all of your conversations. It includes both ongoing conversations and those that have already ended.
The list items in the conversation history show a lot of information about the conversations:
-
The date the conversation was created
-
The type of conversation, i.e. chat, video call, audio call etc.
-
The name of the assignee
-
The name of the context person or primary visitor
-
The state of the conversation, e.g. Active, Ended, Offboarding etc.
-
How long the conversation lasted
-
How long the visitor had to wait for an agent to answer their request
-
How the visitor rated the conversation
Here is an example of what an agent’s conversation history might look like:
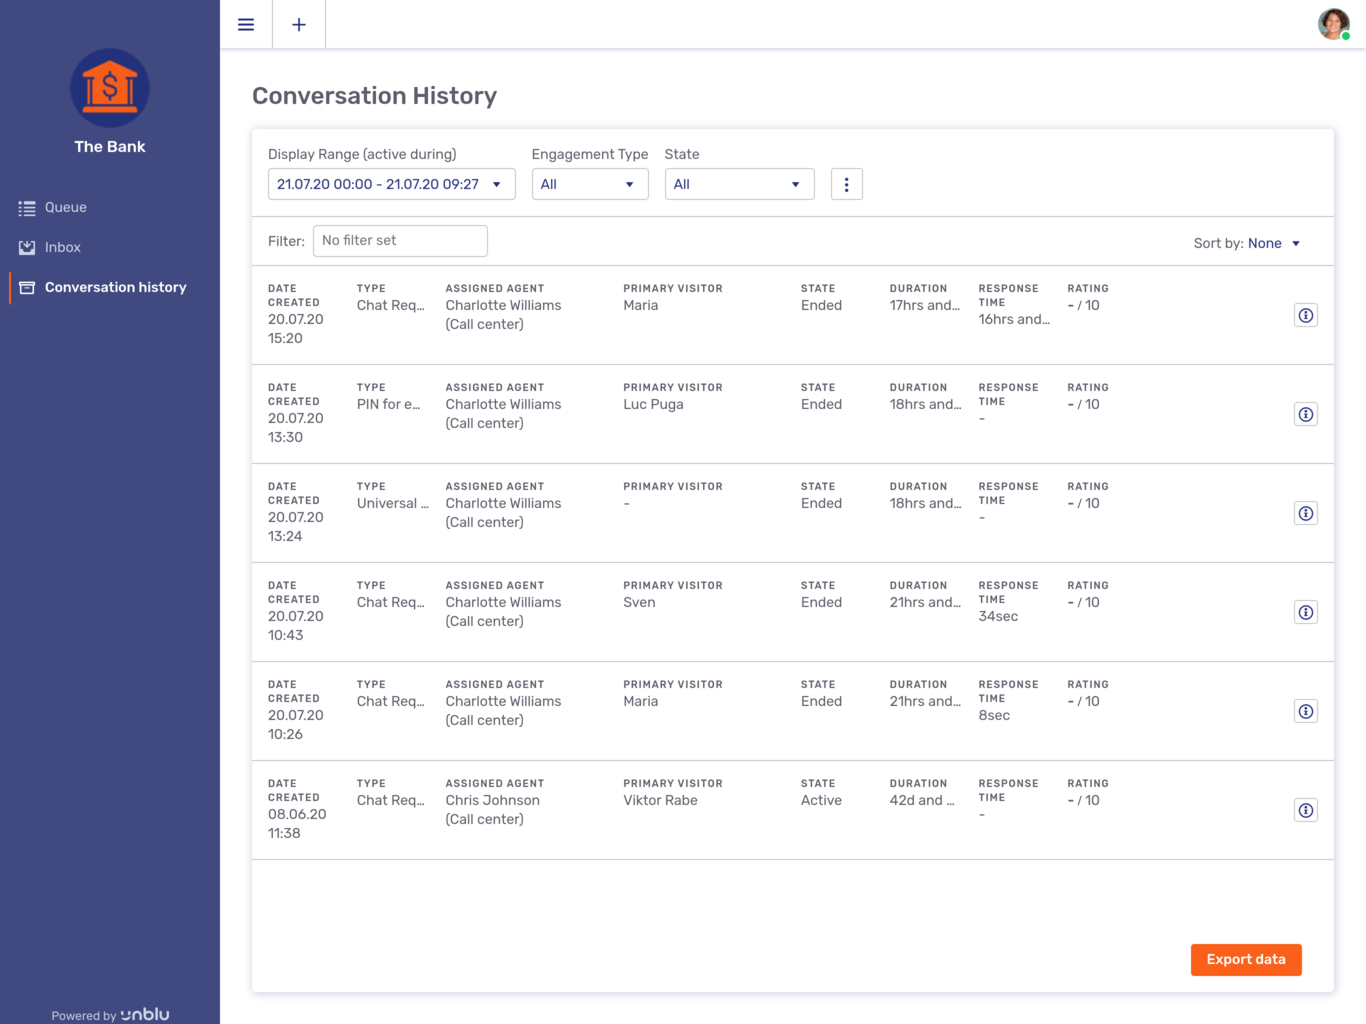
In the picture above, most conversations have ended. The agent, Charlotte, was the assignee of all but one of the conversations. The conversation that Charlotte is participating in as a secondary agent is still active.
The Export data button at the bottom of the list allows you to export the data as a CSV file.
Clicking on a conversation displays its contents. See Viewing a conversation below for more details.
7.2.6.1. Conversation history filters
Like the inbox and the queue, the conversation history provides various filters to specify which conversations should be listed. You can filter by:
-
Display range. This refers to when the conversation was in progress. The default range is the current day.
-
Agent.
-
Team.
-
Language.
-
Visitor source ID. This is the visitor’s username if they’re authenticated by another system that propagates their identity to Unblu.
-
Conversation ID. Selecting this filter disables all other filters.
| A conversation is displayed even if its start and end times were outside the display range. For example, if a conversation started at 09:00 and ended at 12:30, setting the display range to 10:00—11:00 will return the conversation, even if there was no activity in the conversation between 10:00 and 11:00. |
The display range filter is always displayed. You can specify which other filters to show by clicking on the more icon ![]() .
.
The filter field also allows you to search for text in the conversations' information. This lets you search for conversations by the names of participants, for example.
If you apply multiple filters, the conversation history only displays conversations that match all your filter criteria. For example, if you specify a display range and a language, the conversation will only list conversations in that language that were ongoing during that period.
If you select multiple values for a single filter, on the other hand, the conversation history displays all conversations that match any of the values you selected for that particular filter. For example, if you select the languages Czech and Swedish in the language filter, the conversation history lists all conversations whose language was either Czech or Swedish.
The maximum number of conversations displayed in the history is defined in the configuration property com.unblu.conversationhistory.limit. The default value is 100.
7.2.6.2. Conversation history fly-in page
Clicking on a conversation’s information icon ![]() opens a fly-in page with additional details:
opens a fly-in page with additional details:
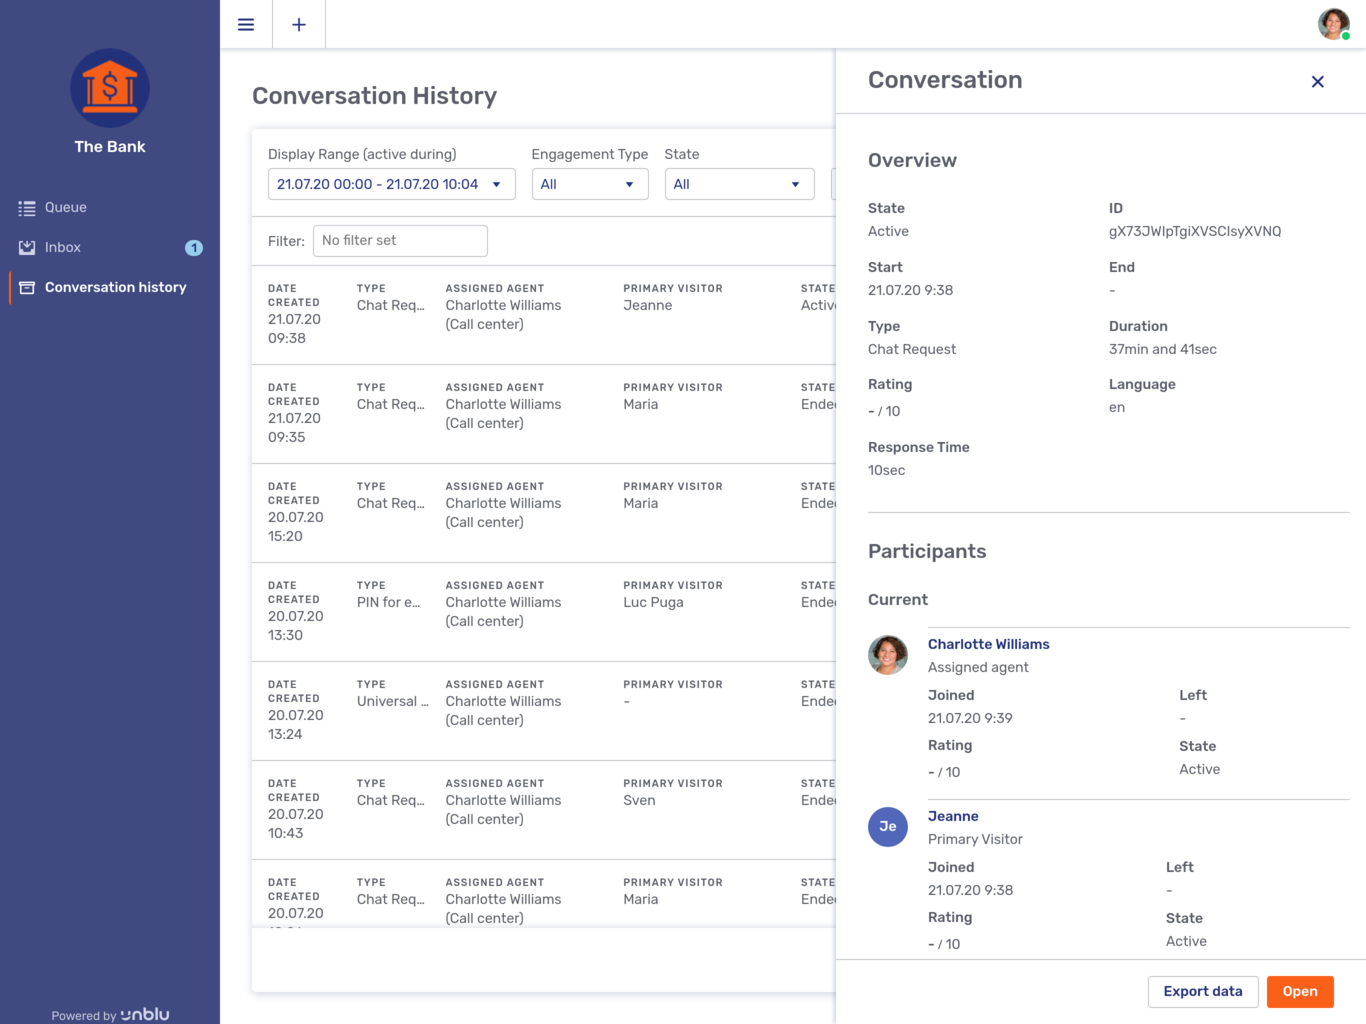
Besides an overview of the conversation’s details, the modal page provides information on the conversation’s participants:
-
Who the participants are or were
-
When they joined and left the conversation
-
What the nature of their participation in the conversation was
-
Whether they are still participating or not
-
How they rated the conversation
The information on the modal page can be exported as a CSV file using the Export data button.
The Open button displays the conversation’s contents.
7.2.6.3. Viewing a conversation
When you open a conversation in the conversation history, the conversation is opened with the agent participating as a ghost. This is the case even if the conversation is still active and the agent is the conversation assignee. In this view, you can see everything that has taken place in the conversation so far, including the entire onboarding process. However, the view is not shown next to the plus icon ![]() at the top of the Agent Desk.
at the top of the Agent Desk.

(Supervisors and admins can also look in on agents' conversations as ghosts.)
Contrast this view with the same conversation after clicking on the Open in normal view button at the bottom of the screen:
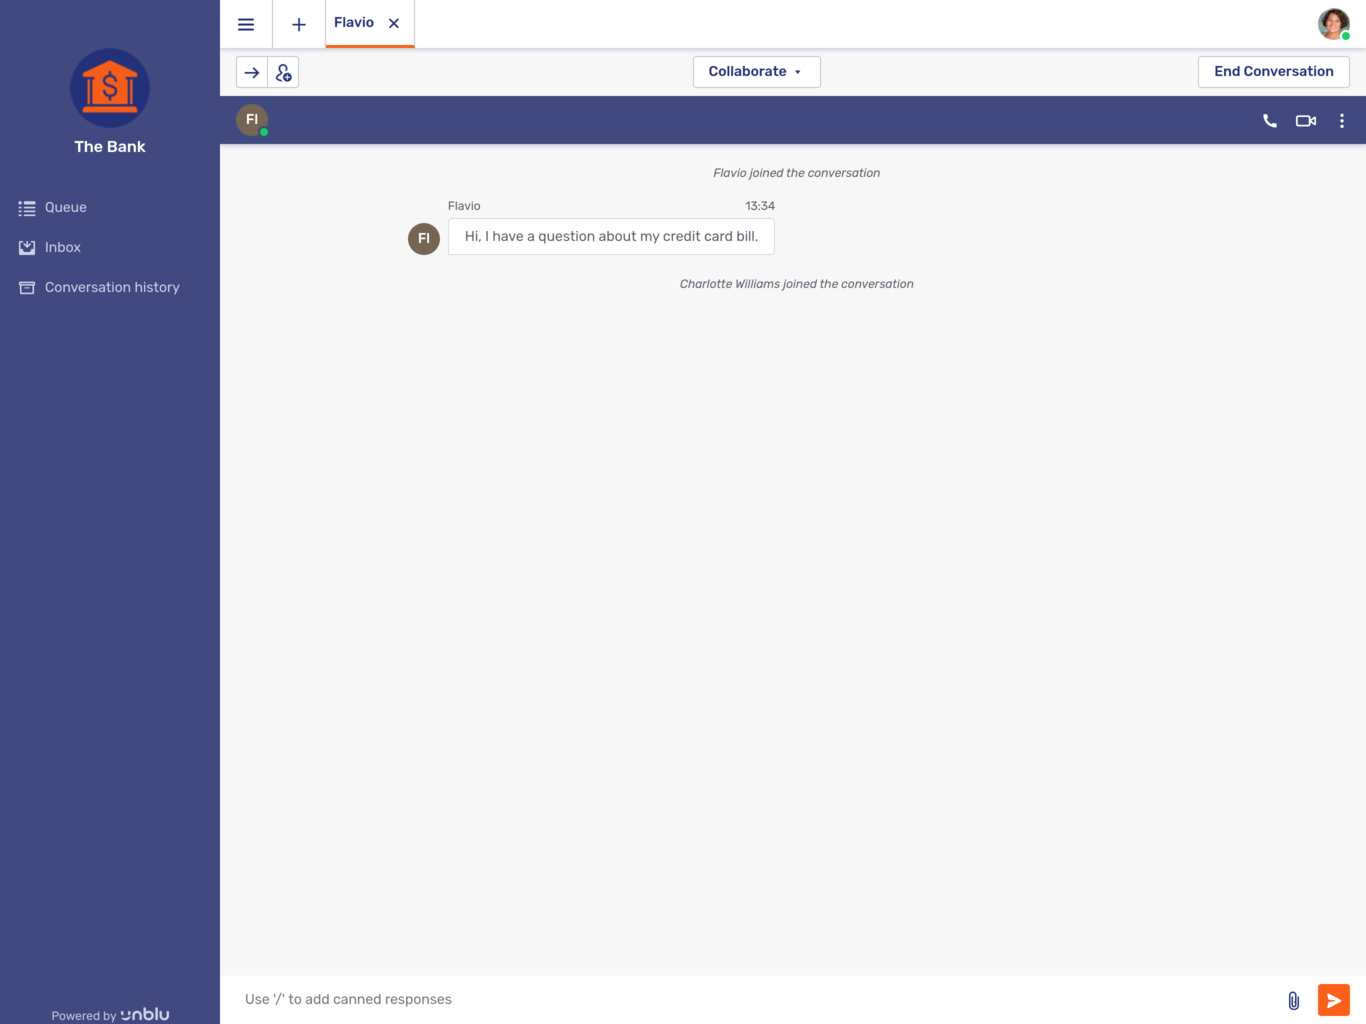
Since the conversation depicted above has not ended, the text input field is available at the bottom of the screen. The Agent can thus continue interacting with the visitor from this view.
7.2.7. Agent monitor
The Agent Monitor allows supervisors and administrators to monitor the capacity of agents and named areas. They can also get an overview of the conversations that agents are currently engaged in.
-
Supervisors can monitor agents on teams they are responsible for.
-
Administrators can monitor any agent of the Unblu account they administer.
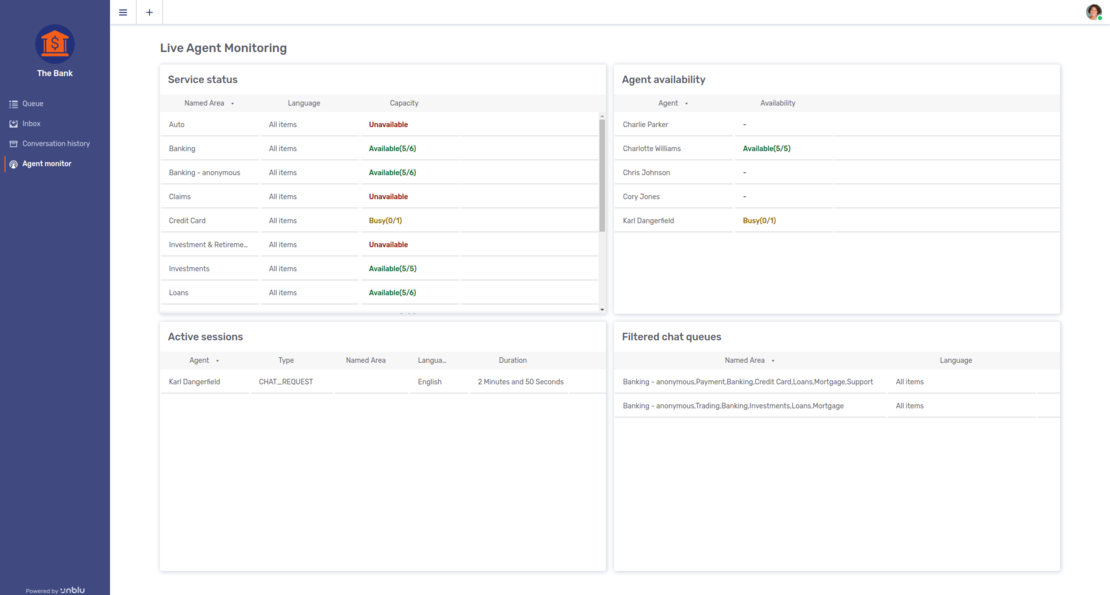
As you can see above, the content area of the agent monitor is divided into four panels:
- Service Status panel
-
The service status panel shows the capacity utilization by named area and language.
- Agent Availability panel
-
The agent availability panel shows each agent’s capacity and their availability.
- Active Sessions panel
-
The active sessions panel provides information about the active conversations, including the type and duration of the conversation, and the agent handling the conversation.
- Filtered Chat Queues panel
-
The filtered chat queues panel shows the filters that agents are applying to their queues. This can be helpful when trying to determine why a certain conversation is not being accepted by any agents: maybe none of them can see it because of the filters they have set in their inbox.
You can sort the contents of any panel according to any of the columns.
7.2.7.1. Availability
The agent monitor distinguishes between three different levels of availability: Available, Busy, and Unvailable.
7.2.7.1.1. Availability by named area
In the service status panel, availability refers to all of the agents assigned to the various named areas. The numbers in brackets after the availability status show the total current capacity utilization for all of the agents.
In the picture above, the named area Banking has an available capacity of five conversations and a total capacity of six conversations. Because there are agents with capacity available to accept conversations in this named area, the availability status is Available.
The named area Credit Cards, on the other hand, has an available capacity of zero conversations and a total capacity of one conversation. Its availability status is therefore Busy.
The situation is even worse for the named area Auto. Its availability status is Unavailable. This means that there are no agents logged in at present who could accept conversations in this named area.
7.2.7.1.2. Agent availability
The availability information in the agent availability panel refers to each agent’s personal availability. The numbers in brackets show their personal current capacity utilization.
In the picture above, the agent Karl Dangerfield has an available capacity of zero conversations and a total capacity of one conversation.
An agent’s personal availability status can be affected in a number of ways:
-
If an agent sets their online status to Away in the Agent Desk settings, their availability status switches to Unavailable.
-
If an agent has reached the maximum number of concurrent active sessions allowed, their availability status switches to Busy.
-
If automatic queue dispatching is active, agents can change their availability status independently of their online status. Check our article on automatic queue dispatching for further information.
7.2.7.2. Filtering
Selecting an entry in any of the four panels will filter out the entries in the other panels that are relevant to the entry selected.
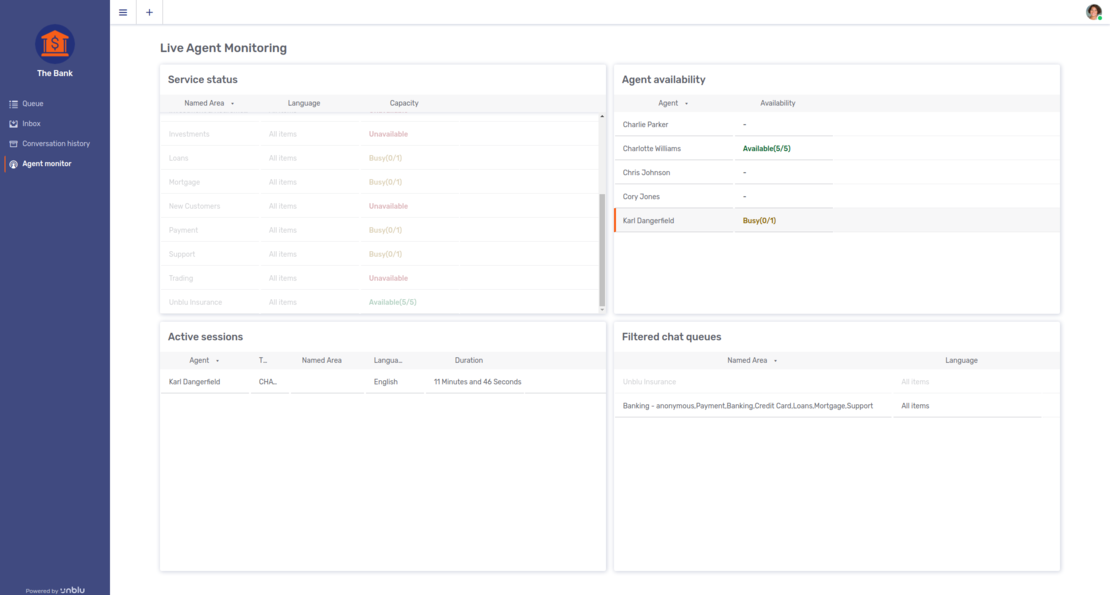
In the picture above, the agent Karl Dangerfield has been selected in the agent availability panel. This is indicated by the vertical orange bar to the left of the entry. As a result of this selection, we can see at a glance which entries in the other panels apply to this agent. Entries that don’t apply to him are grayed out.
7.2.8. Agent Desk settings
Clicking on the avatar in the upper right-hand corner of the Agent Desk opens the Agent Desk settings menu:
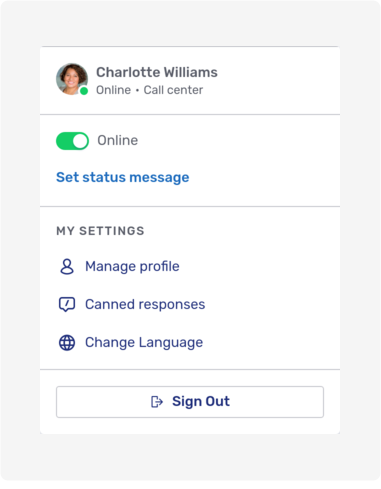
7.2.8.1. Agent information
At the top of the menu, there is a brief summary of the agent’s details: their avatar, name, online status, and the team they are in. The status shown here is mirrored by the badge in the lower right-hand corner of the avatar.
In the picture above, you can see that the agent logged in to the Agent Desk is called Charlotte Williams. She is a member of the Call center team and is currently online.
7.2.8.2. Availability switch
The next element in the menu is a switch to toggle between the statuses Online and Away. The availability status you set here affects your status: if you toggle the switch to Away, your status will be changed to Unavailable, and the badge on your avatar will turn yellow to reflect this change.
7.2.8.3. Status message
Beneath the availability switch is a link labeled Set status message. If you click on the link and enter a message in the text field that appears, the message will be displayed with your status in the secondary conversations tab in the inbox and in the user details popup when somebody clicks on your avatar in a conversation.
Once you enter a status message, the link is replaced by one labeled Edit status.
| The status message appears in visitor interfaces like the Individual UI, too. |
7.2.8.4. My settings
The next section of the menu is dedicated to various settings that will only affect the agent logged in.
7.2.8.4.1. Manage profile
The Manage profile link takes you to the General tab of your Agent Desk user profile.
You can change a number of personal settings, including your first and last name and your username. To change your avatar, upload a new picture with the Select Image button.
If you want (or need) to change your password, select the Define password radio button. This will display two additional text fields for you to define and confirm your new password.
Remember to save any changes you make by clicking on the Save button. If you don’t, Unblu will display a dialog asking whether you want to discard the changes.

If you want to save your changes, click on Keep editing to return to the main window, then click on Save.
| You will not be able to edit your profile if it is managed in an external system. |
7.2.8.4.2. Canned responses
Canned responses are predefined text snippets that you can use in chat messages. They help reduce the amount of typing you have to do for frequently used messages.
Canned responses can be defined for entire Unblu accounts, teams, or individual agents.
The Canned responses menu item opens the Canned responses tab of your Agent Desk user profile.
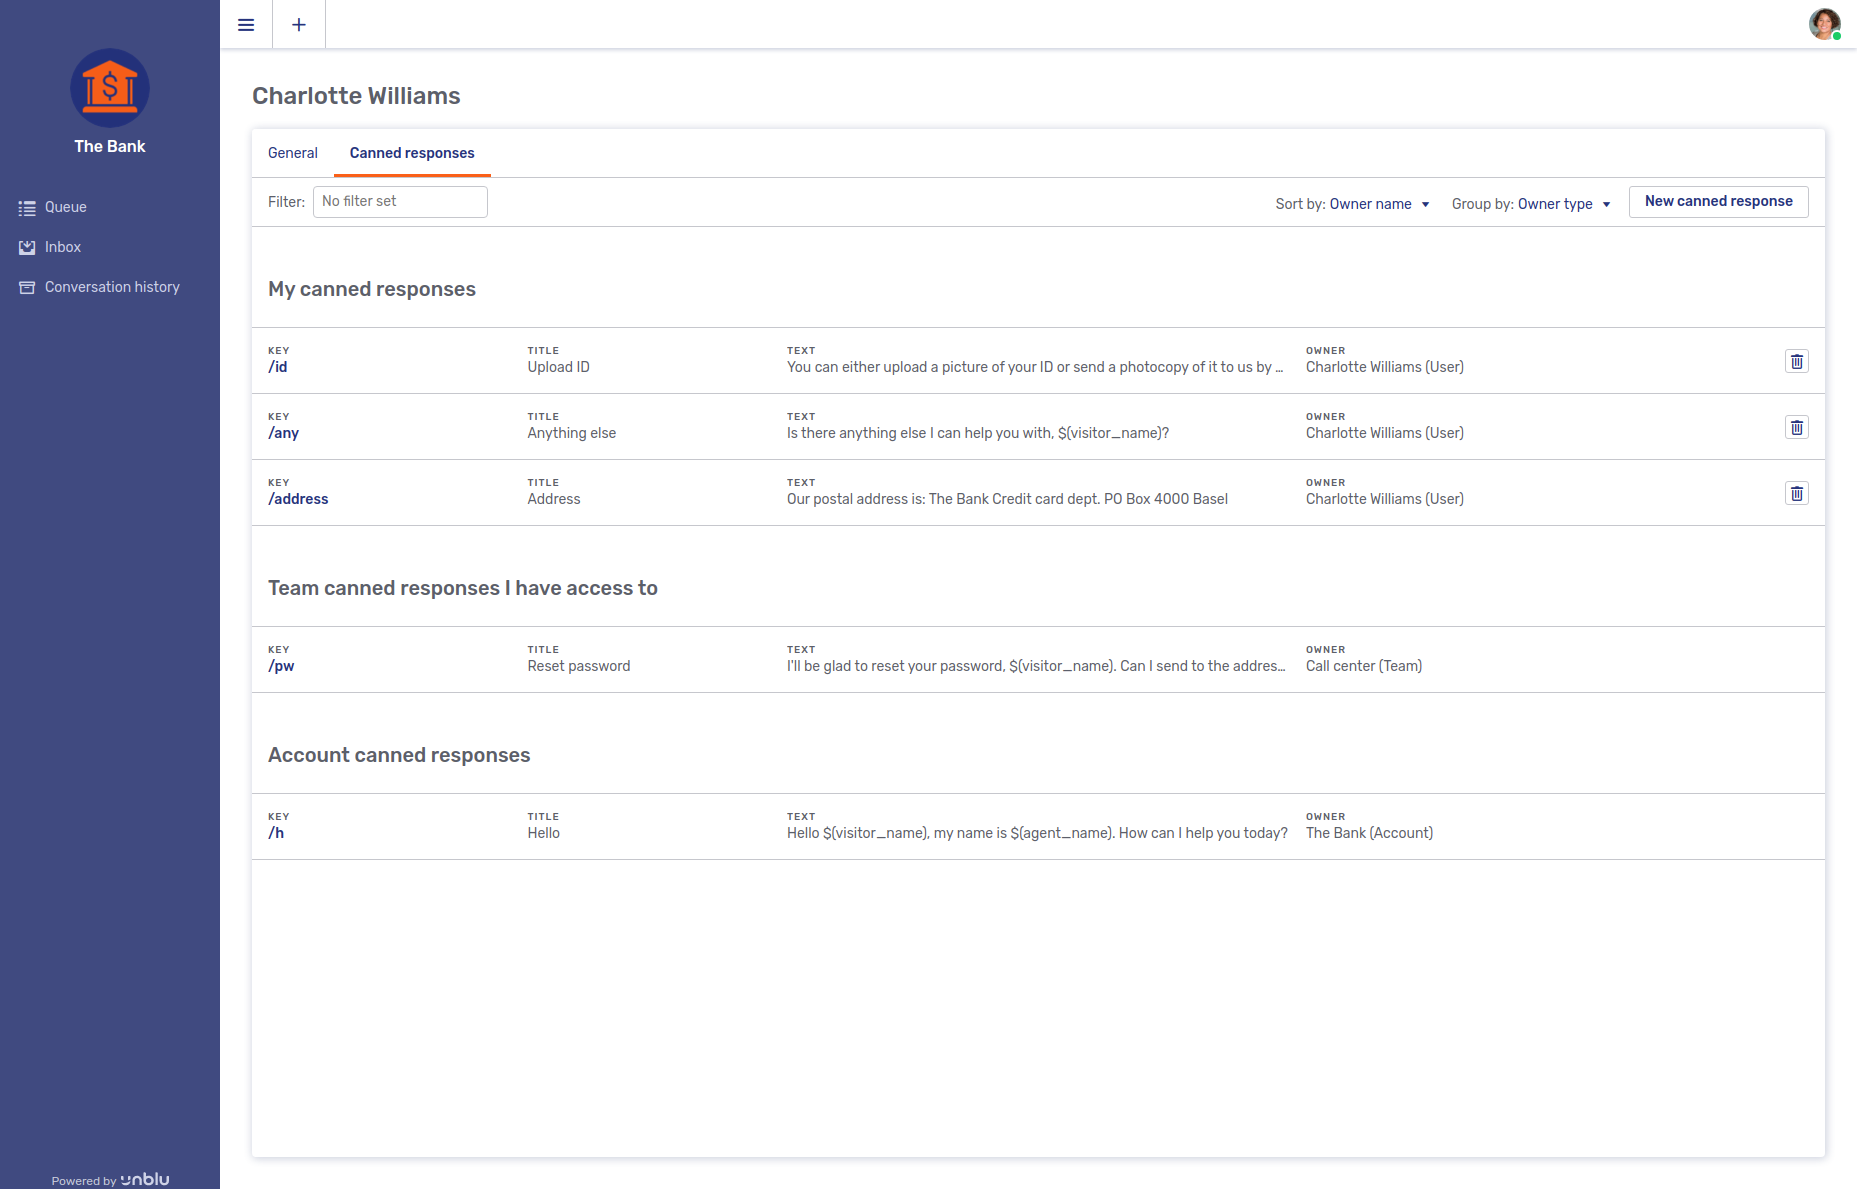
In the picture above, the agent has access to five canned responses:
-
The three canned responses under the heading My canned responses are only available to the agent.
-
The canned response under the heading Team canned responses I have access to are available to anyone who is a member of that team.
-
The canned response under the heading Account canned responses are available to everyone registered user of this Unblu account.
This is what these canned responses look like in the messaging view of a conversation:
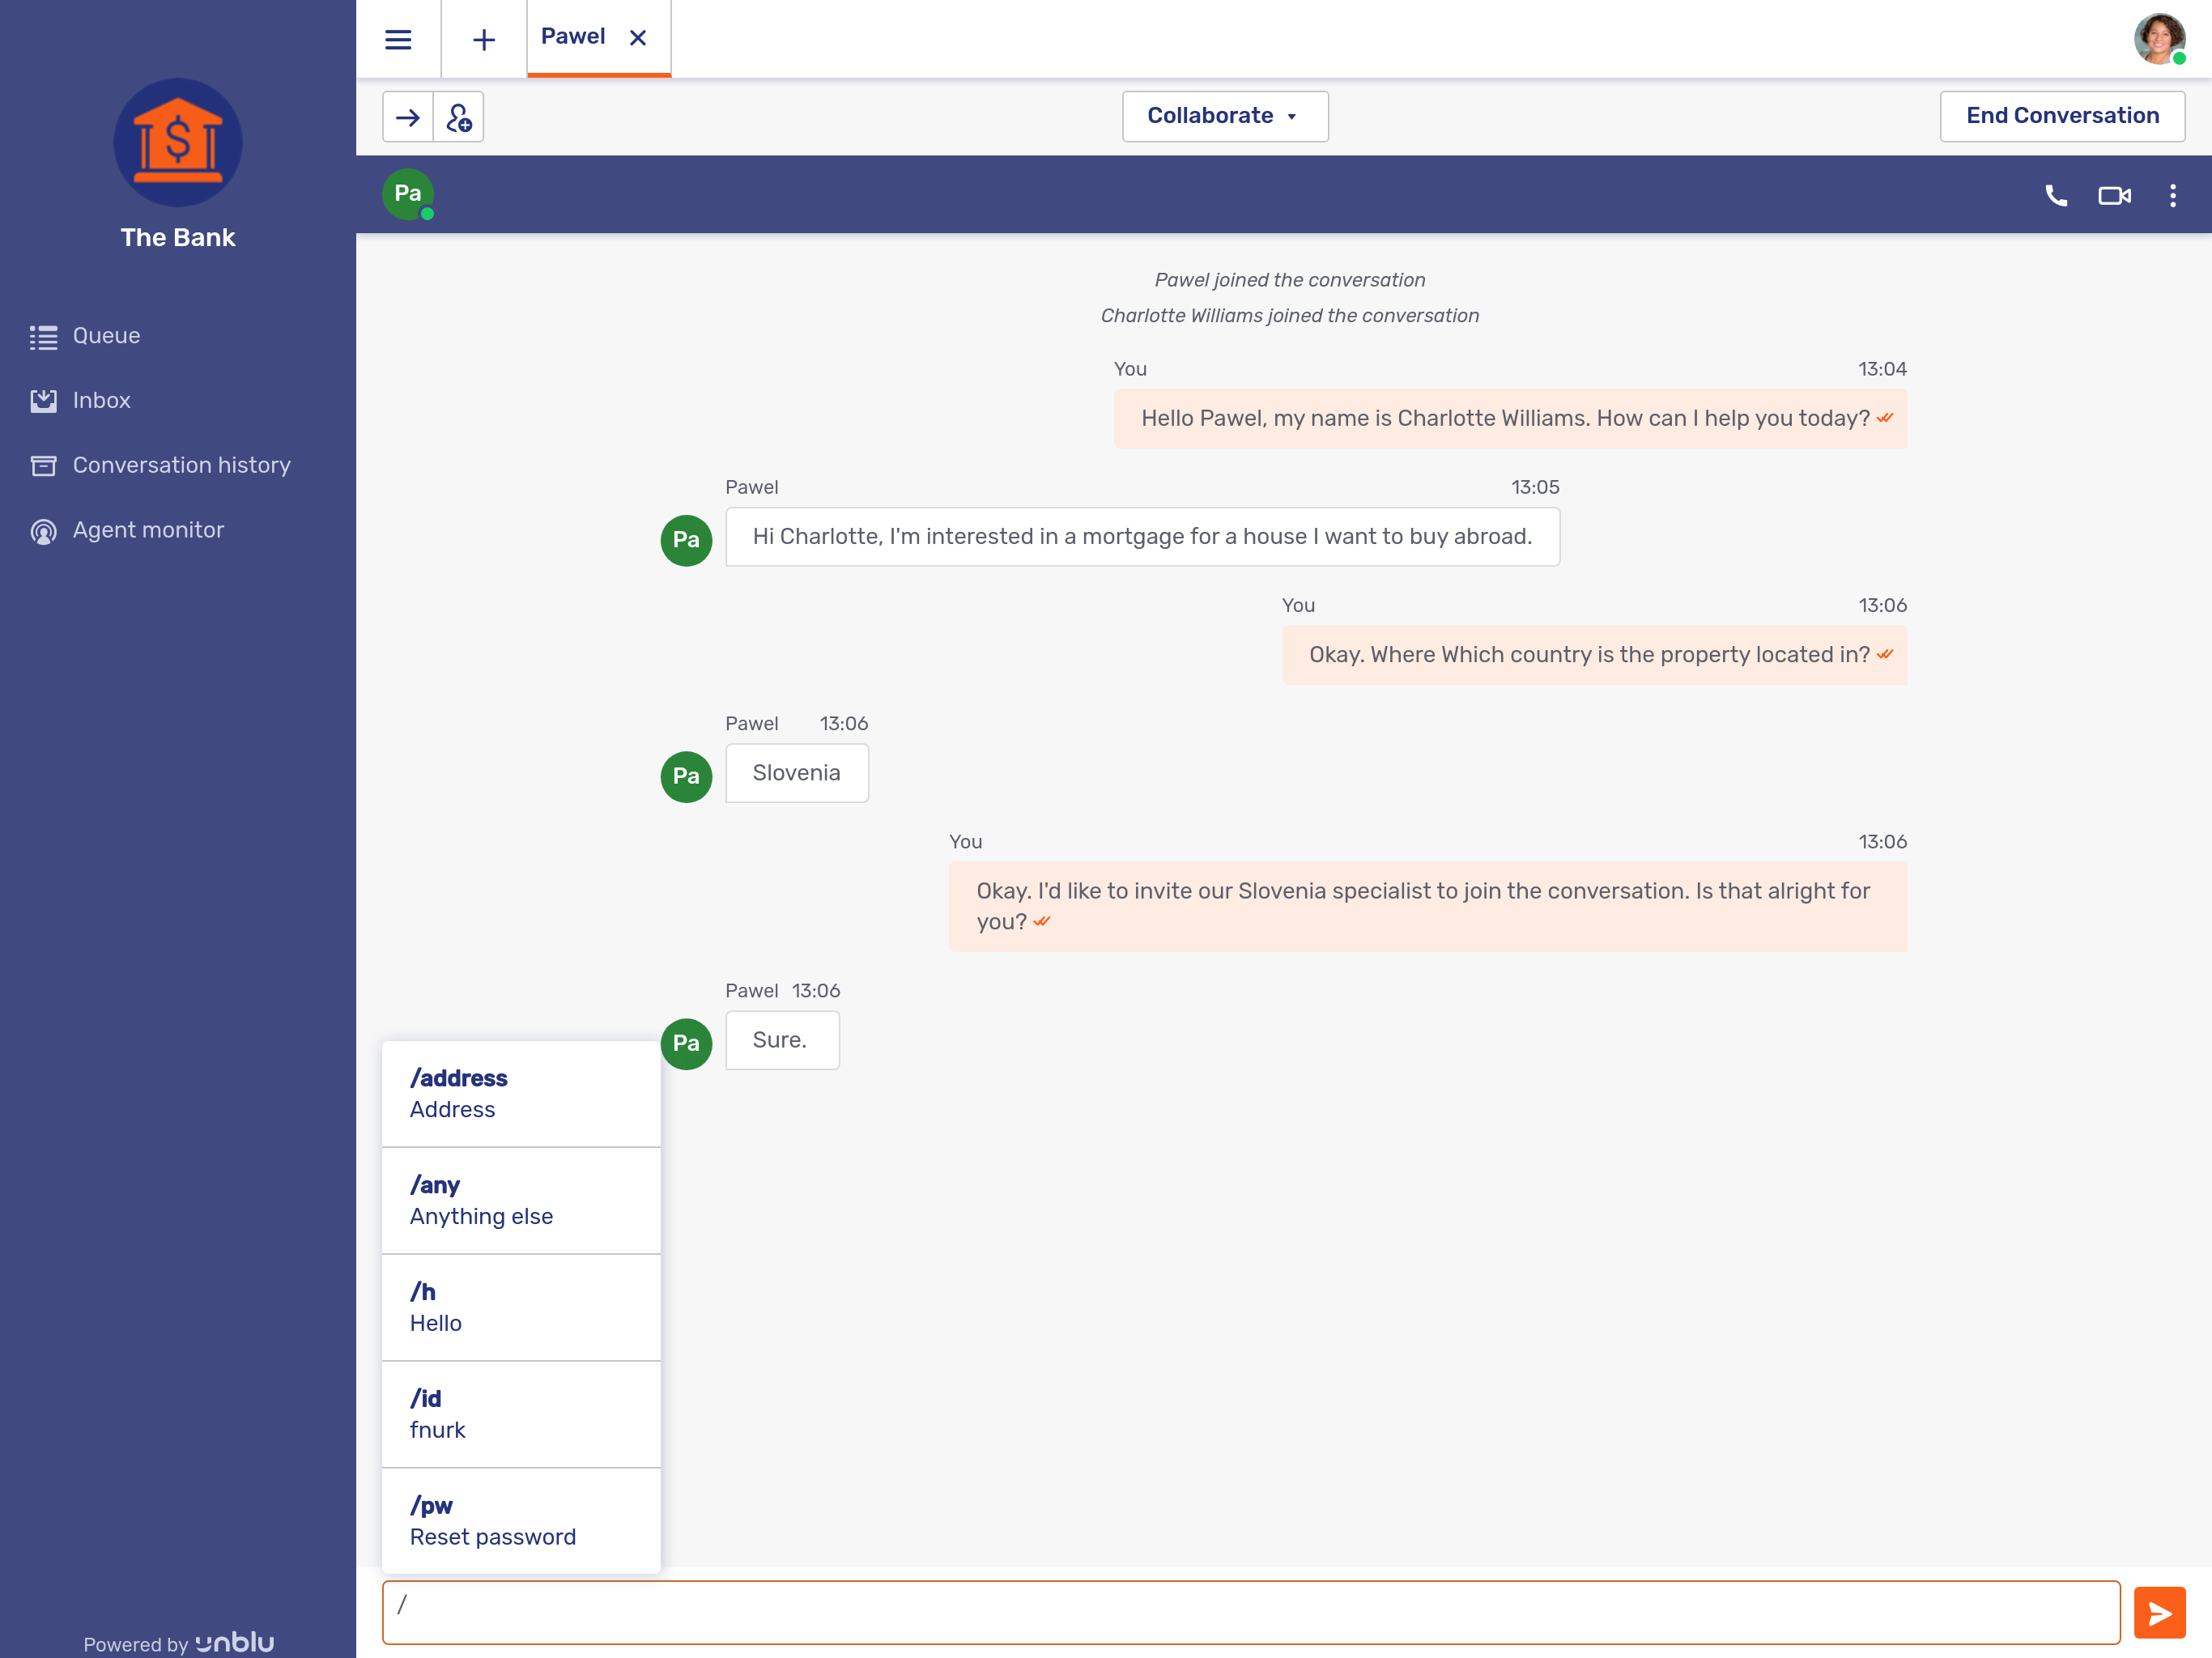
Whenever you enter a slash in the text field, Unblu will display the canned responses available to you. If you continue to type, Unblu will only display the canned responses that match the key you are entering.
You can also use canned responses as part of a more extensive reply.
There are three different ways to influence the overview of canned responses.
- Filter
-
If you enter a term in the filter text field, only canned responses with that term in the key, title, text, or owner field will be shown.
- Sorting
-
By default, canned responses are sorted by owner name. You can choose to sort them by title, text, owner type, or key instead.
If the canned responses are grouped (see below), the sorting is applied separately within each group
- Grouping
-
In the picture above, the canned responses are grouped by owner type: agent, team, or account.
It is also possible to group them by owner. In that case, if you are a member of a team that is a sub-team of another team, the canned responses of your team and its parent team will be grouped separately.
Alternatively, you can choose not to group the canned responses at all.
The New canned response button opens a fly-in page where you can create a new canned response.
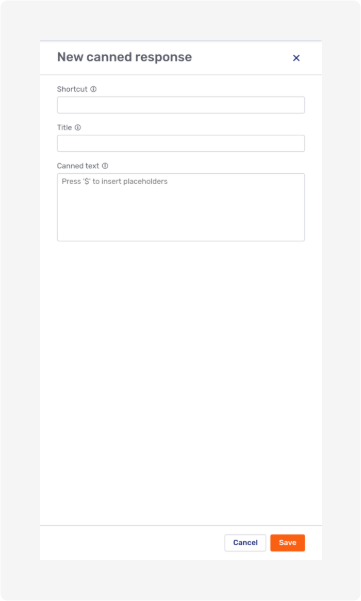
-
The shortcut is what you enter in the text field of conversation, preceded by a slash '/'. When creating a new canned response, enter the key without the slash.
The shortcut may be at most 250 characters long.
-
The title is displayed beneath the key of the canned responses that Unblu suggests when you are in a text conversation. It should be a brief description of the canned response.
The title of a canned response may not be more than 250 characters long.
-
The canned text is the text that is actually inserted in the text field. If Markdown is enabled you can use it in canned texts.
If you enter a Dollar symbol '$' in the canned text, Unblu will display a list of the placeholders available for canned texts. Placeholders allow you to include a visitor’s name or your own name in a canned response without actually having to enter it.
-
Supervisors and Administrators can also specify the scope of the canned response. This allows them to create new canned responses for a team or the Unblu account. (Scope selection is not visible in the picture above.)
| All of the fields in the modal page are mandatory. |
Once you are happy with your new canned response, click on Save to save it. It will appear in the canned response overview immediately.
7.2.8.5. Administration
Supervisors, Administrators and Superadmins have an additional Administration section in the Agent Desk settings menu. All three user roles will find a link labeled Manage account, which opens the Account Configuration Interface.
Superadmins will also have a link labeled Manage global server settings, which opens the Global Server Configuration Interface.
Both interfaces are described in separate sections.
7.3. Account configuration interface guide
The account configuration interface is where administrators, superadmins, and supervisors can configure and administer an Unblu account. (Supervisors can only administer their teams and the agents in their teams.)
Users with the necessary rights to access the account configuration interface have an Administration section in their Agent Desk user menu. The section contains a link labeled Manage account which opens the account configuration interface.
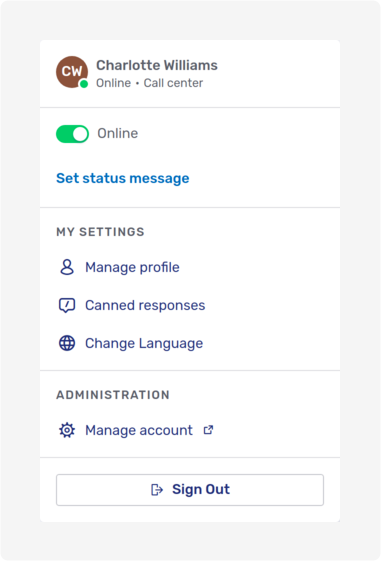
This guide discusses each of the sections of the navigation menu in the account configuration interface. Which sections a user actually sees depends on what they are allowed to change. If you can’t see a certain item, it means you are not authorized to change it.
A number of the sections in the account configuration interface include tabs labeled General, Settings, and Translations, respectively. These tabs have a lot of features in common across the various sections. It therefore makes sense to first discuss what you can do in these tabs, and how to do so.
7.3.1. The configuration tabs: General, Settings, and Translations
This section describes what the tabs mentioned in the title have in common across various sections of the account configuration interface. Any peculiarities limited to a particular section will be described when that section is discussed.
7.3.1.1. The General tab
The General tab contains general information about the entity it pertains to.
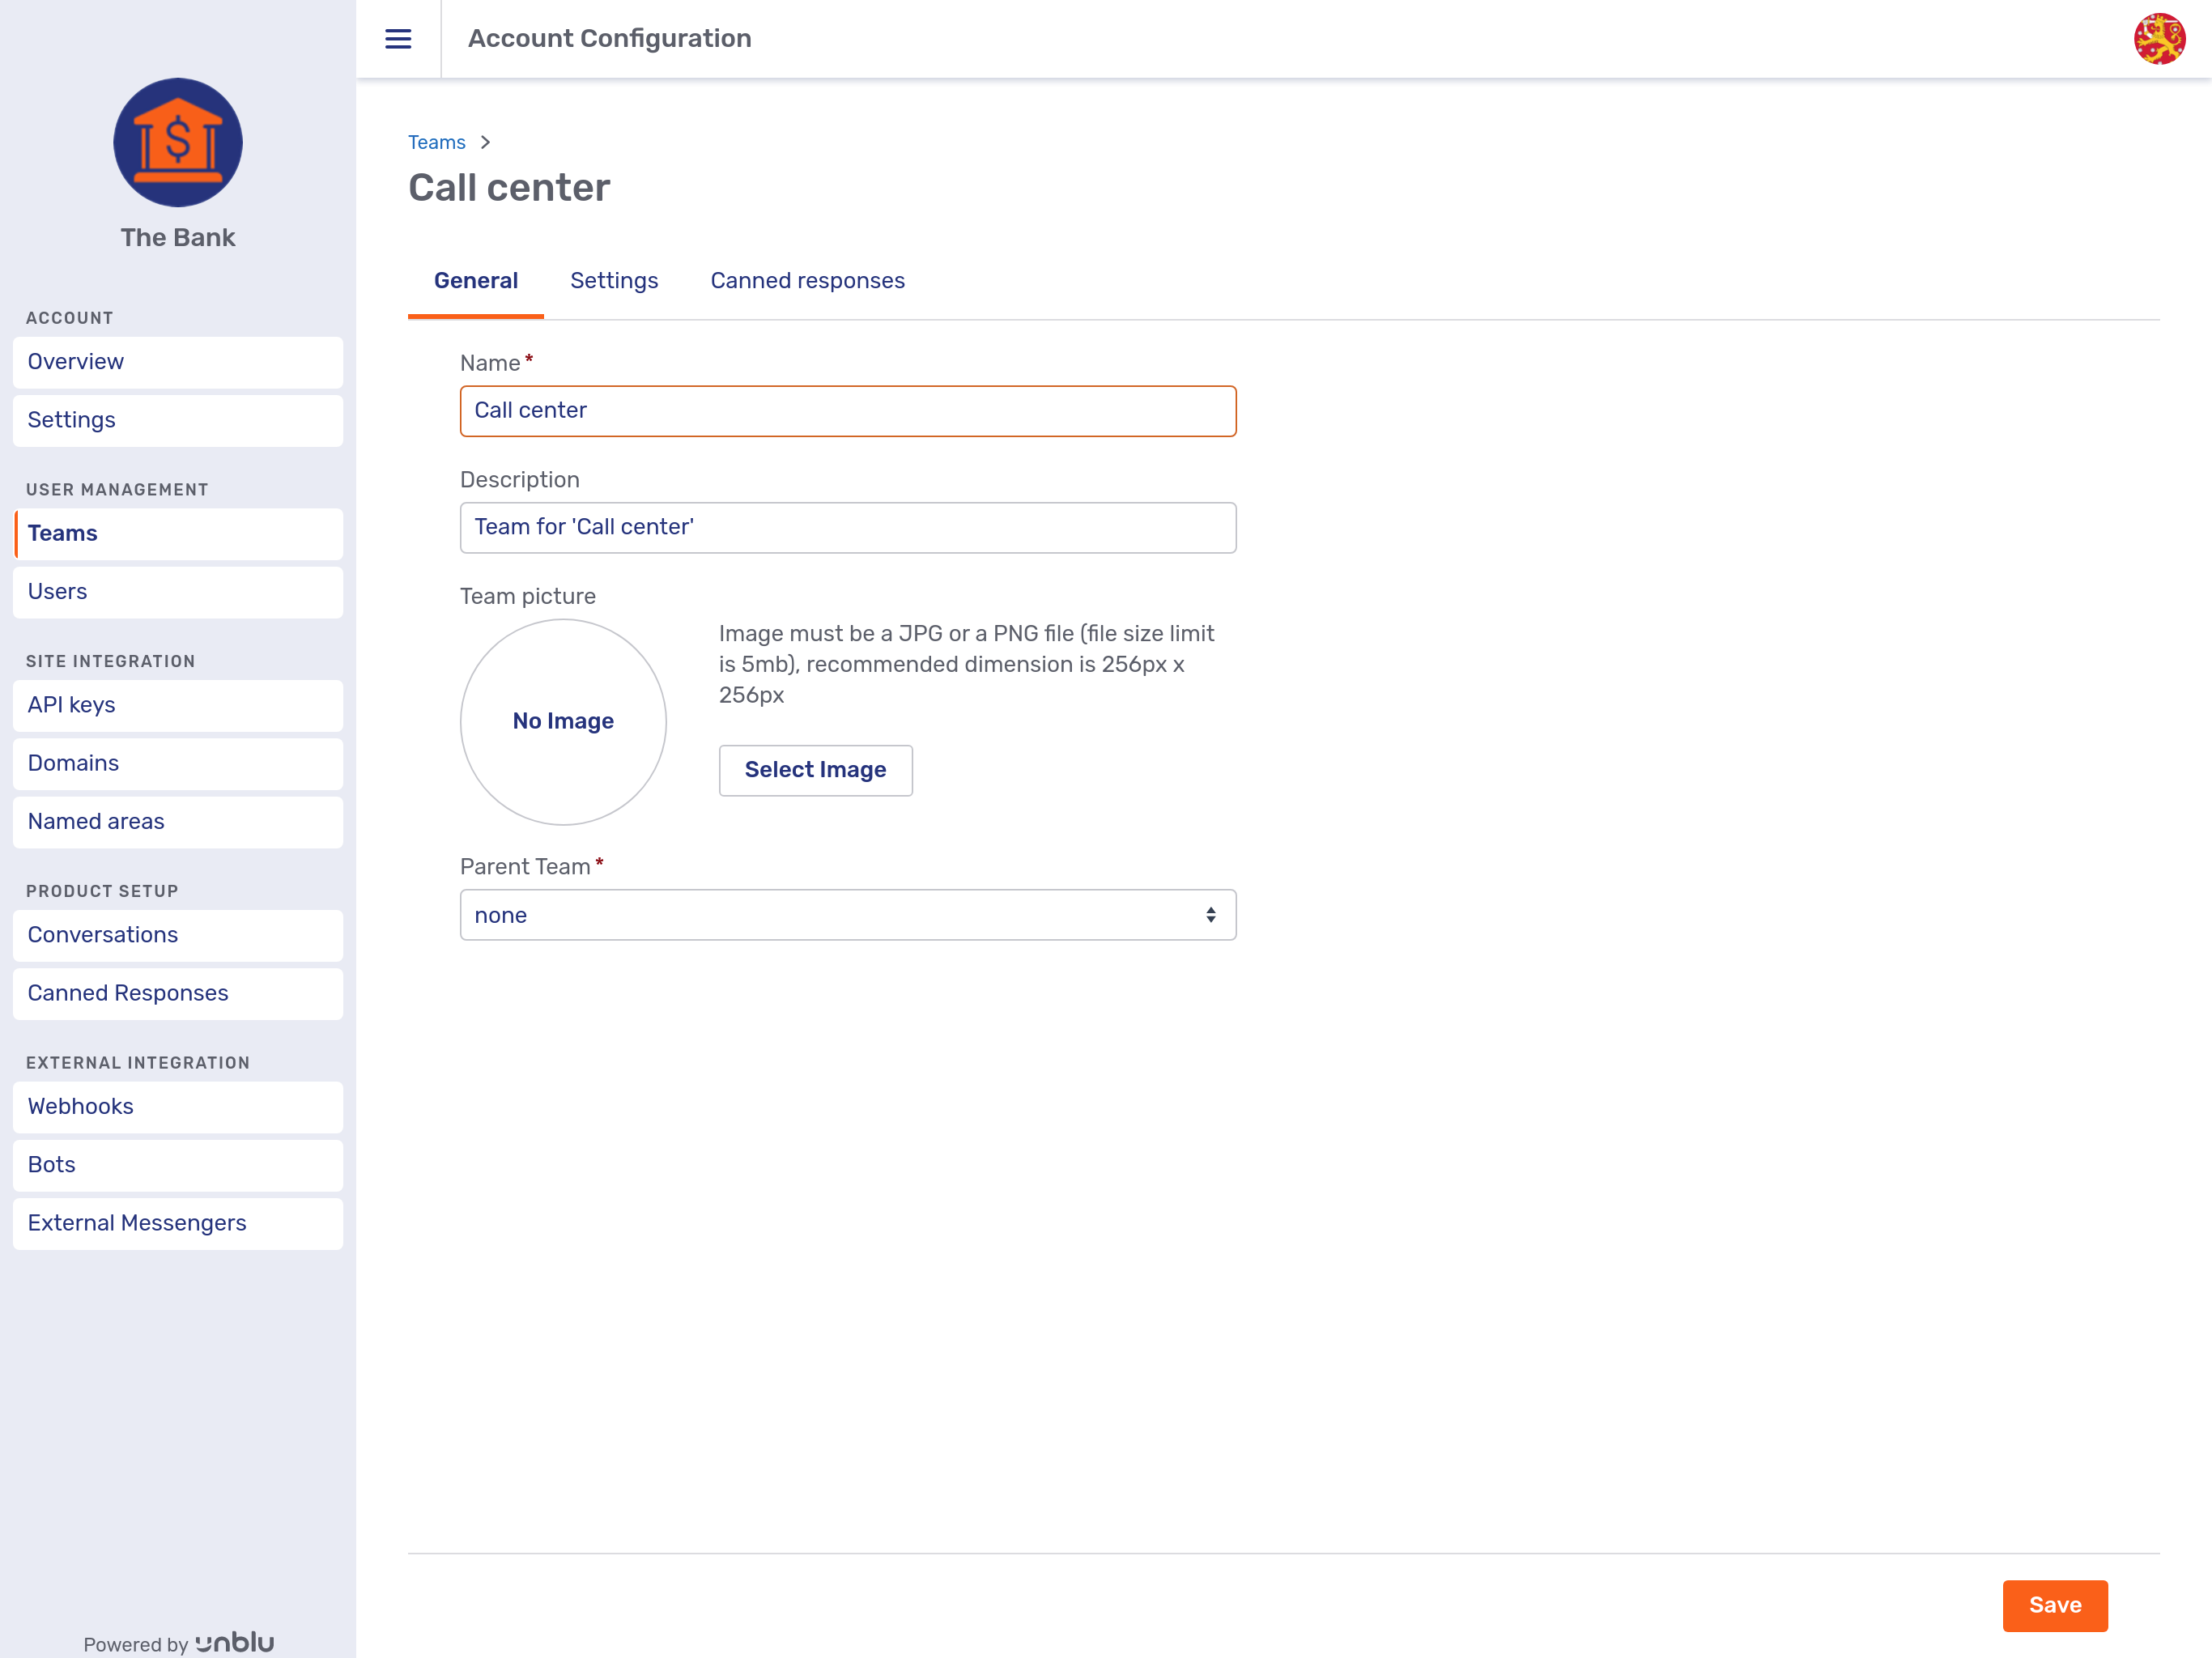
As a rule, you can edit the entity’s name and its description. You can also upload a file to use as the entity’s avatar if it is meant to have one.
The General tab for some entities offers — or requires — additional information. For example, contrast the tab for the Call center team pictured above with the one for the named area Banking below.
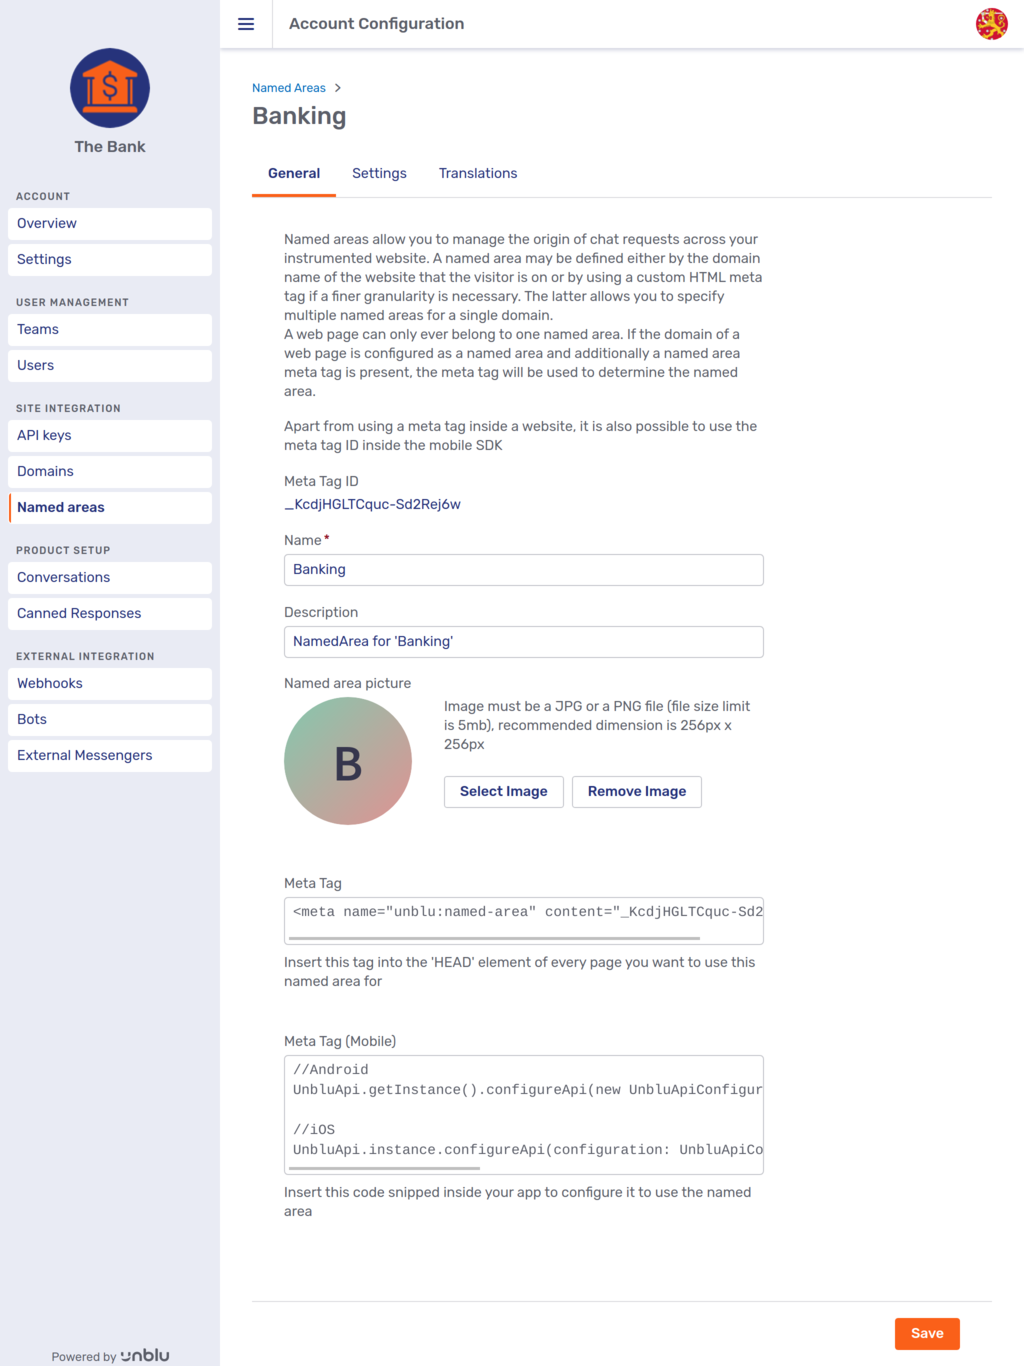
7.3.1.2. The Settings tab
The Settings tab allows you to change configuration properties for the entity it is related to. This is the default view of the Account Settings tab:
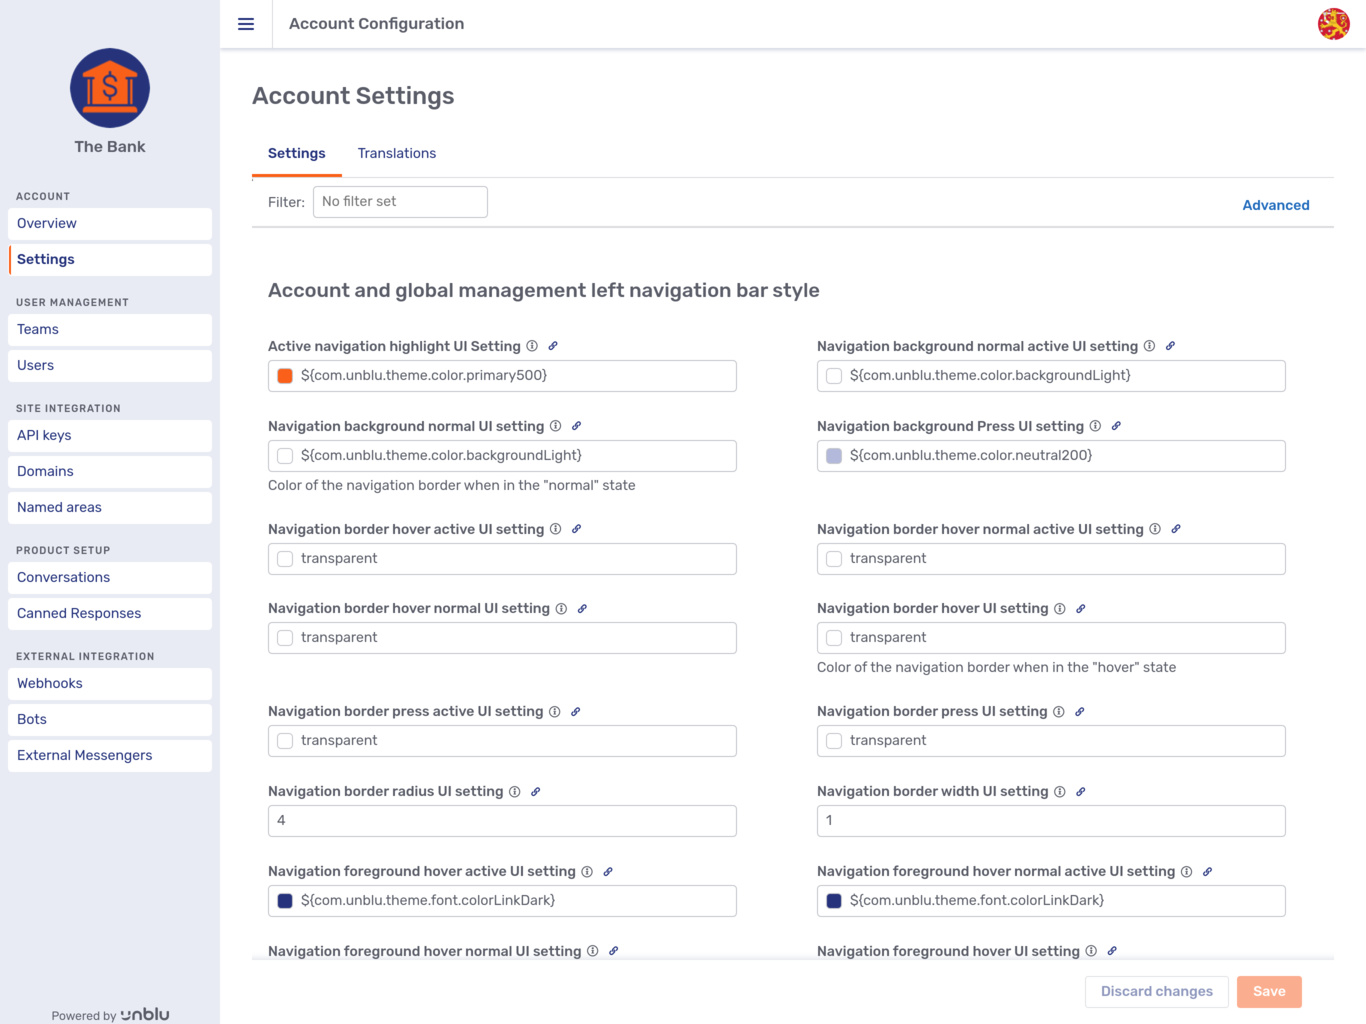
Unlike the General tab, the Settings tab looks the same for all entities, albeit with different settings you can change. The settings you can change here are the configuration properties for which the entity is in scope.
If the value of a setting is defined on a particular entity — as opposed to the entity inheriting the value from an entity higher up the configuration cascade — you will see a Cross button ![]() next to the setting. Furthermore, the field where you specify the setting’s value will be colored.
next to the setting. Furthermore, the field where you specify the setting’s value will be colored.
In the picture below, the settings Enable video archiving and Session Type have been changed for this account, thereby overriding the value for the setting defined globally. Note the blue edge of the checkbox and the green edge on the dropdown. Clicking on the Cross button, deletes the value of the setting defined for the account. The setting will still be visible in the account settings, but it will now merely inherit the value specified at the global level.
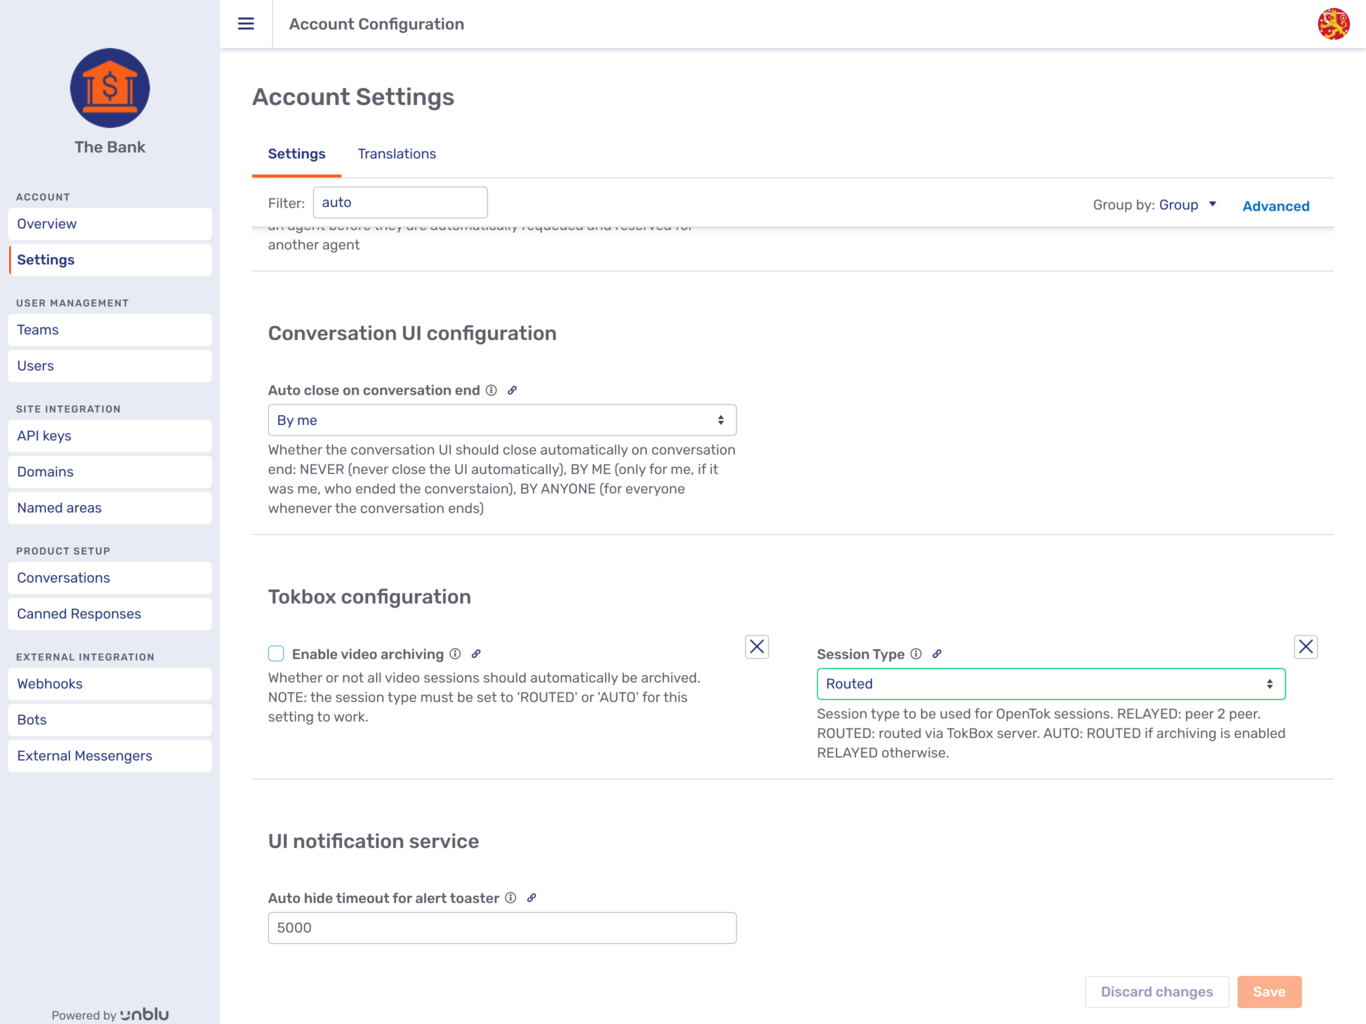
By default, settings are grouped under the same headers as on the configuration properties reference page. The groups are listed in alphabetical order, as are the settings within each group. You can change the grouping with the Group by dropdown to the left of the Advanced button above the list of settings. The Advanced button, in turn, opens an accordion containing two sets of checkboxes and three buttons:
The checkboxes provide additional functionality for the filter. The buttons under the Actions heading are used for bulk operations.
7.3.1.2.1. The Settings filter
The filter above the list of settings allows you to reduce the number of the settings displayed on the page. Simply enter a term to limit the list to groups and settings that use that term in their label or description.
To determine more specifically which settings should be shown, use the checkboxes in the Advanced accordion. The checkboxes under the heading Match against define which fields of a setting the filter should be applied to.
Suppose, for example, that you want to experiment with the configuration property com.unblu.queue.ui.autodispatching.autoDispatchedQueueCategories for automatic request dispatching. Searching for "autoDispatchedQueueCategories" will not return any results with the default filter settings. This is because the term only appears in the property’s key, which the default filter settings don’t taken into consideration. Once you tick the Keys checkbox and search again, it does return a result:

What you enter in the Filter field is treated as a simple string, not as a regular expression or a search expression. If you enter "queue item", say, that is exactly what it will look for; it won’t find "queue of the item".
The options available for filter matching are:
- Declaration
-
The Declaration checkbox is mainly for internal use. It matches the filter against the name of the Java class that a setting is defined in.
- Description
-
This will include settings in the results whose description includes the filter term. Each setting’s description is displayed beneath the setting itself in the Settings tab.
- Group
-
The Group option matches the filter against the header that settings are grouped under. This is useful when the setting labels differ from the term you might expect.
For example, the setting "Agent automatically unavailable" countdown is under the heading Agent auto-unavailability service. If you filtered by the term "availability", you would not find the setting — unless you ticked the Group checkbox.
- Key
-
This is the name of the configuration property that corresponds with the setting.
- Label
-
The label is a more human-friendly name for a setting. In the configuration properties reference page, the label is used as the heading beneath which a configuration property is listed.
- Value
-
Tick this checkbox to match the filter to settings' values.
The checkboxes under the Options heading provide additional ways to influence the settings tab:
- Show inherited
-
With this option ticked, settings inherited by the current scope as part of the configuration cascade will also appear in the settings tab. For example, if you are in a user’s settings tab and Show inherited is ticked, then all settings that apply to that user. The setting may have been set on the user’s team, or it may be the default value specified at, say, the
GLOBALlevel.Compare the two pictures below. In both cass, the filter has been set to agent availability. In the first picture, Show inherited is ticked, and you see four settings, three of which are inherited from the
GLOBALscope.Account settings with Show inherited ticked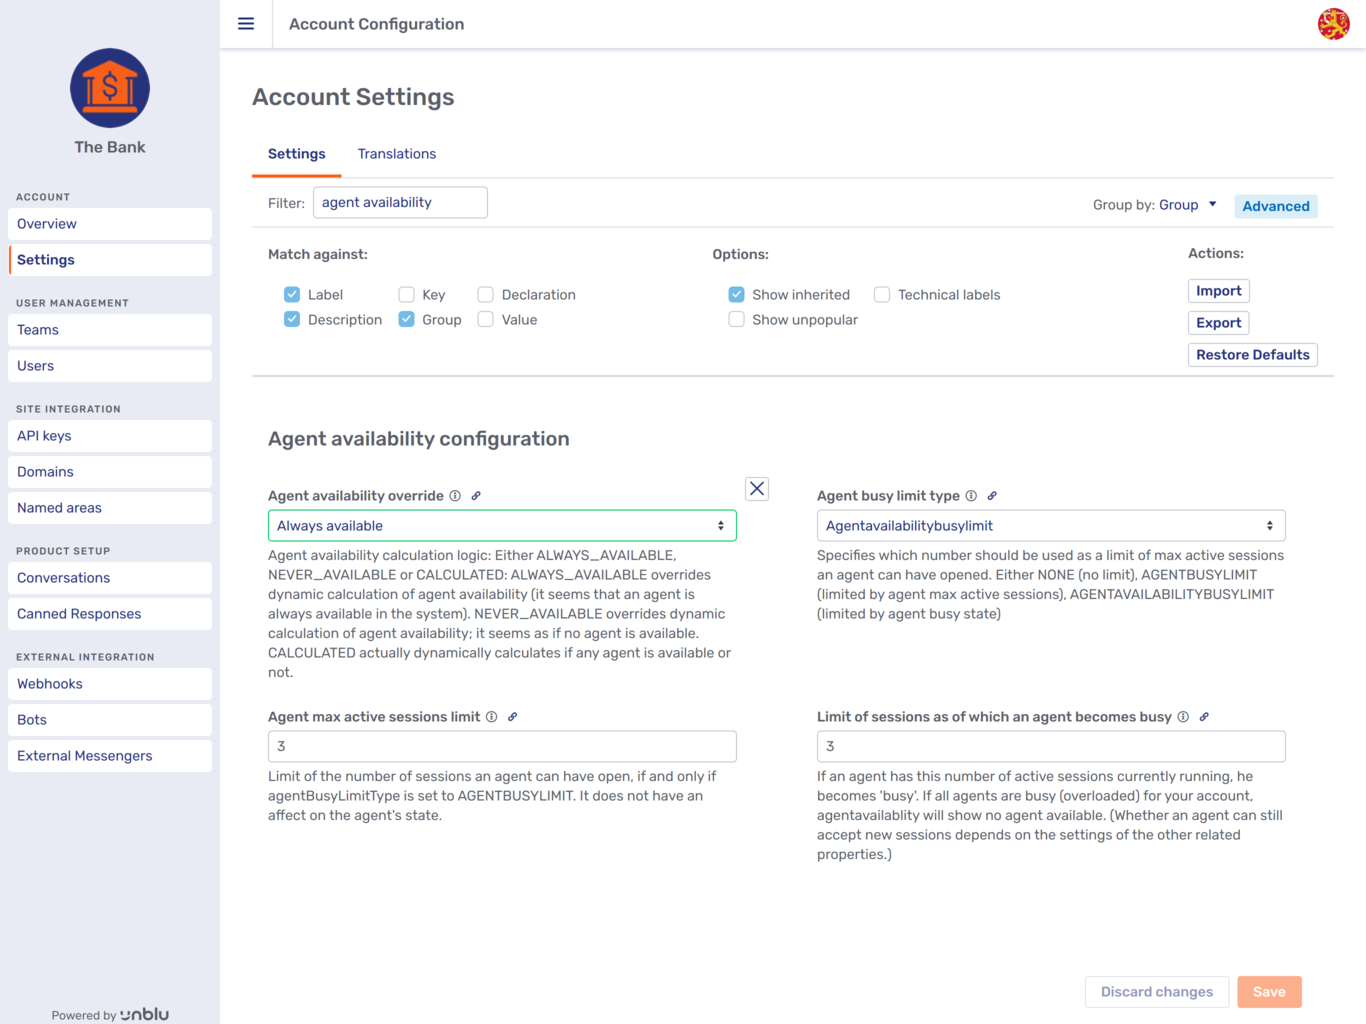
In the second picture, Show inherited is unticked, so you see only the setting defined on the account itself:
Account settings with Show inherited unticked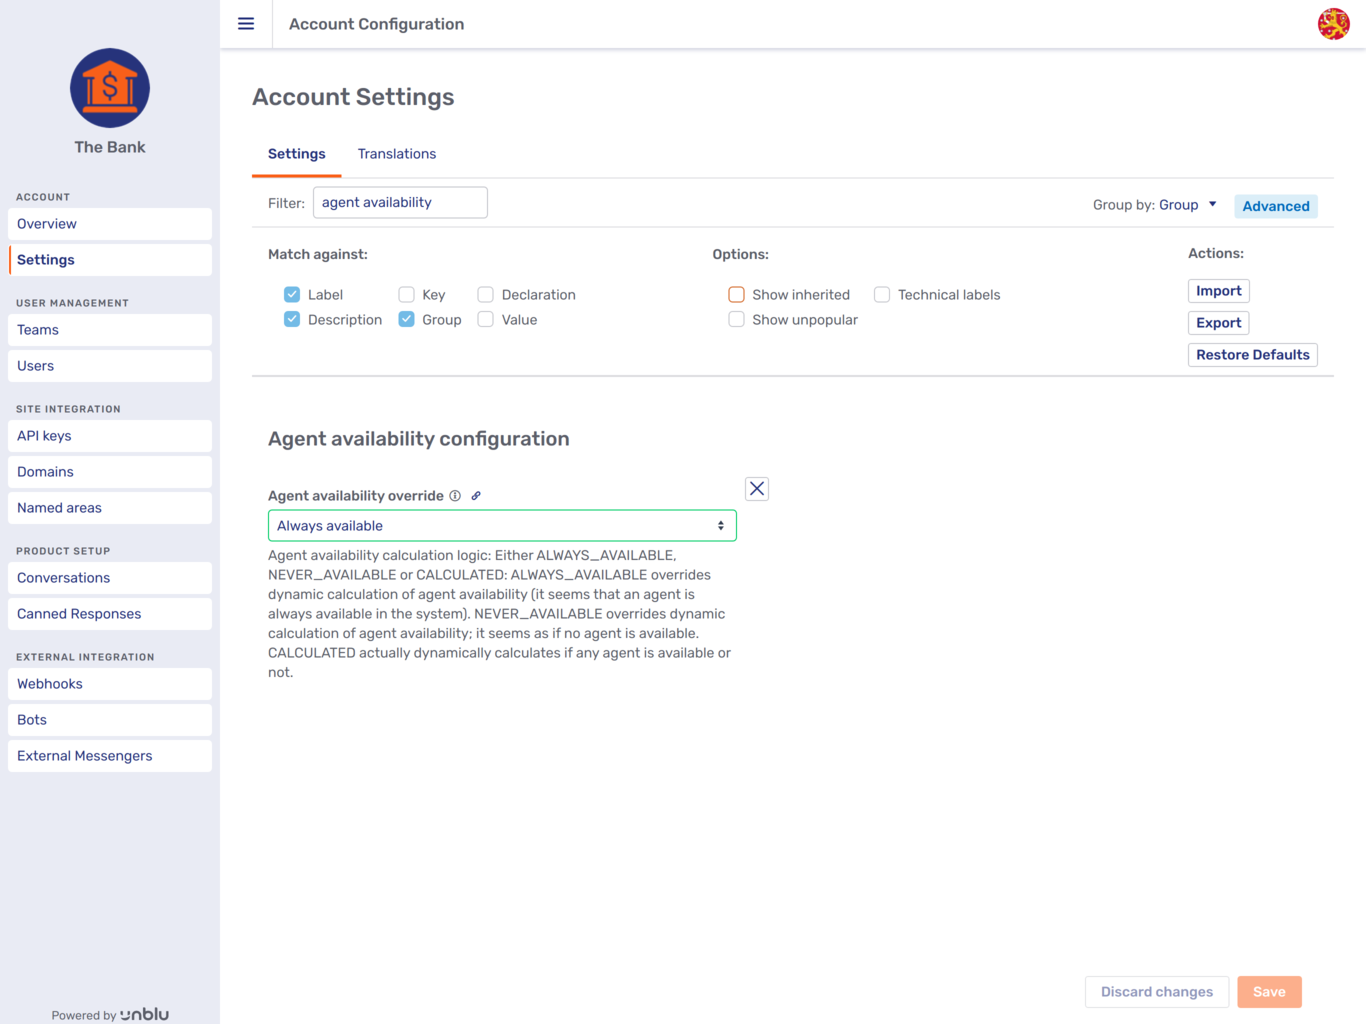
- Show unpopular
-
Tick this box to display settings with a visibility level other than popular.
- Technical labels
-
If you tick this box, the name of the configuration property will be displayed rather than the setting’s label. The
com.unbluat the beginning of every configuration property is omitted from the technical label.
By default, the following checkboxes are ticked:
-
Description
-
Group
-
Label
-
Show inherited
If you aren’t sure what the setting you are looking for is called, we recommend starting off with all of the checkboxes ticked and then narrowing down the number of settings displayed by unticking one box after the next.
7.3.1.2.2. Bulk operations
The Advanced accordion also contains three buttons for bulk operations:
-
The Import button allows you to change settings in bulk by uploading a JSON file containing the relevant configuration properties. Here is an example file:
Listing 55. JSON file containing configuration properties for an account{ "version": 1, "scope": "ACCOUNT", "type": "CONFIGURATION", "data": { "properties": { "com.unblu.cobrowsing.startwithuniversalcobrowsingoptionenabled": "false", "com.unblu.hbworker.googleviewersupportedmimetypes": "[\"application/msword\",\"application/vnd.ms-excel\",\"application/vnd.ms-powerpoint\",\"application/vnd.openxmlformats-officedocument.presentationml.presentation\",\"application/vnd.openxmlformats-officedocument.spreadsheetml.sheet\",\"application/vnd.openxmlformats-officedocument.wordprocessingml.document\",\"text/plain\"]", "com.unblu.core.push_notification.enablepushnotification": "true", "com.unblu.session.inboundconversationreservationtimeout": "100000", "com.unblu.cobrowsing.startwithmobilecobrowsingoptionenabled": "true", "com.unblu.core.server.livetracking.agent.availabilityoverride": "NEVER_AVAILABLE", "com.unblu.chat.videochat.apisecret": "d401724a7c1t5a53cr379cb6f71ab188573f5346", "com.unblu.chat.videochat.enablearchiving": "false", "com.unblu.agent.mobile.ui.showinboxactionbar": "false", "com.unblu.chat.videochat.apikey": "NQFg_1t5a53cr37PIqWlUA", "com.unblu.cobrowsing.startwithscreensharingoptionenabled": "true", "com.unblu.mobile.push_notification.firebasedatabasename": "unblu Companion", "com.unblu.visitor.ui.showoverviewactionbarminmaxaction": "true", "com.unblu.conversation.messaging.ui.chatmessageasmarkdownenabled": "true", "com.unblu.visitor.ui.alwaysdisplayrecipientinconversationoverview": "true", "com.unblu.chat.videochat.sessiontype": "ROUTED", "com.unblu.hbworker.localsitesallowed": "false", "com.unblu.queue.ui.autodispatching.autorequestdispatchingenabled": "true", "com.unblu.queue.ui.enablefilterchanges": "true" } } } -
The Export button generates a JSON file of the settings defined in the scope you are currently viewing. The file will not contain settings inherited from entities further up the configuration cascade.
-
The Restore Defaults button restores the default settings for the entity whose settings you are currently viewing. Any changes you made to the entity’s settings will be deleted.
7.3.1.3. The Translations tab
The Translations tab contains the text properties relevant to the entity you are viewing.
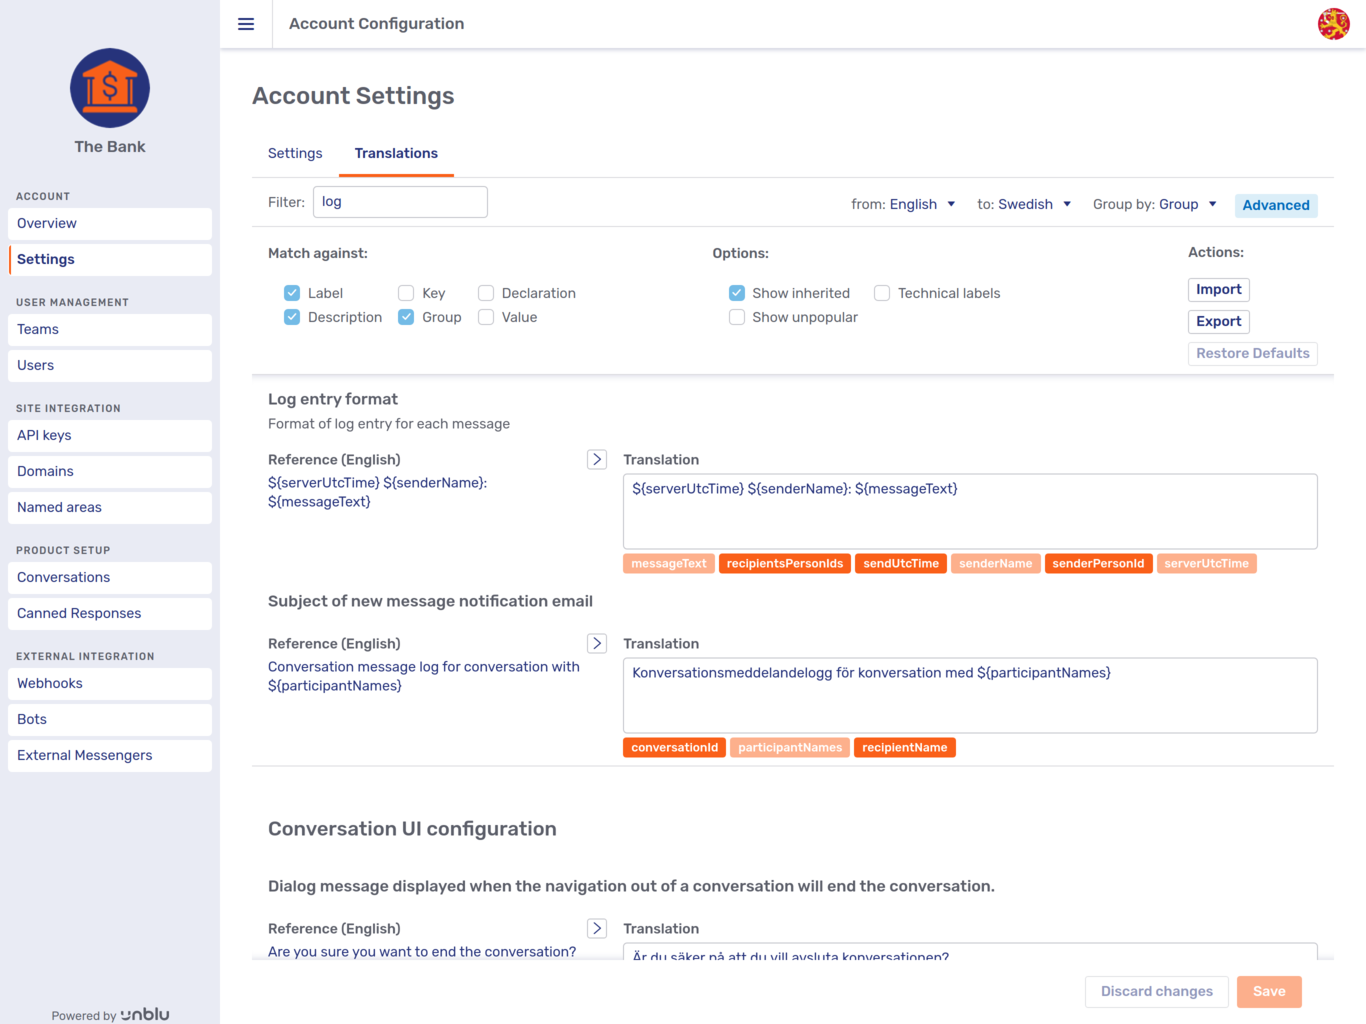
In the picture above, the Advanced accordion is open. It contains the same checkboxes and buttons as on the Settings tab, and the various elements have the same effect. Note also that the Restore Defaults button is not active. This is because the current translations are equivalent to the defaults.
Next to the Group by dropdown there are two further dropdowns to set the language being translated from and to, respectively. The text you are translating from is referred to as the reference language in the list. Texts in the reference language are displayed on the left of the result list.
The language you select from the to dropdown is the target language of your translation, displayed on the right of the result list. We supply a number of pre-translated versions but you can supply your own translations by writing them in the Translation box and saving.
The Fallback Text entry in the language selection dropdowns refers to the text Unblu will use if there is no translation of a text available in the language required. It is always the English text.
7.3.1.3.1. The list of text properties
Like settings, texts are grouped under the same headers as they are on the text properties reference page, with groups listed in alphabetical order. Text properties within groups are also listed alphabetically.
Below some Translation text fields, there are terms in orange boxes. These terms are variables that you can use in this particular text. In the screenshot above, the text for Subject of new message notification email provides three variables, conversationId, participantNames, and recipientName. participantNames has already been used in the translation, so its color is paler than that of the other two variables.
To use a variable in a text simply click on it. This will add the variable to the translation, surrounded by curly brackets and preceded by a dollar sign, e.g. ${participantNames}. (You can, of course, type the variable reference in the text field yourself.)
The Arrow button ![]() copies a reference text to the corresponding Translation text field.
copies a reference text to the corresponding Translation text field.
7.3.1.3.2. Text bulk operations
Bulk operations work the same as on the Settings tab.
Here is an example of a JSON file containing text properties as generated by the Export button. Note that the name of the text property has the locale it is to be used in at the end, .en in this case:
{
    "version": 1,
    "scope": "ACCOUNT",
    "type": "TEXT",
    "data": {
        "supportedLocales": [
            "cs",
            "de",
            "en",
            "es",
            "fr",
            "it",
            "pl",
            "pt",
            "ro",
            "ru",
            "sk",
            "sl",
            "sr",
            "sv",
            "zh-Hans",
            "zh-Hant"
        ],
        "properties": {
            "com.unblu.conversation.messagelog.mail.logentryformat.en": "At ${serverUtcTime}, ${senderName} wrote: ${messageText}"
        }
    }
}
7.3.2. Account
The Account section provides information on and access to settings that affect the entire account.
7.3.2.1. Overview
The Overview page displays basic information about the account you are viewing, including information about the licenses for the account:
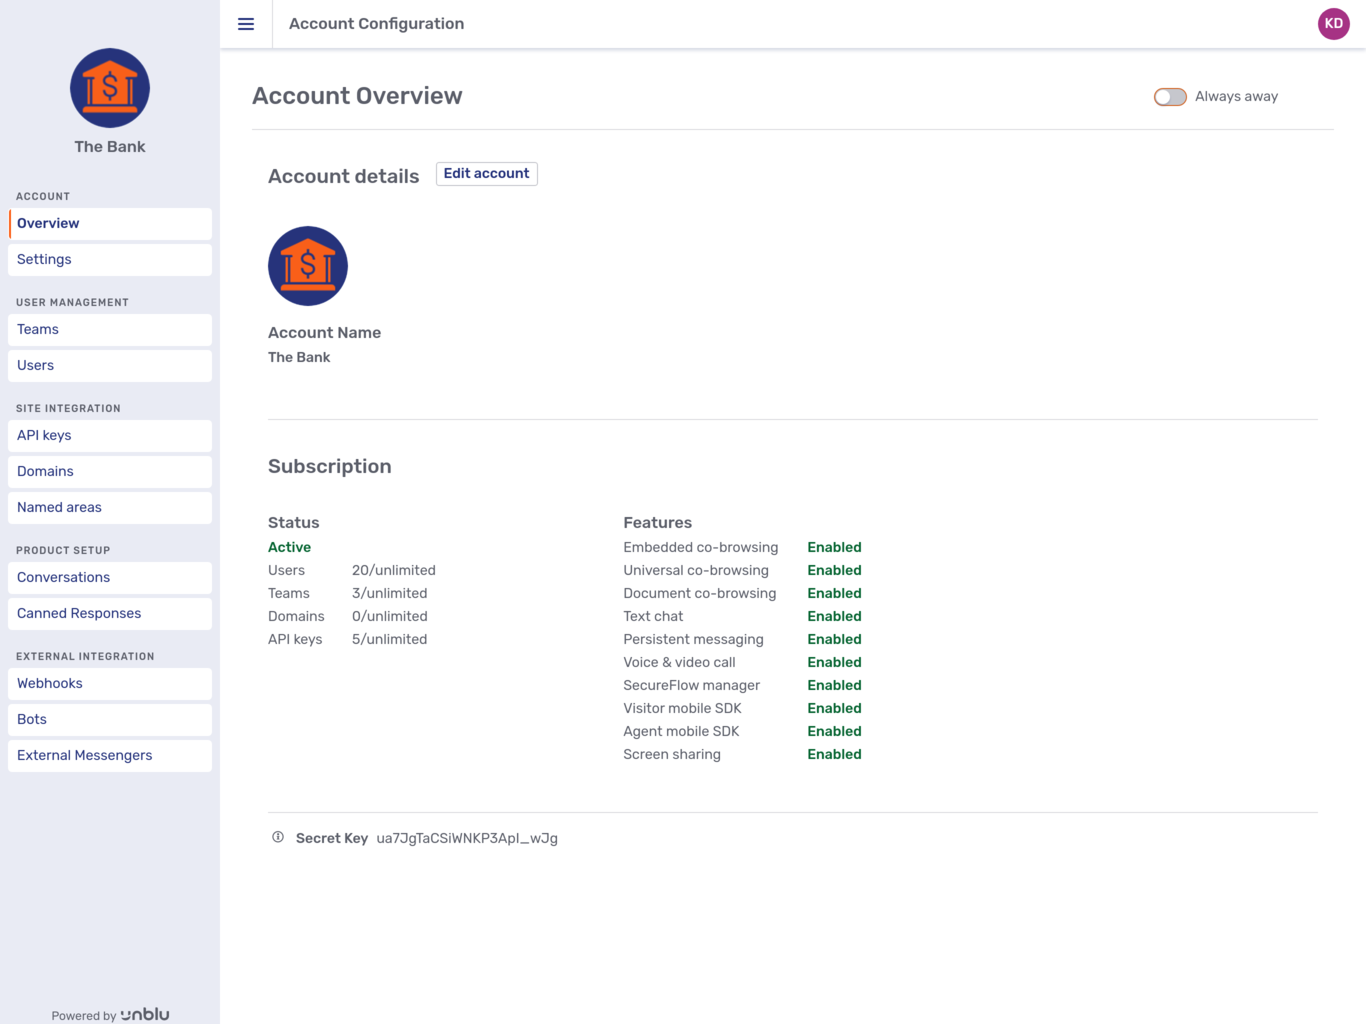
Clicking on the Edit account button in the account overview opens the Edit account modal page.
If you tick the Define a contact address box, a form appears where you can enter the contact address. If you want to add a different billing address, tick the Use a separate billing address box to display additional form fields for this purpose.
The Type dropdown in the Contact information section allows you to add a phone number, email address, or website URL for the account. You can add more than one type of contact information.
7.3.2.2. Settings
The Settings entry in the navigation menu provides access to the account’s Settings and Translations tabs. Changes you make here will be inherited by entities below the account in the configuration cascade.
Both tabs work as outlined above.
7.3.3. User management
The User management section of the navigation menu gives you access to the account’s teams and users.
7.3.3.1. Teams
The Teams item in the navigation menu displays an overview of all an account’s teams and subteams. In the picture below, both Business Support and Private Support are subteams of Call Center.
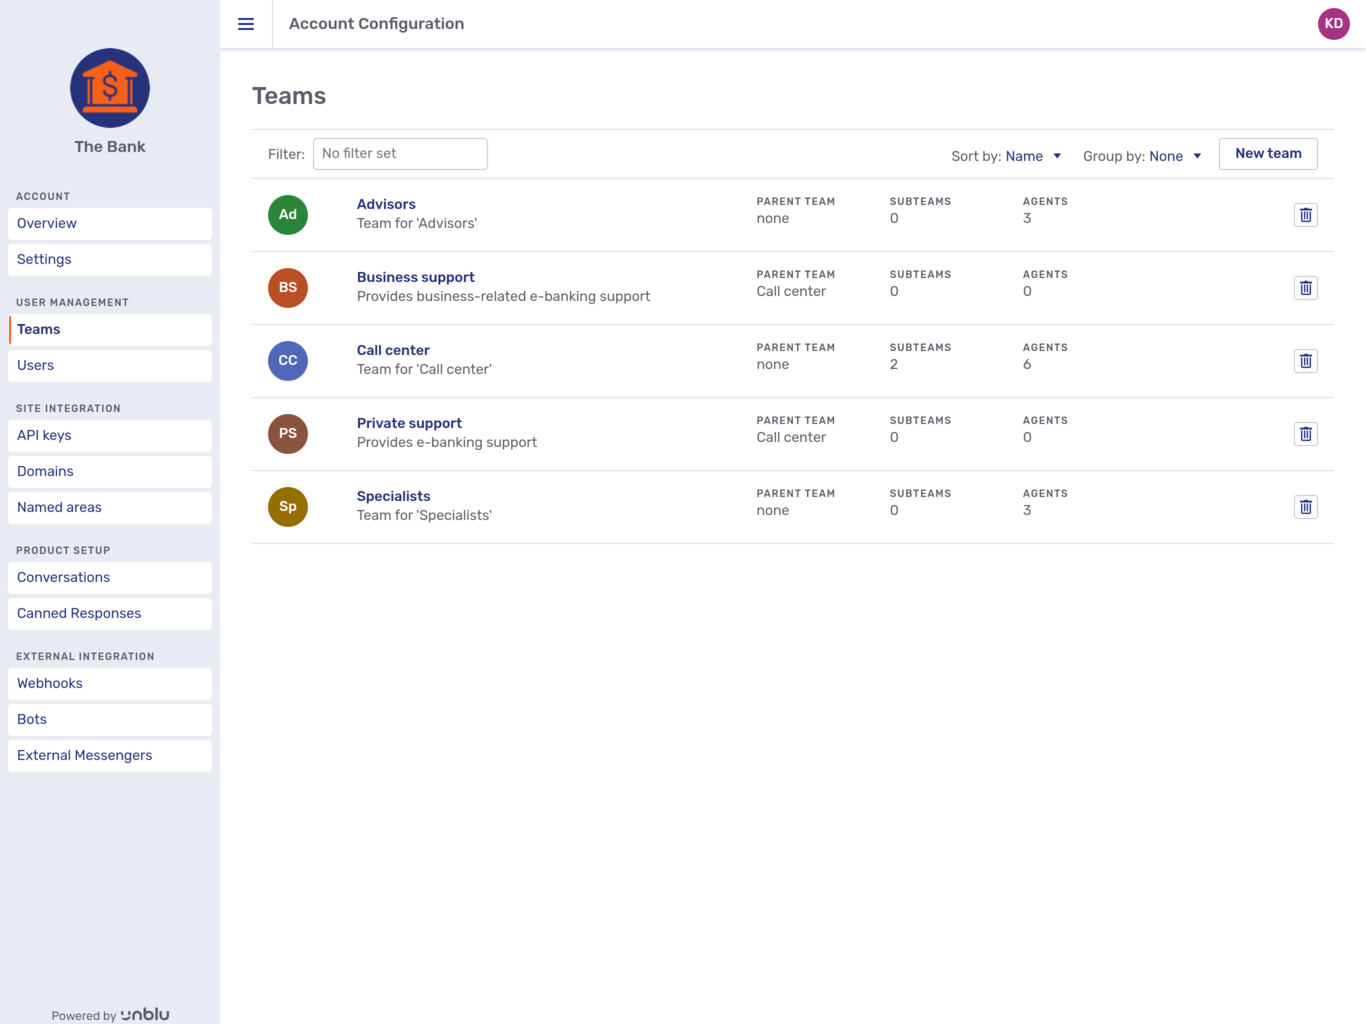
Each entry in the list consists of
-
the team’s name,
-
its description,
-
the name of its parent team if it has one,
-
the number of subteams it has, and
-
the number of agents in the team. Only those agents assigned directly to the team the entry refers to are counted.
There is a delete button ![]() for each entry. When you press it, a modal dialog asks whether you really want to delete the team.
for each entry. When you press it, a modal dialog asks whether you really want to delete the team.
Above the list, there are two dropdown menus that affect the sort order and the grouping of the teams in the overview, respectively.
The New team button opens the New team modal page, which contains the same fields as the General tab described below.
7.3.3.1.1. General
Selecting a team in the overview opens the team’s General tab.
The tab allows you to change the team’s name and description, and to upload an image to use as the team’s avatar. You can also select a different team to be this team’s parent team. If you do so, the team becomes a subteam of that team.
At the top of the tab, you can see whether the team is managed internally, i.e. within Unblu, or externally. If you are in override mode, you will also have a toggle to switch between internal and external management.
7.3.3.1.2. Settings
The Settings tab allows you to specify settings for the team you are viewing. It works as outlined above.
7.3.3.1.3. Canned responses
Canned responses you create on a team’s Canned responses tab are available only to that team’s members. They are not available to members of the team’s subteams.
Please refer to the Canned responses section of the Agent Desk user guide for information on how to create canned responses.
7.3.3.2. Users
The Users menu item opens an overview of all of the users registered with an account:
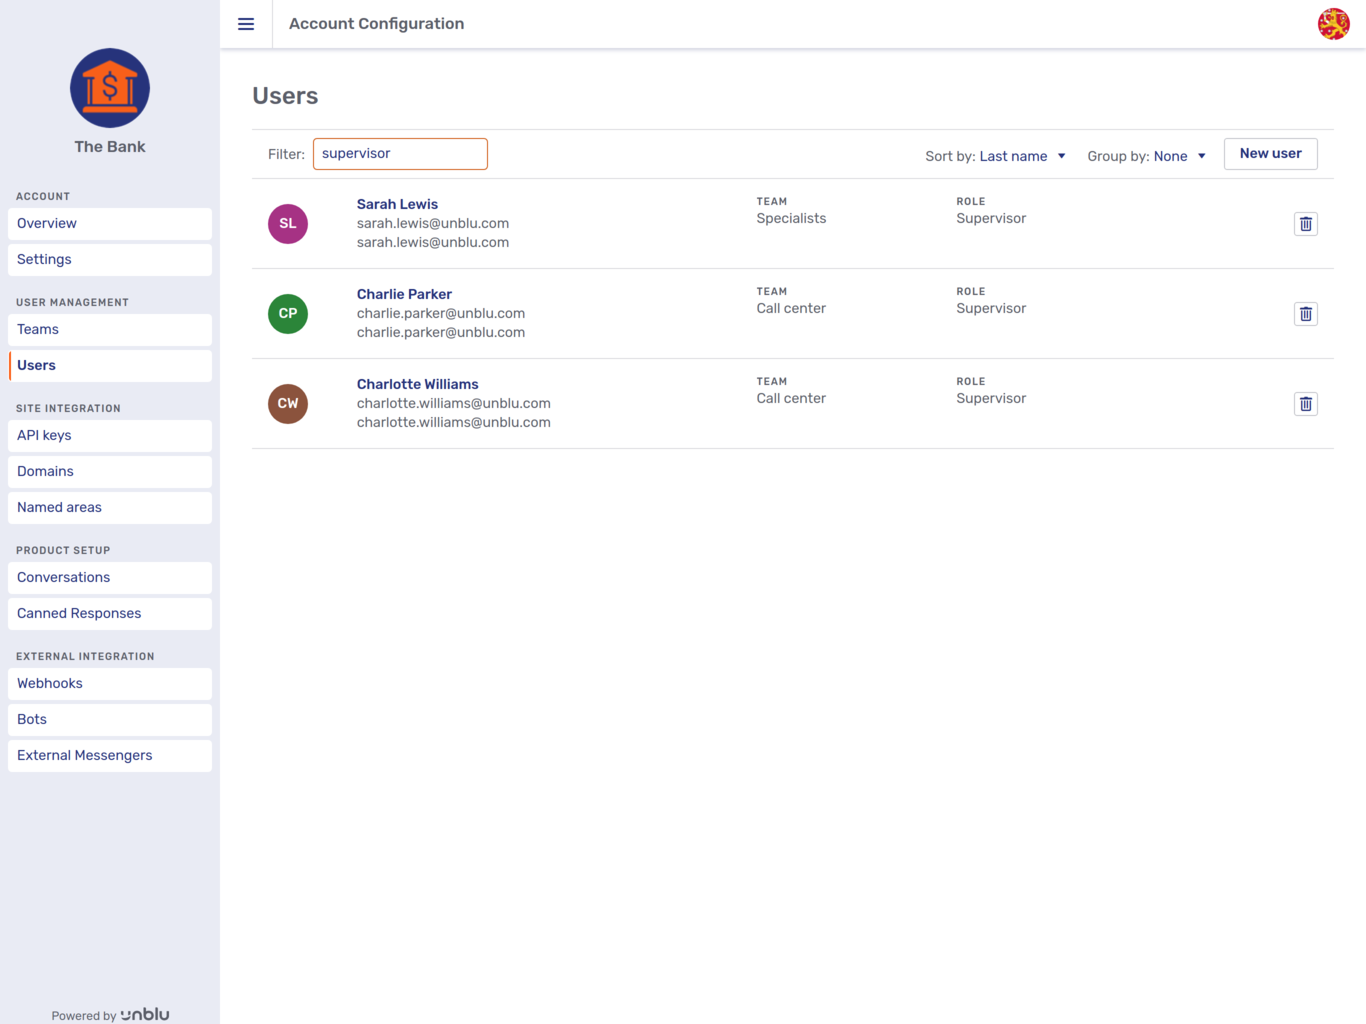
(In the picture above, the user list has been filtered to display only supervisors.)
Each entry consists of
-
the user’s first and last name,
-
their username,
-
their email address,
-
the team the user belongs to, and
-
their role.
| If there is no field to enter the username, that is because Unblu is configured to use the user’s email address as the username. You can change this behavior with the configuration property com.unblu.storage.user.useEmailAsUsername. |
The delete button ![]() deletes the user immediately, without displaying a modal dialog. Click on Undo in the confirmation toast to undo the action:
deletes the user immediately, without displaying a modal dialog. Click on Undo in the confirmation toast to undo the action:
The Sort by dropdown changes the sort order of the list. You can group the users listed by either their role or the team they belong to with the Group by dropdown menu.
The New user button opens the modal page of the same name. The possibilities you have here are the same as on the General tab of an existing user. See the following section for further details.
| Not all roles are authorized to create and delete users. See the section on user roles for further details. |
7.3.3.2.1. General
Use the General tab to review and change a user’s basic details. Besides common fields such as Name or Description, you can specify the user’s Username and assign them to a particular team.
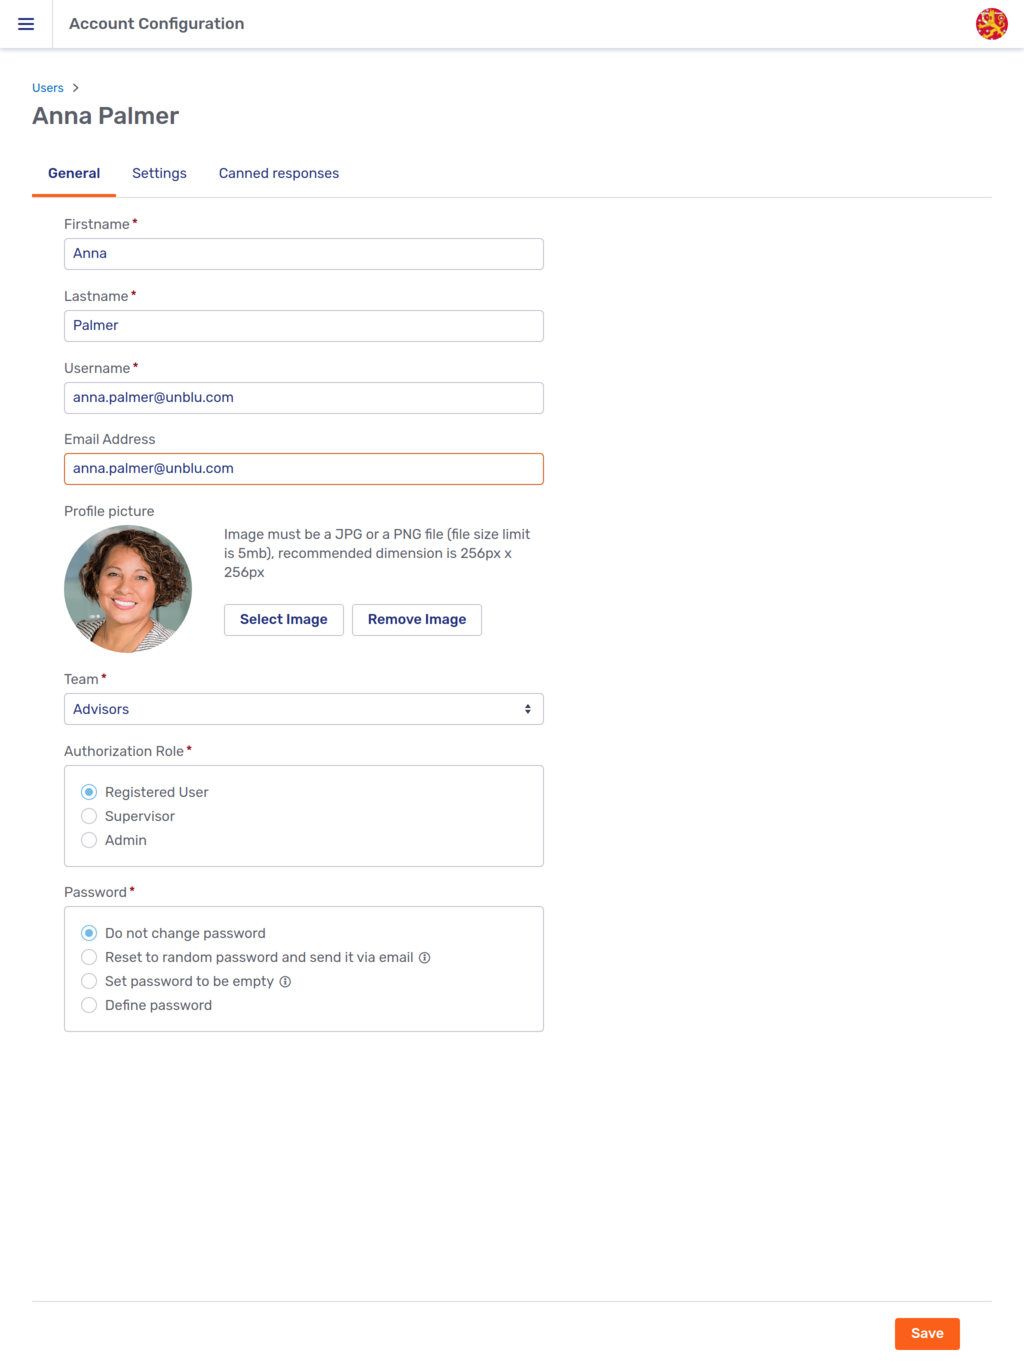
At the top of the tab, you can see whether the user is managed internally, i.e. within Unblu, or externally. If you are in override mode, you will also have a toggle to switch between internal and external management.
In the Authorization Role section, you can only assign a user a role with as many permissions as your own role, or fewer. A supervisor, for example, can only assign the roles Registered User or Supervisor.
The Password section offers the following options:
- Do not change password
-
Leaves the current password untouched. This is the default option.
- Reset to random password and send it via email
-
Most useful when a user has forgotten their password. The change takes effect once you click on Save. When you do so, the password is also shown in a modal dialog:
- Set password to be empty
-
Used when users are authenticated by some third-party mechanism through ID propagation. If active, the user will not be able to log in on the Unblu login screen.
- Define password
-
Allows you to specify a password for the user.
When you select this option, two additional fields appear where you can enter and confirm the new password.
| You cannot change the general properties of virtual users in the Account Configuration interface. |
7.3.3.2.2. Settings
The Settings tab displays the settings for a particular user. It works as outlined above.
7.3.3.2.3. Canned responses
Canned responses you create on a user’s Canned responses tab are available only to that user.
Please refer to the Canned responses section of the Agent Desk user guide for information on how to create canned responses.
7.3.4. Site integration
The Site integration section of the navigation menu groups configuration options related to integrating Unblu into your organization’s website.
7.3.4.1. API keys
The API keys menu entry opens the API key overview, which lists all API keys with their name and description.
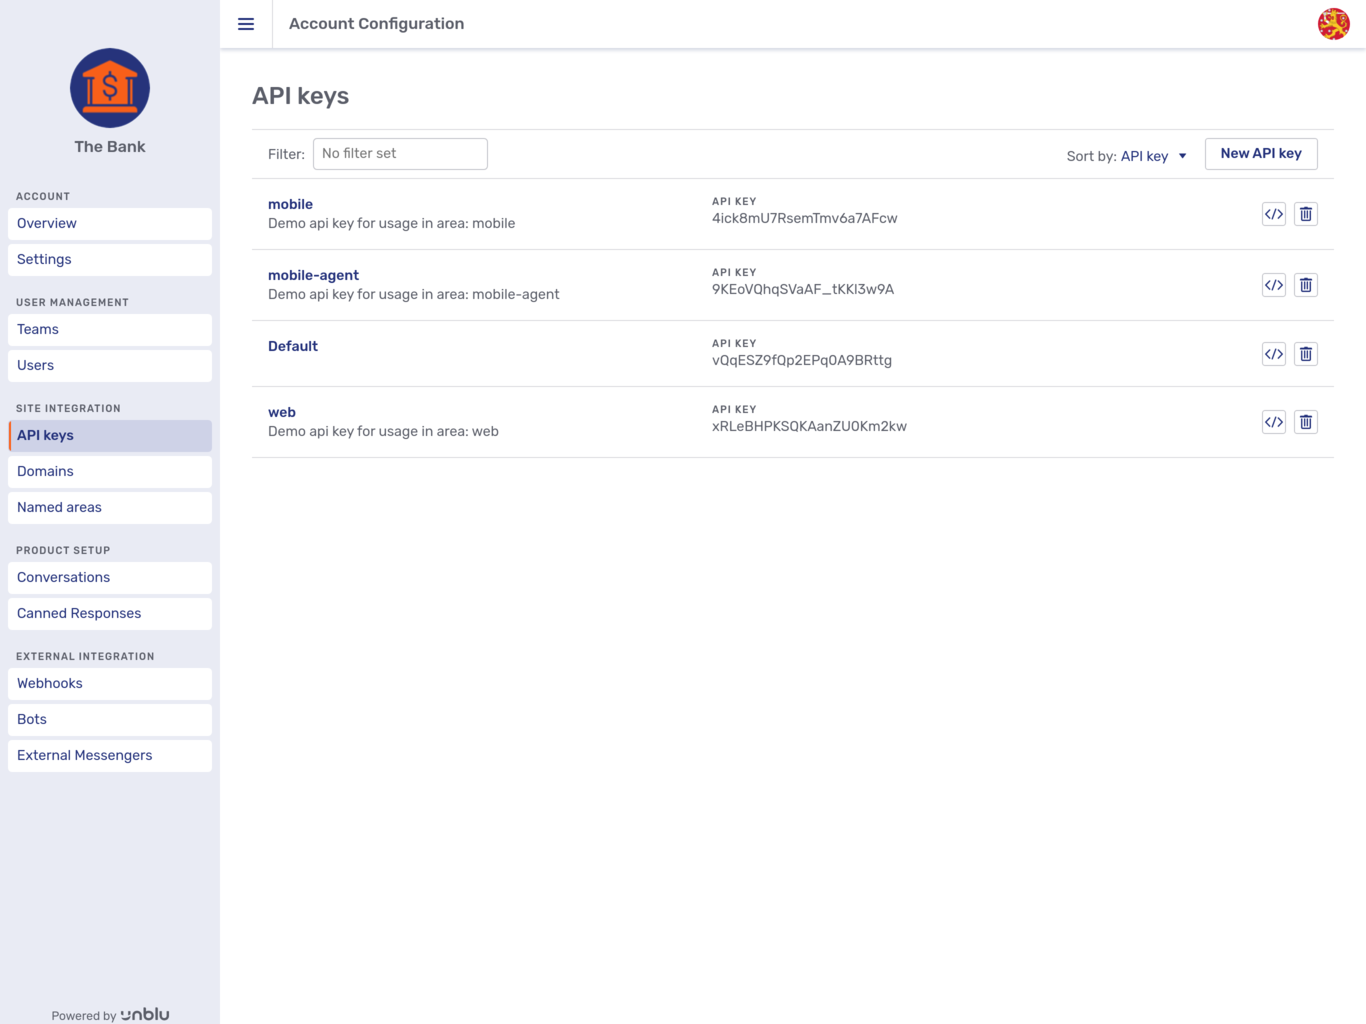
You can sort the list of API keys by name, description, or API key with the Sort by dropdown.
The delete button ![]() opens a modal dialog which asks whether you really want to delete the API key in question.
opens a modal dialog which asks whether you really want to delete the API key in question.
The code snippet button ![]() opens the API key’s JavaScript Snippet tab.
opens the API key’s JavaScript Snippet tab.
Pressing the New API key button opens a modal page where you can enter the API key itself along with a name for and a description of the key:
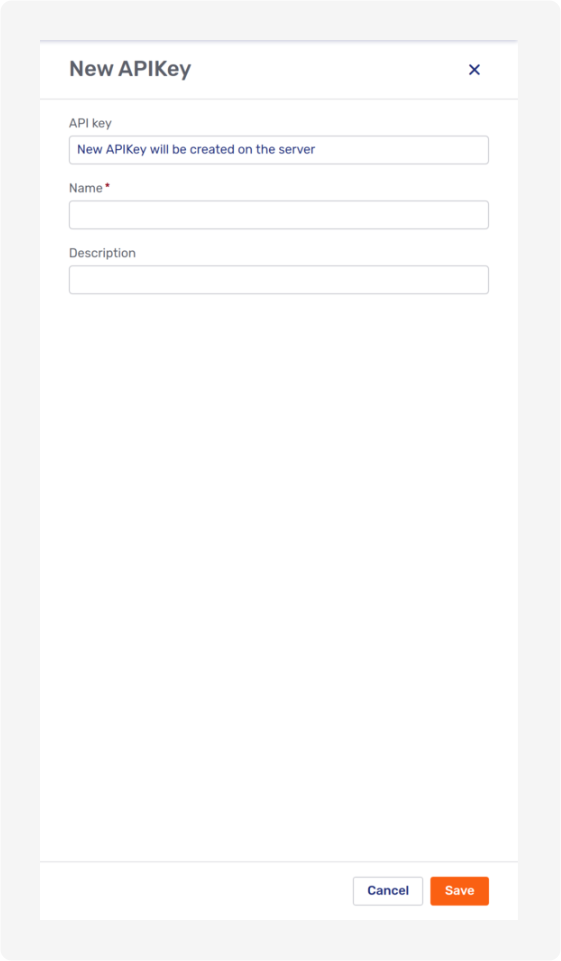
The General tab for API keys is almost the same as teh New API key modal page. It displays the API key and allows you to edit the key’s name and description. You cannot, however, change the API key itself.
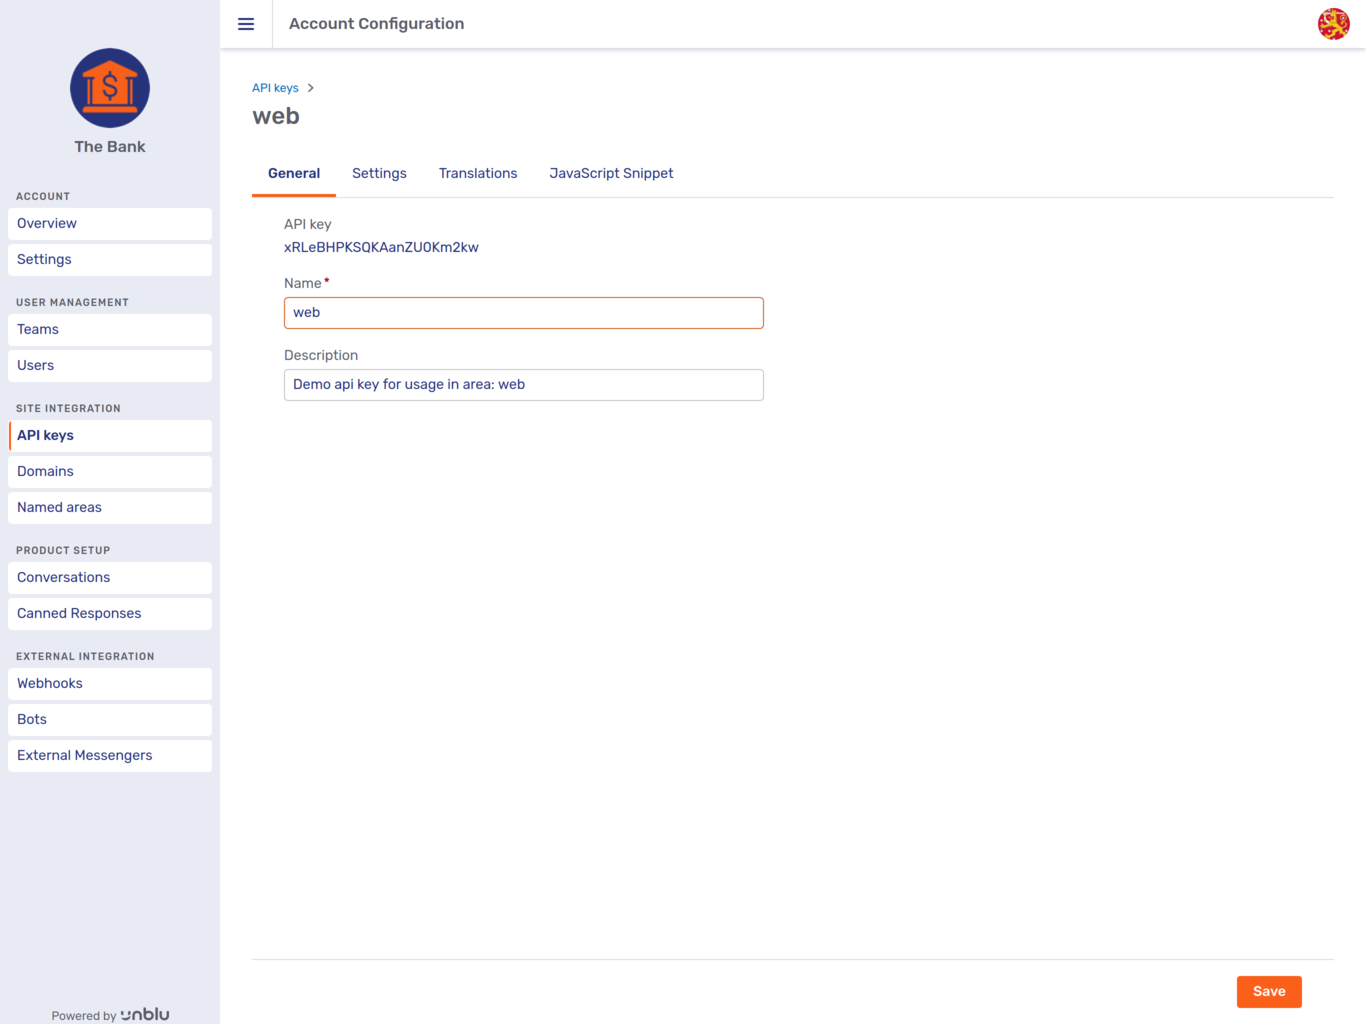
The Settings and Translation tabs work as described above.
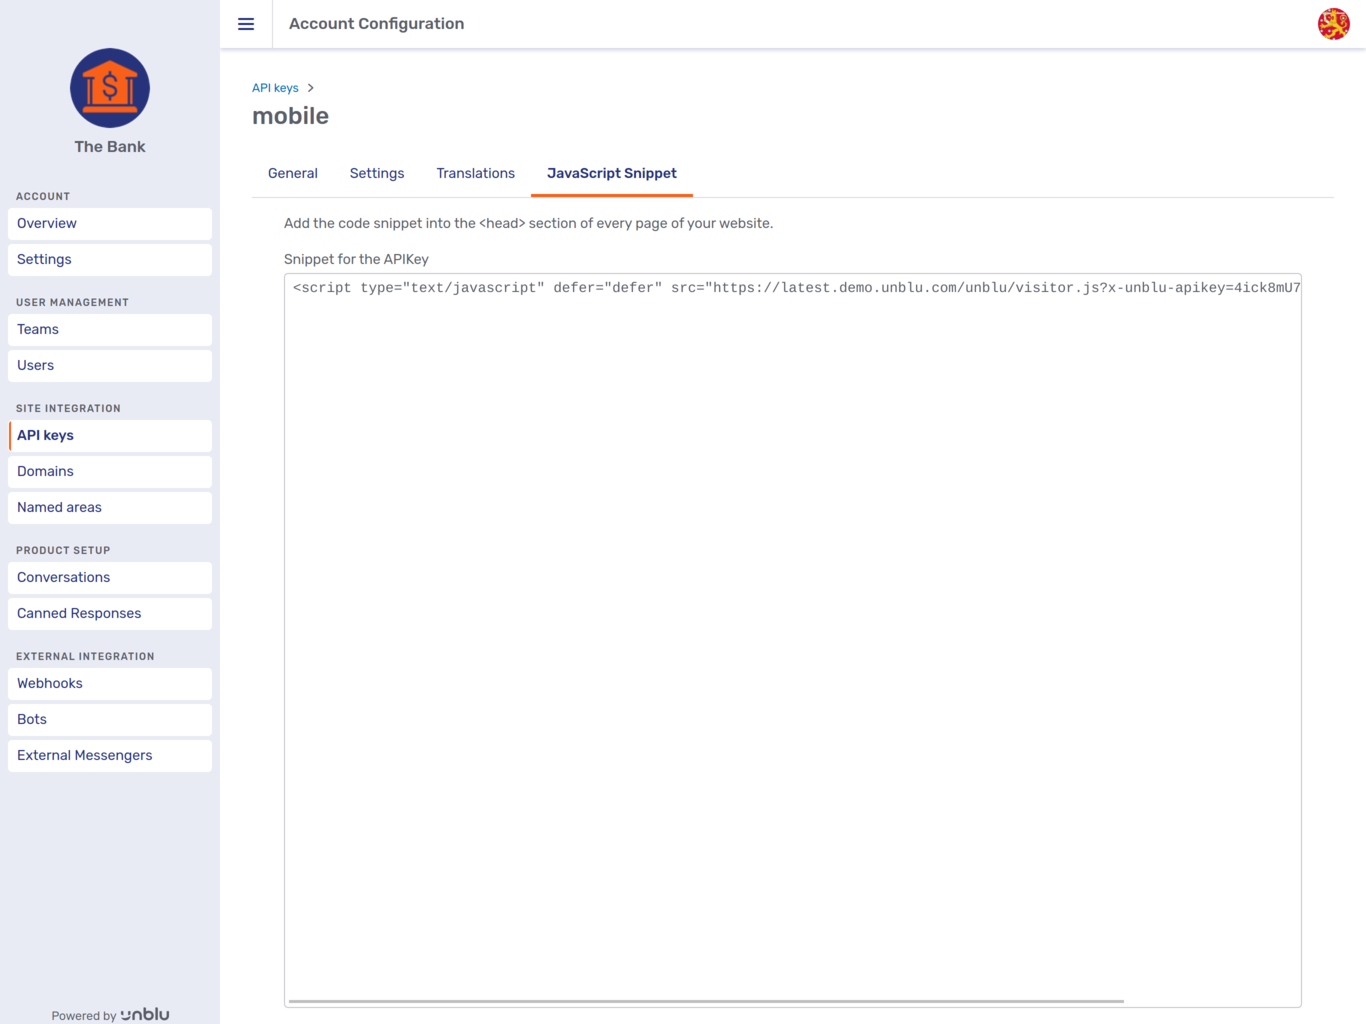
7.3.4.2. Domains
The Domains menu item lists all of the domains you have registered for this account.
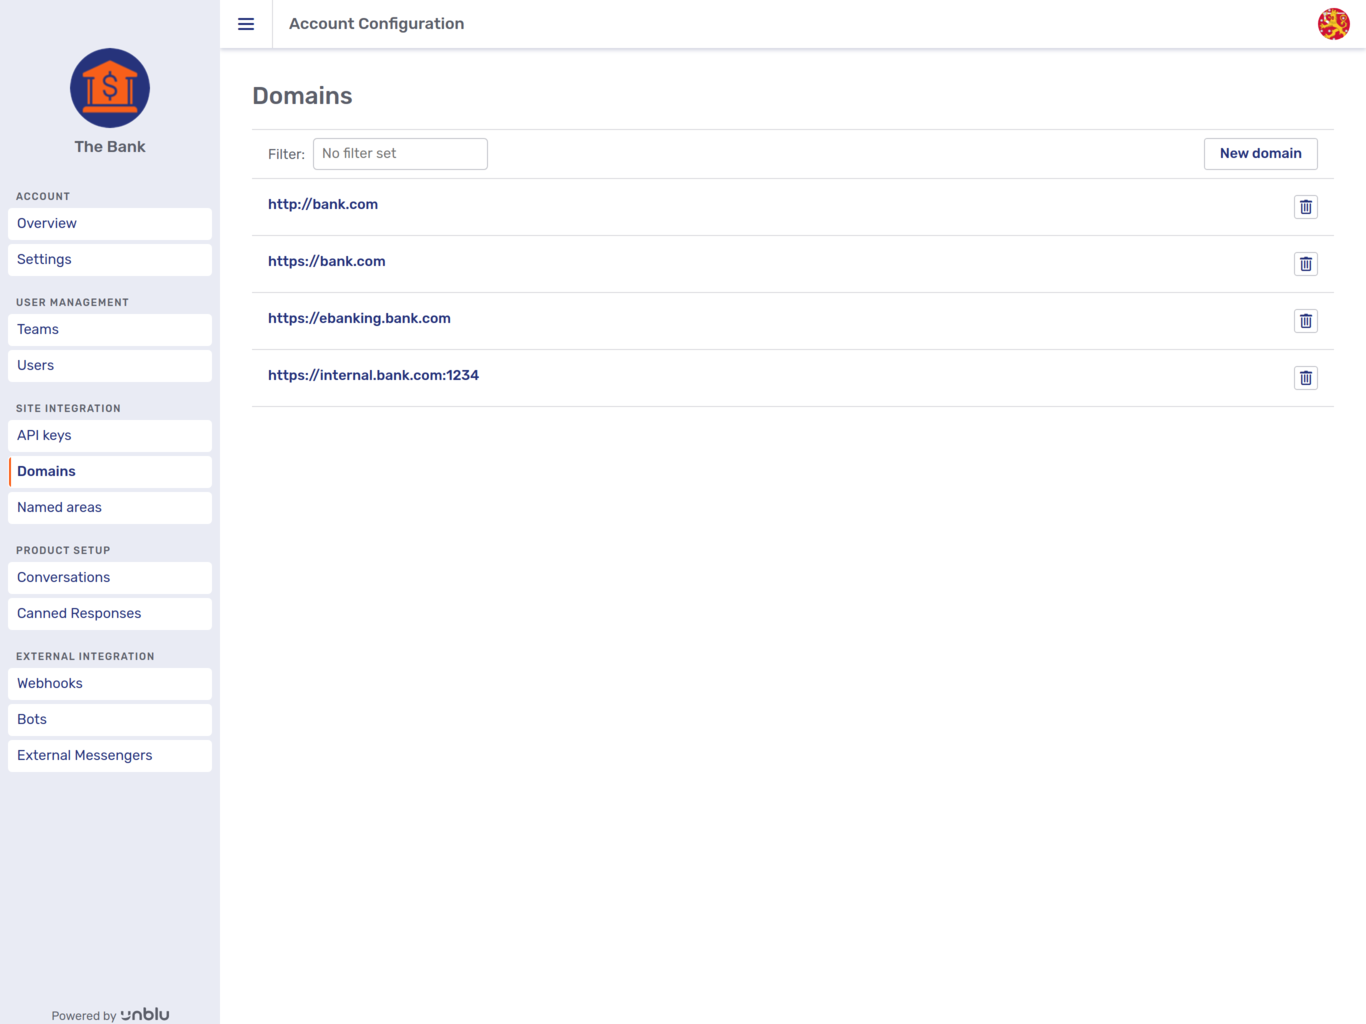
The New domain button opens the New domain modal page. Clicking on a domain opens the Edit domain modal page. The only difference between the two modal pages is the Protocol section: You can choose to add a new domain for both HTTP and HTTPS protocols, whereas for existing domains, you can only select either HTTP or HTTPS.
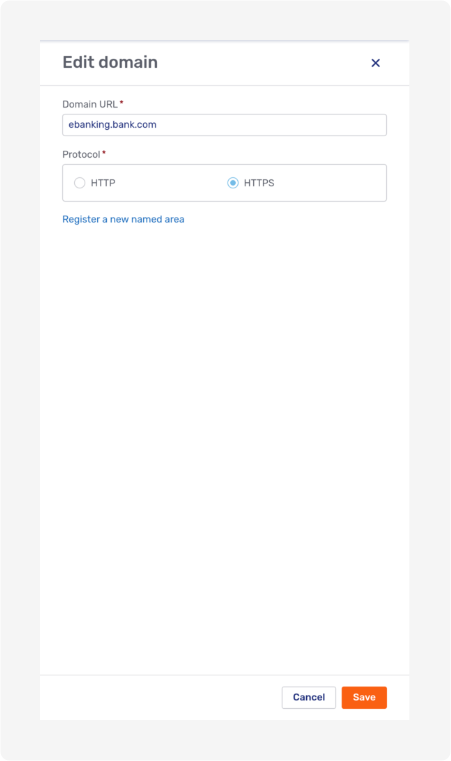
You can specify a particular port for a domain by appending it to the domain’s URL, as has been done for internal.bank.com:1234 in the picture above.
If you try to add a domain that is already present with the same protocol, an error message will be displayed on the modal page.
For more information on domains, refer to the appropriate sections of the article on named areas.
7.3.4.3. Named areas
The Named areas entry in the navigation menu opens the overview of named areas currently defined on the account.
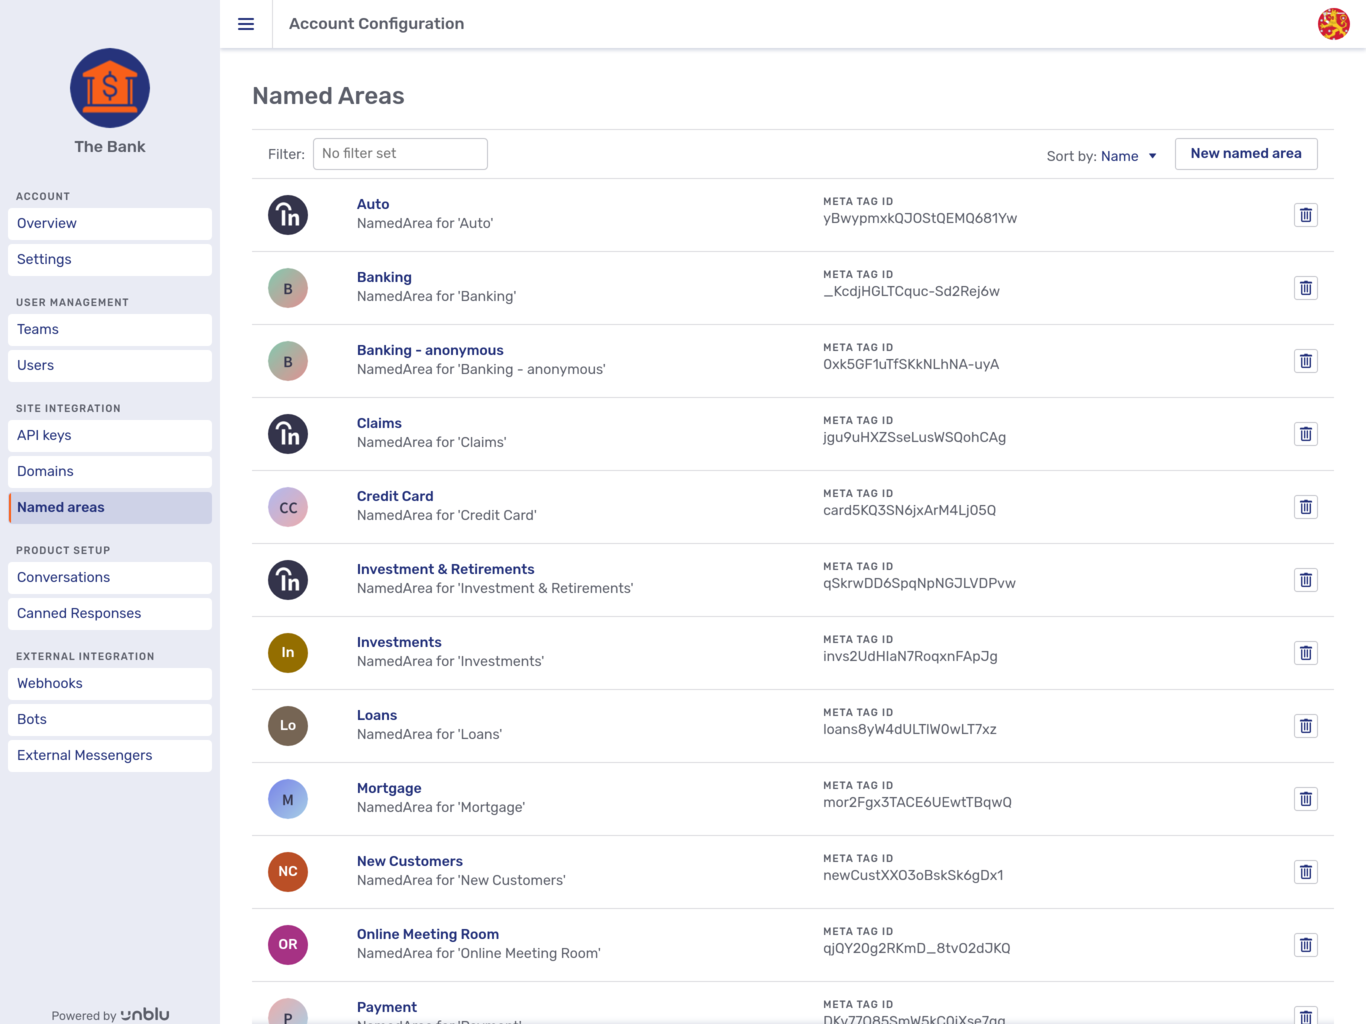
The Sort by dropdown allows you to sort the overview by name, description, or type of named area.
The New named area button opens the modal page of the same name:
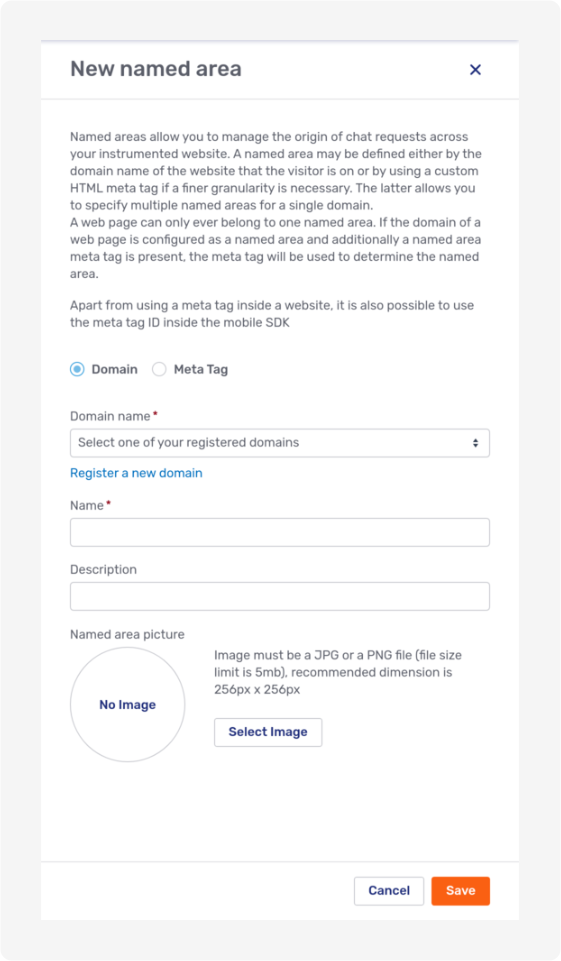
Besides the usual fields such as Name and Description, the modal page requires you to specify how the named area should be defined, by Domain or by Meta Tag. Depending on your choice, the modal page will display a field where you can select the domain or enter the meta tag ID for the named area. In the picture above, the modal page includes a dropdown to select the domain to associate with the named area.
If you select the Meta Tag option, the domain dropdown is replaced by the Meta Tag ID field:
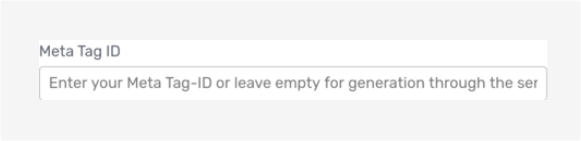
As the hint in the field says, you can either provide a meta tag ID of your own or leave the field blank and let Unblu generate a unique meta tag ID for the new named area.
A domain or meta tag ID may only be associated with one named area. If you try to assign a domain or meta tag ID that is already associated with an existing named area to another named area, the modal page will display an error message.
It is not possible to change a named area’s defining attribute once you have saved it.
Clicking on an entry in the overview gives you access to that named area’s configuration.
The delete button ![]() deletes the named area immediately, without displaying a modal dialog. You can, however, undo the action in the confirmation toast that is displayed afterwards:
deletes the named area immediately, without displaying a modal dialog. You can, however, undo the action in the confirmation toast that is displayed afterwards:
For more information on named areas, refer to the article on named areas.
7.3.4.3.1. General
Besides the usual descriptive fields, the General tab for a named area includes the attribute defining that named area, i.e. the domain or meta tag ID associated with it. This attribute cannot be changed.
If the named area is defined by a meta tag ID, the General tab includes two code snippets:
-
An HTML meta tag. Add this snippet to each page where you want to use this named area.
-
A set of code snippets intended for mobile apps, one for iOS apps and one for Android apps. Replace
<UNBLU_SERVER_URL>and<API_KEY>in the snippets with the respective values for your account.
7.3.4.3.2. Settings and Translations
The Settings and Translation tabs work as described above.
7.3.5. Product setup
The Product Setup section groups the main configurable aspects of visitor interaction, i.e. conversations and canned responses.
7.3.5.1. Conversations
Clicking on Conversations in the navigation menu opens the overview of conversation templates defined for the account:
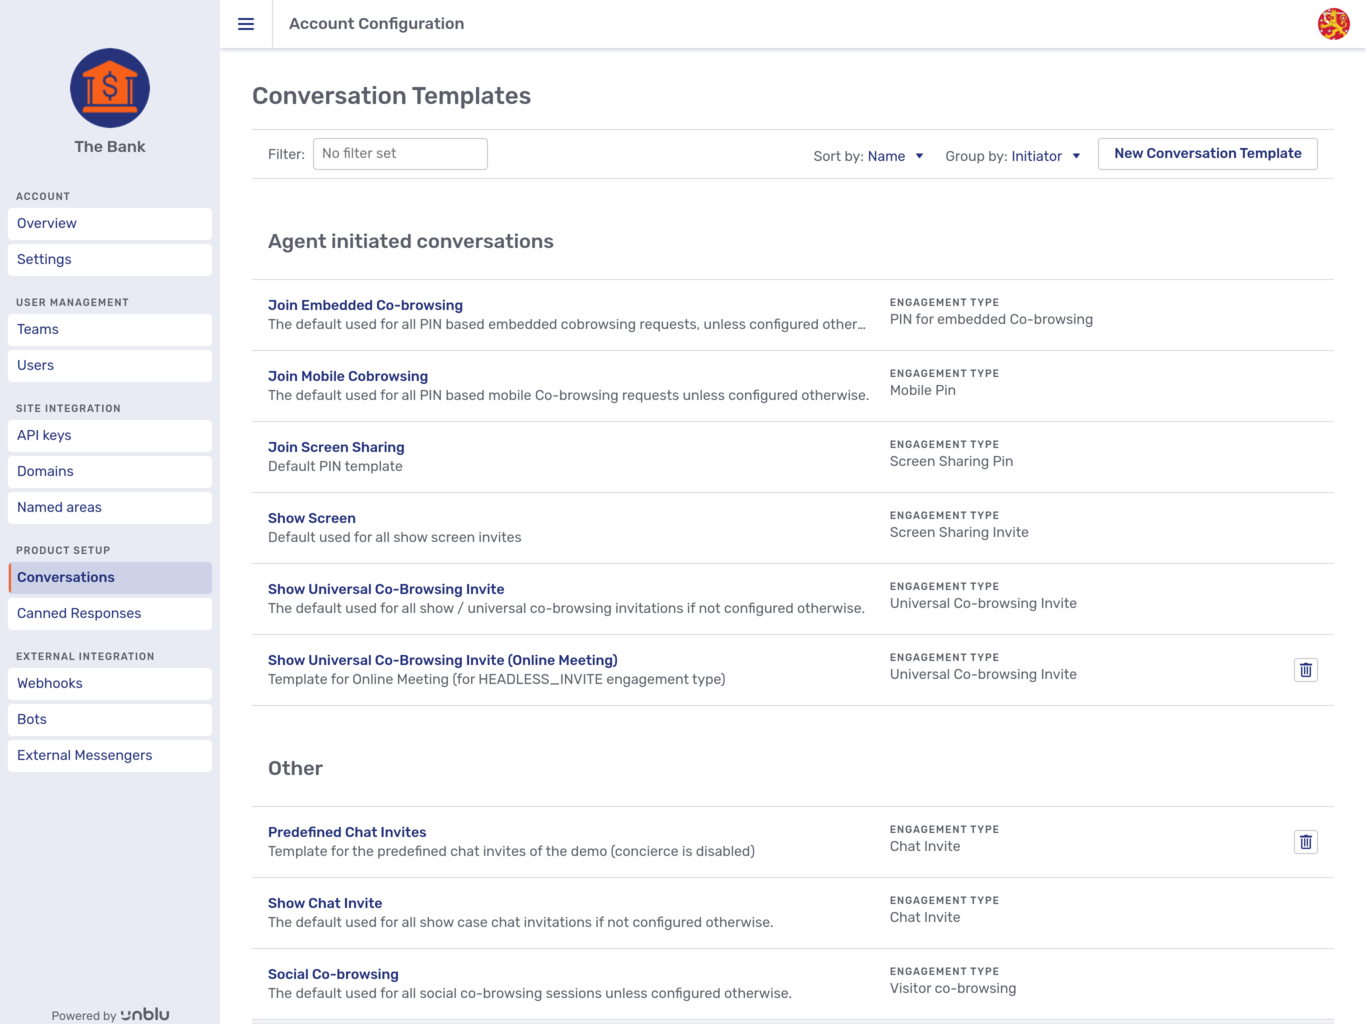
The list can be sorted by description, engagement type, or name with the Sort by dropdown. Using the Group by dropdown, you can group templates by engagement type, initiator, join type, or media type.
All of the templates you are authorized to delete sport a delete button ![]() . The default conversation templates provided by Unblu out of the box cannot be deleted.
. The default conversation templates provided by Unblu out of the box cannot be deleted.
When you delete a conversation template, a toast appears at the top of the interface allowing you to undo the action.
The New Conversation Template button opens the modal page pictured below:
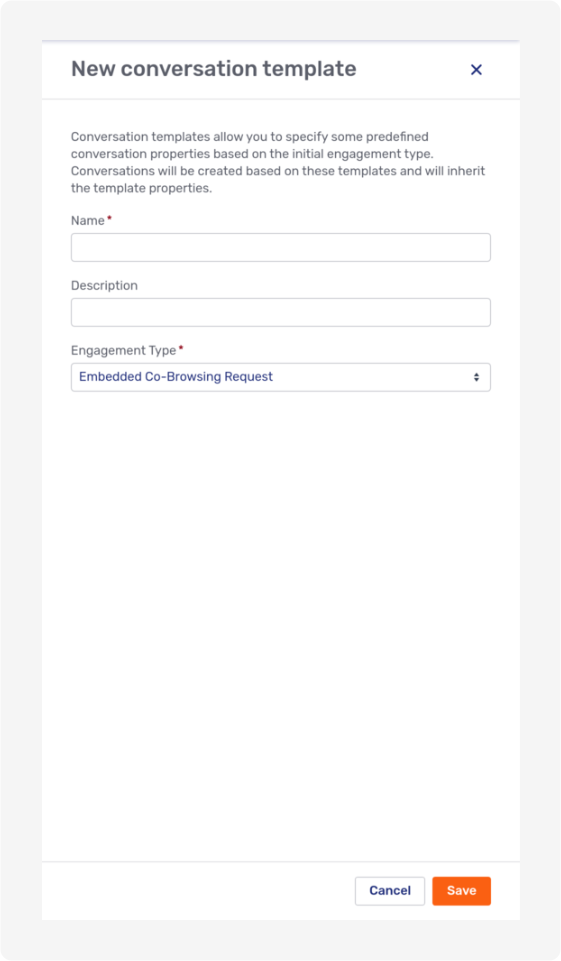
Once you have set the template’s name, given it a description, and chosen the engagement type it should be used for, click Save. You can then configure the template on its Settings and Translations tabs. To access them, simply click on the template in the overview.
| We recommend that you review Elements of a conversation to learn more about conversations and engagement types before creating new conversation templates. |
7.3.5.1.1. General
A conversation template’s General tab contains the same fields as the New conversation template modal page. See the previous section for further information.
7.3.5.1.2. Settings and Translations
The Settings and Translation tabs work as described above.
The Translations tab mentions that you can use Markdown to format texts defined for conversation templates. The preview to the right of the Translation text field shows you what the formatted text looks like:
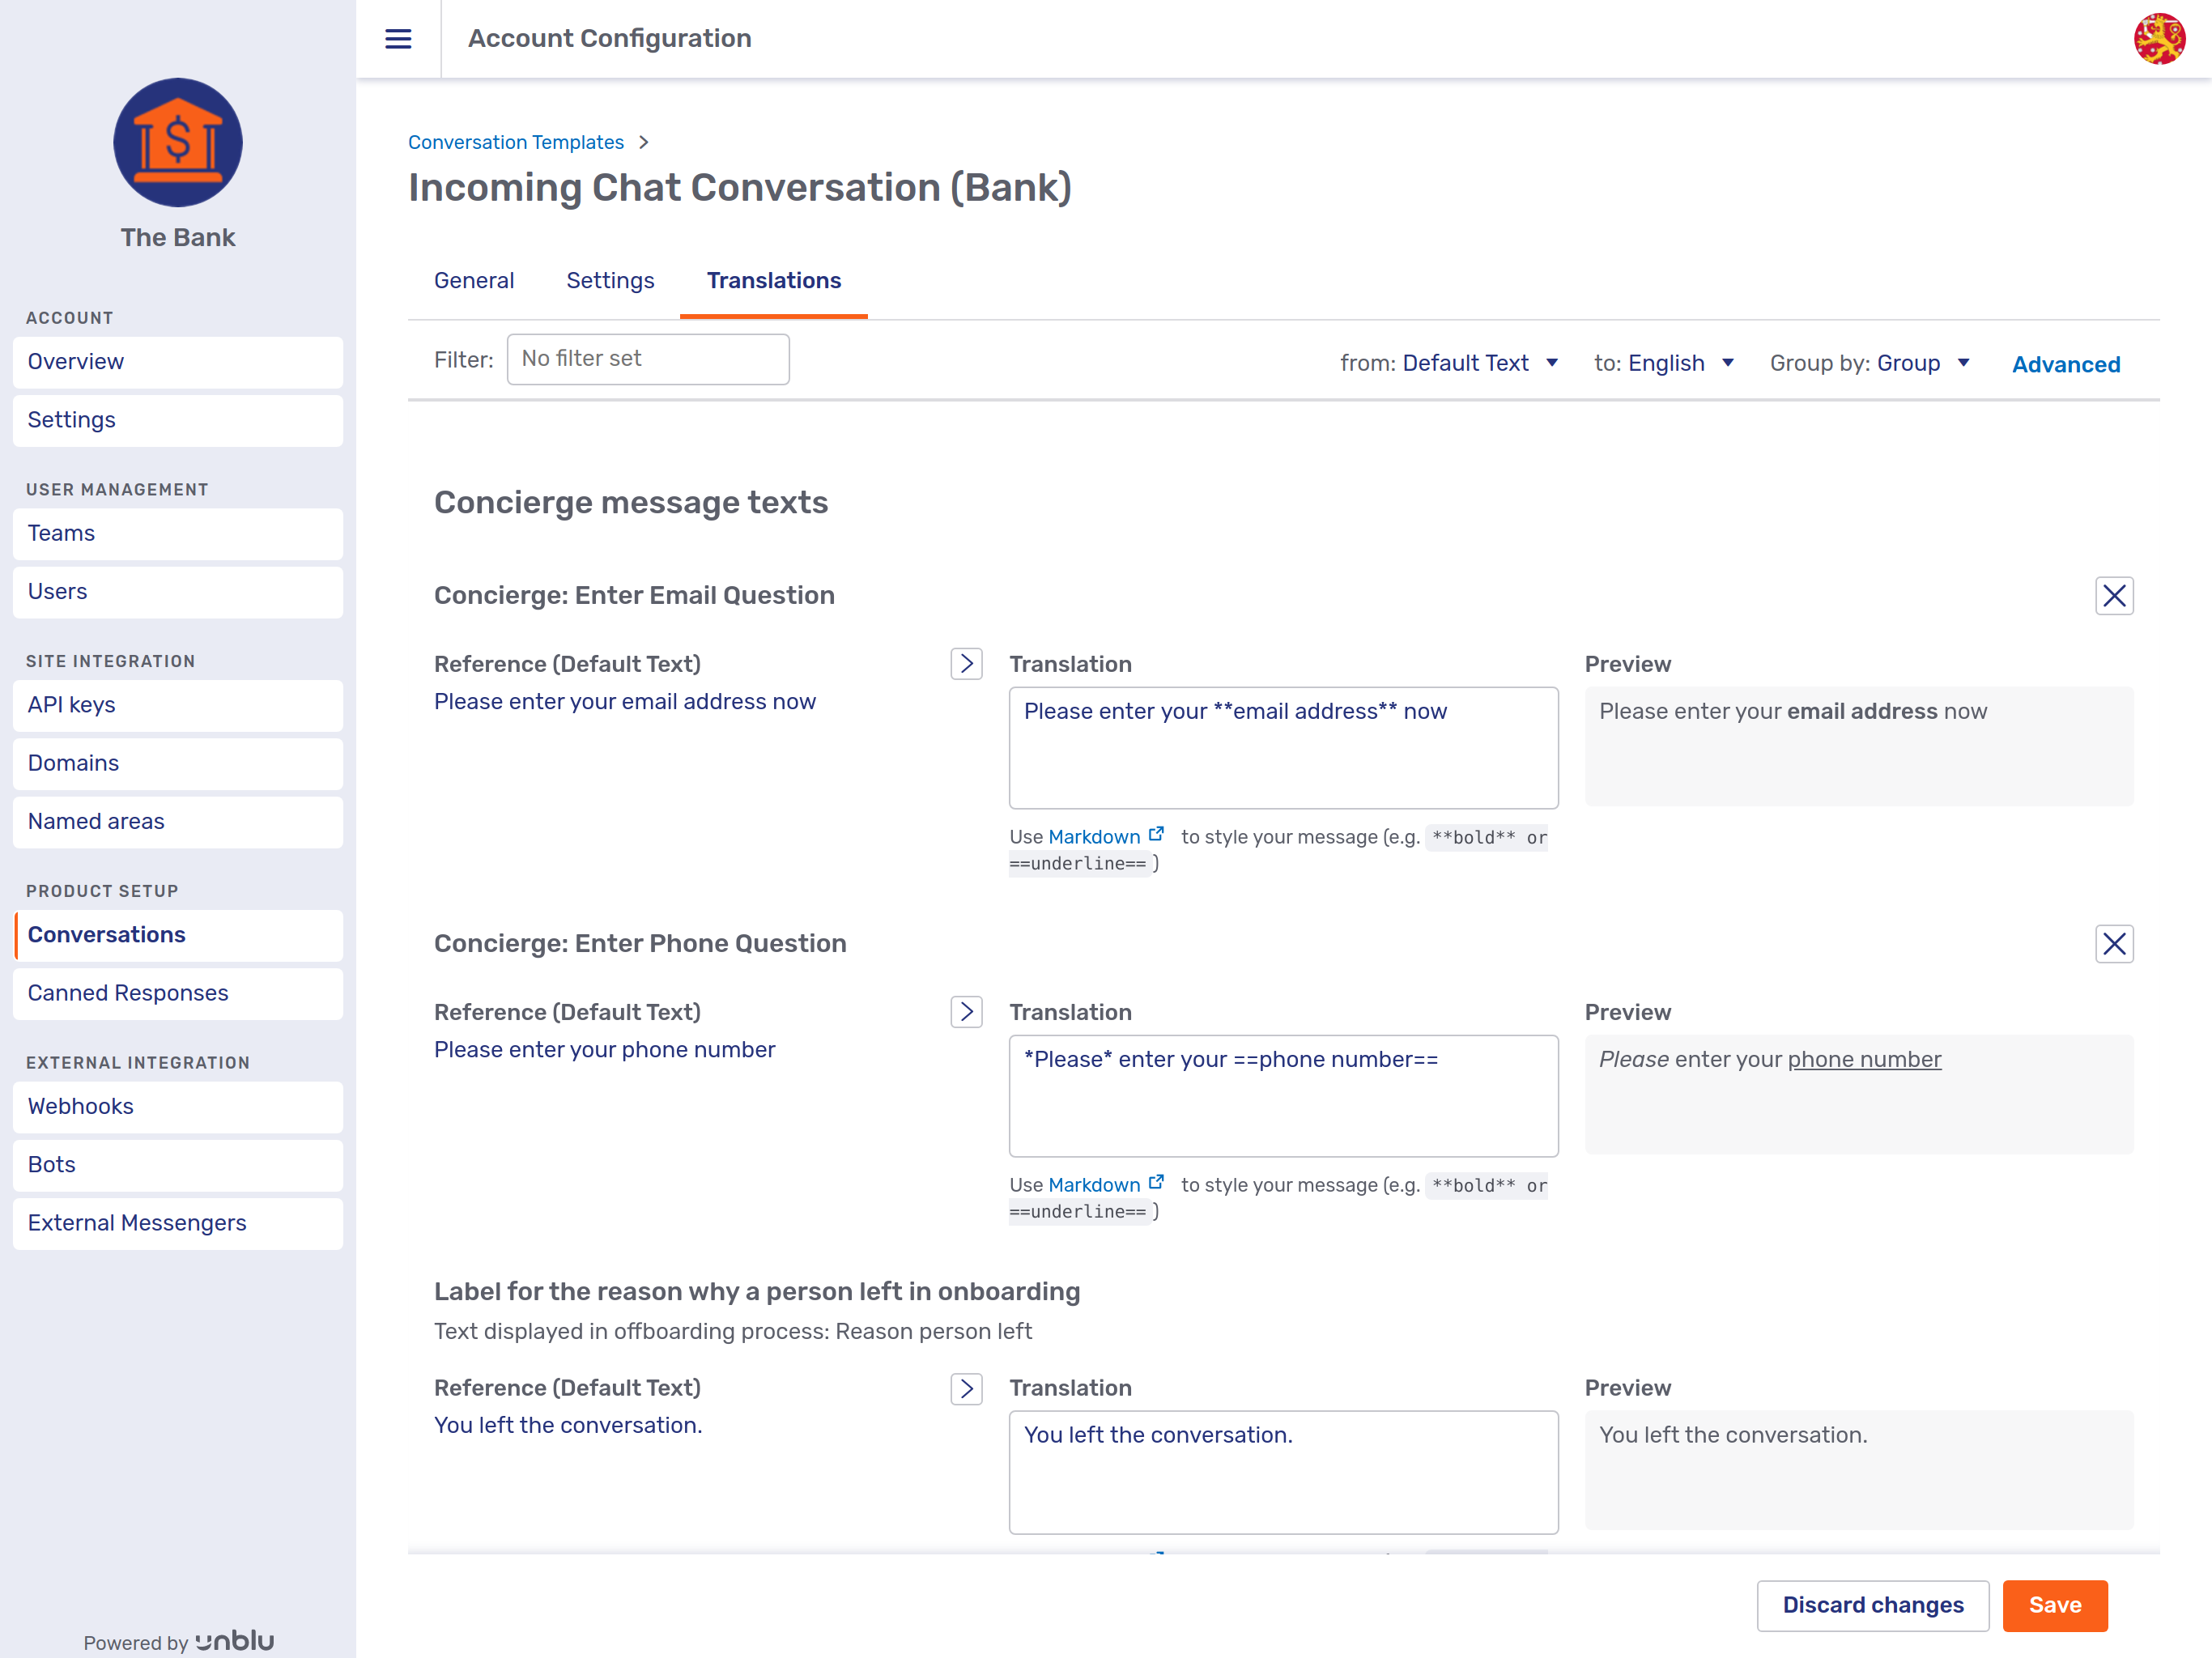
Settings and translations that you define on a conversation template are applied to each conversation based on that template.
7.3.5.2. Canned responses
Canned responses that you create in the Canned responses section are available to all agents and teams in the account.
If you want to restrict the use of a canned response to a particular team, set it up on the Canned response tab of that team instead. To create a canned response for a single user, do so on that user’s Canned response tab.

See the Canned responses section of the Agent Desk user guide for further information on how to create canned responses.
When you click on a canned response’s delete button ![]() , the canned response is deleted immediately. The toast message confirming the action provides an Undo option to recover the canned response:
, the canned response is deleted immediately. The toast message confirming the action provides an Undo option to recover the canned response:
7.3.6. External integration
The External integration section contains configuration options for ways to integrate Unblu into external applications.
7.3.6.1. Webhooks
|
The functionality of the Webhooks section is also available via REST calls. For further information on webhooks in Unblu, read the article Webhooks technical details. |
The Webhooks section provides a convenient overview of all of the webhooks registered with your account. You can sort the overview by name or by endpoint URL with the Sort by dropdown.
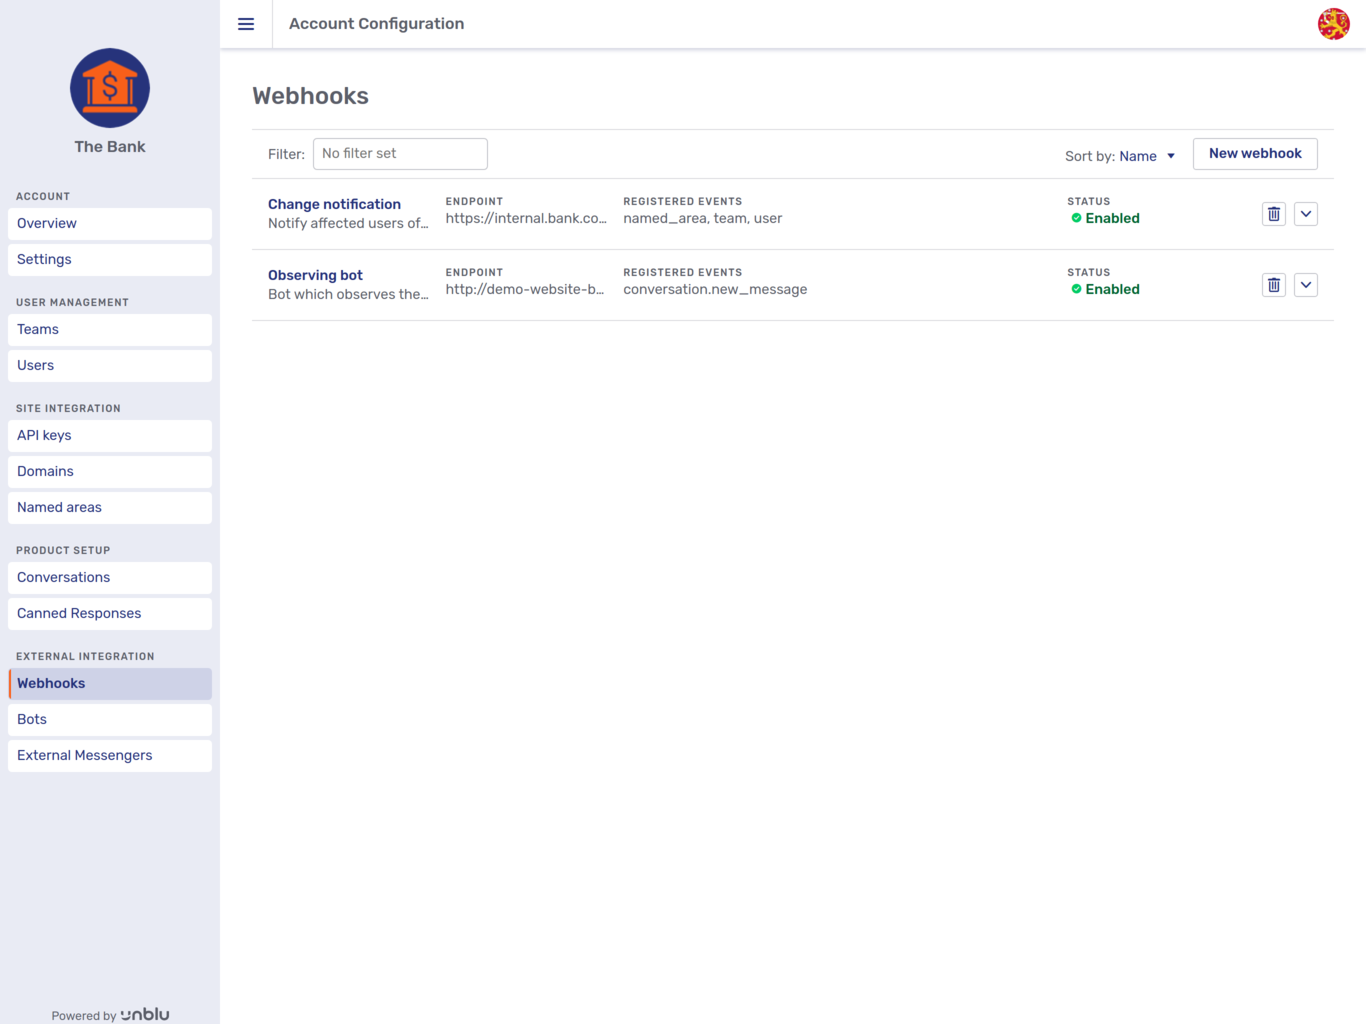
Each webhook is listed with its name, its endpoint URL, the events which will trigger a notification, and its status. Clicking on a webhook opens its General tab, which provides exactly the same possibilities as the New webhook modal page described below.
Deleting a webhook using the delete button ![]() immediately deletes the webhook. The toast that appears at the top of the interface allows you to undo the action.
immediately deletes the webhook. The toast that appears at the top of the interface allows you to undo the action.
The chevron button ![]() to the right of the delete button opens a context menu which provides direct access to the webhook’s delivery log tab and allows you to send a ping event
to the right of the delete button opens a context menu which provides direct access to the webhook’s delivery log tab and allows you to send a ping event
Grouping these two functions in one place provides a convenient way to test your webhooks:
-
When you click on the chevron button and select Send ping event, a modal dialog appears.
If you click on OK, the ping event is sent to the webhook’s endpoint URL.
-
You can now check the webhook’s delivery log to verify that it was delivered successfully.
7.3.6.1.1. Creating webhooks
Register new webhooks with the New webhook button. This opens the following modal page:
Besides the webhook’s name and description, the modal page allows you to specify
-
the webhook’s endpoint URL,
-
the version of the Unblu web API it uses,
-
the events that should be sent to the webhook, and
-
a secret key (not visible in the picture above). The key is used to generate an SHA1 HMAC of the request body sent to the webhook’s endpoint. By comparing the body’s raw content with the contents of the
x-unblu-signatureheader, you can verify that the notification came from the Unblu collaboration server.
The toggle at the top of the modal page that enables or disables a new webhook is set to Enabled by default.
7.3.6.1.2. Delivery log
The Delivery log tab lists all delivery attempts to a particular webhook. You can sort the delivery log by event, response code, retry number, and time using the Sort by dropdown.
The picture below show an unsuccessful delivery:
For further details, click on the chevron to expand the delivery log entry:
You can access the Delivery log tab by clicking either on a webhook in the overview or on a webhook’s chevron button and selecting Delivery log.
7.3.6.2. Bots
|
Only dialog bots can be configured in the account configuration interface. Conversation-observing bots are integrated into Unblu using webhooks. For more general information on setting up dialog bots, please refer to the bot integration section of the documentation. |
The Bots entry in the navigation menu opens the dialog bots overview. You can sort the list of dialog bots by name, onboarding filter, onboarding order, offboarding filter, or offboarding order.
Each bot registered with the account is listed along with information regarding the person used by the bot as well as the filter and order used during onboarding, reboarding, and offboarding. You can also see whether the bot is enabled or not.
The delete button ![]() opens a modal dialog asking whether you really want to delete the bot. If you click on OK, the bot is deleted immediately.
opens a modal dialog asking whether you really want to delete the bot. If you click on OK, the bot is deleted immediately.
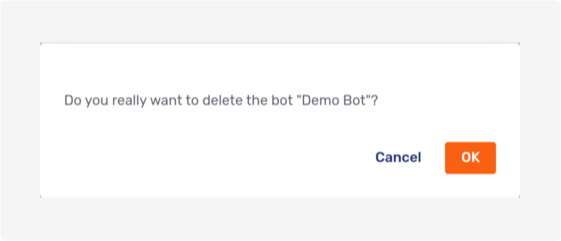
As with webhooks, the chevron button ![]() opens a context menu where you can open the delivery log tab directly, or send a ping event to test the bot. Clicking on a bot in the list opens the bot’s General tab.
opens a context menu where you can open the delivery log tab directly, or send a ping event to test the bot. Clicking on a bot in the list opens the bot’s General tab.
7.3.6.2.1. New dialog bot
Clicking on the New Bot button opens the New Dialog Bot modal page:
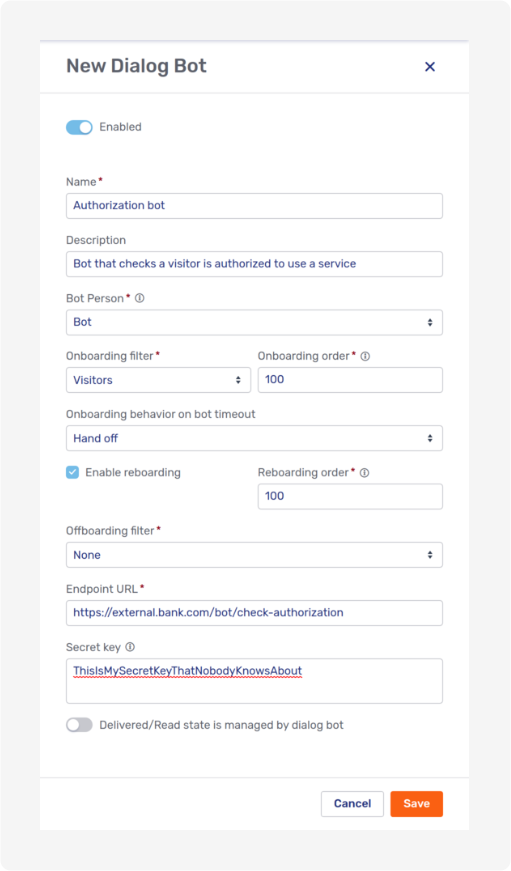
By default, the Enabled toggle is active, meaning that your new dialog bot will be enabled when you click on Save.
Besides the familiar Name and Description fields, the page offers numerous options to configure your new bot in a way that suits your organization’s needs:
- Bot Person
-
The person that will represent the bot in conversations. See the Bot persons section of the documentation for further information.
- Onboarding filter
-
The filter specifies whose onboarding the bot should join: Visitors, Agents, Both, or None.
- Onboarding order
-
If more than one bot takes part in onboarding, the number you enter here determines which order the bots are invited to participate in the process. A bot with a low number gets called before one with a higher number.
The field is only present if you select an onboarding filter other than None.
- Onboarding behavior on bot timeout
-
Specifies what Unblu should do if the bot takes too long to respond. Possible values are Abort and Hand off.
- Enable reboarding
-
Specify whether teh bot is triggered during reboarding.
- Reboarding order
-
A number to determine the bot’s place in the order of bots taking part in the reboarding process. Bots with lower numbers take precedence over ones with higher numbers.
The field is only present if Enable reboarding is ticked.
- Offboarding filter
-
The filter specifies whose offboarding process the bot should join: Visitors, Agents, Both, or None.
- Offboarding order
-
Determines the bot’s position in the call order of bots taking part in the offboarding process. A lower number means the bot is called earlier.
The field is only available if an offboarding filter other than None is selected.
- Endpoint URL
-
The endpoint URL called to invite the dialog bot to participate in a dialog.
- Secret key
-
The key you enter here can be used to establish that the invitation was sent by the Unblu collaboration server. See the description above for further information.
- Delivered/Read state is managed by dialog bot
-
If active, the toggle specifies that the dialog bot will actively inform the Unblu collaboration server when a message addressed to it has been delivered or read. This state is reflected in the number and color of the ticks displayed next to the sent message in the UI the human participant sees.
If the toggle is not active, the state and thus the UI feedback is managed by the Unblu collaboration server.
7.3.6.2.2. General
The General tab allows you to modify the same fields as the New dialog bot modal page. Please refer to the latter’s description in the preceding section for further information.
7.3.6.2.3. Delivery log
The Delivery log tab contains the same information as the same tab for webhooks. Please refer to the latter’s description for further information.
7.3.6.3. External messengers
The External messengers menu item gives access to the configuration options for external messengers such as WhatsApp. It opens the external messengers overview:
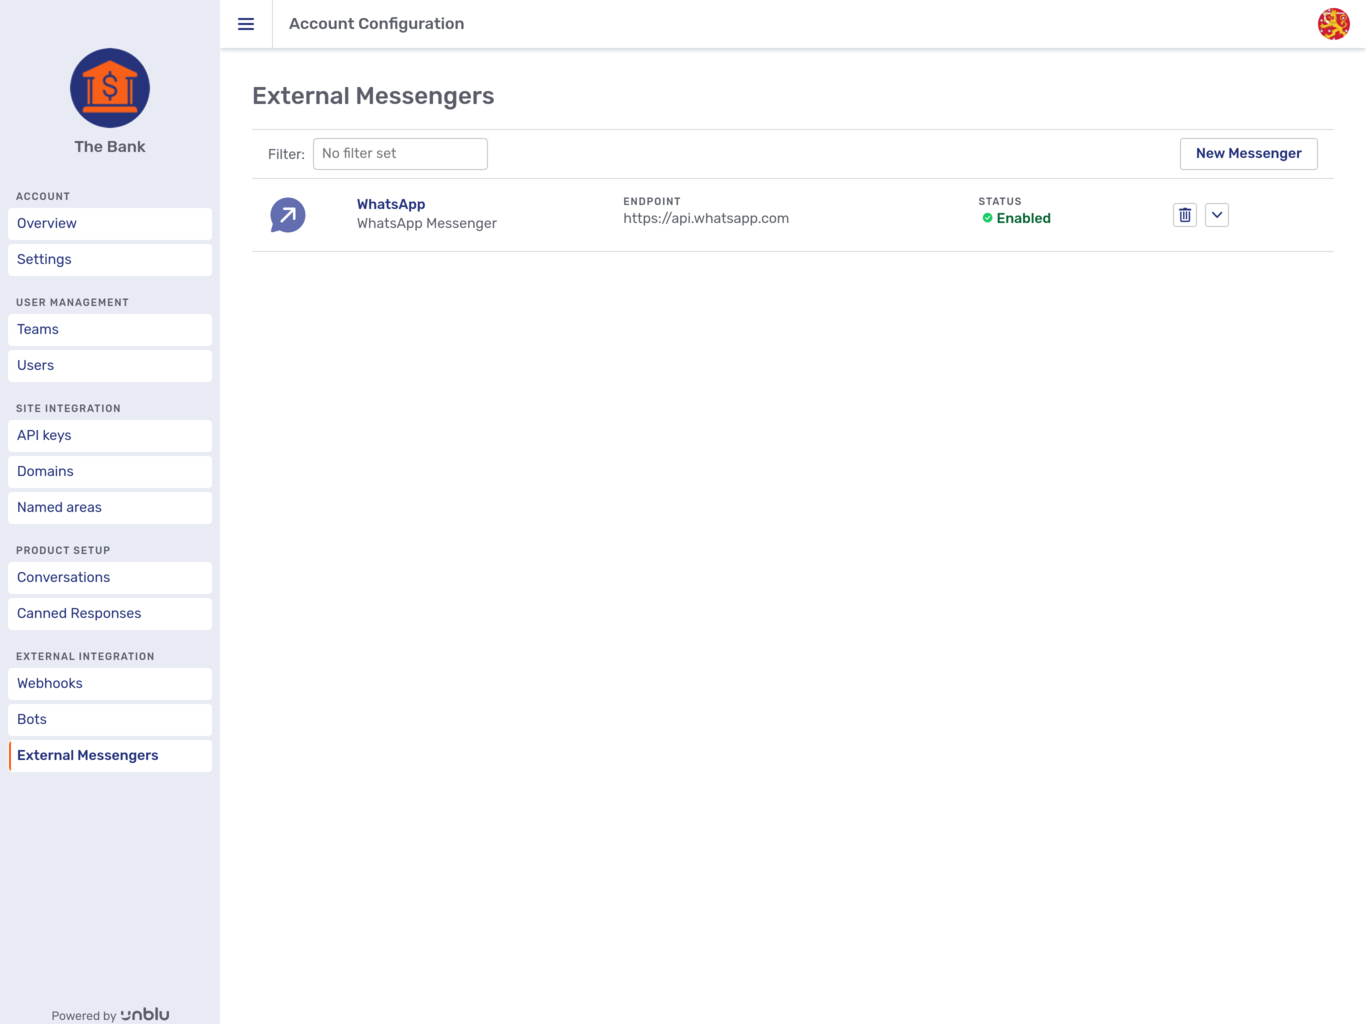
You can see the name, description, endpoint, and status of each external messenger configured for the account. Like webhooks and bots, each external messenger sports a delete button ![]() and a chevron button
and a chevron button ![]() . The delete button opens a modal dialog:
. The delete button opens a modal dialog:
If you click on OK, the external messenger configuration is deleted immediately.
The chevron button ![]() opens a context menu where you can open the delivery log tab directly, or send a ping event to test the bot.
opens a context menu where you can open the delivery log tab directly, or send a ping event to test the bot.
The New messenger button opens a modal page with the same configuration options as an existing external messenger’s General tab, described below.
7.3.6.3.1. General
The General tab allows you to specify the following settings of an external messenger:
-
A toggle to enable or disable the external messenger in Unblu
-
The name
-
The description
-
An image to use as the messenger’s icon, e.g. in the Agent Desk
-
The endpoint URL
-
A toggle to specify whether the the read and delivered states of messages sent to the external messenger are managed by the external messenger or by Unblu. This state is reflected in the number and color of the ticks displayed next to a message in the UI.
7.3.6.3.2. Delivery log
The Delivery log tab provides a list of all calls made to the external messenger’s endpoint by the Unblu collaboration server.
Here is an example of a successful delivery, expanded with the chevron button to show the request sent and the response received:
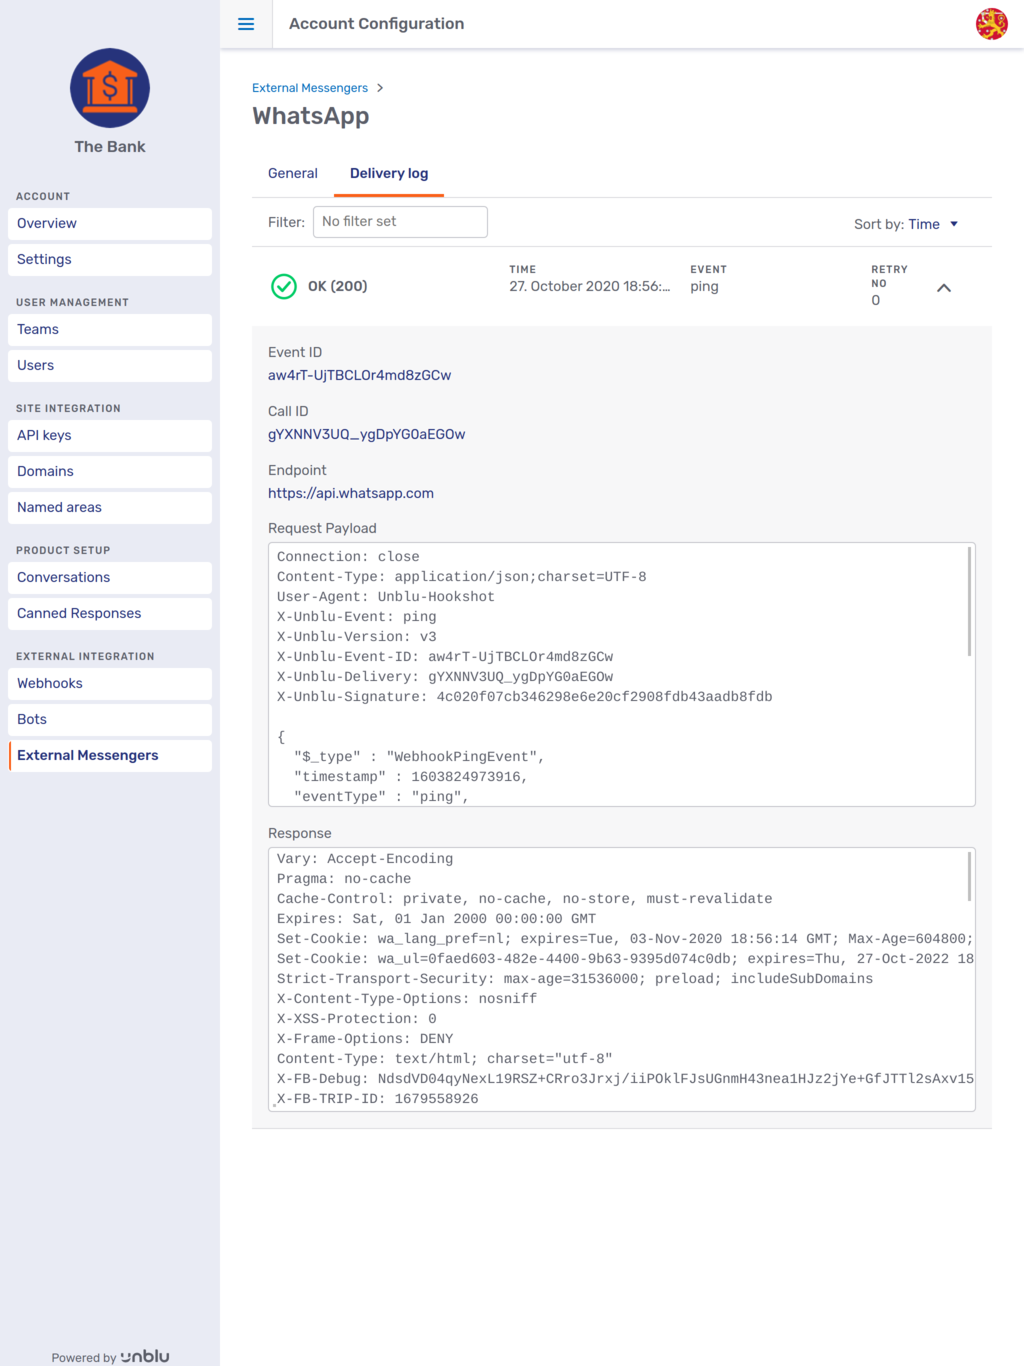
8. Visitor experience
An end customer or visitor has different ways to interact with a company using Unblu as its central collaboration platform.
8.1. Site Integration
Usually the Unblu collaboration suite will be integrated into the website of the customer e.g. the online banking, the insurance customer center etc.
8.1.1. Individual UI
The Individual UI consists of 4 major elements:
- The Unblu launcher button
-
This button is typically positioned in the bottom right corner and is the first interaction point of the visitor with Unblu. It allows to maximize and collapse the Conversation Panel and also gives information about the current state:
-
If the visitor has unread messages a little badge with a notification count will be displayed on it
-
When a visitor enters a conversation the icon in the button will change to indicate that closing the conversation panel won’t end the conversation.
-
If the visitor pops out the conversation panel into its own window (usually used during calls) the launcher button will change its icon to allow "popping in" the window again.
-
- The conversation panel
-
The conversation panel is the main interaction window with Unblu. When initially opening it, it will show the overview with past conversations and ways to start new conversations. On the overview the visitor will also directly see, if there is an agent available or not. Based on the availability of agents the visitor will see different possibilities to start a conversation. From here the visitor can navigate in and out of conversations.
- The collaboration space
-
The collaboration space is like an overlay over the whole website. As long as only chat is active, it is not visible for the visitor. When embedded co-browsing is started in a conversation, a green frame and banner will be displayed around the website, indicating that the content of the page is currently being shared. If any other collaboration layer (e.g. document or universal co-browsing) is activated, it’s content will be displayed inside the collaboration space, hiding the actual page behind it.
- The collaboration layer control panel
-
The content displayed and the interactions that can be done within the collaboration space are controlled by the collaboration layer control panel. By default the panel is only displayed when a collaboration layer is activated. It floats over the collaboration space and allows the visitor to see which layer is active, to stop sharing that layer and depending on the configuration to control the active layer and switch to another one.
8.1.2. Customization
The way Unblu’s collaborative features are presented can be individualized to fit the page they are integrated in and corporate design of the customer using configuration properties. This includes themeing like colors, button shapes etc., the position of the UI, the texts displayed and the features available for the visitor and much more.
Additionally further customization like the usage of a self-built UI for the Unblu Launcher Button or the PIN-Input can be achieved using the JavaScript API.
8.1.3. Visitor Desk
The Visitor Desk is a special instance of the Individual UI that is hosted on its own page served from the Unblu Server, it is not integrated into your company web page. The Visitor Desk is used for special cases where an agent may wish to send a link to a specific visitor allowing that visitor to communicate through Unblu without actually having to go to the company website.
8.2. State management
The Unblu Site Integration UI has different states with different life cycles that shall be explained here.
Unblu manages visitors in devices. Each browser is identified as a device by setting a long-term cookie. This means, that the Unblu server will treat all tabs from one browser as belonging to the same device.
8.2.1. Visitor identity
8.2.1.1. Non-authenticated
When a non-authenticated visitor opens a website that has Unblu enabled, the visitors identity will be linked to the device cookie. As long as the visitor doesn’t delete their cookies and uses the same browser, they will be treated as the same person when coming back to the page and all past conversations will be visible to him.
8.2.1.2. Authenticated
When a visitor authenticates himself (and this authentication is propagated from the customers website e.g. E-Banking to the Unblu server) Unblu will always treat the visitor the same person and make all previous conversations available to the visitor independent of the system, browser or device they are using.
8.3. Visitor engagement use cases
There may be different use cases where the visitor will use the Unblu UI to engage with an agent. These use cases may be generally divided into two categories.
8.3.1. Engagement requests
This category includes all use cases where a visitor has a question and actively uses Unblu to start a conversations. This may be:
-
Chat Request
-
Video Call
-
Voice Call
These requests will end up in the agents inbound queue and picked up by the next available agent. Typically the full Unblu UI is used for these use cases since the visitor needs the UIs to start conversations and may want to open a past conversation to review the information inside it.
8.3.2. PIN support conversations
Here the conversation usually starts with a telephone call outside of Unblu. At some point the agent would like to see the visitors screen, starts a new PIN conversation and tells the visitor the PIN via the phone connection.
-
Embedded PIN
-
Mobile PIN
Depending on the exact use case the visitor will either enter the PIN into a custom UI implemented in the website and the conversation is entered via the Unblu Visitor JS API. In this case the Unblu Launcher Button and Conversation Panel may not be displayed and only the collaboration space and the collaboration layer controls panel will be visible to the visitor.
Alternatively the fully Unblu UI may be used to enter the PIN and join the conversation.
8.4. Conversation panel
8.4.1. Conversation overview
After opening the Conversation Panel they will see the Overview Page. If it is their first interaction using Unblu, they will only see some welcome text, if an agent is available as well as different possibilities to start a new or join an existing conversation. However if they have had previous conversations, all active and past conversations will be accessible from the overview.
-
Active conversations have a notification badge next to them if they contain unread messages. They can be entered and all collaborative features may be used in them.
-
Ended conversations are grayed out. They can be entered to view their content e.g. messages and files but no further collaboration can be done in these conversations.
8.4.2. PIN entry page
From the conversation overview the visitor can navigate to the PIN-Entry page. (This may also be done automatically using the Visitor JS API.) Here the visitor can enter a PIN provided by an agent and will then be automatically navigated into the conversation.
8.4.3. Conversation
When a visitor opens or joins a conversation, they will always be in one of the conversation views. During a conversation files may always be shared by dragging them onto the Conversation Panel independent which conversation view is active.
8.4.3.1. Conversation action bar
The action bar within a conversation will feature info and actions specific to that conversation. The left side displays an avatar for every participants in the conversation except for the own avatar. Also keep in mind, that hidden participants will also not be displayed. Clicking on an avatar will reveal additional information as well as actions for that person.
Depending on the configuration one or several actions may be started from the action bar:
-
Start voice & video calls
-
Start sharing the own screen or website
-
Downloading a conversation log in csv format
-
Leaving the conversation
-
Ending the conversation
-
Navigating to the "All shared files" view
8.4.3.2. Messaging view
When a visitor opens or joins a conversation they will initially see the messaging view. This is the main conversation view which allows the visitor to read and write chat messages and share files using the clip icon. Shared documents can be downloaded or co-browsed if the file type is supported by the document co-browsing layer. Approvals to start collaborations can be accepted or declined here.
8.4.3.3. Files view
The files view shows all files that have been shared in this conversation. Files may be downloaded, deleted or co-browsed from here.
8.4.3.4. Call view
When a visitor starts a voice or video call or there is an incoming call inside a conversation the call view is displayed. The call view takes up the whole Conversation Panel to give a maximum focus to the call. Once the call is active the visitor may use several features on the call view:
-
Go back to the Messaging UI.
-
Enable or disable the microphone & camera.
-
Take a snapshot of the ongoing call (only if the agent has video enabled).
-
Maximize the conversation panel to take the whole window size.
-
Pop the conversation panel out into its own window..
If a call is active, the file and messaging views will display a banner on the top indicating this. Clicking on the banner will open the full call view again. Also if the other person in the call is sharing video, a small preview of that video will be displayed in a movable overlay on these views.
9. Supervisor and administrator
Supervisors and admins are special agent roles in Unblu. But except from being agents, they can manage several additional parts of inside a team/account. Admins have more permissions than supervisors.
Besides regular admins, there is sometimes the need for technical support people to have access to the configuration interface but not to the regular Agent Desk. The role that covers this scenario is called technical admin.
9.1. Supervisor
Supervisors are meant to manage their team and also their sub-teams and all users in those teams. To manage the teams and users, they can open the Account configuration. Managing a team or user means that supervisors can change the properties of an entity, but they can not create or delete them. See User Management for further details.
One key capability of supervisors is that they can check in the conversation history not only their conversations but also all the conversations of the agents from their teams.
Additionally, supervisors are able to use the Agent Monitor to see if their teams perform well or if there are any bottlenecks.
9.2. Administrator
An admin has all the capabilities to manage the whole Unblu account.
In the Agent Desk they can basically do the same as a supervisor. Inside the conversation history they can see all conversations of the account. Furthermore, in the Agent Monitor, admins can see all teams and agents if they are short on capacity or if everything is working as expected.
When an admin opens a conversation (normally, preview or in ghost mode), they have the possibility to change the configuration of the conversation.
On the Account configuration page an admin has the ability to manage all kind of account entities and their settings/translations. This includes the account details themselves, teams, users, apiKeys, domains, named areas, conversation templates, canned responses, webhooks, bots and external messengers. In contrast to the supervisor and admin can also create and delete those entities. Only the accounts themselves cannot be created or delete by admins (that would require a superadmins).
9.3. Technical administrator
The technical administrator role is intended for IT specialists whose tasks involve configuring or troubleshooting Unblu.
Technical administrators have similar permissions to administrators as far as managing account configurations are concerned. However, they cannot access the Agent Desk or any conversations that take place in Unblu.
9.4. Agent monitor
The agent monitor can be used by users who have the role supervisor or admin. It provides information about the available capacity of agents, named areas, about used filters and active sessions.
The UI is split into 4 sections: Service status, Agent availability, Active sessions and Filtered chat queues. If one or more entries in one of the 4 sections are selected, all unrelated entries in the other 3 sections are grayed out.
9.4.1. Services status
The Services status informs about the available capacity related to different named areas. Depending on different used filters for the languages, it shows also the capacity related to the different languages.
9.4.2. Agent availability
In this section the capacity per agent is displayed. For supervisors only the agents of their teams are displayed. For admins all agents of the account are displayed. The config property com.unblu.core.server.livetracking.agent.unavailableSessionLimit defines the amount of capacity available for each agent. Whenever they have one active session, the available capacity is reduced by one. If an agent is on status away, they have no capacity available.
9.5. Agent Desk
The agent desk is where your agents and advisors converse with visitors and clients. It provides for:
-
Handling the Queue of incoming conversation requests.
-
Managing an Inbox of current conversations.
-
Managing the Conversation History, keeping a record of all interactions.
-
For agents designated as Supervisors: managing teams of agents.
Here is the Agent Desk Inbox, showing the current, ongoing conversations:
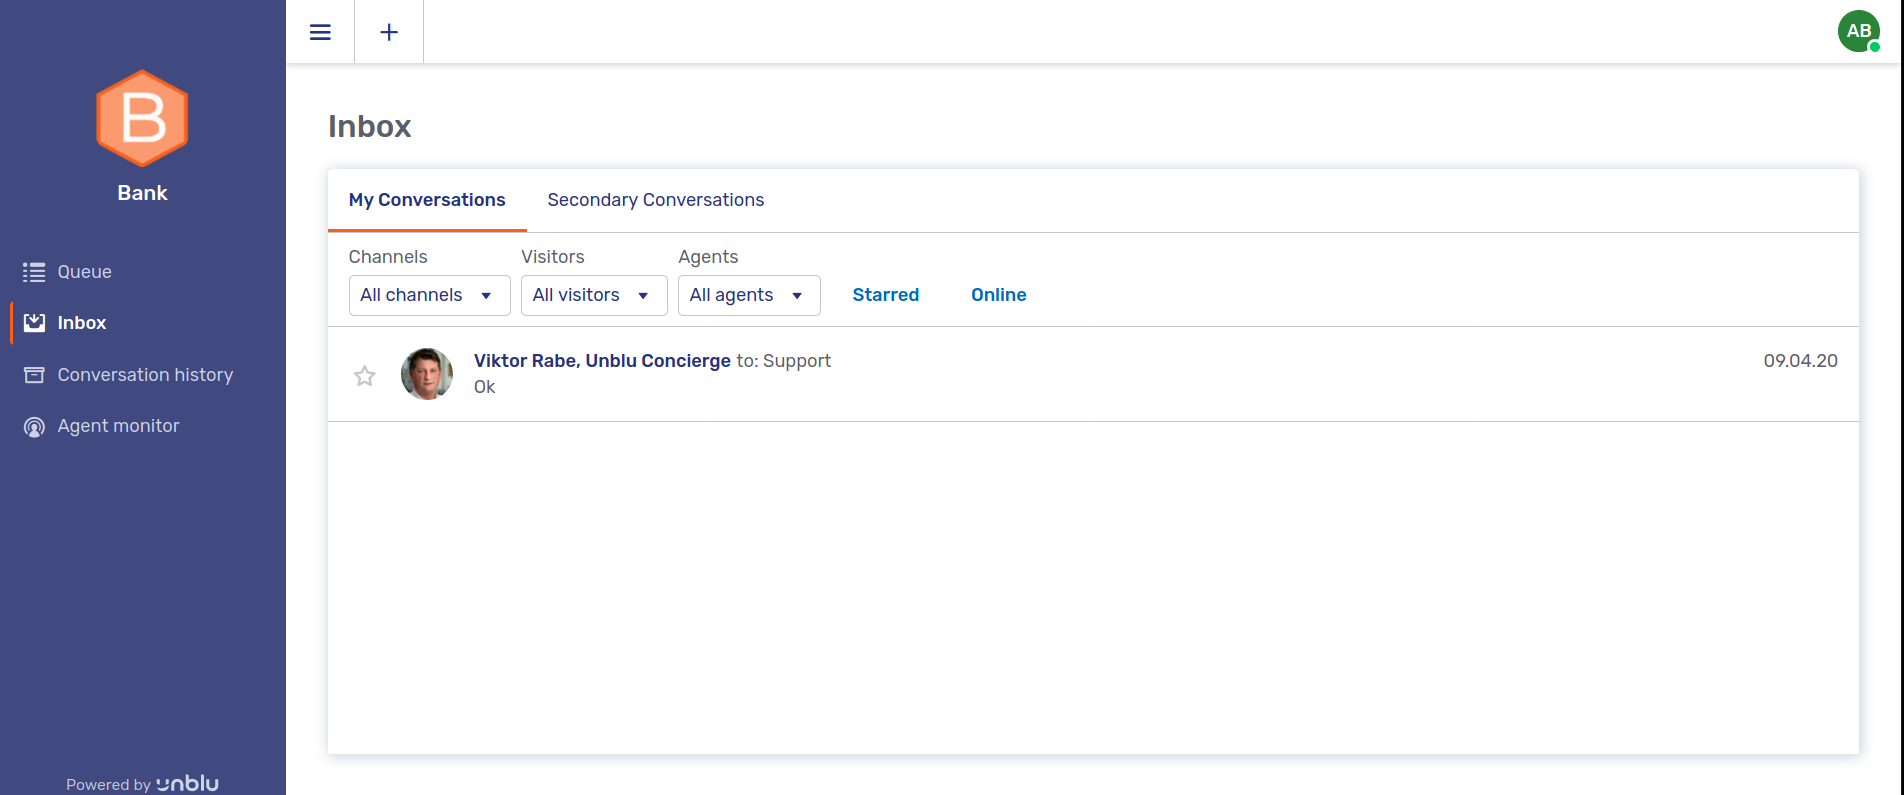
9.6. Team
Agents in Unblu can be organized into teams. A team is defined as a grouping that contains:
-
A supervisor (An agent with special permissions to manage the team, see below)
-
Zero or more agents (The members of the team)
-
Zero or more sub-teams (Teams can contain other teams, defining a hierarchy. Circular references are not permitted)
Teams are created and deleted by admins. Each team is managed by its supervisor.
9.7. Supervisor
The role of the supervisor is to manage their team. To do this the supervisor role has all the permissions of a normal agent plus specific ones to do with team management. Specifically a supervisor can:
-
Manage their team and sub-teams through the Agent Monitor in the Agent Desk.
-
Edit the team assignments within the team and its sub-teams.
-
Manage the canned-responses for their team in sub-teams
A supervisor, however, cannot:
-
Create new agent accounts.
-
change tje user-level canned responses.
In general, only a subset of the user or team configuration items are available to the supervisor.
9.8. Admin
This is the highest business role in a single account. The Admin user can see, configure and manipulate everything within a given account (see Accounts).
An admin can:
-
Create users and teams.
-
Define team hierarchy and assign agents to their respective teams.
-
Configuration settings used to integrate Unblu into the visitor website. This includes adapting the interface to reflect corporate standards and branding.
-
Manage the conversation templates used when new conversation are created.
-
Manage canned responses for the account, each team or each individual user.
-
Setup webhooks for integration with third party applications.
9.9. Superadmin
The superadmin is the highest role in the system. The difference between an admin and a superadmin is that the superadmin can see the "Global Server Configuration" item in the menu, where they will be able to manage global server-level settings. Specifically, a superadmin can:
-
Create and remove accounts
-
Act as admin for any particular account.
-
Manage the global configuration. For example the superadmin can configure Settings and Translations at a global level, meaning that these settings will then be applied for all accounts, unless they are overridden at the account level.
10. Conversations
10.1. The elements of a conversation
The concept of a conversation is central to Unblu. To understand how Unblu works, it is essential to have a solid grasp of the various elements that make up a conversation.
| We will not describe the numerous configuration properties that may affect a conversation or its components here. Please refer to the configuration properties reference for more details on conversation configuration. |
10.1.1. Overview
All communication in Unblu takes place within the context of a conversation. A conversation begins before there are any participants in the conversation, and a number of factors determine how Unblu will create a conversation. First, Unblu must ascertain the type of conversation to be created. This is referred to as the engagement type, and it is used to determine which conversation template to base the new conversation on.
Next, Unblu must identify who may participate in the conversation. A conversation has two main participants, one a visitor, the other an agent. The main visitor is referred to as the Context person; the main agent is the Assignee. (There may also be other participants, as discussed below in the section Conversation participants.)
The person or people who did not initiate the conversation will receive an invitation to join the conversation. If the conversation was initiated by a visitor, they will be the main participant on the visitor’s side. In such a case, the invitation will be sent to the conversation’s Recipients, i.e. those agents who have the authorization and/or skills required to join the conversation. The recipient who accepts the invitation first and joins the conversation will become the conversation’s Assignee.
Depending on the configuration, participants may leave a conversation and return to it later. Once one of the conversation’s participants is present in the conversation, a conversation session is opened. The session is maintained until no participants are present in the conversation.
10.1.2. Engagement types
When creating a conversation, Unblu uses the following four factors to determine the conversation’s engagement type:
-
The person type of the person who initiates the conversation, i.e. agent or visitor
-
The person type of the person that the conversation is centered around: again, either agent or visitor
-
The type of media initially used in the conversation
-
Whether the conversation is initiated in a standard Unblu UI or via the API
The engagement type is used to determine the conversation template for the conversation. It is only taken into account when first establishing a conversation. At that point, the configuration of the conversation template is copied to the conversation. From then on, the configuration of the conversation is independent of the conversation template. When an existing conversation is re-opened. the engagement type is no longer relevant.
10.1.2.1. Chat request
A visitor requests to chat.
-
Creator person type: visitor
-
Central person type: visitor
-
Media Type: Chat
-
Available in standard UIs: yes
10.1.2.2. Offline chat request
A visitor requests to chat while no agent is available.
-
Creator person type: visitor
-
Central person type: visitor
-
Media Type: Chat
-
Available in standard UIs: yes
10.1.2.3. Video request
A visitor requests to start a video call.
-
Creator person type: visitor
-
Central person type: visitor
-
Media Type: Video
-
Available in standard UIs: yes
10.1.2.4. Audio request
A visitor requests to start an audio call.
-
Creator person type: visitor
-
Central person type: visitor
-
Media Type: Audio
-
Available in standard UIs: yes
10.1.2.5. Universal co-browsing request
A visitor requests to start context migration co-browsing.
-
Creator person type: visitor
-
Central person type: visitor
-
Media Type: universal co-browsing
-
Available in standard UIs: yes
10.1.2.6. Embedded co-browsing request
A visitor requests to start embedded co-browsing.
-
Creator person type: visitor
-
Central person type: visitor
-
Media Type: embedded co-browsing
-
Available in standard UIs: yes
10.1.2.7. Mobile co-browsing request
A visitor requests to start mobile co-browsing.
-
Creator person type: visitor
-
Central person type: visitor
-
Media Type: Mobile co-browsing
-
Available in standard UIs: yes
10.1.2.8. Universal co-browsing PIN
An agent invites a visitor to join universal co-browsing via a PIN.
-
Creator person type: agent
-
Central person type: visitor
-
Media Type: Universal co-browsing
-
Available in standard UIs: yes
10.1.2.9. Embedded co-browsing PIN
An agent invites a visitor to join embedded co-browsing via a PIN.
-
Creator person type: agent
-
Central person type: visitor
-
Media Type: Embedded co-browsing
-
Available in standard UIs: yes
10.1.2.10. Mobile co-browsing PIN
An agent invites a visitor to join mobile co-browsing via a PIN.
-
Creator person type: agent
-
Central person type: visitor
-
Media Type: Mobile co-browsing
-
Available in standard UIs: yes
10.1.2.11. Chat invite
This engagement type does not reflect a standard use case. It can only be used for conversations that are created using the Unblu Web API. While it is possible in principle to create conversations of any engagement type via the Web API, in practice, chat invite is the most commonly used engagement type under these circumstances.
-
Creator person type: agent
-
Central person type: agent
-
Media Type: Chat
-
Available in standard UIs: no
10.1.2.12. Universal co-browsing invite
An agent sends a visitor an invitation to join universal co-browsing.
-
Creator person type: agent
-
Central person type: agent
-
Media Type: Universal Co-browsing
-
Available in standard UIs: yes
10.1.2.13. Visitor co-browsing invite
A visitor sends another visitor an invitation to start embedded co-browsing.
This engagement type is not a standard use case. It can only be created using the Unblu JavaScript API.
-
Creator person: visitor
-
Central person: visitor
-
Media type: Embedded co-browsing
-
Available in standard UIs: no
10.1.3. Invitations
When a person has created a conversation, Unblu sends an invitation to other potential participants. To join a conversation, an invitee must redeem the invitation. An invitation can only be redeemed once. Thus, even if more than one person receives an invitation, at most one these people can join the conversation using this invitation.
Besides being redeemed, an invitation can also be revoked, either by an agent or by Unblu, provided it has not yet been redeemed. Once an invitation has been revoked, it can no longer be used to join a conversation.
10.1.3.1. Recipients
If a visitor initiates a conversation, the agent or group of agents to receive an invitation to join a conversation are referred to as the conversation’s recipients. They are potential participants in the conversation.
Once a recipient has redeemed the invitation, it is not possible for other recipients to join the conversation with the same invitation. However, the conversation’s recipient stays the same when the invitation has been redeemed.
If a conversation is forwarded to another agent, team, or named area, they become the conversation’s new recipient.
Recipients are displayed in the conversation list of the Individual UI until a recipient redeems the invitation.
10.1.3.2. Invitation types
There are a number of different types of invitation, depending on who initiated the conversation and on the purpose of inviting the other person.
10.1.3.2.1. Conversation request
This is the most common type of invitation. It is sent to conversation Recipients when a visitor initiates a conversation.
10.1.3.2.2. Agent forwarding
When an agent forwards a conversation to another agent (or to a team), the new agent receives this kind of invitation. Once the latter joins the conversation, they become the conversation Assignee, and the original assignee leaves the conversation.
10.1.3.2.3. Agent invitation
This kind of invitation is used to invite an agent to join a conversation as a secondary agent. The status of other agents in the conversation is not affected when the invited agent joins.
10.1.3.2.4. Visitor invitation
This is the kind of invitation created when an agent adds a visitor to an existing conversation using the Invite a customer option in the agent desk. Any user with the invitation ticket of an visitor invitation can join the conversation as a visitor. Once the invitation has been redeemed it cannot be used by another visitor.
10.1.3.2.5. PIN conversation
This invitation type is used for universal, mobile, and embedded PIN sessions. Any user with the invitation ticket can join the conversation as a visitor. The invitee redeems the invitation by entering a PIN code. Once the invitation has been redeemed it cannot be used by another visitor.
10.1.4. Conversation participants
A participant in a conversation is a person who has joined that conversation. Unblu distinguishes between different participants depending on their person type (visitor or agent) and on whether they are primary or secondary participants in the conversation. What participants are able to do in a conversation is configurable. You may wish to prevent visitors from inviting other people to join the conversation as Secondary participants, for example.
10.1.4.3. Secondary participants
Secondary participants are participants invited to join a conversation by a current participant of the same conversation. For example, Unblu allows the assignee of a conversation to invite other agents and/or visitors to join them. Of course, who exactly is able to invite whom to join a conversation is configurable.
10.1.4.3.1. Secondary visitors
Secondary visitors are any visitors other than the context person participating in a conversation. For example, a relationship manager may wish to chat with two clients in different locations. In this case, the relationship manager could start a conversation with one of their clients and then invite the other client to join them in the conversation. Here, the first client would be the context person and the second client would be a secondary visitor.
| There can be more than one secondary visitor in a conversation. |
10.1.4.3.2. Secondary agents
Secondary agents are any agents participating in a conversation that are not the assignee of that conversation. For example, a relationship manager may wish to invite a tax specialist from the bank to take part in a conversation with their client. In that case, the tax specialist would be a secondary agent in the conversation.
Another context where secondary agents are important is deputy management, which is most commonly used for long-running conversations between advisors and their clients. By specifying a deputy, a client advisor can ensure that their clients' enquiries will be dealt with in a timely fashion even if they themselves are unavailable. In such situations, the deputy is a secondary agent as well as a hidden participant (see below) to the principal advisor’s conversations.
| There can be more than one secondary agent in a conversation. |
10.1.4.3.3. Hidden participants and ghost participants
Hidden participants are secondary agents in a conversation who are not visible to the other participants. A hidden secondary agent participates in a conversation just like a normal secondary agent: they can see the conversations where they are a secondary agent in their inbox under Secondary Conversations. There, they can open a conversation and observe it as it happens. However, if they begin to participate actively in the conversation — by sending a message to the chat, say --, they become visible to the other participants.
Unlike hidden participants, ghost participants are not actual participants in a conversation. They may view a conversation, usually by using the Preview button in the inbox or the conversation history of the Agent Desk. Depending on the configuration of the conversation, ghost participants have the right to execute actions such as forwarding the conversation to another agent or inviting another agent; see the configuration properties reference for further details.
10.2. Collaboration layers
Unblu’s collaboration layers allow conversation participants to view the content of a website, a mobile app or an application together. They make communication more effective and provide a richer experience for your visitors.
Unblu offers five different collaboration layers, each serving a different purpose and often using different technology:
-
Embedded co-browsing
-
Universal co-browsing
-
Document co-browsing
-
Screen sharing
-
Mobile co-browsing
This article describes the collaboration layers. It presents each collaboration layer and explains the differences between the layers.
For information on how to work with collaboration layers, please review the Visitor individual UI guide and the Agent desk guide.
The article Configuring and manipulating collaboration layers provides information on the various ways you can customize the configuration of each collaboration layer.
10.2.1. Embedded co-browsing
The embedded co-browsing collaboration layer allows collaboration on web pages instrumented with the Unblu JavaScript snippet. It does so using a technique called DOM capturing, which runs in the visitor’s browser. The visual state of the visitor’s browser is cloned and transferred to the agent. Additional resources like images or CSS files that the agent’s browser needs to replicate the visitor’s view of the page are retrieved separately, not from the visitor’s browser.
Unblu doesn’t persist any of the data transferred from a page during an embedded co-browsing session. It merely holds it in memory on the Unblu server during the collaboration session. The only data persisted in the Unblu database is metadata relating to the various types of session involved in an embedded co-browsing collaboration session during a conversation. Once the collaboration session ends, the data transmitted, including any data transferred to the resource history, is removed from the Unblu server.
As mentioned above, each page you want to enable embedded co-browsing on must contain the Unblu JavaScript snippet. Without it, the state of visitor’s view of a page can’t be forwarded to the agent. You can add the JavaScript snippet to the <head> section of the pages you want to instrument. Alternatively, you can have the snippet injected dynamically by the SecureFlow Manager or a tag management system.
Embedded co-browsing allows access to the full set of collaboration tools: mark mode, remote control, and scroll lock.
Since you have control over the pages that are instrumented for embedded co-browsing, you can also take advantage of other features, such as the ability to hide page elements from agents. For further information, refer to Configuring and manipulating collaboration layers.
Embedded co-browsing allows in-context sessions. This means that the visitor’s current browser information is kept intact. For example, suppose a visitor has logged in to your website and requests a co-browsing session. All the visitor’s context information, such as their login information and browsing history, carry over into the embedded co-browsing session. Agents thus have access not just to the web page the visitor was on but to the whole context of what they were doing, such as completed form fields.
Although a powerful tool, embedded co-browsing does have some technical limitations. For an in-depth discussion, refer to Limitations of embedded co-browsing.
10.2.2. Universal co-browsing
|
Universal co-browsing requires the Unblu rendering service. Please refer to our guide on Configuring the rendering service for information on how to configure the rendering service. |
In a universal co-browsing session, participants in the conversation can view websites together that haven’t been instrumented for use with Unblu. For example, if a relationship manager recommends that a client invest in a particular company, they may wish to view that company’s website together.
Universal co-browsing makes this possible by using the Unblu rendering service. * Each universal co-browsing session launches a new rendering service in a Docker container. The rendering service is an application based on a Chromium browser running in headless mode. * All of the participants in the session interact with this browser instance, and the same graphical output is streamed to all of the participants. * The view of the browser is transmitted to all participants via the WebRTC API. Check our browser requirements page to see which browser versions support WebRTC. * Interaction with the browser — mouse clicks, marking, editing and the like — takes place via the collaboration server, which forwards the interaction to the rendering service via gRPC.
The participants in a universal co-browsing session cannot see anything that is on another participant’s computer. This is a significant difference from embedded co-browsing and screen sharing sessions, where all participants view the contents of a particular participant’s browser. It also means that, unlike with embedded co-browsing, it is not possible to hide part of a page from some participants and show to others.
Like embedded co-browsing, universal co-browsing comes with collaboration tools that are not available in screen sharing sessions: mark mode, remote control, and scroll lock.
10.2.3. Document co-browsing
|
Document co-browsing requires the Unblu rendering service. Please refer to our guide on Configuring the rendering service for information on how to configure the rendering service. |
Document co-browsing allows the participants of a conversation to view a single copy of a document together. With the appropriate settings enabled, participants can also highlight sections of the document or edit it.
To co-browse a document, a conversation participant must upload it to the conversation. Any participant with the required permissions can then initiate a co-browsing session of the document. As with universal co-browsing, the interaction between participants and the software displaying the document takes place over the WebRTC API.
When a document is edited in the course of a co-browsing session, the modified document must be uploaded to the conversation to save the changes. If the document is not uploaded to the conversation, the changes made to the document will be lost. The rendering service does not store a copy of the document.
You can also integrate third-party electronic signature solutions such as DocuSign. This allows you to complete the entire contract negotiation process online, from the advisory stage to the final signature.
10.2.3.1. Supported file types
Unblu allows you to co-browse PDF files, plain text (.txt) files, and images. (PDFs that require special plugins are not supported.)
It is possible to enable co-browsing of other file types, too. To do so, you will need access to software such as ONLYOFFICE or Microsoft Office Online Server that allows you to view and possibly edit these file types.
| If you don’t have an on-premise solution such as Microsoft Office Online Server, using document co-browsing with files of a type other than PDF requires third-party services and involves uploading the files to the servers of those third parties. |
10.2.4. Screen sharing
In a screen sharing collaboration session, the participants in a conversation all have access to the screen, or part of the screen, of one of the participants.
This is useful if, for example, a relationship manager wishes to share a view of a spreadsheet in Microsoft Excel to show a client some calculations they made without giving the client access to the Excel file itself. In the Agent Desk, that would look like this:
The client in the conversation would see this:
When initiating a screen sharing session, the participant sharing their screen is usually asked which content they wish to share.
| This is not a feature of Unblu but a security measure built into modern browsers. |
Most browsers offer the following choices:
-
The entire screen
-
An application window
-
A browser tab
This flexibility can be very useful, since it allows people to share a view of their own computer without the need to share files or programs with the other participants in a conversation. If a customer is experiencing technical difficulties printing a contract, they could allow your support agents to view their printer settings.
However, screen sharing also has disadvantages compared to universal or embedded co-browsing:
-
There are no collaboration tools available in screen sharing sessions. Screen sharing is not a remote desktop solution.
-
It is easier to share content inadvertently that you did not want other participants to see.
-
The view being shared is captured by the browser of the participant sharing their screen. As a result, screen sharing may exhibit inconsistent behavior across different browsers.
-
Screen sharing uses the Screen Capture API to access the video and audio stream of a participant’s screen. This API is only available in relatively modern browsers.
-
Screen sharing relies on the page that the screen sharing session was launched from to remain available. If the visitor navigates to a different page instrumented with Unblu, the screen sharing session stops and must be re-initiated.
| The specific browser versions that permit screen sharing are listed on the browser requirements page. |
10.2.5. Mobile co-browsing
Mobile co-browsing refers to the possibility for your agents to join users of your mobile apps as they use them. This requires that Unblu is integrated into your mobile apps using the Unblu Mobile SDKs for iOS and Android.
The following features are available in mobile co-browsing sessions:
-
Co-browsing all of your app’s content
-
Interactions of the user with the device screen can be seen remotely
-
Orientation changes are displayed on the agent side
-
Lock the screen displayed in the agent desk if the visitor puts the app into the background
-
Areas of the app can be marked remotely
10.2.6. Collaboration tools
Unblu includes various tools to make working with collaboration layers more effective:
- Mark mode
-
Allows conversation participants to mark an area of the view being shared in the conversation.
- Remote control
-
Allows a conversation participant to take control of the pointer
- Scroll lock
-
Locks the section of the page displayed in place. Even if another participant scrolls the page, what is displayed on the screen of whoever activated scroll lock will remain the same.
The controls for these three tools are grouped together. In the Agent Desk, they are in the collaboration layer’s action bar. For visitors, they are located in the collaboration layer controls at the top of the collaboration space.
10.2.6.1. Enabling collaboration tools
Not all tools are available in all collaboration layers. If a tool is available in a particular collaboration layer, there will be a configuration property to enable it.
The configuration properties that enable collaboration tools are defined on conversations or conversation templates. This provides for fine-grained configuration possibilities. You might, for example, decide that relationship managers should be granted full control of the collaboration layer in conversations with their clients. In conversations between support agents and visitors, on the other hand, agents should only be allowed to mark sections of the layer.
As a rule, you can specify which categories of participant may enable a tool.
In addition to enabling collaboration tools, you can define whether using the tools requires the explicit approval of the visitor or agent (depending on the tool).
For more information on configuring collaboration tools, and indeed other aspects of collaboration layers, please read our article Configuring and manipulating collaboration layers.
10.3. Conversation and participation life cycles
Each conversation proceeds through a number of different states which determine what can or must occur within the conversation for it to proceed. The state of a user’s participation in a conversation goes through a similar (but not identical) series of changes. These series of transitions from one state to the next are referred to as the conversation life cycle and participation life cycle, respectively.
10.3.1. The conversation life cycle
The conversation life cycle is a simple series of transitions from one state to the next. It is influenced by the participation states of the users taking part in the conversation as well as the engagement type of the conversation. The latter determines which conversation template is used when creating the conversation. This in turn determines which transitions are possible and/or necessary in the conversation’s life cycle. The following diagram shows all of the possible conversation states and the order of transition.

A conversation need not necessarily go through all of the states in the diagram above. If a visitor declines the Terms and Conditions, for example, the conversation state will change from ONBOARDING to ENDED. Other states, such as UNASSIGNED, are only used in certain configurations.
10.3.1.1. Conversation states
The conversation states specify the overall state of a conversation.
- Created
-
This is the initial state of a conversation, regardless of whether it was a visitor or an agent who started the conversation. Whoever started the conversation automatically joins the conversation as the context person (visitor) or assignee (agent), respectively.
- Onboarding
-
While the central person of the conversation is completing the onboarding process, the conversation is in the
ONBOARDINGstate.The central person of a conversation need not be the person who initiated the conversation; see Engagement types for more details. In many cases, the onboarding process needs visitor input to be completed. If, however, the onboarding process you put in place doesn’t require any action by the visitor, Unblu will complete the onboarding process without waiting for the visitor to open the conversation. This will be the case if, for example, you aren’t using the concierge or any other dialog bots at all, or if the concierge merely displays a message.
If you use an external dialog bot, Unblu doesn’t know whether the visitor will have to answer any questions, so it always waits for the visitor to open the conversation.
Unblu completing the onboarding process without waiting for the visitor to open the conversation is referred to as fast onboarding. Fast onboarding is not a way of speeding up the onboarding process.
- Queued
-
If the conversation was initiated by a visitor, the conversation’s state will change from
ONBOARDINGtoQUEUEDonce the central person has completed the onboarding process. A conversation may also be assigned this state by calling the web API endpoint/invitations/requeueConversationon it to move it to the queue.The conversation remains in this state until an agent joins the conversation.
- Active
-
A conversation is
ACTIVEonce two primary participants have joined the conversation (if the conversation was initiated by a visitor) or once the central person has completed onboarding (if the conversation was initiated by an agent). - Unassigned
-
When the assignee leaves an
ACTIVEconversation, its state is changed toUNASSIGNED. If the visitor remaining in the conversation as a participant wishes to resume the conversation, they can simply send a message to start the reboarding process.Whether it is possible for a visitor to stay in a conversation after the assignee has left depends on how the conversation or its template is configured. Only conversations originally initiated by visitors can be
UNASSIGNED. All other conversations are ended when the assignee leaves.See the list of engagement types for further information.
- Reboarding
-
When a message is sent to a conversation whose state is
UNASSIGNED, the conversation’s state is set toREBOARDINGuntil the central person has completed the reboarding process. Once the reboarding process is completed, the conversation will be placed in the queue again for an agent to accept. If the process is canceled, the conversation state reverts toUNASSIGNED. - Offboarding
-
When an active conversation is ended, its state changes to
OFFBOARDINGand remains in this state while the participants complete their respective conversation offboarding processes. - Ended
-
When the offboarding process has been completed for each participant, either by the participants themselves or due to timing out, the conversation’s state changes to
ENDED. The participants that didn’t leave the conversation remain active participants of the conversation. This enables them to view the details of the ended conversation at a later point in time.
10.3.1.2. Starting a conversation
When a visitor wants to start a conversation, they generally either click on a button in the visitor UI or trigger the execution of code you wrote that uses the Unblu JS API. Both of these actions attempt to start a conversation with a certain engagement type. For example, you may have added a link to your organization’s e-banking that allows users to request an embedded co-browsing session with a support agent. When a user clicks on the link, you call UnbluAPI.startConversation() with the type DOMCAP_BROWSER_REQUEST.
The configuration property com.unblu.cobrowsing.startWithOfflineChatOptionEnabled gives you the possibility to let visitors start a conversation even though there are no agents available to deal with their request. This engagement type is called an offline chat request. All other engagement types are online requests.
Offline chat requests are passed to the Unblu server.
-
If com.unblu.cobrowsing.startWithOfflineChatOptionEnabled is
true, the request is added to the queue. -
If com.unblu.cobrowsing.startWithOfflineChatOptionEnabled is
false, the request will raise an exception which is then returned to the visitor’s client.
Online requests are evaluated both on the client and the server.
-
The visitor’s client checks whether offline requests are enabled.
-
If offline requests are enabled, the client sends the chat request to the Unblu server.
-
If offline requests are disabled, the client sends a request to the Unblu server to determine whether an agent is available.
-
If an agent is available, the client sends the chat request to the Unblu server.
-
If no agent is available, the client throws an error and displays a message explaining the situation.
-
-
-
Upon receiving a chat request, the Unblu server also checks whether offline requests are enabled.
-
If offline requests are enabled, the server will start the conversation regardless of whether an agent is currently available or not.
-
If offline requests are disabled, the server checks whether an agent is available.
-
If an agent is available, the server starts the conversation.
-
If no agent is available, it raises an exception and returns it to the visitor’s client.
-
-
10.3.1.3. Leaving vs ending a conversation
When a participant leaves a conversation, they no longer have access to the conversation: they cannot view it in their conversation history, nor can they rejoin it. If they wish to rejoin the conversation, they will need a new invitation. The conversation has not necessarily ended, though.
When a conversation has ended, on the other hand, participants who didn’t leave the conversation remain active participants in the conversation and continue to have access to it in their conversation history. Although an ended conversation has active participants, it is not possible to send new messages to an ended conversation or to invite people to join it. A conversation that has ended is in a state that can no longer change.
You can specify that a conversation be ended when participants leave a conversation with the configuration property com.unblu.conversation.lifecycle.autoEndOnLeave. It is also possible to configure Unblu so that participants automatically leave or end a conversation when they disconnect. The relevant configuration properties are
10.3.1.3.1. Closing a conversation
When we say a user has closed a conversation, we mean that they have navigated away from a conversation, e.g. by closing the browser tab the conversation was taking place in. Closing a conversation doesn’t affect the conversation state. However, it is possible to configure Unblu so that participants automatically leave or end a conversation when they disconnect.
If you want the Individual UI to close automatically when a conversation has ended, you can set it to do so with the configuration property com.unblu.conversation.ui.autoCloseOnConversationEnd. However, the setting will not have an effect if the visitor’s participation in a conversation is ended by the system, e.g. because they declined the terms and conditions during onboarding. In such cases, you cannot close the UI automatically.
10.3.2. The participation life cycle
The participation life cycle describes how the state of a user in relation to a conversation changes in the course of that conversation.
10.3.2.1. Participation states
- Created
-
The participant has been created.
- Onboarding
-
The participant is completing the onboarding process for the conversation. During the onboarding process, the participant can only see messages that are part of the onboarding process.
- Active
-
The participant has joined the conversation and is an active member. If the participant doesn’t leave the conversation, their participation in the conversation will remain active even after the conversation has ended. See Leaving vs ending a conversation for more information.
- Offboarding
-
The participant is completing the offboarding process to leave the conversation.
A participant’s state only changes to OFFBOARDINGif they leave the conversation. If they remain in a conversation until it ends, they will be required to complete the conversation offboarding process, but their participation state will remainACTIVE. - Ended
-
The participant is no longer present in the conversation and no longer has access to it.
10.4. Concierge
10.4.1. Overview
The Unblu concierge is a bot that can be configured to automate three common interactions that occur during a typical conversation: onboarding, reboarding and offboarding.
For example, it can ask visitors to answers preliminary questions such as
-
"What is your name?"
-
"What is your email address?"
-
"Do you accept the terms and conditions?"
This is all done before an agent actually joins the conversation.
This helps the agents by automating the asking of repetitive questions and can provide valuable information for sorting the incoming chat requests. At the end of the conversation the concierge can ask about the experience and relay additional information to the visitor.
The flow of messages written and question asked by the concierge can be configured by choosing among a large set of possible predefined actions and by defining conditions as to when specific actions are performed. For example, depending on the situation (start of a conversation, ejection of visitor from conversation, reboard visitor after agent left, conversation is ended, visitor did not successfully finished the onboarding, etc.) the type and order of the messages sent can be defined. This can be different depending on the type of engagement (chat request, pin based conversation, …) and depending on the page where the visitor is (named area).
The possibilities during onboarding are:
-
Greet & several other customizable text messages
-
Ask for name
-
Ask for terms and conditions
-
Determine the for recipient of the conversation by asking between a multiple answers question
-
Ask for email to send notifications
The possibilities during reboarding are:
-
Ask the visitor if they want to chat with an agent again. The visitor then has the option to
-
Accept: the conversation will be put into the queue again and an agent can pick it up
-
Decline: the conversation will stay unassigned
-
The possibilities during offboarding are:
-
Give reason for offboarding (info message)
-
Several customizable text messages
-
Rate conversation
-
Ask to send log via email
11. Glossary
- Account
-
The account is the main entity to separate several tenants on the same Unblu installation. You can think of an account as a collection of users, teams, named areas, conversation templates, configuration properties etc.
- Admin
-
A user of the Unblu agent desk who has administrator privileges. Administrators have access to the account configuration interface and can configure settings at the account level.
- Administrator
-
See Admin.
- Agent
-
A registered user of the Unblu Agent Desk, usually a representative of the organization that offers collaboration services on their website.
- Agent Desk
-
The web-based interface for users to conduct and manage conversations, calls, and collaboration sessions.
- API key
-
A code passed by websites instrumented with the Unblu snippet to identify themselves. The API key acts as both a unique identifier and a secret token for authentication, and has a set of access rights and configuration associated with it.
API keys are commonly used to provide different configurations for Unblu in mobile and desktop web applications, or on different websites that belong to the same organization.
- Avatar
-
A graphical representation of an entity (e.g., User, person, Team, Account, Named area).
- Canned response
-
A canned response is a predefined text snippet that agents can use in chat messages. They help reduce the amount of typing agents have to do for frequently used messages.
- Configuration cascade
-
The mechanism by which the values of configuration properties are inherited by entities from other entities. The configuration cascade is defined by Unblu and cannot be changed.
Read our article entitled Configuration property scope and the configuration cascade for more further information.
- Configuration property
-
A property or setting defined on an entity which specifies a facet of the entity’s behavior.
- Conversation template
-
A collection of configuration and text properties applied to a conversation when it is created. Which conversation template is applied to a new conversation depends on the engagement type and the named area that the conversation request originated from.
- Domain
-
A distinct subset of the Internet with addresses sharing a common suffix or under the control of a particular organization or individual.
- Engagement type
-
The set of criteria used to determine which type of conversation to launch. The criteria are:
-
The person type of the person who initiates the conversation, i.e. agent or visitor
-
The person type of the person that the conversation is centered around: again, either agent or visitor
-
The type of media initially used in the conversation
-
Whether the conversation is initiated in a standard Unblu UI or via the API
-
- Inheritance
-
The method by which configuration properties are transferred to entities further down the configuration cascade.
- Individual UI
-
The standard visitor interface. The individual UI is the part of Unblu that can be integrated into your public website.
- Named area
-
A 'pseudo-domain' defined by adding tags to your existing web pages.
Named areas allow you to group parts of your website where Unblu should behave differently. They can be constructed using pages from any domain registered in Unblu.
- Person
-
The representation of a user in conversations. The user’s details, such as their name, are copied to the person. Changes made to the user’s details are reflected in the person that represents it.
Users who joined a conversation at some point in the past are represented by persons in the conversation. This is the case even if they aren’t currently present in a conversation, for example because they closed the browser tab with the conversation. When they open the conversation again, they’re represented by the same person.
Decoupling the representation of users in conversations from the users themselves allows for persistent conversations to be displayed with information about their participants even after a user has been deleted from Unblu.
- PIN
-
An identifier, typically consisting of several digits.
Typically, the agent gives the visitor the PIN code over the phone. The visitor then enters the code to join the conversation (see PIN invitation).
- Scope
-
The scope of a configuration property describes the set of entities the property may affect, depending on the level within the configuration cascade that the value of the configuration property is specified.
Read our article entitled Configuration property scope and the configuration cascade for further information.
- Settings
- Subteam
-
See Team.
- Superadmin
-
See Superadministrator.
- Superadministrator
-
A user of the Unblu Agent Desk who has superadministrator privileges. Superadministrators (or "superadmins") can configure settings at the account and server level.
- Supervisor
-
A user with the authorization to administer some aspects of an account, for example certain teams.
- Team
-
Teams are groups of users and subteams. A subteam is simply a team within another team.
Teams allow you to apply and change settings for multiple users quickly and uniformly.
Teams do not intersect: a user can only be a member of a single team. If a user is a member of a sub-team, they are not members of the parent team as well.
- User
-
The entity used to store information about someone who can use Unblu, such as their name and email address, in the Unblu server.
Agents, supervisors, admins, and superadministrators are all represented as users in Unblu.
What a user can do in Unblu is determined by their role.
Users may be created in Unblu or propagated from an external source such as an identity management system. For more information, see User modes.
In conversations, users are represented by person entities.
- Virtual user
-
A user identity propagated to Unblu by another system. This means that Unblu does not have any local information about that user (in the built-in user directory) but fully trusts the system that propagates the user identity.
- Visitor
-
A person that is using Unblu to get assistance, support or advice. Usually a customer of the company that offers collaboration services on their web site.