|
This document describes version 5 of Unblu. If you’re using the latest major version of Unblu, go to the documentation of the latest version. The support period for version 5 ended on 22 November 2021. We no longer provide support or updates for this version. You should upgrade to the latest version of Unblu. |
The Airlock Web Application Firewall (WAF) is one of the reverse-proxy products specifically supported by Unblu for securing public internet access to on-premises Unblu installations.
This section describes the configuration of an Airlock WAF that proxies your on-premises Unblu server and your Unblu-enabled web application (for example an e-banking web application) to your public visitors using a site-embedded architecture.
This should not be confused with the configuration and set up need for agents within your organization to access Unblu. This is handled by a different mechanism.
| In some cases the agent integration maybe handled with a related product, Airlock IAM. The two Airlock products are distinct. In this section all mentions of "Airlock" refer to Airlock Web Application Firewall. |
Requirements
The first step is to install Airlock WAF on your internal infrastructure, on the same internal network as your Unblu server installation and your Unblu-enable web application. For details on installing Airlock WAF consult the Airlock knowledge base and the Airlock machine sizing page.
Unblu supports Airlock WAF version 5.3 or higher.
Overview
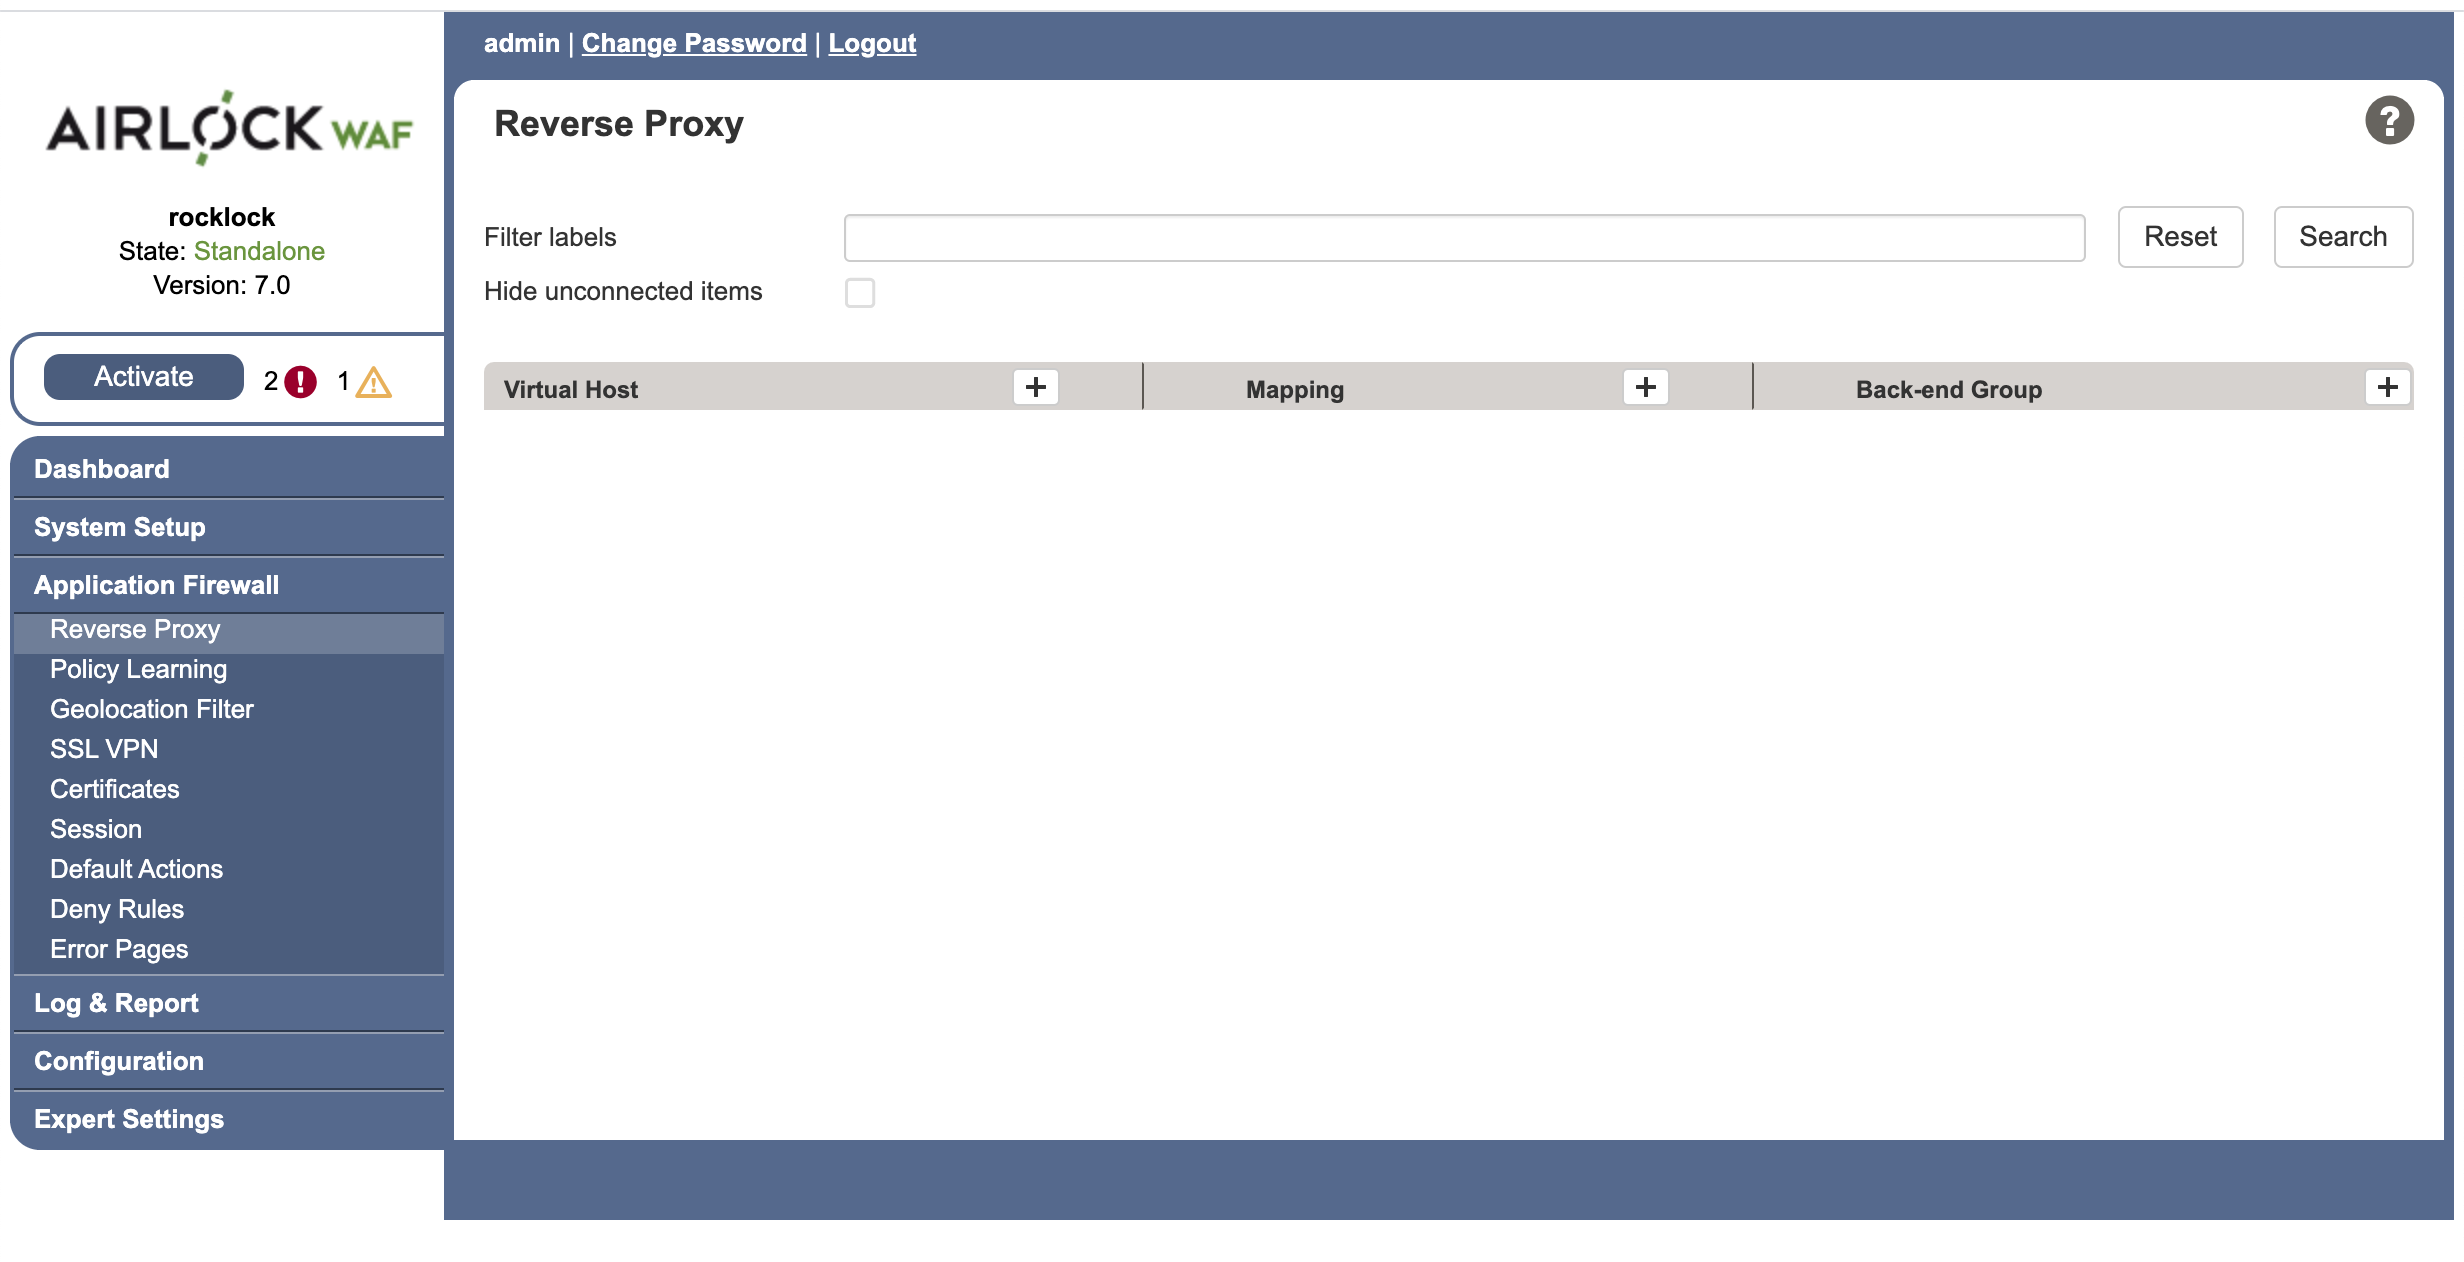
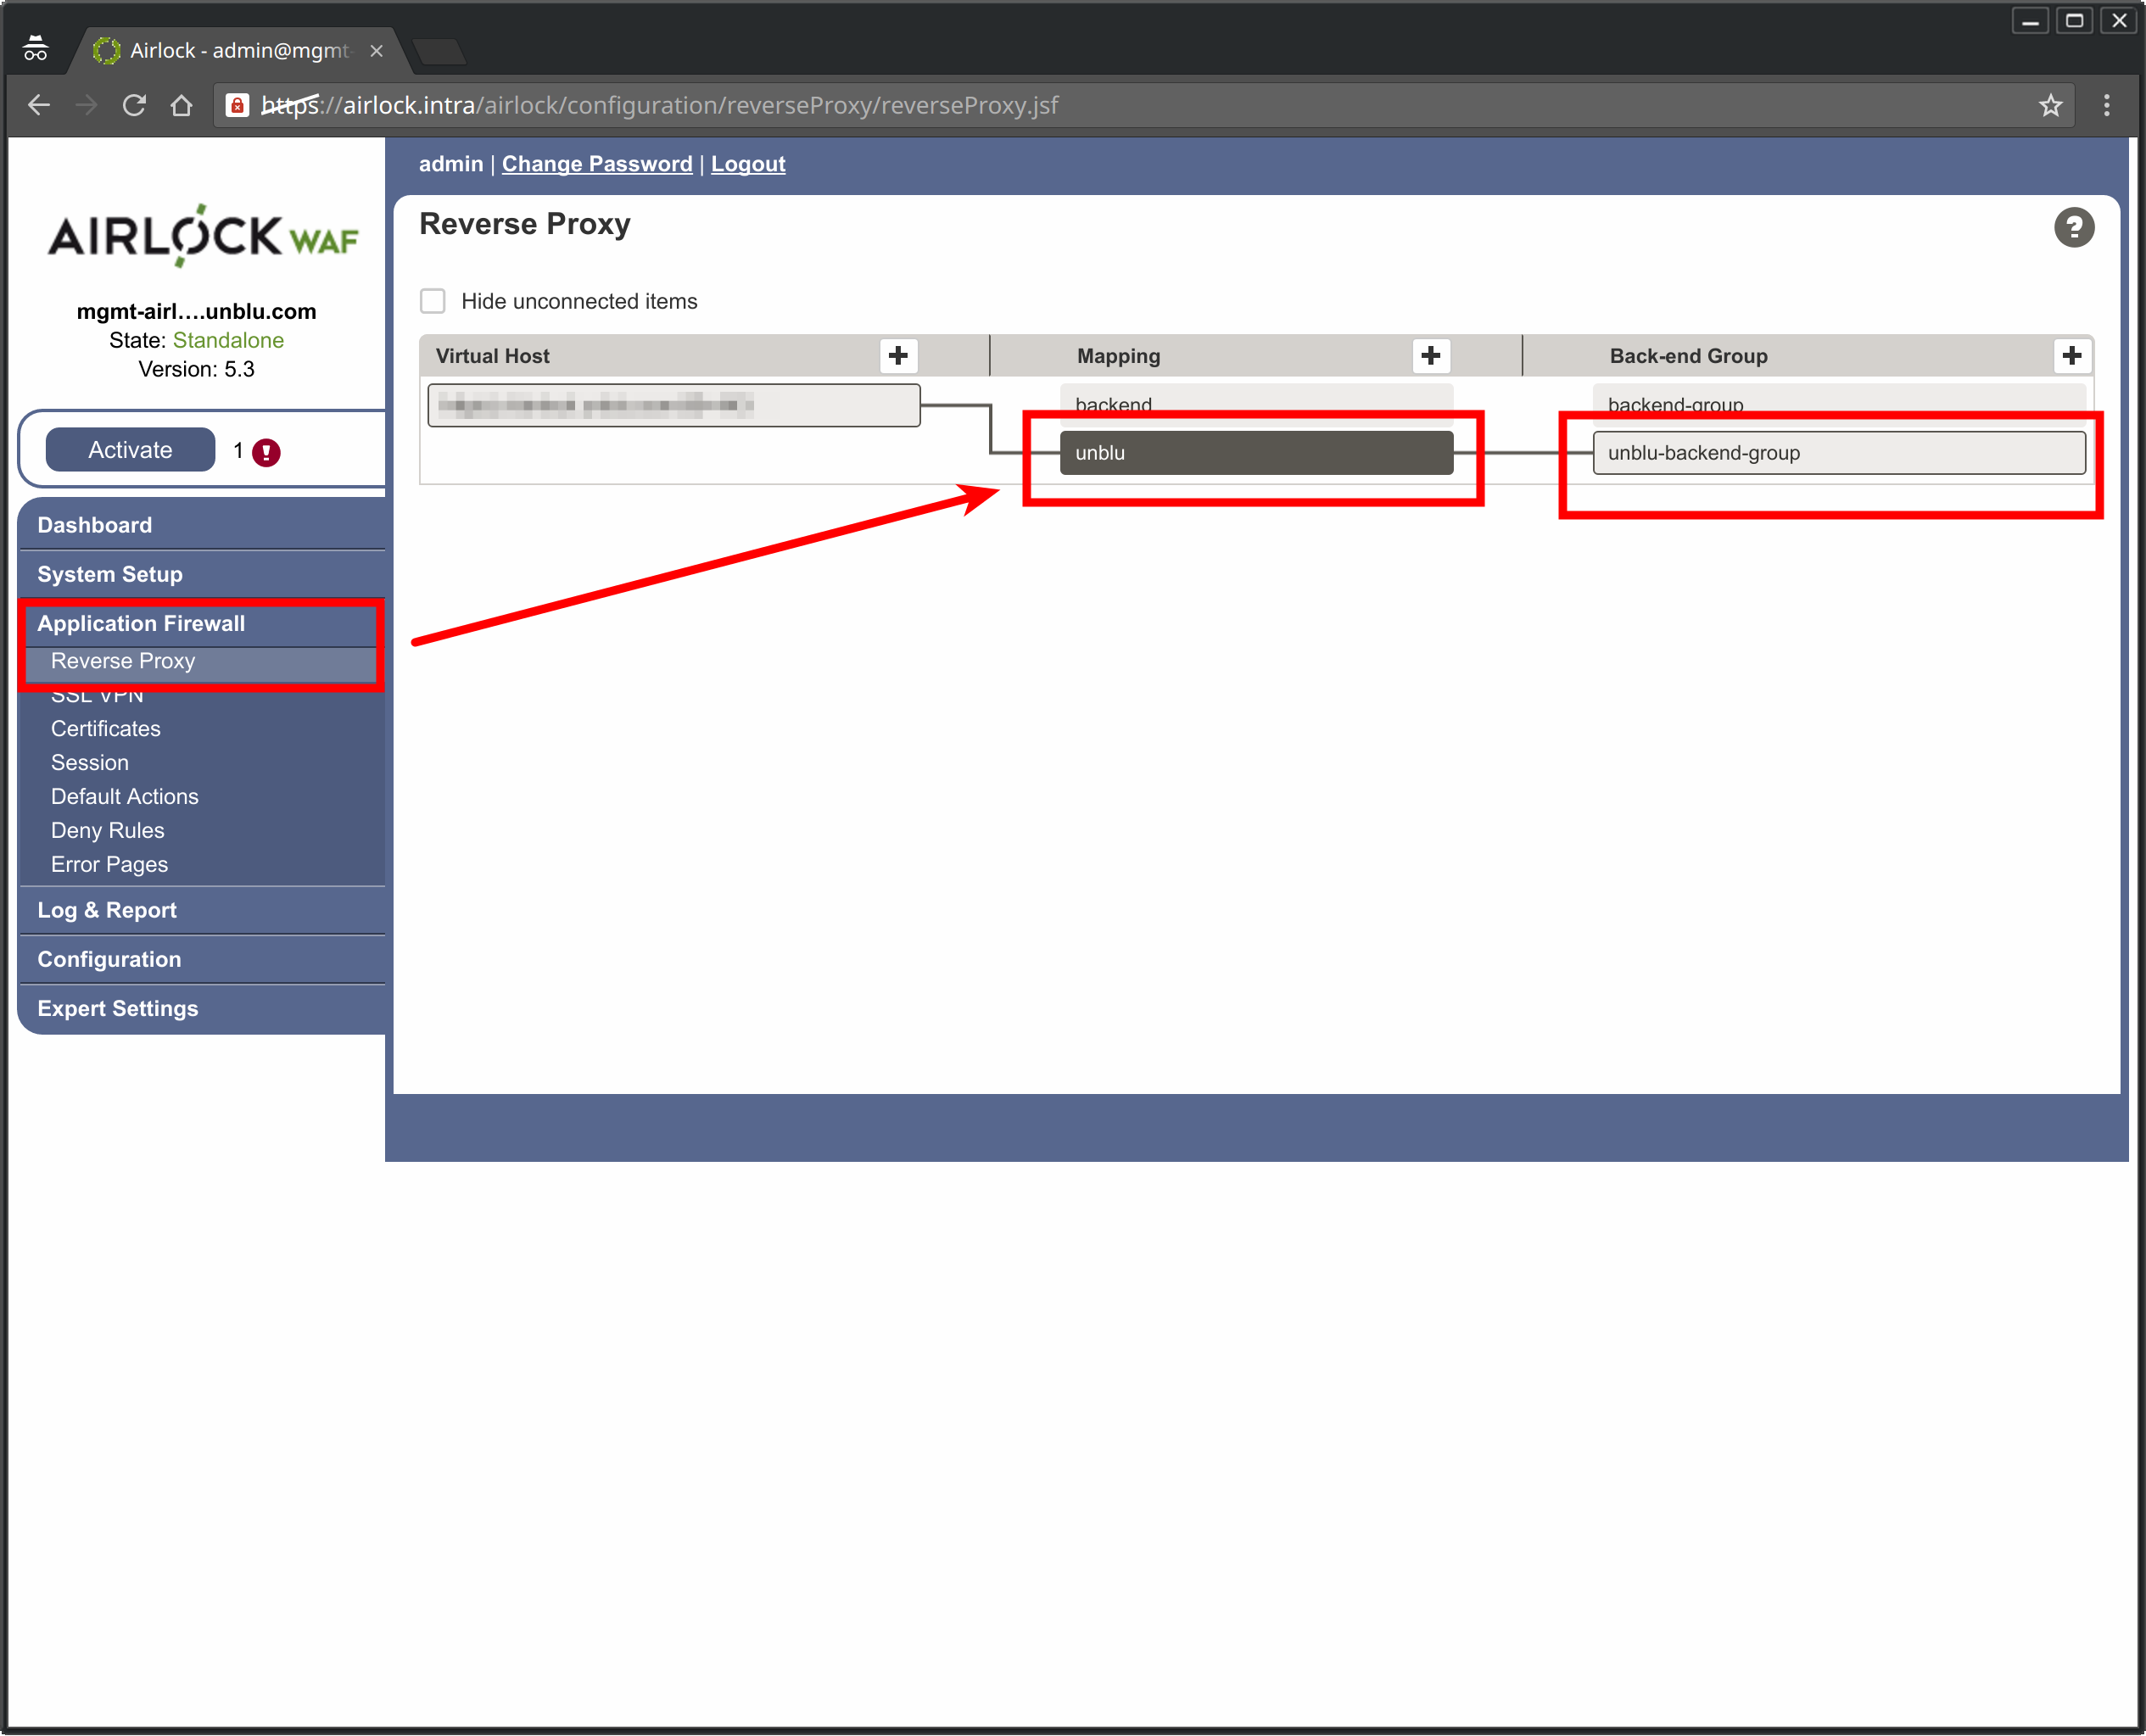
The main part of the Airlock configuration that we will be concerned with is the reverse proxy configuration. You can find it by selecting Application Firewall > Reverse Proxy in the left tab list of the Airlock WAF administration interface.
On this page you will see three columns:
- Virtual Host
-
Each virtual host represents an external address through which one or more of the back end groups will be exposed to the internet.
- Mappings
-
Each mapping is a set of filtering rules that govern how requests coming into a virtual host are routed to the back end groups.
- Back-end Group
-
Each back end group represents one or more servers providing the actual web applications you want to serve.
Example
Let’s say you are setting up Unblu and Airlock WAF for the e-banking website at ebanking.example.com using a site-embedded architecture.
Recall that in a site-embedded set up the e-banking web application server is running alongside an on-premises installation of the Unblu server and both are serving the visitor via the same host (in this case ebanking.example.com).
The e-banking web application delivers a web page that is Unblu-enabled, so that the Unblu individual UI is available to the e-banking visitor. The result is that the visitor browser will be making some requests to ebanking.example.com related to the e-banking application itself and some requests related to Unblu.
The goal in setting up Airlock WAF is to ensure that these two types of incoming requests are, in fact, directed to the correct back-end server: normal e-banking request to the e-banking back end and Unblu requests to the Unblu server.
In Airlock terminology this amounts to configuring the WAF so that:
-
The internet sees a single address,
ebanking.example.com. -
There are two servers on the back end:
-
Your e-banking web application
-
Your installation of the Unblu server
-
-
There are two mappings:
-
A mapping that directs all requests from the Unblu individual UI to the Unblu server.
-
A mapping that directs all other requests to the e-banking back end.
-
The goal is to end up with a reverse proxy configuration page (Application Firewall > Reverse Proxy) will look something like this:
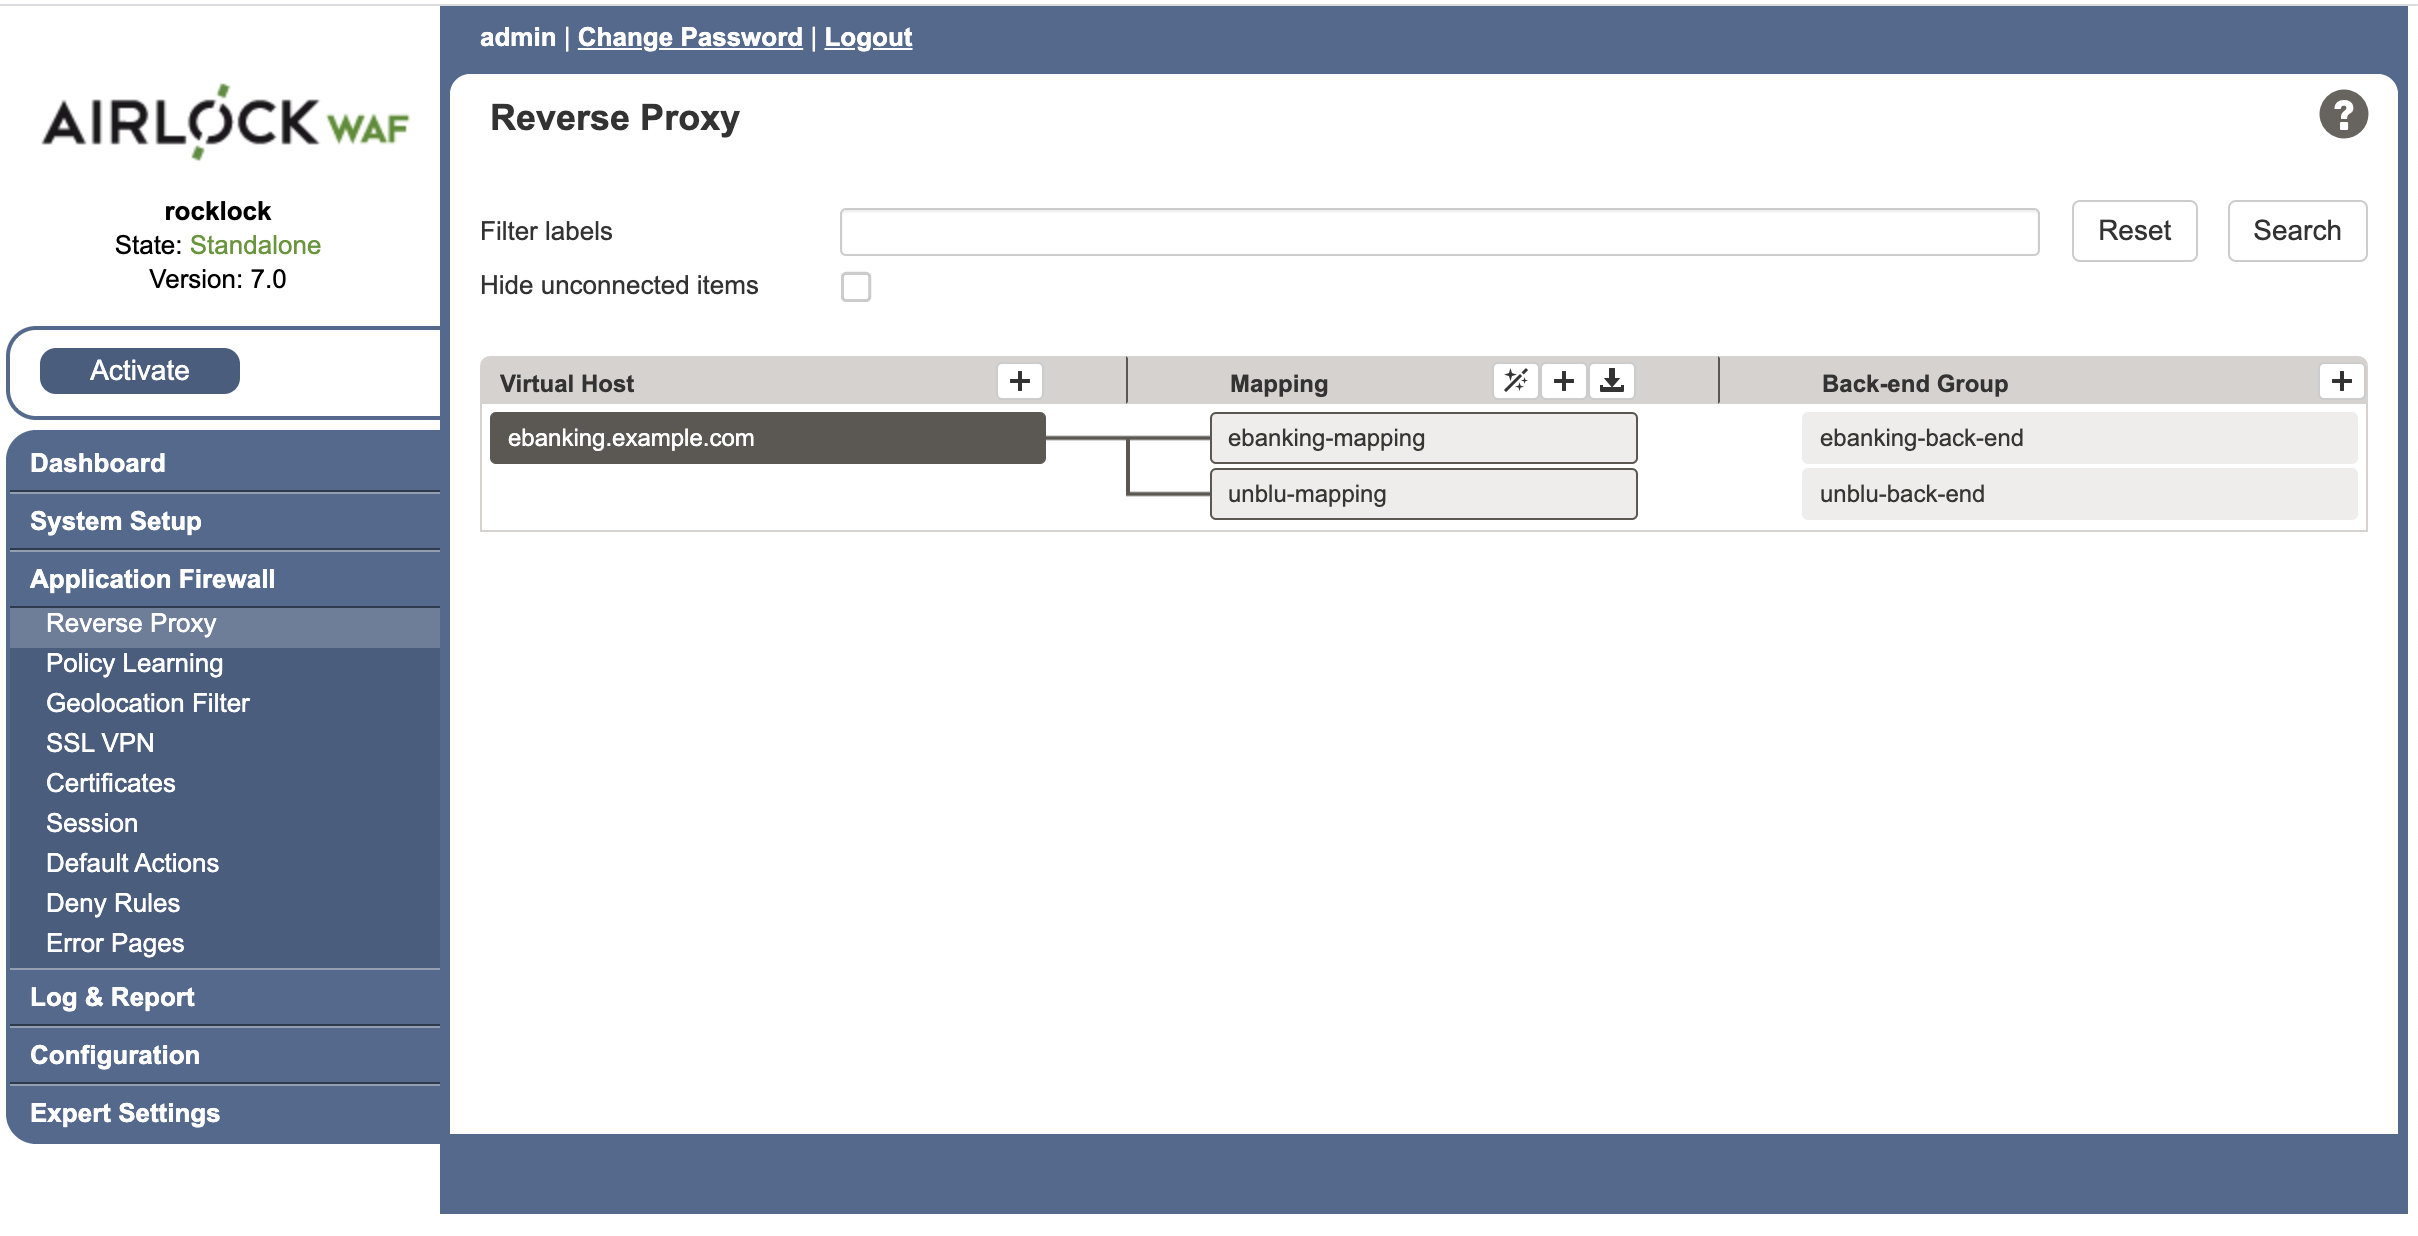
Below we describe how to get to this point, step by step.
Add the Virtual Host
The first step is to define the virtual host to which requests from the internet will be directed:
-
In the Application Firewall > Reverse Proxy administration screen, click the [ + ] button in the heading area of the Virtual Hosts column. Airlock opens a new virtual host configuration page.
-
Enter the internal Name and Host name (fully qualified domain name) of the virtual host. It is usually a good idea to make these the same and to enforce this by checking the Strictly match FQDN and aliases check box.
-
Specify the External network interface and IPv4 address (or IPv6 address) for this virtual host.
-
Specify whether to accept HTTP, HTTPS or both.
Now the Basic tab of the resulting virtual Host configuration should look something like this:
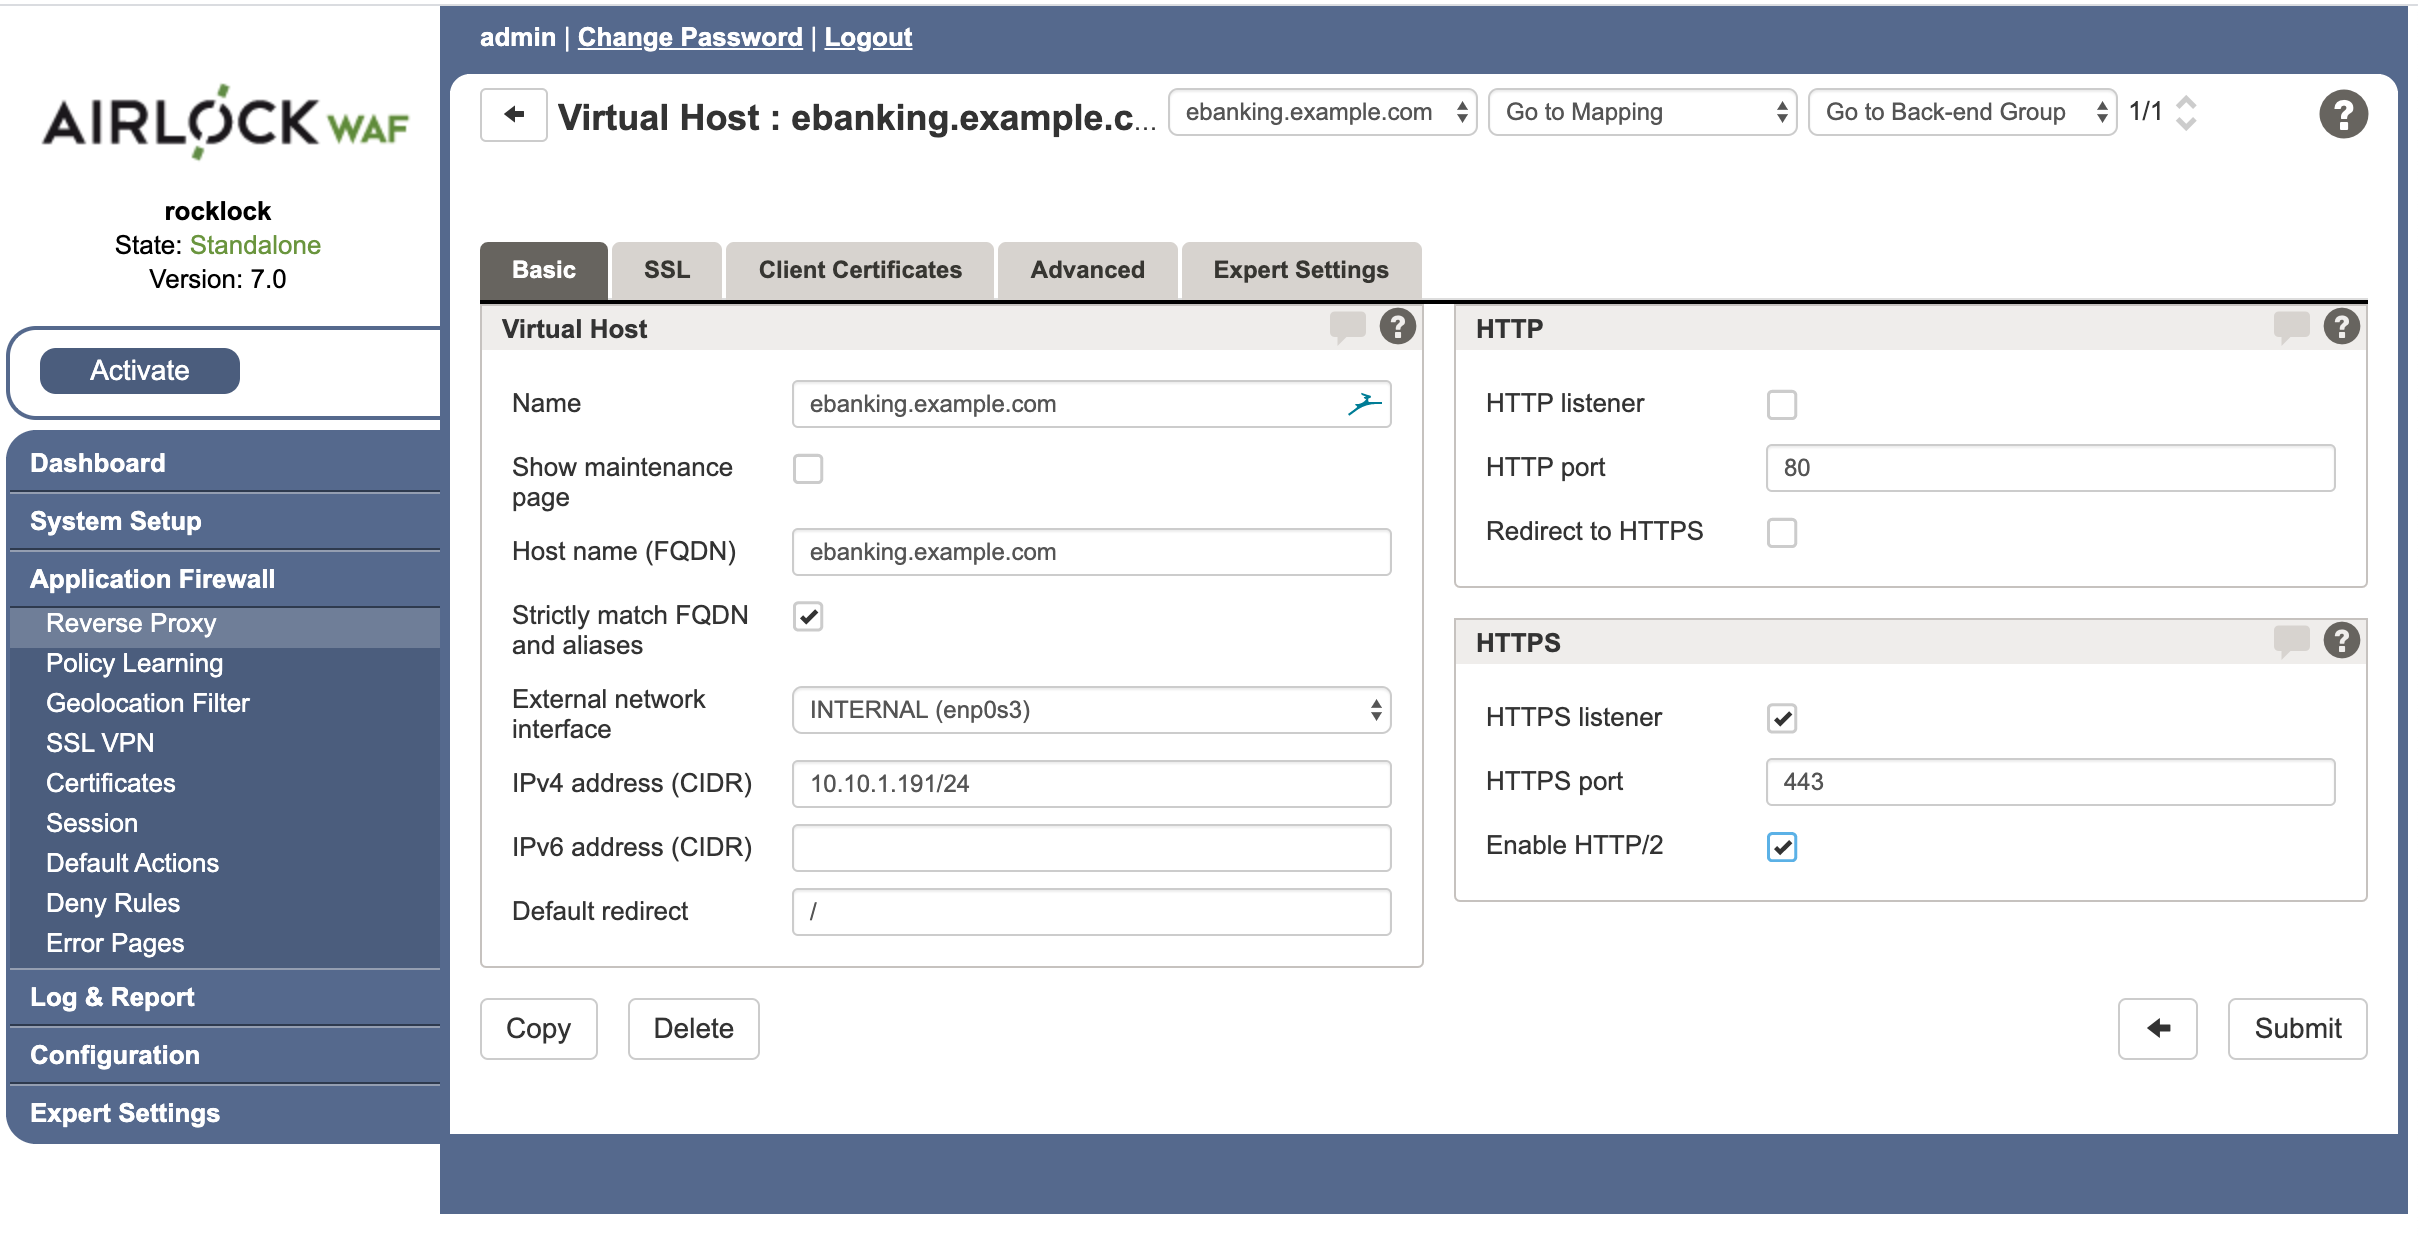
-
Adjust the entries on the other tabs as necessary (for example if you have configured HTTPS, you will need to configure the SSL and Client Certificates tabs)
-
Click Submit.
Add the Unblu-Enabled Web Application
The server that runs your Unblu-enabled web application must be set up as a member of its own back end group:
-
In the Application Firewall > Reverse Proxy administration screen, click the [ + ] button in the Back-end Group list. Airlock creates a new back-end group. The group contains one empty entry for a server.
-
Enter the Name you want to use for the web application back-end group.
-
In the Back-end Hosts section, enter the Protocol, Host and Port of the web application server. These details depend, of course, on the installation details of your web application server on your internal netwrok.
-
Click Submit.

Add the Unblu Server
The next step is to add the Unblu server to its own back end group:
-
In the Application Firewall > Reverse Proxy administration screen, click the [ + ] button in the Back-end Group list. Airlock creates a new back-end group. The group contains one empty entry for a server.
-
Enter the Name you want to use for the Unblu back-end group.
-
In the Back-end Hosts section, enter the Protocol, Host and Port of the Unblu server. Again, these details depend on the installation details of the server on your internal network.
-
Click Submit.

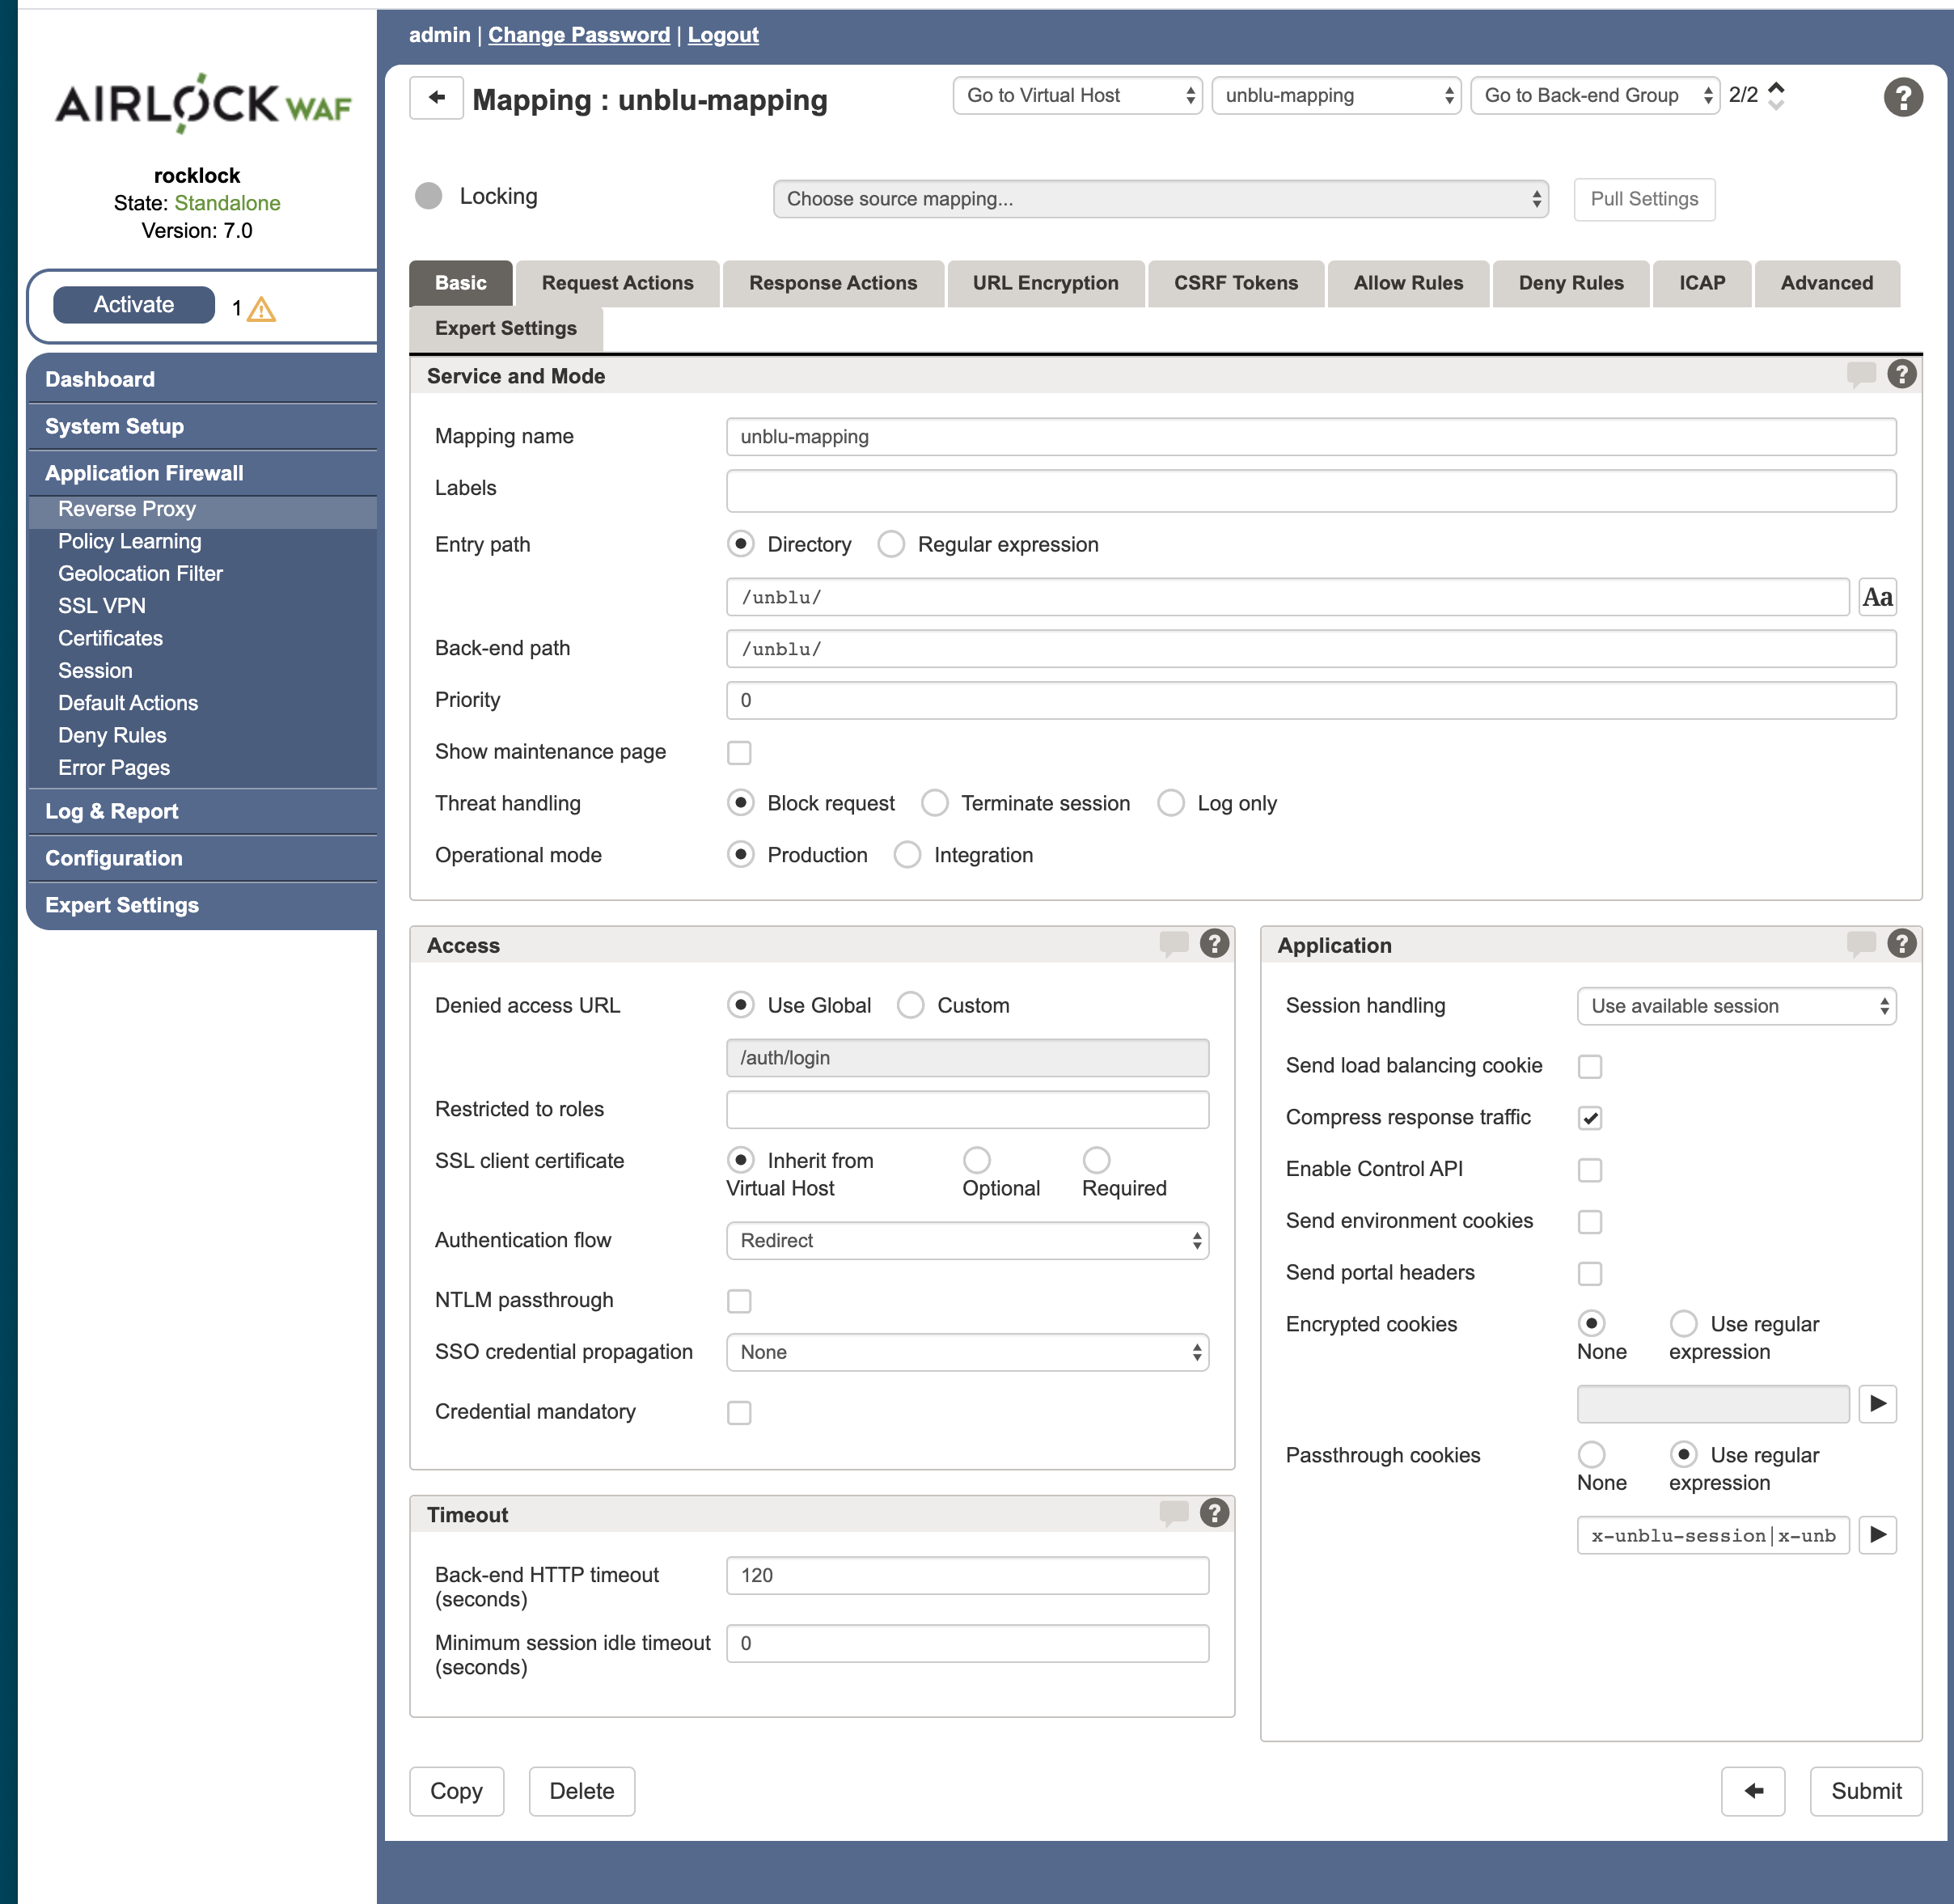
Mapping for Unblu Back End
The next step is to set up the mapping between the virtual host you set up and the back end group containing the Unblu server. The goal is to route Unblu requests to the Unblu server, while all others are routed to the web application back end (see Mapping for Web Application Back End, below). Setting this up is straightforward but requires some configuration to make sure that cookies and HTTP headers are forwarded correctly.
-
In the Reverse Proxy administration screen, click the [ + ] button in the Mapping list. Airlock will add a new mapping.
-
Give the mapping a suitable name, such as
unblu-mapping.
-
On the
unblu-mappingpage go to the the Basic tab. -
Using the Directory type, specify the Entry Path. The entry path specified here should be the one for an
UNTRUSTEDcall origin. By default this is/unblu/. -
In the Application panel, make sure the Passthrough Cookies are defined as
x-unblu-session | x-unblu-recorder-session. -
Press the Submit button to apply your changes.
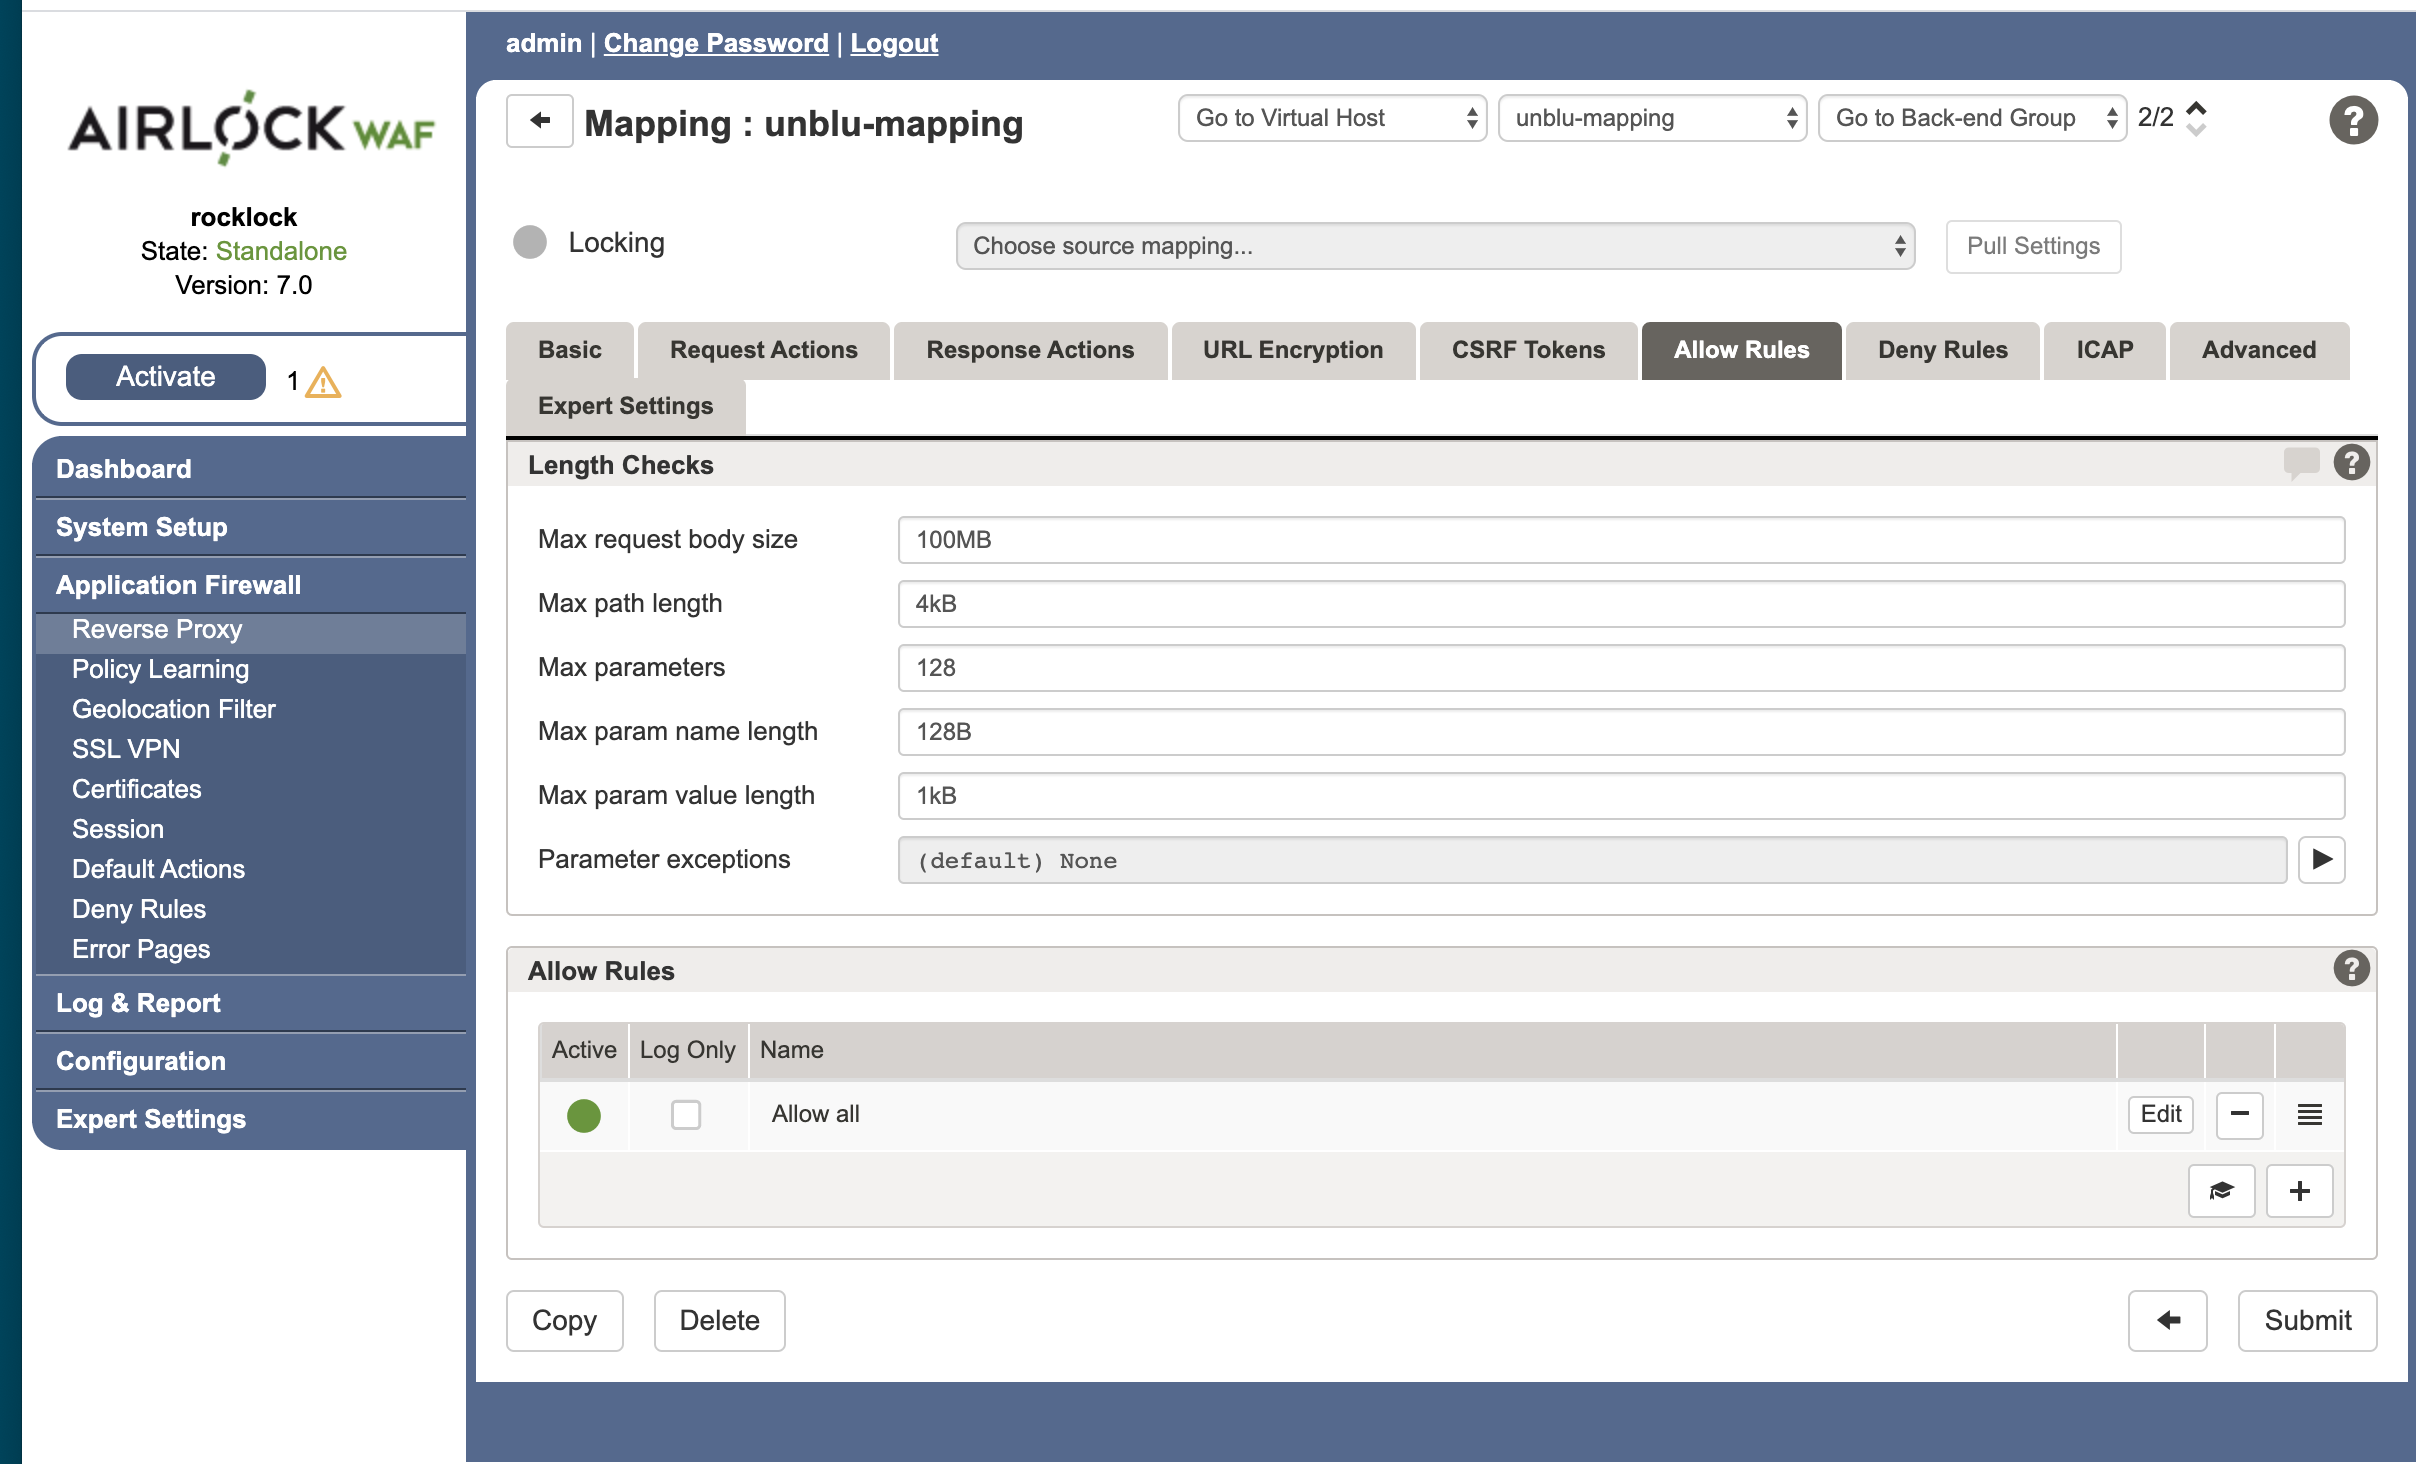
Configure the Allow Rules
The next step is to configure the Allow Rules for the unblu-mapping.
-
On the
unblu-mappingpage go to the Allow Rules tab. -
Increase Max path length to at least 4kB.
-
Click Submit.
Configure the Request Header Actions
If you restrict the headers that Airlock forwards, then you need to add Unblu’s request header to the list of allowed headers.
-
On the
unblu-mappingpage go to the Request Actions tab. -
Select the middle icon of (default) Request header whitelist (on the extreme right of the Default Actions panel) to create a customized version of it.
-
In the Header Name Pattern field add the following entries to the list of the allowed headers:
x-unblu-xui | x-unblu-client | x-unblu-page | x-unblu-referer
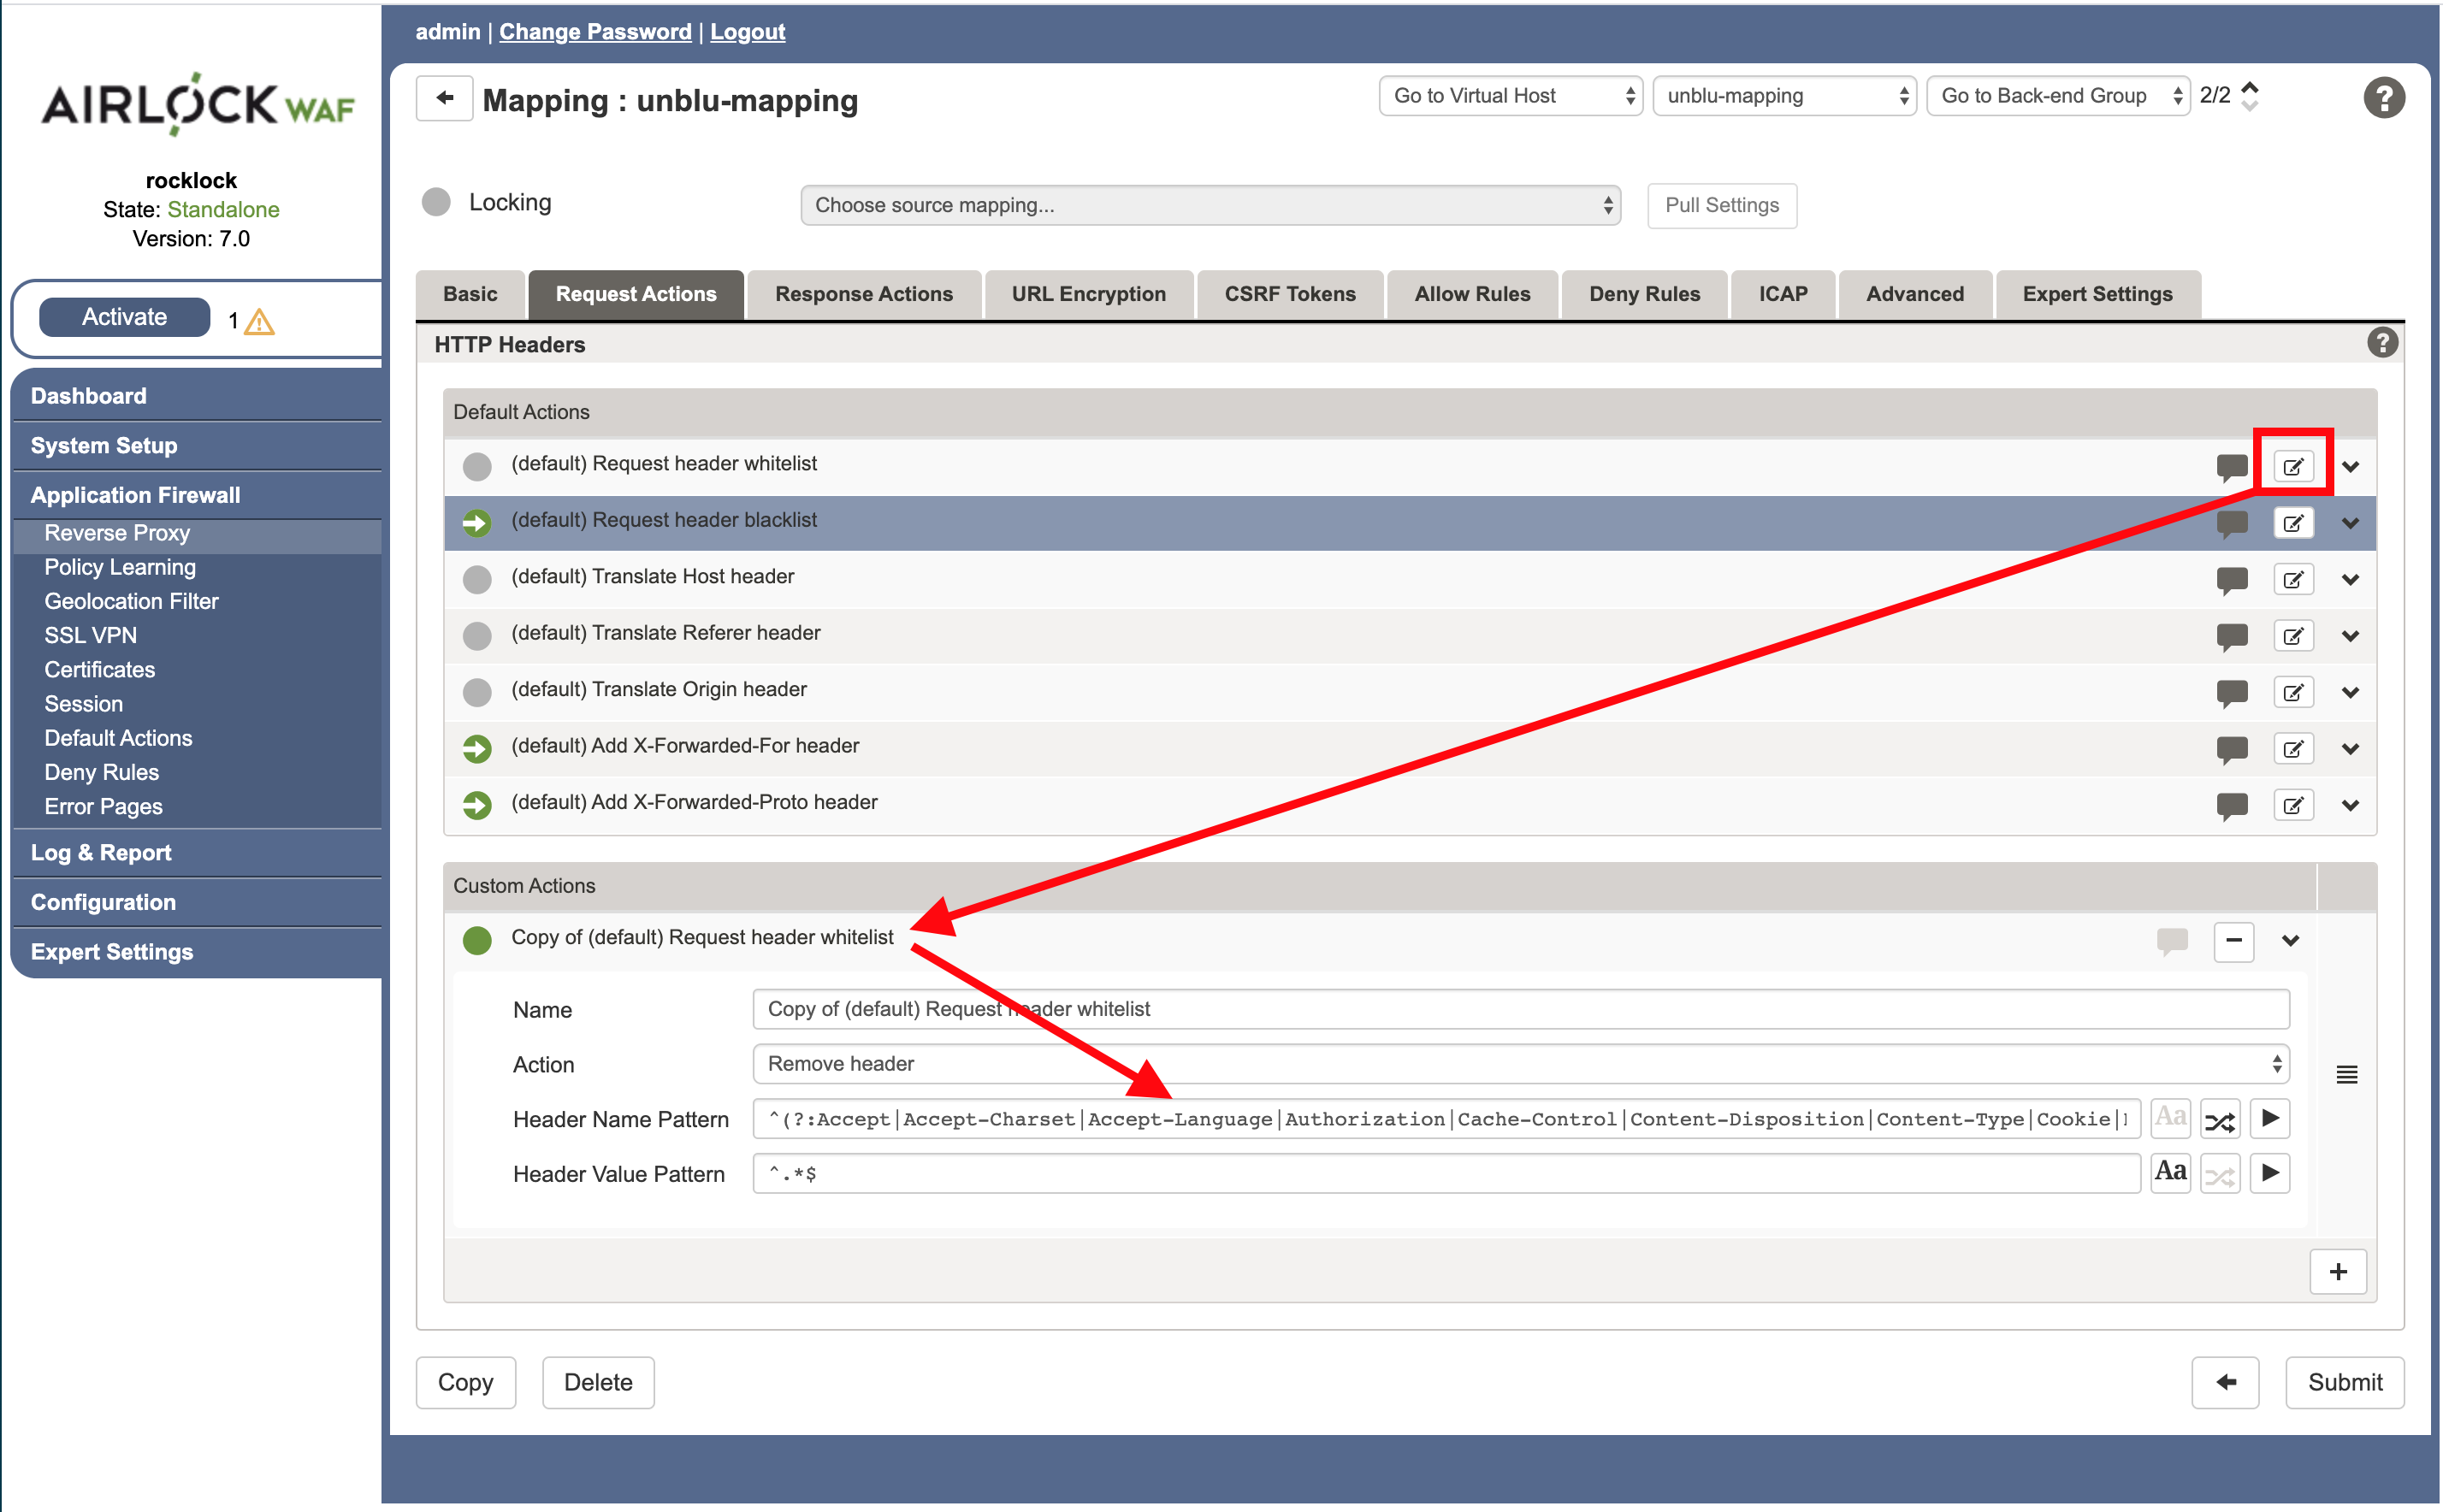
-
Next, expand the (default) Add X-Forwarded-Proto header subsection and ensure the following settings:
-
Action: Add or replace header
-
Header Name:
X-Forwarded-Proto -
Header Value:
%ENTRYPROTOCOL%
-
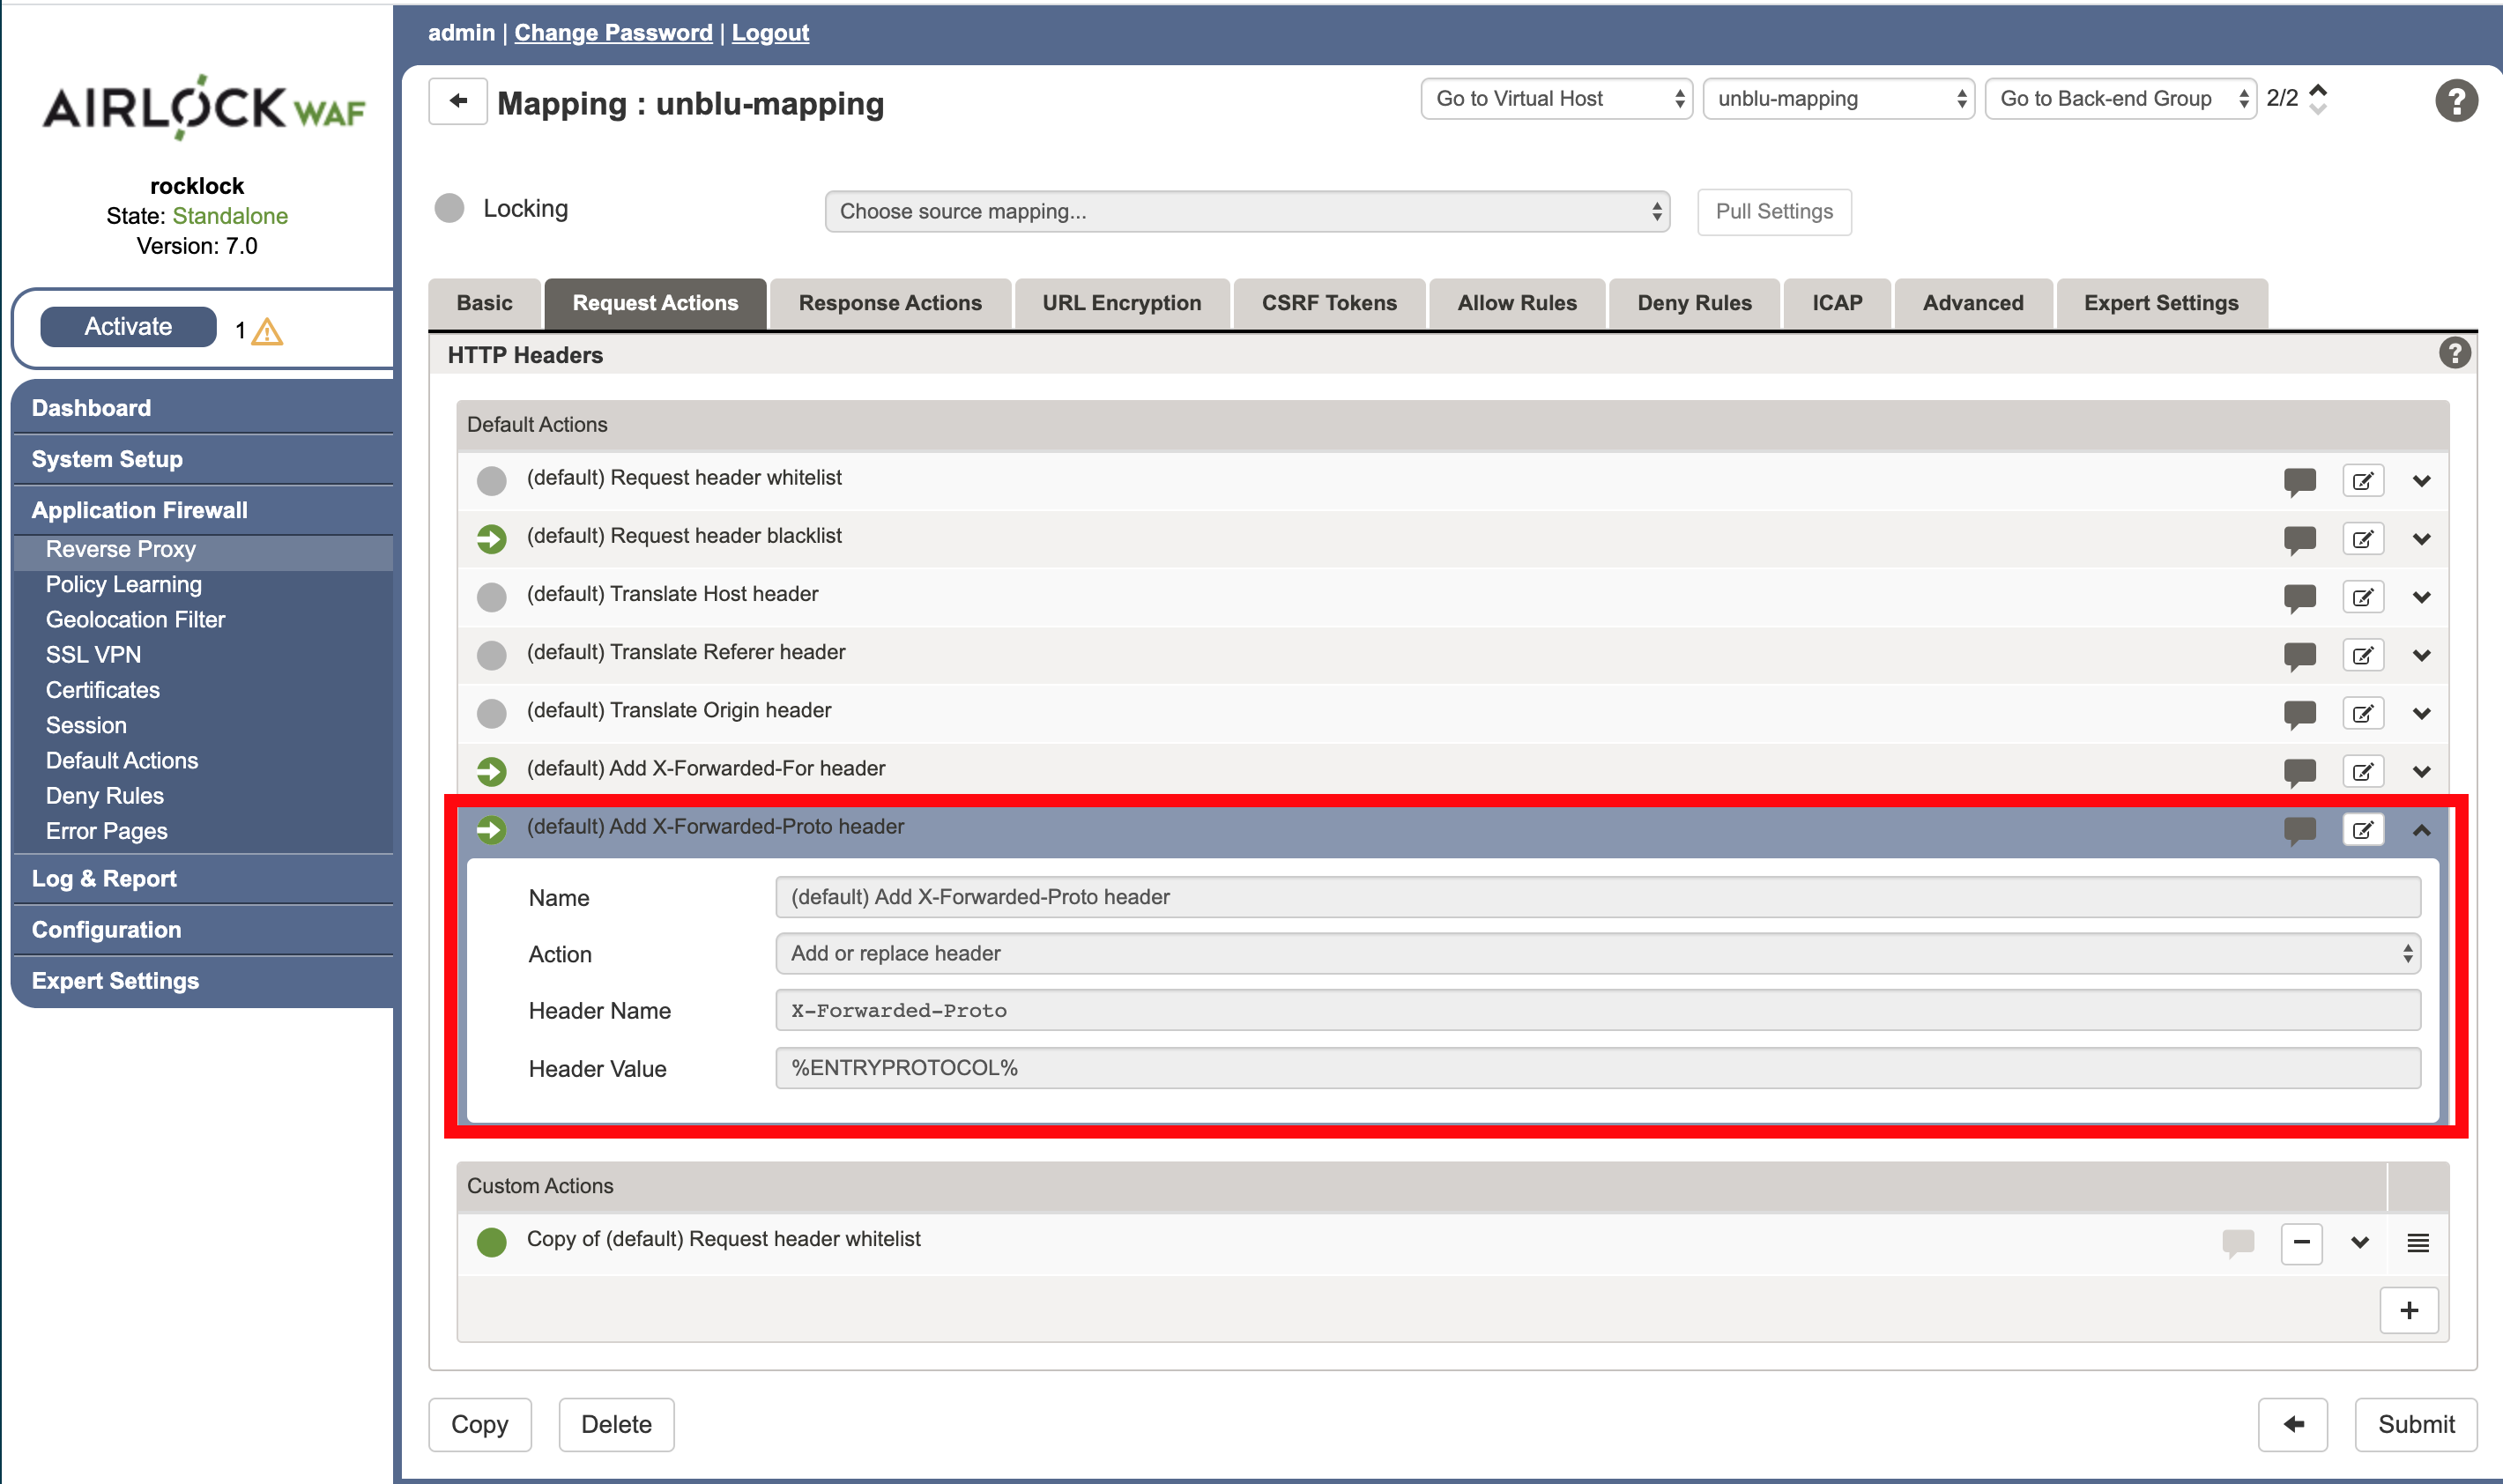
-
Click Submit to apply your changes
When a reverse proxy, like Airlock WAF, forwards a request to the back end, information about the protocol (HTTP vs HTTPS) used by the original incoming request is lost, because all requests are converted to HTTP for transit within the internal corporate network. However, often this information is needed by the back end to correctly serve the request. To solve this problem the standard header X-Forwarded-Proto is added to the incoming request when it passed to the back end, which holds the original protocol information. Failure to correctly pass this information can lead to redirect loops and other problems. |
Configure the Response Header Actions
You also need to allow Unblu’s response headers to pass back through the firewall:
-
On the
unblu-mappingpage go to the Response Actions tab. -
The Response Actions screen will display.
-
Click the middle icon on (default) Response header whitelist (on the right side of the Default Actions panel) to create a customized version of it.
-
In the Header Name Pattern part add (or make sure they are present) the following headers:
Pragma | Cache-Control | Expires | x-unblu-xui | x-unblu-client | x-unblu-page | x-unblu-start-time -
Click Submit.

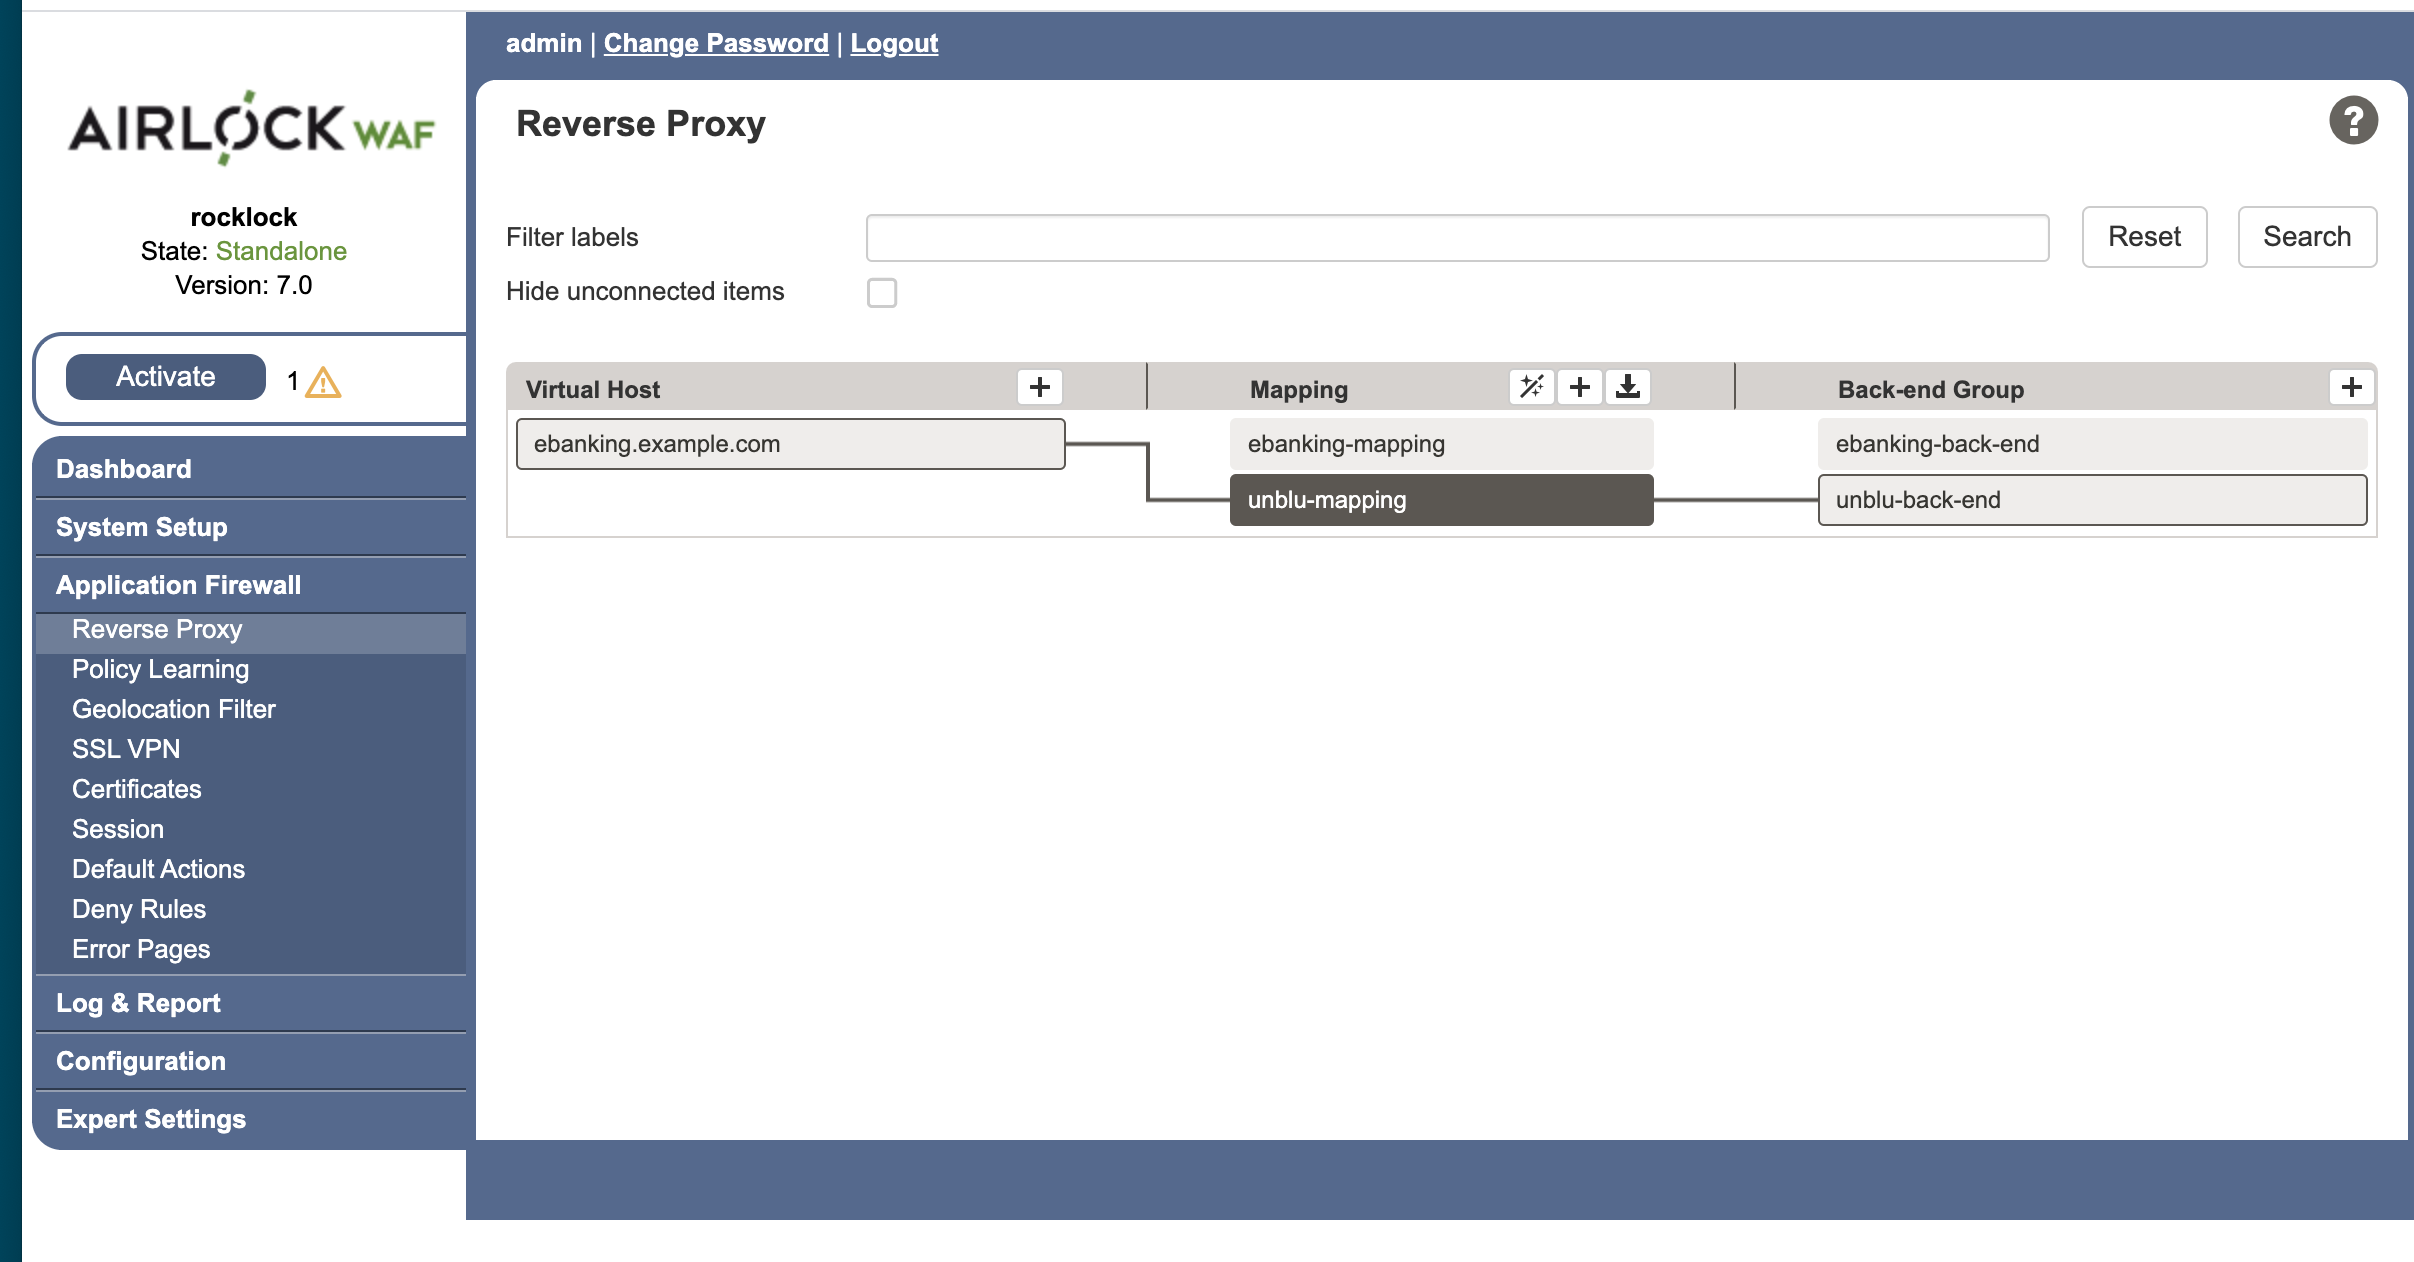
Mapping for Web Application Back End
Having set up the mapping from the virtual host to the Unblu back end, you also need to set up another mapping from the same virtual host to the web application that serves your (Unblu-enabled) website. The unblu-mapping you set up above routes all requests with the UNTRUSTED Unblu entry path (/unblu/ by default). In this mapping you need to specify that all other requests go to your web application back end.
-
In the Reverse Proxy administration screen, click the [ + ] button in the Mapping list. Airlock will add a new mapping.
-
Give the mapping a suitable name, such as
ebanking-mapping.
-
On the
ebanking-mappingpage go to the the Basic tab. -
Using the Directory type, specify the Entry Path. Set it to
/ -
When Airlock WAF selects which mapping to pass a request to it will always test the most specific first. In this case the most specific is the
unblu-mappingthat you set up above. If the request path does not match the entry path specified there (usually/unblu/), then it will test this mapping (theebanking-mapping) and it will match, since this mapping’s entry path is/. -
Press the Submit button to apply your changes.

Enabling SecureFlow Manager
The SecureFlow Manager is an optional addition to your Unblu installation. How the feature is installed depends on which reverse proxy you are using. The following section details how to to enable this feature in an installation that uses Airlock WAF.
In contrast to the other reverse proxies, Airlock WAF does not require the installation of an actual add-on or module to enable SecureFlow Manager. This is because Airlock supports the addition of add-on components remotely over HTTP using a protocol called ICAP. All that is required is to have an appropriately-designed ICAP component running and accessible and then to configure Airlock to connect to that component.
The Unblu server is designed with a built-in Secureflow Manager ICAP component precisely for this purpose. Thus, "installing" the SFM actually just involves configuring your Airlock WAF as follows:
-
Set up an ICAP connection on your Airlock WAF to your Unblu server.
-
Specify which requests to forward to the Unblu server.
-
Restrict the request forwarding so that Airlock only forwards them when a co-browsing session is in progress.
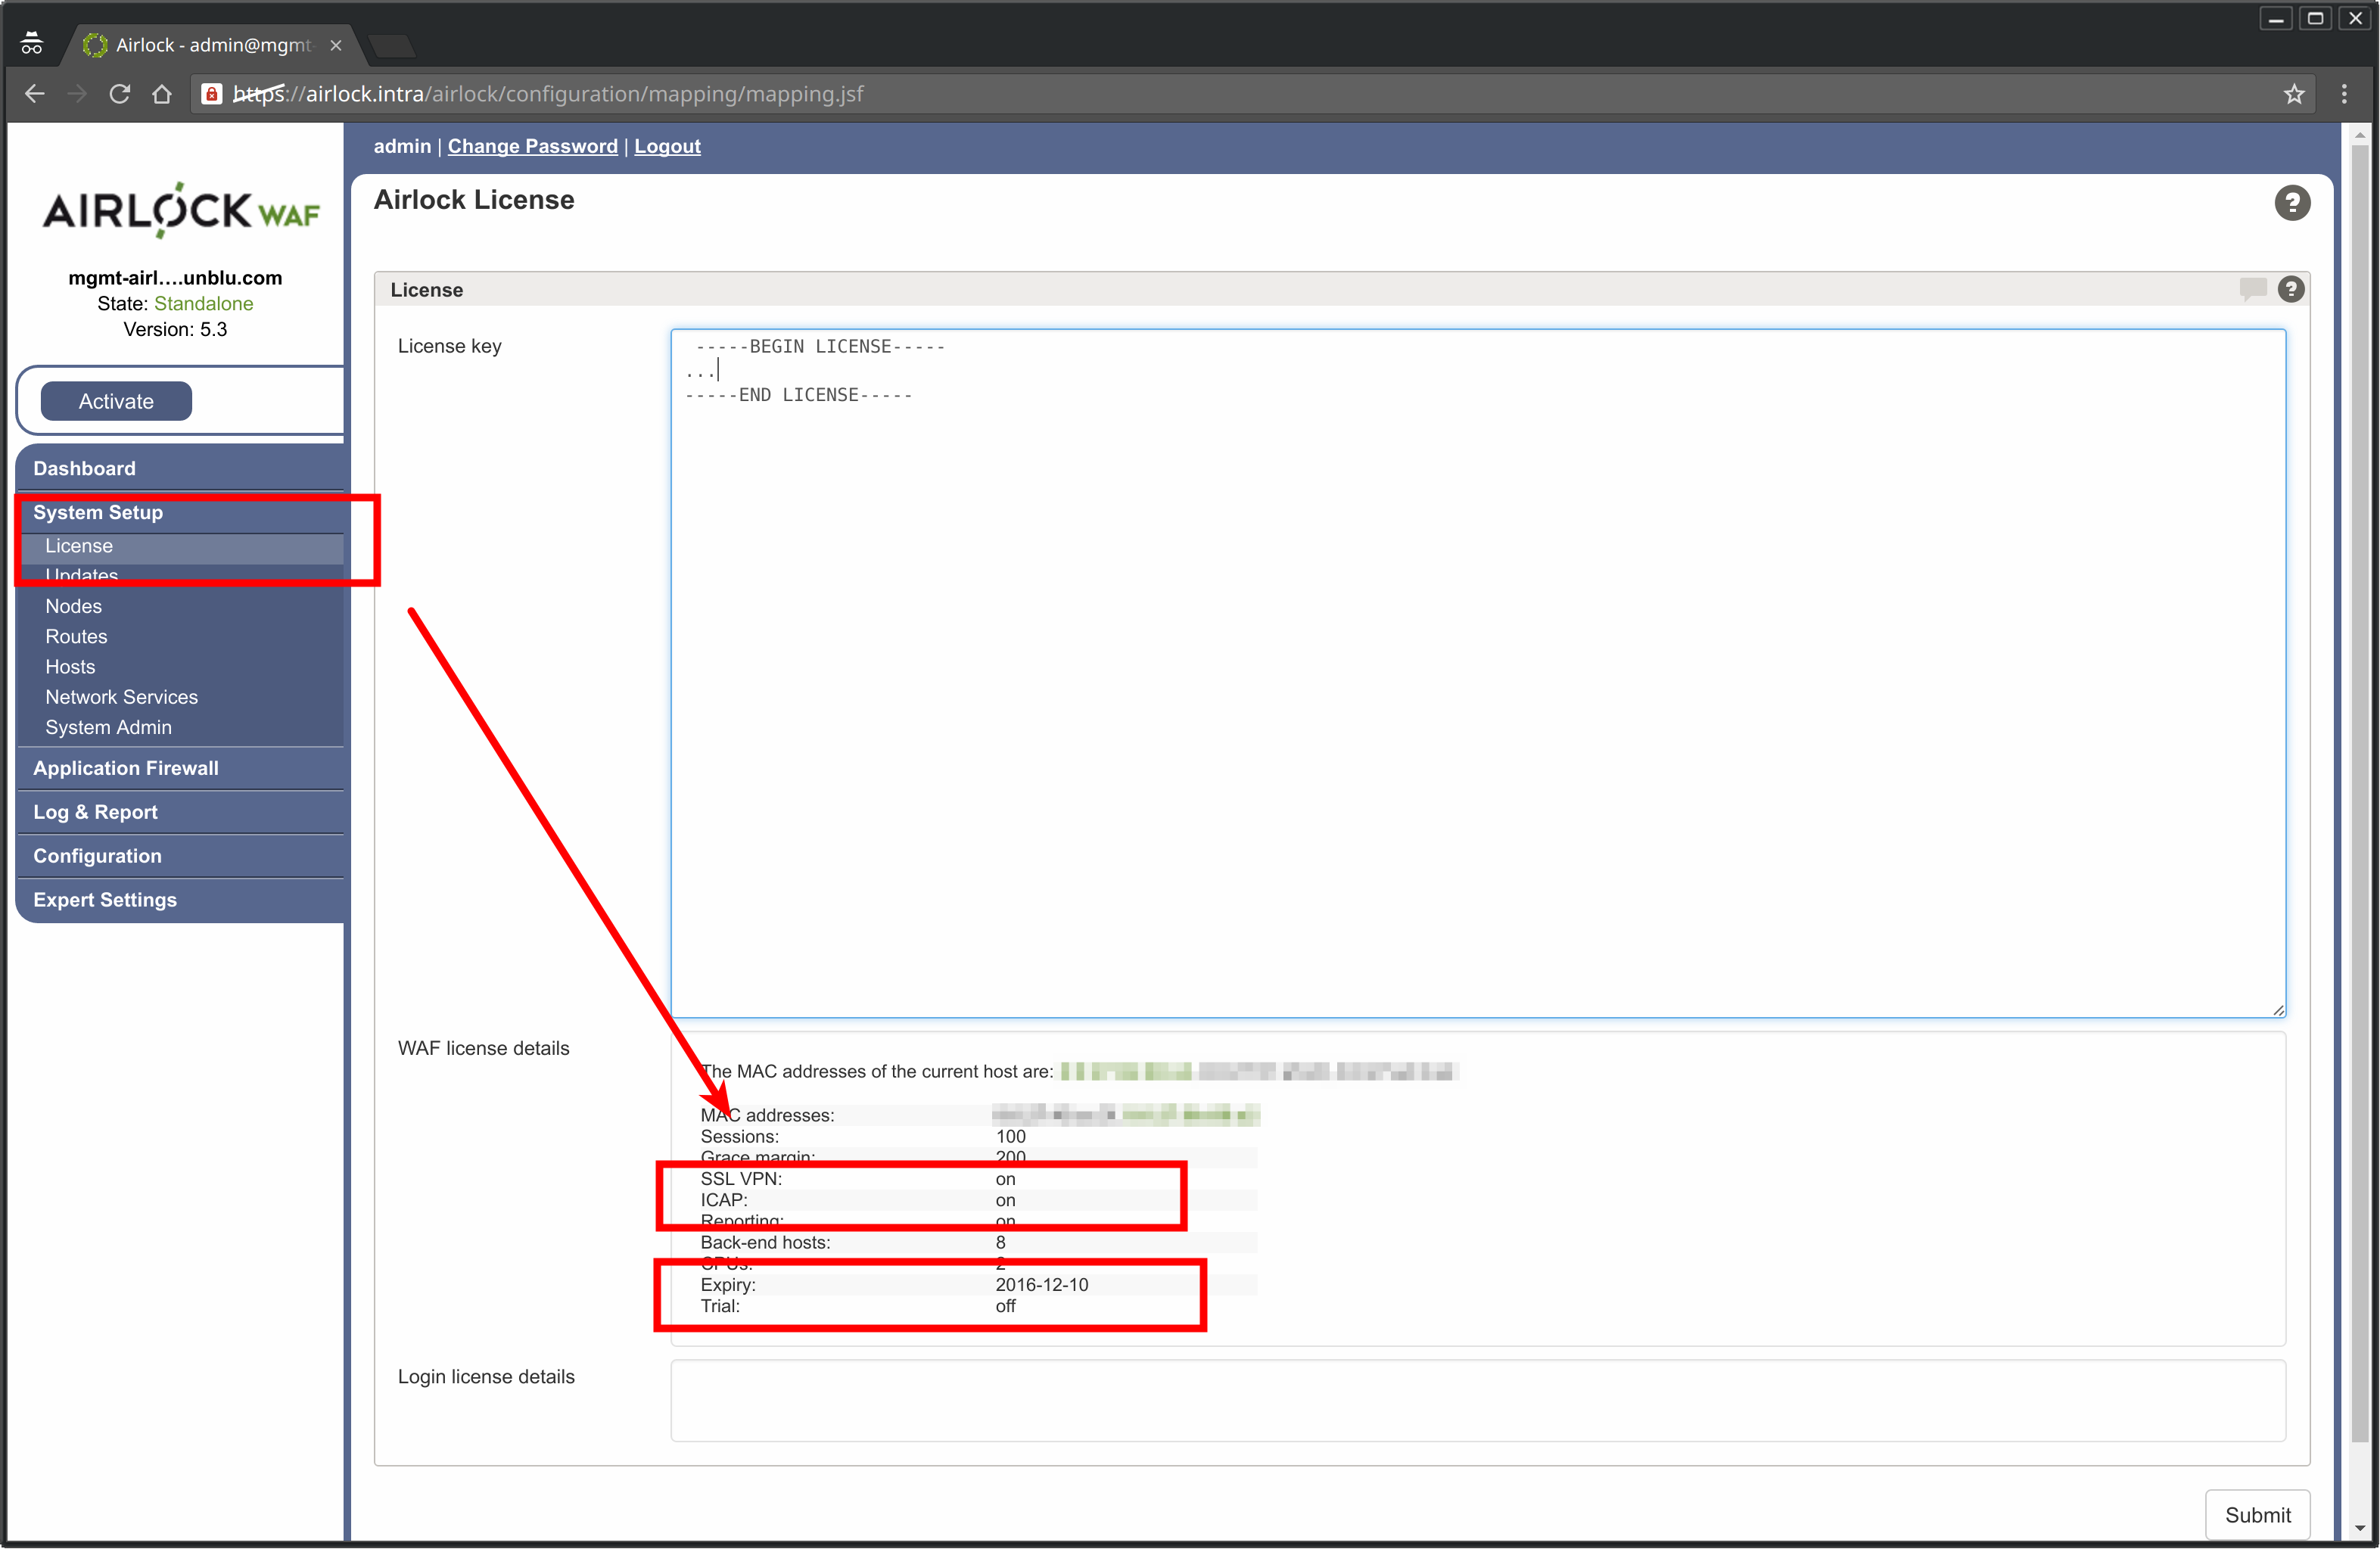
To connect to the SecureFlow Manager ICAP component, your Airlock WAF must be licensed to use ICAP. To check the license, on the Airlock WAF Admin Page:
-
Select System Setup > License
-
Make sure that ICAP is set to on
Configure the ICAP Connection
To configure the ICAP connection to the Unblu server, go to the Airlock WAF Admin Page:
-
Select System Setup > Network Services
In the Network Services panel:
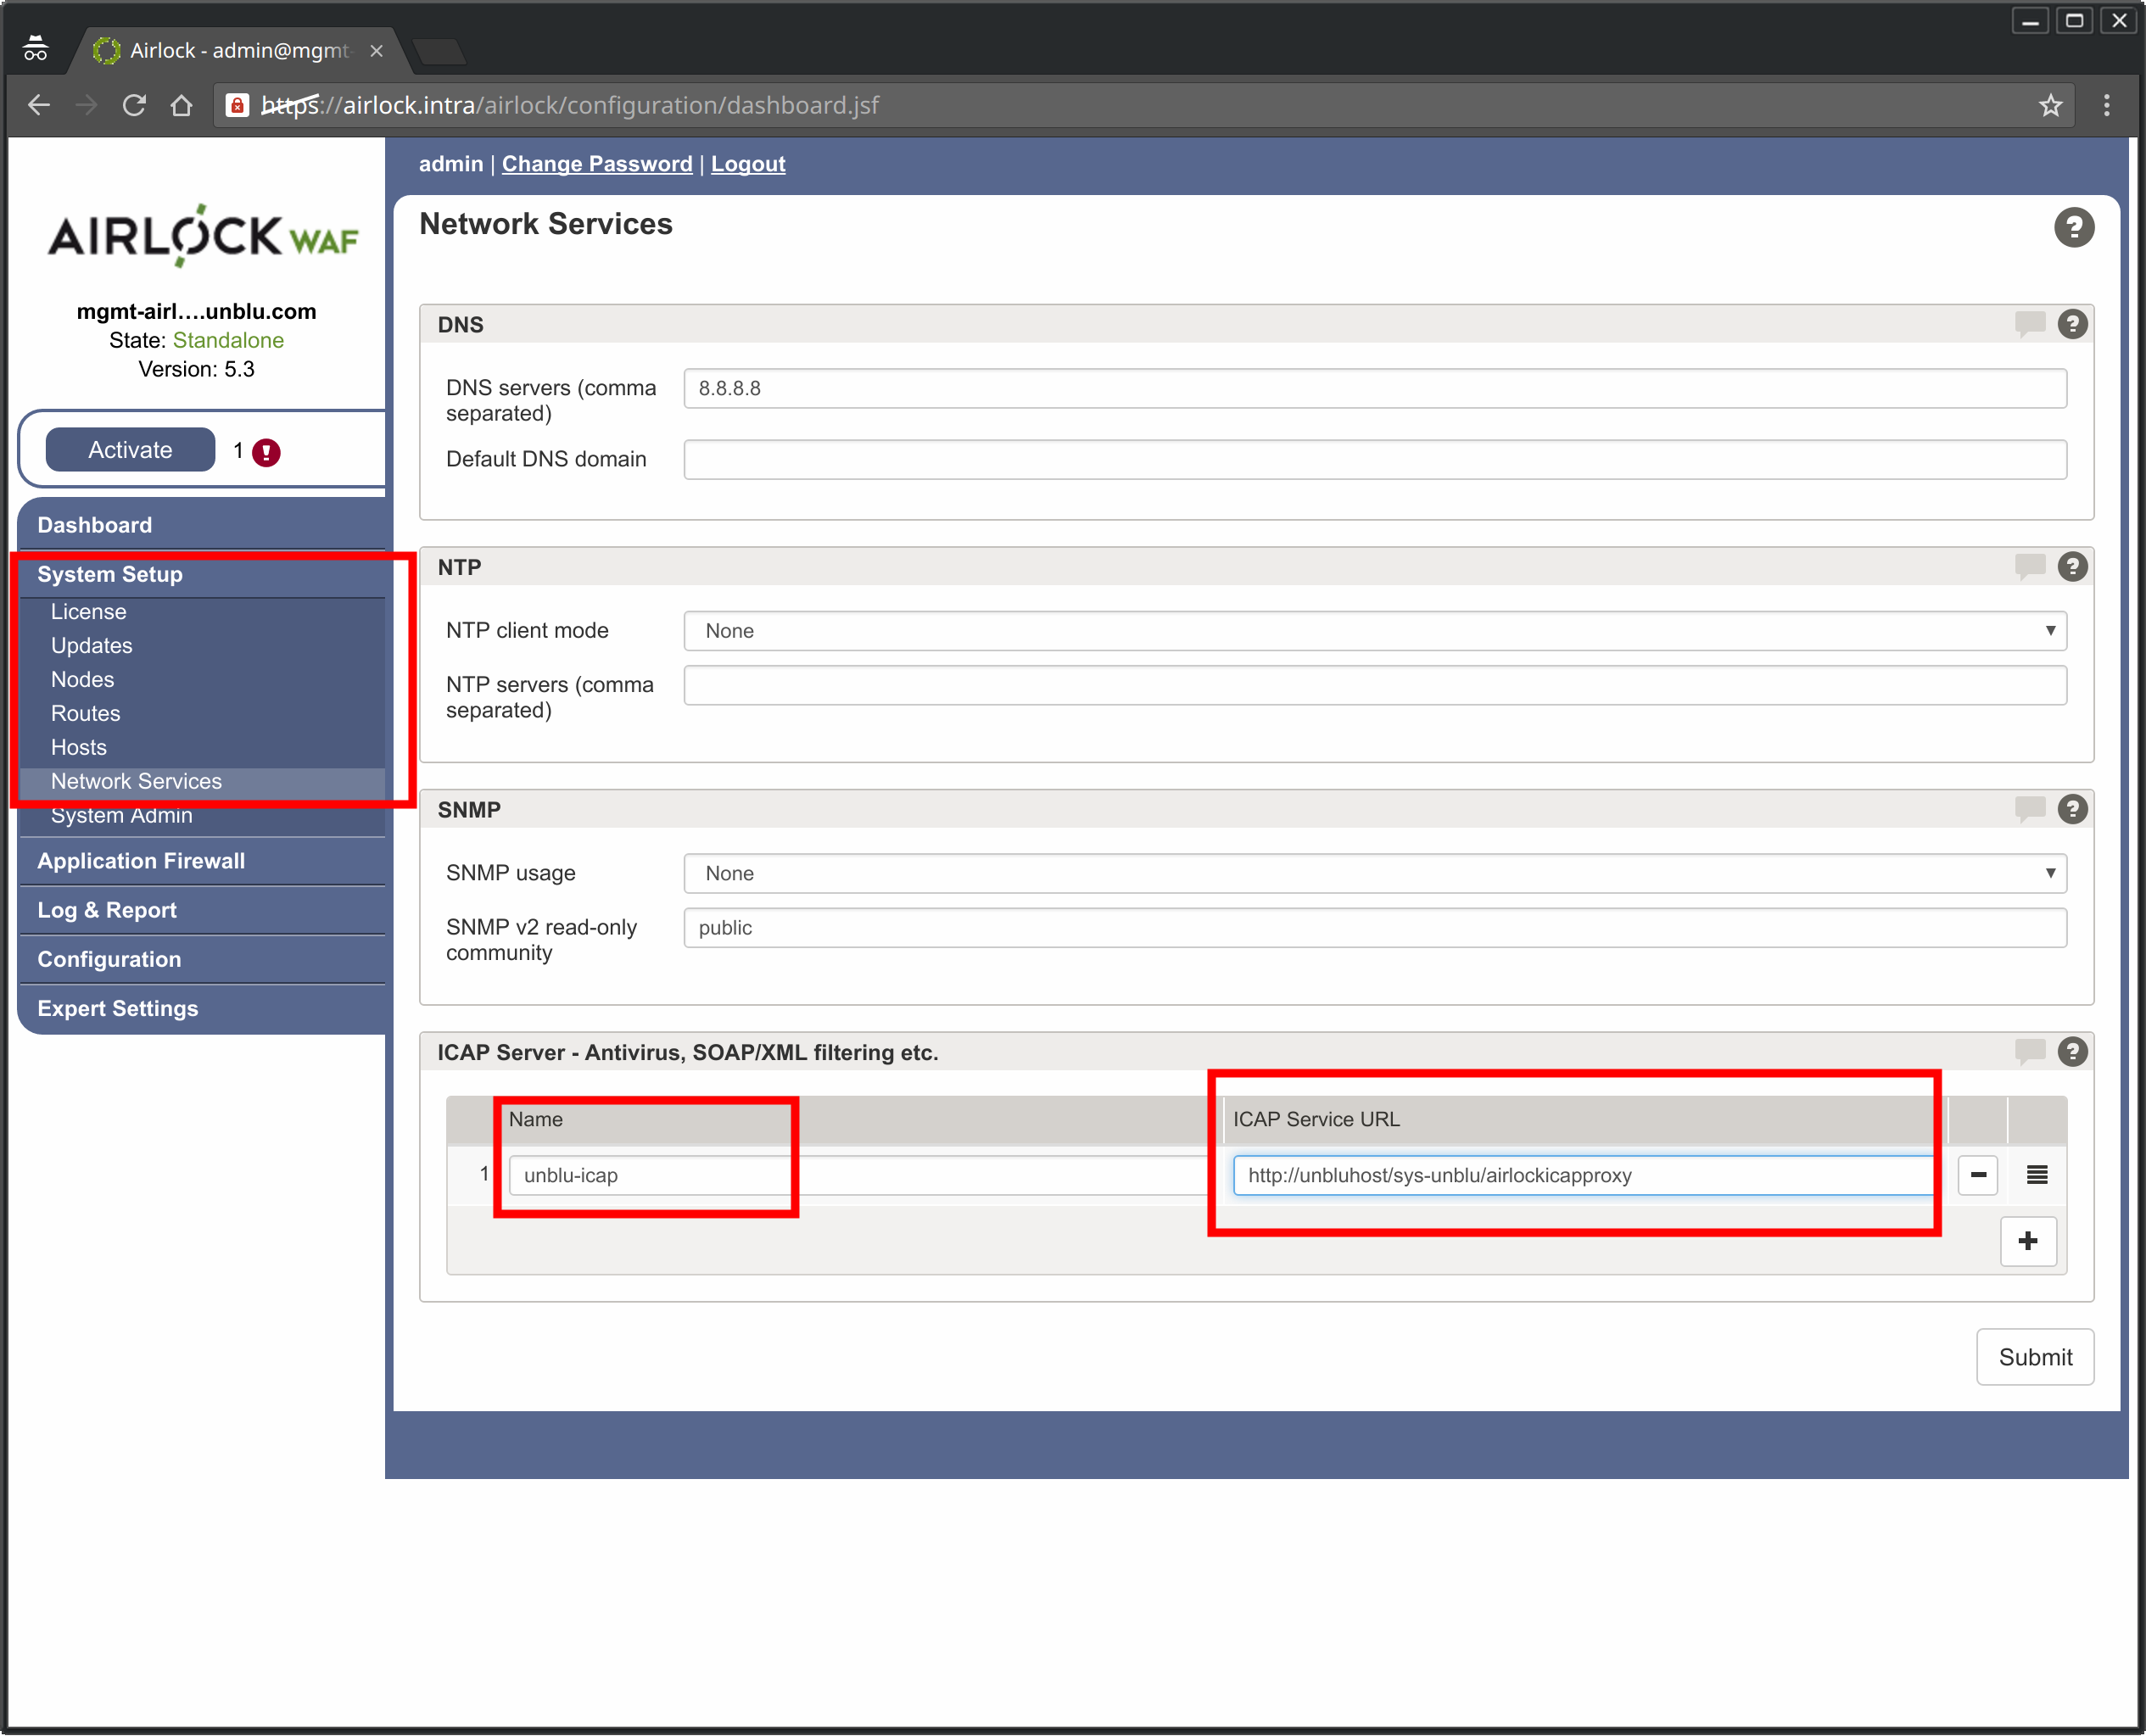
-
Click the [ + ] button to add a new ICAP server.
-
In the Name field, type the name you want to use for the connection.
-
In the ICAP Service URL field, type the URL of the Unblu server (here: http://unbluhost/) followed by the path
sys-unblu/airlockicap. -
Click the Submit button.
Mapping the Application Responses via ICAP
The next step is to configure Airlock to forward any responses from the back-end to the Unblu server via ICAP.
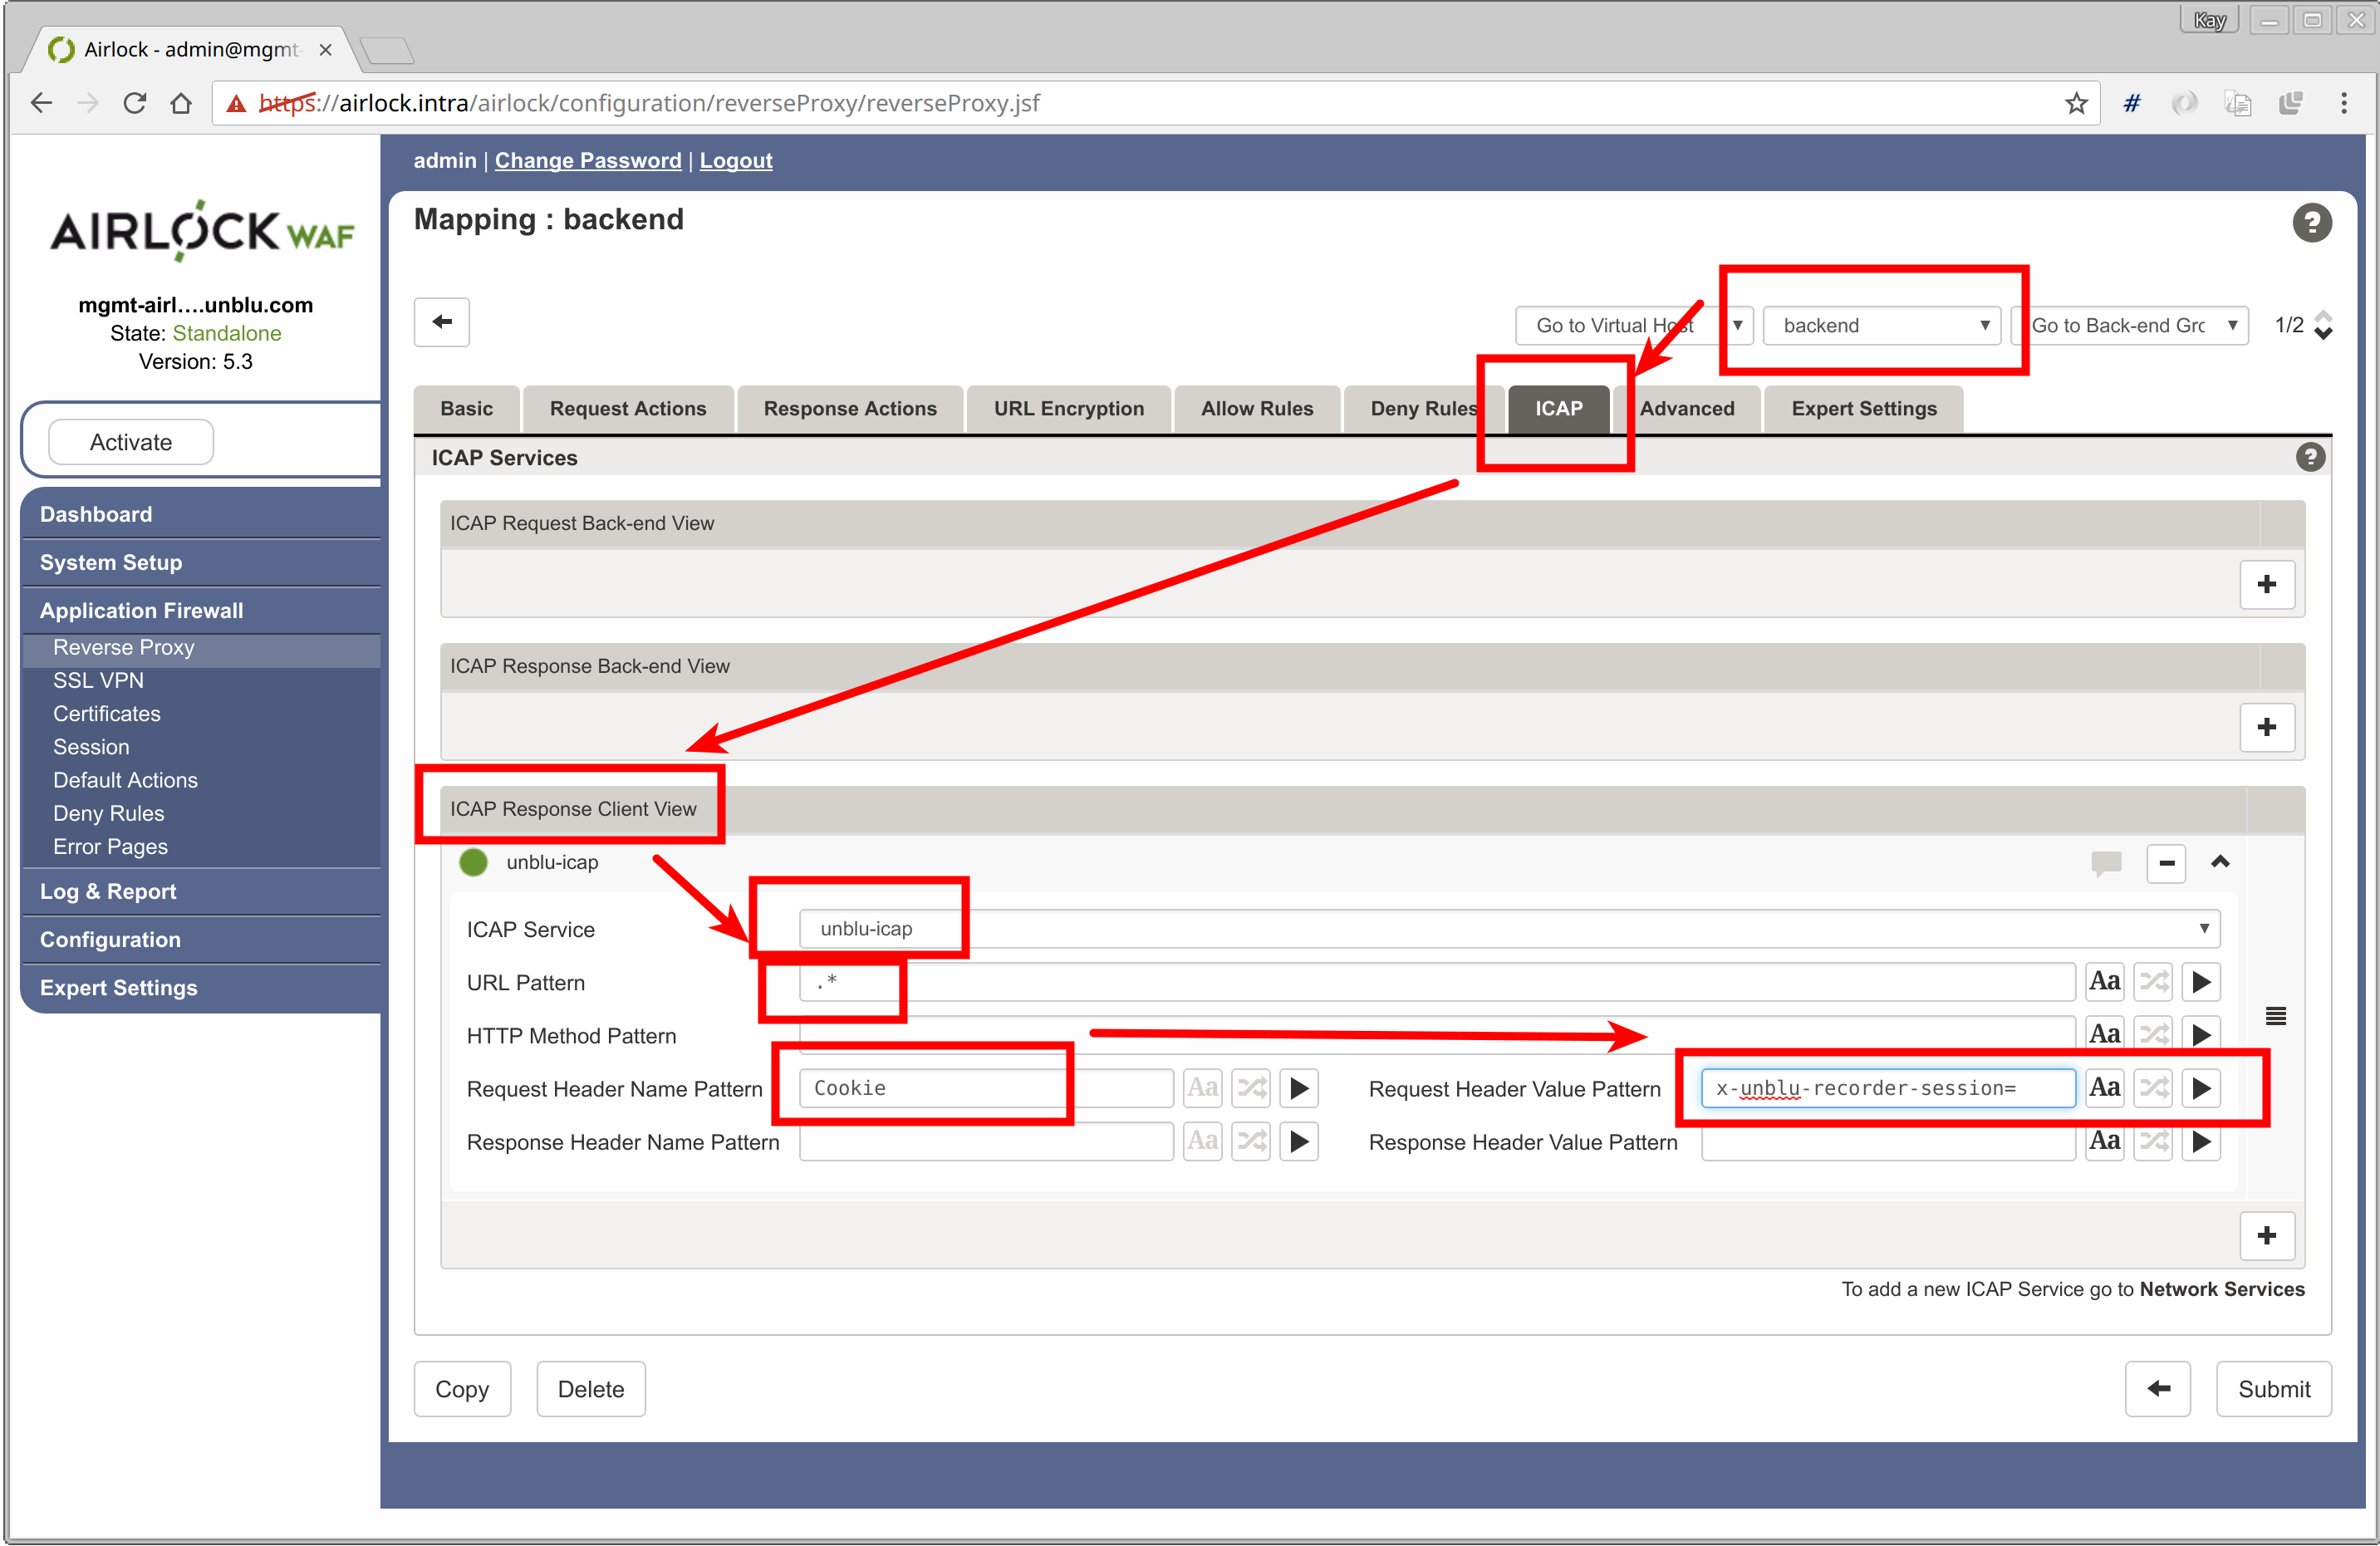
-
In the Reverse Proxy administration screen, edit the mapping of your application (for this example, we use a mapping called backend).
-
Click the ICAP tab.
-
Click the [ + ] button in the ICAP Response Client View.
-
Check the Handle response checkbox.
-
In ICAP service drop-down list, select the Unblu-ICAP service you have created in Configure the ICAP Connection above.
-
In the Request Header Value Pattern ("Value", not "Name") section, add the regular expression
x-unblu-recorder-session=. -
Click Submit. Airlock now forwards all responses in a running co-browsing session to the Unblu server via ICAP.
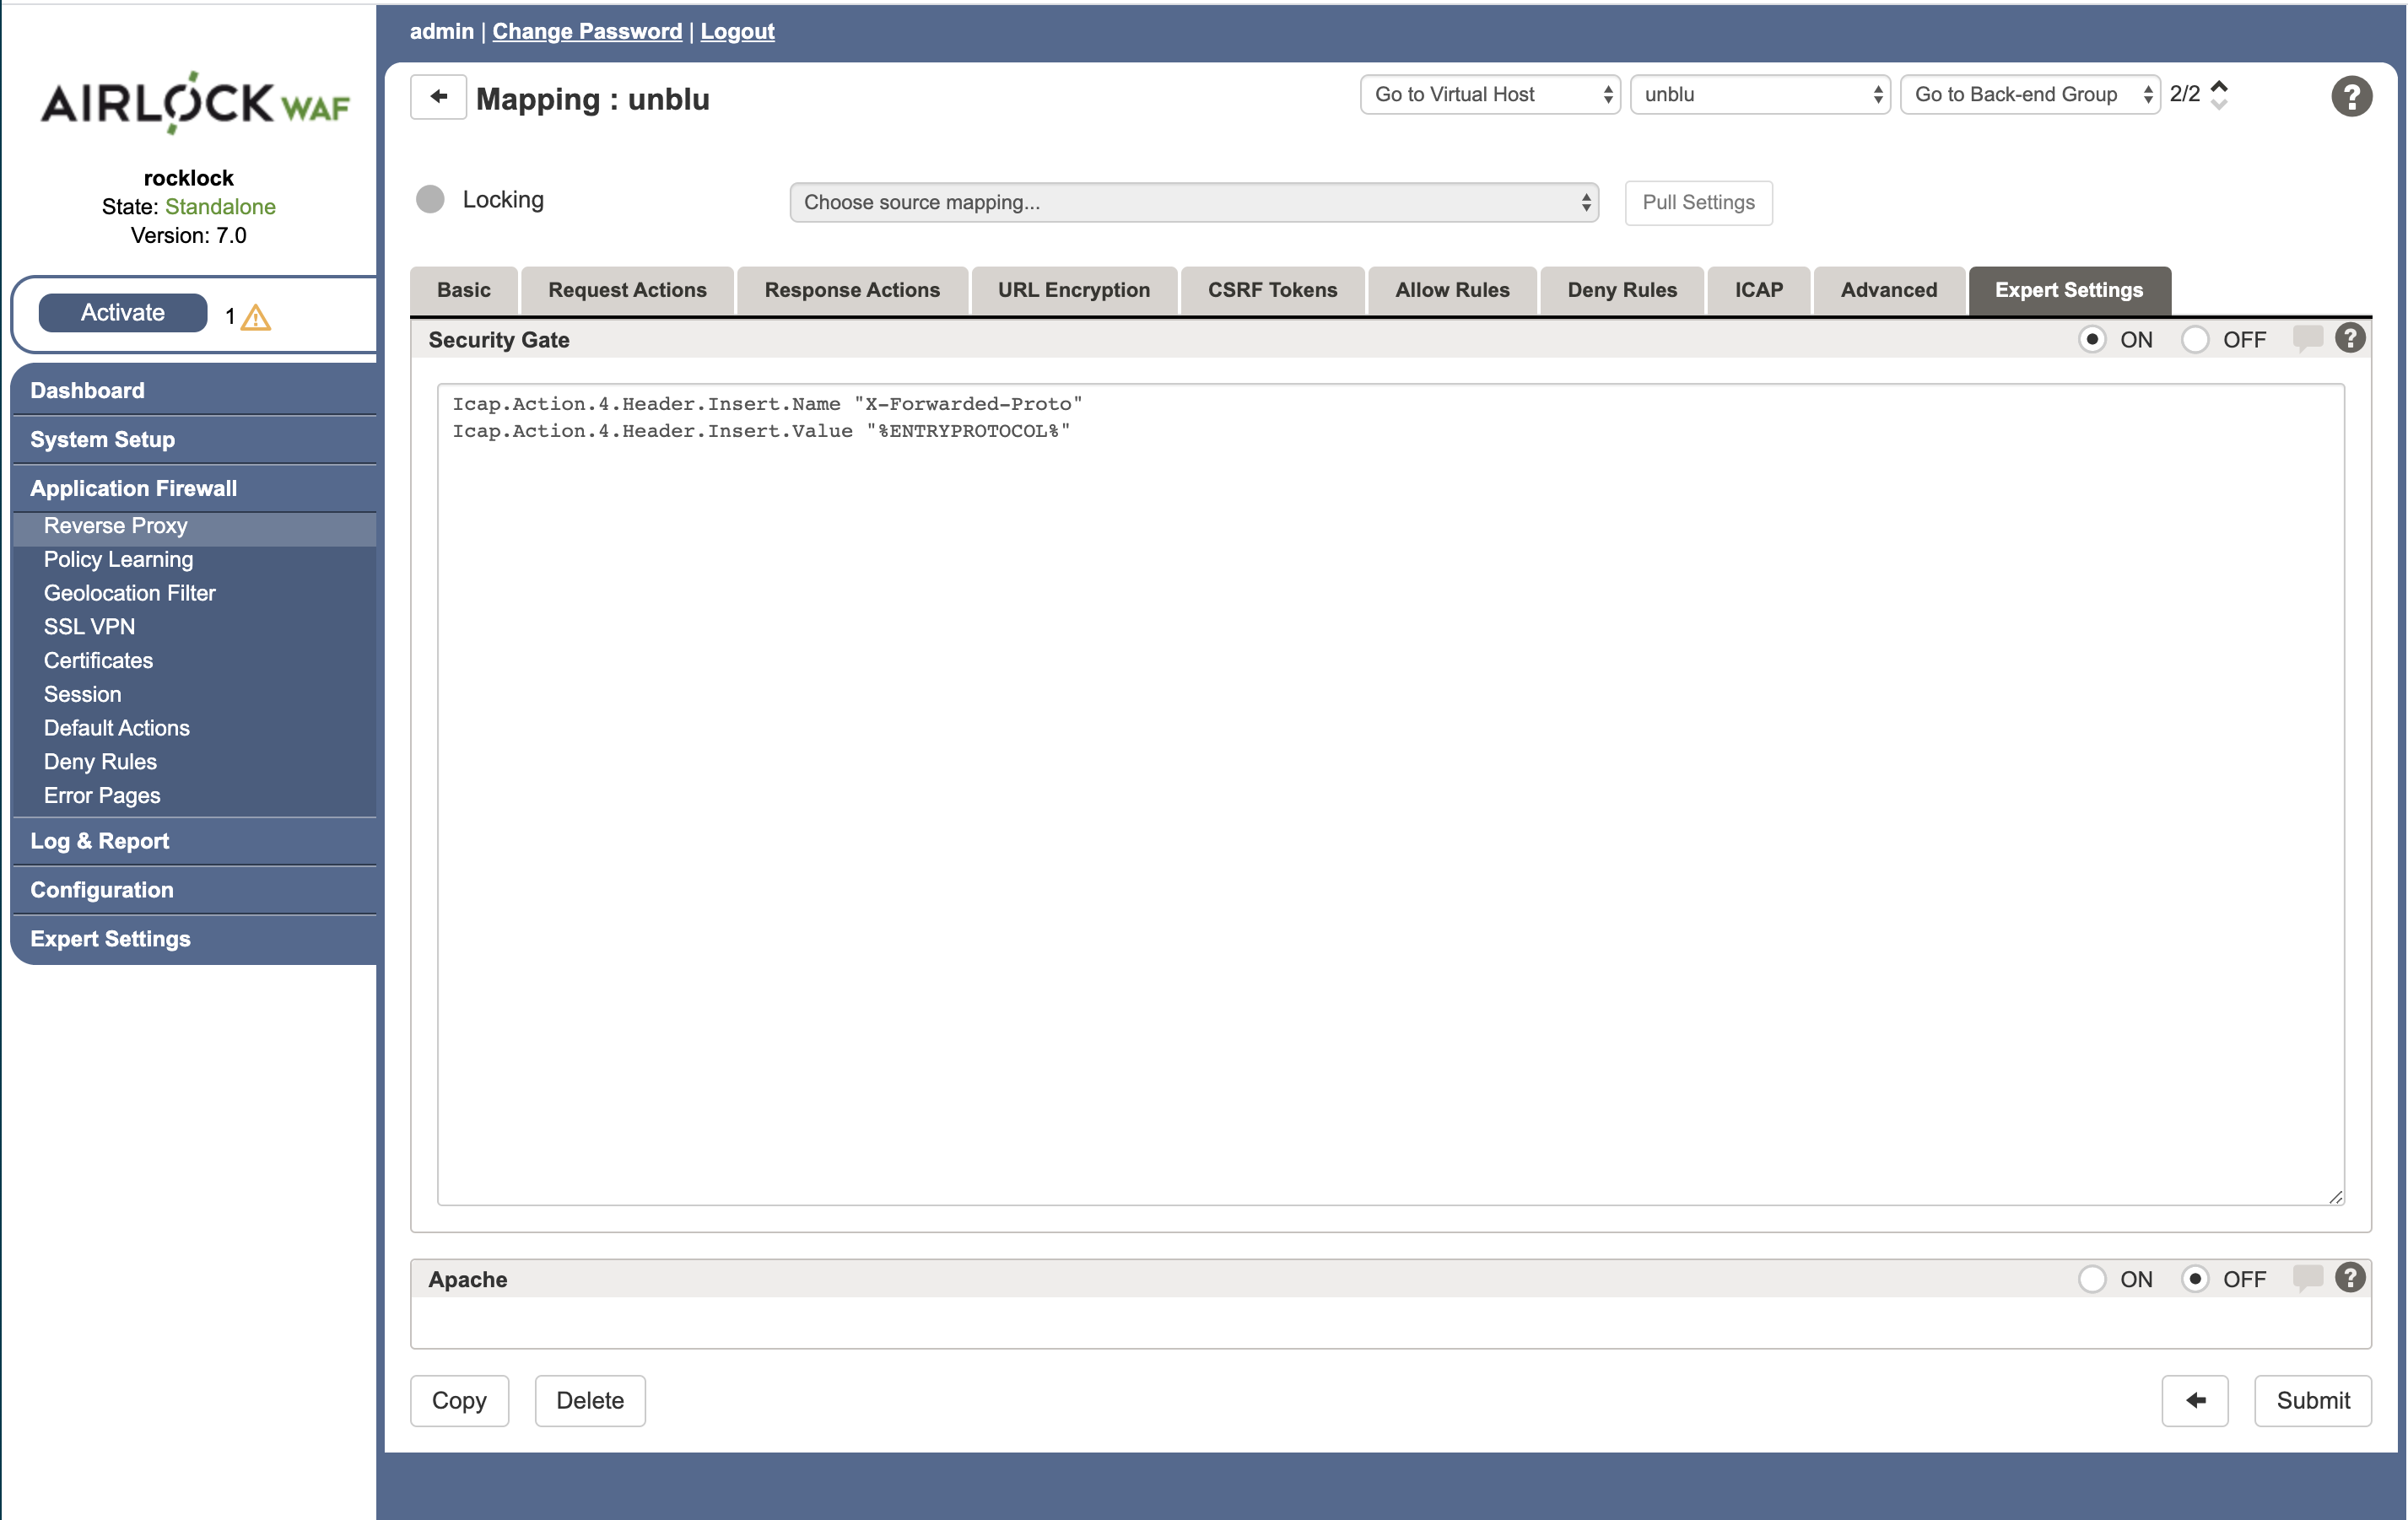
Configuring the X-Forwarded-Proto Header for ICAP
-
In addition to the general configuration of the
X-Forwarded-Protoheader discussed above, if you are using the SFM, you also need to configure the header forwarding for ICAP specifically. -
In the Application Firewall > Reverse Proxy administration screen, go to the Expert Settings tab and select the On radio button in the Security Gate section. Airlock will open an editable text field. Paste the following into that field:
Icap.Action.4.Header.Insert.Name "X-Forwarded-Proto"`
Icap.Action.4.Header.Insert.Value "%ENTRYPROTOCOL%"`
The number "4" refers to the nth defined ICAP service. You must use the correct number, which is defined in the "default settings file" / "Generated Config".
Unblu Server Configuration for Airlock
On the Unblu server you will also need to ensure certain configuration settings. The minimal necessary settings are:
com.unblu.identifier.siteEmbeddedSetup=true
com.unblu.cobrowsing.hideOfflineFlap=true
com.unblu.domcap.server.filter.airlock.enableAirlockIcap=true